


Hystrix豪猪和CircuitBreaker熔断器
1、添加依赖
	<!--引入hystrix依赖-->
    <dependency>
        <groupId>org.springframework.cloud</groupId>
        <artifactId>spring-cloud-starter-netflix-hystrix</artifactId>
    </dependency>
2、启动类加入注解
2.1 启动类上加入注解,第一种方式
@EnableCircuitBreaker
2.2 启动类上加入注解,第二种方式
/*@SpringBootApplication
@EnableCircuitBreaker //启动豪猪和熔断器
@EnableDiscoveryClient//开启eureka客户端*/
@SpringCloudApplication
3、对方法设置错误提示
//user-service服务service实现方法里面休眠两秒

@RequestMapping("/{id}")
@HystrixCommand(fallbackMethod = "queryStudentByIdFallBack")//fallbackMethod 是有错误调用某个方法
public String queryStudentById(@PathVariable("id") Integer id){
    String url = "http://user-service/student/"+id;
    String student = restTemplate.getForObject(url, String.class);
    return student;
}
//自定义一个方法,方法名称任意,参数列表和返回值要与@HystrixCommand注解方法保持一致
public String queryStudentByIdFallBack(Integer id){
    return "不好意思,服务器太拥挤了";
}
4、对类设置错误提示
//类级别的豪猪,需要使用@DefaultProperties注解,发现错误时调用哪个方法
//配置在defaultFallback属性中,方法遵循方法名任意,无参列表,返回值一般为String,根据不同的业务场景进行不同的设置
@RestController
@RequestMapping("/consumer")
@DefaultProperties(defaultFallback = "queryStudentByIdFallBack")
public class StudentController {

    @Autowired
    private IStudentService studentService;

    @Autowired
    private RestTemplate restTemplate;

    @RequestMapping("/{id}")
    @HystrixCommand
    public String queryStudentById(@PathVariable("id") Integer id){
        if(id %2 == 0){
            throw new RuntimeException("");
        }
        String url = "http://user-service/student/"+id;
        String student = restTemplate.getForObject(url, String.class);
        return student;
    }


    public String queryStudentByIdFallBack(){
        return "不好意思,服务器太拥挤了";
    }
}
5、设置超时时长
-
5.1 方法级别
//需要对方法进行豪猪设置,需要使用HystrixCommand注解 //commandProperties属性,如果对于多参数进行设置,那么需要使用@HystrixProperty注解,中间用逗号进行分割 //设置属性可参考hystrix包下的HystrixCommandProperties类 @HystrixCommand(commandProperties = { @HystrixProperty(name="execution.isolation.thread.timeoutInMilliseconds",value = "3000") }) 该设置是对豪猪的访问的超时时长进行设置,默认为1秒,单位为毫秒 -
yaml配置
hystrix:#设置豪猪 command: #设置公共的属性 default: #拦截哪一个服务,默认为default所有 execution: #从这开始,就为参数名称,中间的点改为冒号进行上下级分割 isolation: thread: timeoutInMilliseconds: 3000 #超时时长 -
5.3 设置熔断器的属性
  /*
  circuitBreaker.requestVolumeThreshold    设置的是用户的请求次数,默认为20次
  circuitBreaker.sleepWindowInMilliseconds 设置的是熔断器的休眠时长,默认为10秒
  circuitBreaker.errorThresholdPercentage  请求次数百分比达到多少时触发熔断器,默认为50%
  */
  @HystrixCommand(commandProperties = {
      @HystrixProperty(name="circuitBreaker.requestVolumeThreshold",value = "10"),//请求次数
      @HystrixProperty(name="circuitBreaker.sleepWindowInMilliseconds",value = "50000"),//休眠时长
      @HystrixProperty(name="circuitBreaker.errorThresholdPercentage",value = "60")//请求次数百分比达到多少时触发熔断器
  })
feign
- Feign可以把Rest的请求进行隐藏,伪装成类似SpringMVC的Controller一样。你不用再自己拼接url,拼接参数等等操作,一切都交给Feign去做。
1、导入pom依赖
	<!--引入feign依赖-->
    <dependency>
        <groupId>org.springframework.cloud</groupId>
        <artifactId>spring-cloud-starter-openfeign</artifactId>
2、在启动文件中加入注解:
@EnableFeignClients//开启Feign客户端
3、自定义一个类Client
//告诉feign要对哪个服务进行调用,fallback是当服务发生意外时对其进行处理
//fallback对应的类要对本接口进行实现
@FeignClient(value = "user-service",fallback = StudentClientFallBack.class)
public interface StudentClient {

//调用哪一个controller的哪一个方法,要告诉feign
@RequestMapping("/student/{id}")
public Student queryStudentById(@PathVariable("id") Integer id);
4、ClientImpl类
@Component
public class StudentClientFallBack implements StudentClient {
    @Override
    public Student queryStudentById(Integer id) {
        Student student = new Student();
        student.setName("未知用户!");
        return student;
    }
}
4、调用方直接引入Client的依赖即可:
@Autowired
private StudentClient client;

@RequestMapping("/{id}")
public Student queryStudentById(@PathVariable("id") Integer id){
    return client.queryStudentById(id);
}
5、yaml配置
feign:
	hystrix:
		enabled: true #开启feign下的熔断功能
ribbon:
	ConnectionTimeOut: 500 # 连接超时时长
	ReadTimeOut: 2000 #读取内容超时时长
- feign内置了hystrix基本依赖和ribbon依赖;
Zuul网关
加入zuul后的架构

- 不管是来自于客户端(PC或移动端)的请求,还是服务内部调用。一切对服务的请求都会经过Zuul这个网关,然后再由网关来实现 鉴权、动态路由等等操作。Zuul就是我们服务的统一入口。
1、创建一个工程,引入依赖
<dependency>
        <groupId>org.springframework.cloud</groupId>
        <artifactId>spring-cloud-starter-netflix-zuul</artifactId>
    </dependency>
2、在启动类中加入注解
@EnableZuulProxy//启用zuul网关
@SpringCloudApplication
public class GateWayApplication {

    public static void main(String[] args) {
        SpringApplication.run(GateWayApplication.class,args);
    }
}
3、yaml配置
server:
	port: 10010
spring:
	application:
		name: gate-way
zuul:
	routes:
		haha: # 这里是路由id,随意写
			 path: /user/** # 拦截路径
			 url: http://127.0.0.1:8081 # 转发到哪个url地址
2、加入eureka-client的配置
	<!-- Eureka客户端 -->
    <dependency>
        <groupId>org.springframework.cloud</groupId>
        <artifactId>spring-cloud-starter-netflix-eureka-client</artifactId>
    </dependency>
3、yaml的变化:
server:
	port: 10010
spring:
	application:
		name: gate-way
eureka:
	client:
		fetch-registry: true
		service-url:
  			defaultZone: http://127.0.0.1:10086/eureka
	 	registry-fetch-interval-seconds: 5
zuul:
	prefix: /api
	strip-prefix: true
	routes:
	    haha: # 这里是路由id,随意写
			 path: /user/** # 拦截路径
			 url: http://127.0.0.1:8081 # 转发到哪个url地址
    	user-service: #/user-service/** #映射路径
      		path: /student/** #映射路径
      		serviceId: user-service
      		strip-prefix: false #是否去除前缀,默认为true
	ignored-services:
  		- consumer-client
-
启动了eureka客户端,那么会自动的对服务器上的服务进行拉取,并对所有的serviceId进行配置。
  //user-service是路由id,一般就是serviceId,拦截的路径是serviceId开头
  user-service: /user-service/** #映射路径
  //是否去除前缀
  strip-prefix: false #是否去除前缀,默认为true
过滤器之ZuulFilter
-
Zuul作为网关的其中一个重要功能,就是实现请求的鉴权。而这个动作我们往往是通过Zuul提供的过滤器来实现的。
-
ZuulFilter是过滤器的顶级父类。在这里我们看一下其中定义的4个最重要的方法
public abstract ZuulFilter implements IZuulFilter{ abstract public String filterType();//过滤器类型 abstract public int filterOrder();//过滤器顺序 boolean shouldFilter();// 来自IZuulFilter Object run() throws ZuulException;// IZuulFilter } -
shouldFilter:返回一个Boolean值,判断该过滤器是否需要执行。返回true执行,返回false不执行。
-
run:过滤器的具体业务逻辑。
-
filterType:返回字符串,代表过滤器的类型。包含以下4种:
- pre:请求在被路由之前执行
- routing:在路由请求时调用
- post:在routing和errror过滤器之后调用
- error:处理请求时发生错误调用
-
filterOrder:通过返回的int值来定义过滤器的执行顺序,数字越小优先级越高。
-
过滤器执行生命周期

正常流程:
请求到达首先会经过pre类型过滤器,而后到达routing类型,进行路由,请求就到达真正的服务提供者,执行请求,返回结果后,会到达post过滤器。而后返回响应。
异常流程:
整个过程中,pre或者routing过滤器出现异常,都会直接进入error过滤器,再error处理完毕后,会将请求交给POST过滤器,最后返回给用户。
如果是error过滤器自己出现异常,最终也会进入POST过滤器,而后返回。
如果是POST过滤器出现异常,会跳转到error过滤器,但是与pre和routing不同的时,请求不会再到达POST过滤器了。
使用场景
-
场景非常多:
-
请求鉴权:一般放在pre类型,如果发现没有访问权限,直接就拦截了
-
异常处理:一般会在error类型和post类型过滤器中结合来处理。
-
服务调用时长统计:pre和post结合使用。
自定义一个过滤器
-
接下来我们来自定义一个过滤器,模拟一个登录的校验。基本逻辑:如果请求中有access-token参数,则认为请求有效,放行。
  @Component
  public class LoginFilter extends ZuulFilter{
  @Override
  public String filterType() {
     // 登录校验,肯定是在前置拦截
  	return  FilterConstants.PRE_TYPE;
   }

  @Override
  public int filterOrder() {
  	// 顺序设置为前置进来之前
  	return FilterConstants.PRE_DECORATION_FILTER_ORDER - 1;
  }

  @Override
  public boolean shouldFilter() {
  	// 返回true,代表过滤器生效。
 	 return true;
   }

   @Override
   public Object run() throws ZuulException {
  // 登录校验逻辑。
  // 1)获取Zuul提供的请求上下文对象
  RequestContext ctx = RequestContext.getCurrentContext();
  // 2) 从上下文中获取request对象
  HttpServletRequest req = ctx.getRequest();
  // 3) 从请求中获取token
  String token = req.getParameter("access-token");
  // 4) 判断
  if(token == null || "".equals(token.trim())){
      // 没有token,登录校验失败,拦截
      ctx.setSendZuulResponse(false);
      // 返回401状态码。也可以考虑重定向到登录页。
      ctx.setResponseStatusCode(HttpStatus.UNAUTHORIZED.value());
  }
  // 校验通过,可以考虑把用户信息放入上下文,继续向后执行
  return null;
   }
  }
负载均衡和熔断
Zuul中默认就已经集成了Ribbon负载均衡和Hystix熔断机制。但是所有的超时策略都是走的默认值,比如熔断超时时间只有1S,很容易就触发了。因此建议我们手动进行配置:
ribbon:
	ConnectTimeout: 250 # 连接超时时间(ms)
	ReadTimeout: 2000 # 通信超时时间(ms)
	OkToRetryOnAllOperations: true # 是否对所有操作重试
    MaxAutoRetriesNextServer: 2 # 同一服务不同实例的重试次数
	MaxAutoRetries: 1 # 同一实例的重试次数
hystrix:
  command:
  	default:
        execution:
          isolation:
            thread:
              timeoutInMillisecond: 6000 # 熔断超时时长:6000ms
- 计算公式:ribbonTimeout = (readRibbonTimeout + ribbonConnectTimeout) * (MaxAutoRetries * 1) * (MaxAutoRetriesNextServer + 1)
- 熔断超时时长必须>=ribbon的超时时长,否则会有提示/保错,还没进入到微服务就熔断/结束了。
Config
-
简介:没有Config之前我们是每个模块进行单独配置,有了Config之后,将我的配置信息统一的放入git上进行托管,我们直接拉去git上面的配置即可。
-
1、在GitHub上创建一个仓库,这里使用的是码云GitHub,仓库名称为dm-config-demo,根据自己的实际情况建立分支语句,这里使用到的分支有两个,他们分别是mater分支和springcloud分支,他们底下分别于一个文件夹,是config-file,文件夹中有一个文件,是dm-gateway-zuul-dev.properties,里面的内容就是一个token属性。

-
2、导入pom文件
org.springframework.boot spring-boot-starter-parent 1.5.6.RELEASE com.springcloud.config dm-config-zuul 0.0.1-SNAPSHOT dm-config-zuul Demo project for Spring Cloud<properties> <java.version>1.8</java.version> <!--降版--> <spring-cloud.version>Dalston.SR4</spring-cloud.version> </properties> <dependencies> <dependency> <groupId>org.springframework.cloud</groupId> <artifactId>spring-cloud-config-server</artifactId> </dependency> <dependency> <groupId>org.springframework.boot</groupId> <artifactId>spring-boot-starter-test</artifactId> <scope>test</scope> </dependency> <dependency> <groupId>org.springframework.cloud</groupId> <artifactId>spring-cloud-starter-eureka</artifactId> </dependency> </dependencies> <dependencyManagement> <dependencies> <dependency> <groupId>org.springframework.cloud</groupId> <artifactId>spring-cloud-dependencies</artifactId> <version>${spring-cloud.version}</version> <type>pom</type> <scope>import</scope> </dependency> </dependencies> </dependencyManagement> <build> <plugins> <plugin> <groupId>org.springframework.boot</groupId> <artifactId>spring-boot-maven-plugin</artifactId> </plugin> </plugins> </build> -
3、修改主启动类
@SpringBootApplication @EnableDiscoveryClient @EnableConfigServer//启用Config服务器 public class DmConfigZuulApplication { public static void main(String[] args) { SpringApplication.run(DmConfigZuulApplication.class, args); } } -
4、yml文件
  server:
    port: 8084
  eureka:
    client:
      fetch-registry: true
      register-with-eureka: true
      service-url:
        defaultZone: http://admin:123456@localhost:7776/eureka
  spring:
    application:
      name: dm-config-zuul
    cloud:
      config:
        server: # ConfigServer相关配置
          git:
            uri: https://gitee.com/yuhaiSteven/dm-config-demo.git # 你创建的项目路径
            username: yuhaiSteven # gitConfig项目的用户名
            password: yuhai980522. # gitConfig项目的密码
            search-paths: config-file # 重要配置在什么文件夹下面
启动ConfigServer服务器,并启动我们的Postman工具,通过get请求进行访问:
localhost:8084/dm-gateway-zuul/dev/springcloud
localhost:8084是我们的config所在工程/服务器;
dm-gateway-zuul 是我们需要读取的配置文件
dev是我们配置文件的版本,dev一般是开发,test是测试,pro/prod是生产;
springcloud是我们需要使用的分支;
Config Customer端,这里使用的是Zuul网关
-
application.yml是运行时执行的文件,bootstrap.yml是运行在此文件之前;
-
创建一个bootstrap.yml;
  spring:
    application:
      name: dm-gateway-zuul # 将服务名称提前到此文件中
    cloud:
      config:
        uri: http://localhost:8084 # configClient读取的ConfigServer地址
        profile: dev # 读取的是什么版本
        label: master # 读取的是什么分支
        # 读取的格式是 uri的地址/文件名称/读取版本/分支
配置Config中的配置手动刷新
-
1、在Config Client中导入手动刷新的依赖:
<dependency> <groupId>org.springframework.boot</groupId> <artifactId>spring-boot-starter-actuator</artifactId> </dependency> -
2、在Zuul对应的过滤器上加上注解:
@RefreshScope -
3、在此过滤器上要给什么属性读取什么样的配置:
@Value("${token}") private Boolean token; -
例如:
@Component @RefreshScope public class PreFilter extends ZuulFilter{ @Value("${token}") private Boolean token; @Override public String filterType() { return FilterConstants.PRE_TYPE; } @Override public int filterOrder() { return 0; } @Override public boolean shouldFilter() { return true; } @Override public Object run() { RequestContext ctx = RequestContext.getCurrentContext(); HttpServletRequest request = ctx.getRequest(); String key = request.getParameter("key"); /*System.out.println("1 access filter!"); ctx.set("thirdFilter",true); if("1".equals(key)){ ctx.setSendZuulResponse(false); ctx.setResponseStatusCode(-401); ctx.setResponseBody("{\"msg\":\"key"+ key +" is end,and set ZuulResponse is false!\"}"); ctx.set("thirdFilter",false); }*/ if(token) { String token = request.getHeader("token"); if (token == null || "".equals(token)) { ctx.setSendZuulResponse(false); ctx.setResponseStatusCode(401); ctx.setResponseBody("{\"msg\":\"401 PreFilter if fail ! Please try again!\"}"); return "try again!"; } } return "pass"; } } -
启动服务,在postman中进行操作:
  http://localhost:8083/refresh
  # http://localhost:8083是此服务名称,refresh是刷新

如果是出现这张图所示的内容,已更新到内容,如果是[]空括号,就没有更新到内容。
加密解密
-
因为jre版本对加密解密的内容有长度限制,需要将

两个jar文件拷贝到你电脑上的jdk/jre目录的security目录下,拷贝到任意一个即可。
我本地的电脑jdk拷贝目录应该是’D:\Program Files\Java\jdk1.8.0_131\jre\lib\security’,
jre拷贝目录应该是’D:\Program Files\Java\jre1.8.0_131\lib\security’,即可。 -
在Config Server端建立bootstrap.yaml文件:
encrypt: key: dm # 相当于开启加密解密功能,dm是项目的通用前缀 -
使用postman工具进行加密解密:
http://localhost:8084/encrypt # http://localhost:8084/是我本地的ConfigServer地址 http://localhost:8084/decrypt # encrypt是加密,decrypt是解密 使用的请求方式是post 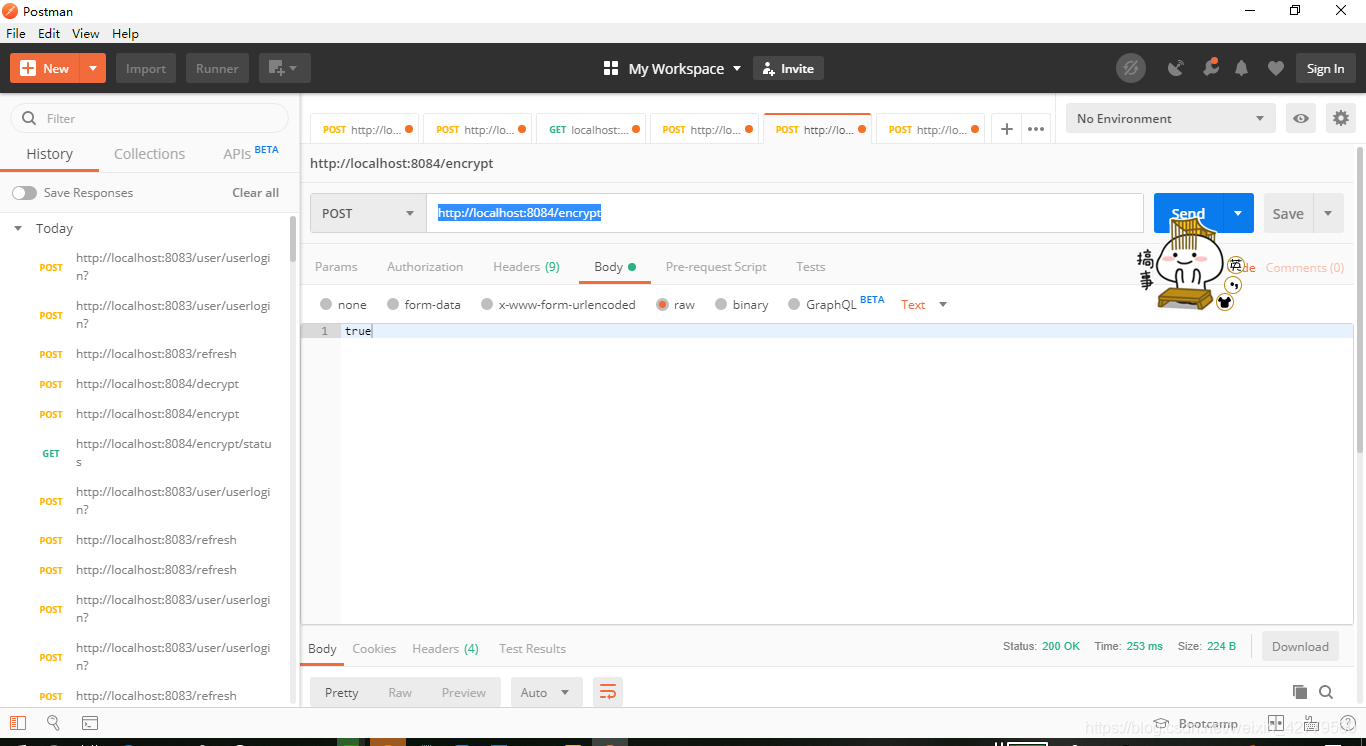然后点击body --> raw,输入对应的加解密内容,开始加解密,加解密成功的内容显示在下方Body中。
git中的核心Config配置
- 如果你对加密的内容进行解密。比如,我对true进行加密,加密后的文本是d75a7e932ea7c2e6bad0bcd9d7a8dba91da99876fa37f7646b05de0e4a162c49
那么我书写到properties文件中应该是token = {cipher}d75a7e932ea7c2e6bad0bcd9d7a8dba91da99876fa37f7646b05de0e4a162c49,其中{cipher}代表的是这是加密的内容,需要解密,其后面的内容是我已经对true进行加密的内容。 - 如果是yml文件,需要对=号后面的内容用单引号括起来,否则会出现解析错误。


 1万+
1万+

 被折叠的 条评论
为什么被折叠?
被折叠的 条评论
为什么被折叠?
 到【灌水乐园】发言


