Arduino RP2040 两个CDC虚拟串口通讯
- 🎬通讯效果演示:

- 🌿基于
Earle F. Philhower的固件开发平台:https://github.com/earlephilhower/arduino-pico - 🔖USB配置参考:
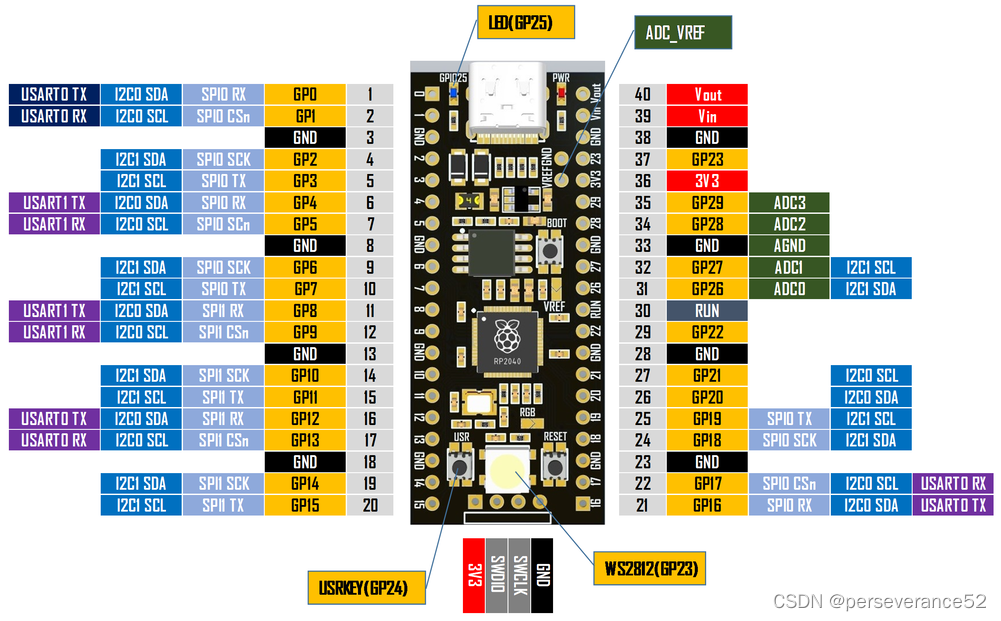
https://arduino-pico.readthedocs.io/en/latest/usb.html - ✅本例程使用的开发板:YD-RP2040版(源地YD-RP2040)

📑功能说明
🖋两个CDC虚拟串口通讯,不受波特率限制,物理上只占用一个USB接口。
🛠参数配置
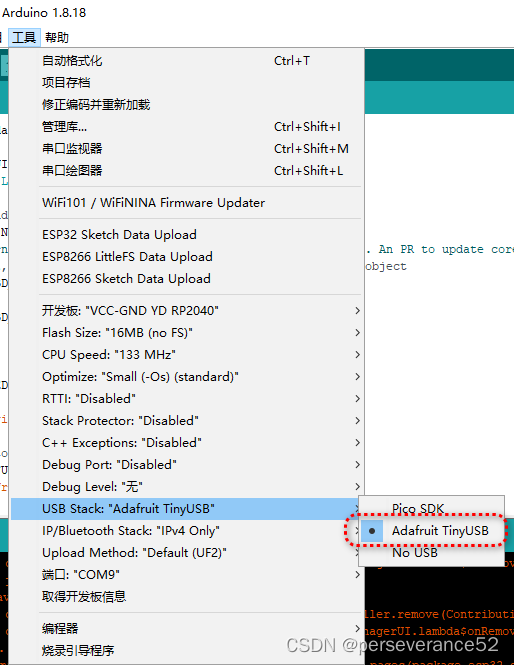
- 🔧编译并运行此例程需要将默认参数中的
USB Stack配置为Adafruit TinyUSB库才可以实现多个USB设备的挂载。

- 🔨修改
Adafruit TinyUSB库中的默认参数

🔖个人的文件路径参考:
C:\Users\Administrator\AppData\Local\Arduino15\packages\rp2040\hardware\rp2040\3.3.0\libraries\Adafruit_TinyUSB_Arduino\src\arduino\ports\rp2040
-
- 👉🏻修改宏
CFG_TUD_CDC参数为2,默认是只生成一个CDC虚拟串口。
- 👉🏻修改宏
//--------------------------------------------------------------------
// Device Configuration
//--------------------------------------------------------------------

#define CFG_TUD_ENDOINT0_SIZE 64

#define CFG_TUD_CDC 2   //默认值是1,只生成一个虚拟CDC端口,2代表生成2个CDC虚拟端口
#define CFG_TUD_MSC 1
#define CFG_TUD_HID 2
#define CFG_TUD_MIDI 1
#define CFG_TUD_VENDOR 1
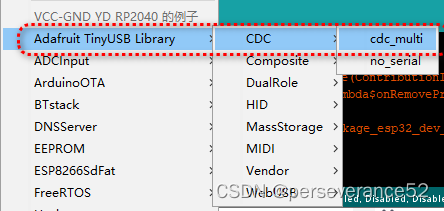
- 🌿程序烧录成功后,将生成2个CDC虚拟串口:

- ✨如果是第一次使用Arduino平台开发,那么需要按住RP2040开发板上的Boot按键,通过USB数据线连接到电脑USB端口,会出现一个64MB的虚拟U盘,此再编译上传代码即可。
📝例程代码
- 🔖本例程代码可以在固件库自带的例程示例中找到:

/*
    This example demonstrates the use of multiple USB CDC/ACM "Virtual
    Serial" ports

    Written by Bill Westfield (aka WestfW), June 2021.
    Copyright 2021 by Bill Westfield
    MIT license, check LICENSE for more information
*/


/* The example creates two virtual serial ports. Text entered on
   any of the ports will be echoed to the all ports with
    - all lower case in port0 (Serial)
    - all upper case in port1
需要修改库中的配置参数:libraries/Adafruit_TinyUSB_Arduino/src/arduino/ports/rp2040/tusb_config_rp2040.h
#define CFG_TUD_CDC 2 //默认值是1,只生成一个虚拟CDC端口,2代表生成2个CDC虚拟端口
   Requirement:
    The max number of CDC ports (CFG_TUD_CDC) has to be changed to at least 2.
    Config file is located in Adafruit_TinyUSB_Arduino/src/arduino/ports/{platform}/tusb_config_{platform}.h
    where platform is one of: nrf, rp2040, samd

    NOTE: Currnetly multiple CDCs on ESP32-Sx is not yet supported.
    An PR to update core/esp32/USBCDC and/or pre-built libusb are needed.
    We would implement this later when we could.
*/

#include <Adafruit_TinyUSB.h>

#define ARDUINO_ARCH_RP2040
#define LED LED_BUILTIN

// Create 2nd instance of CDC Ports.
#ifdef ARDUINO_ARCH_ESP32
#error "Currnetly multiple CDCs on ESP32-Sx is not yet supported. An PR to update core/esp32/USBCDC and/or pre-built libusb are needed."
// for ESP32, we need to specify instance number when declaring object
Adafruit_USBD_CDC USBSer1(1);
#else
Adafruit_USBD_CDC USBSer1;
#endif

void setup() {
  pinMode(LED, OUTPUT);

  Serial.begin(115200);

  // check to see if multiple CDCs are enabled
  if ( CFG_TUD_CDC < 2 ) {
    digitalWrite(LED, HIGH); // LED on for error indicator

    while (1) {//如果没有修改Adafruit_TinyUSB_Arduino/src/arduino/ports/tusb_config_rp2040.h中的CFG_TUD_CDC参数,程序将停留在这里面运行
      Serial.printf("CFG_TUD_CDC must be at least 2, current value is %u\n", CFG_TUD_CDC);
      Serial.println("  Config file is located in Adafruit_TinyUSB_Arduino/src/arduino/ports/{platform}/tusb_config_{platform}.h");
      Serial.println("  where platform is one of: nrf, rp2040, samd");
      digitalWrite(LED, HIGH);
      delay(1000);
      digitalWrite(LED, LOW);
      delay(1000);
    }
  }

  // initialize 2nd CDC interface
  USBSer1.begin(115200);

  while (!Serial || !USBSer1) {
    if (Serial) {
      Serial.println("Waiting for other USB ports");
    }

    if (USBSer1) {
      USBSer1.println("Waiting for other USB ports");
    }

    delay(1000);
  }

  Serial.print("You are port 0\n\r\n0> ");
  USBSer1.print("You are port 1\n\r\n1> ");
}

int LEDstate = 0;

void loop() {
  int ch;

  ch = Serial.read();
  if (ch > 0) {
    printAll(ch);
  }

  ch = USBSer1.read();
  if (ch > 0) {
    printAll(ch);
  }

  if (delay_without_delaying(500)) {
    LEDstate = !LEDstate;
    digitalWrite(LED, LEDstate);
  }
}

// print to all CDC ports
void printAll(int ch) {
  // always lower case
  Serial.write(tolower(ch));

  // always upper case
  USBSer1.write(toupper(ch));
}

// Helper: non-blocking "delay" alternative.
boolean delay_without_delaying(unsigned long time) {
  // return false if we're still "delaying", true if time ms has passed.
  // this should look a lot like "blink without delay"
  static unsigned long previousmillis = 0;
  unsigned long currentmillis = millis();
  if (currentmillis - previousmillis >= time) {
    previousmillis = currentmillis;
    return true;
  }
  return false;
}
⛳USB虚拟串口使用注意事项
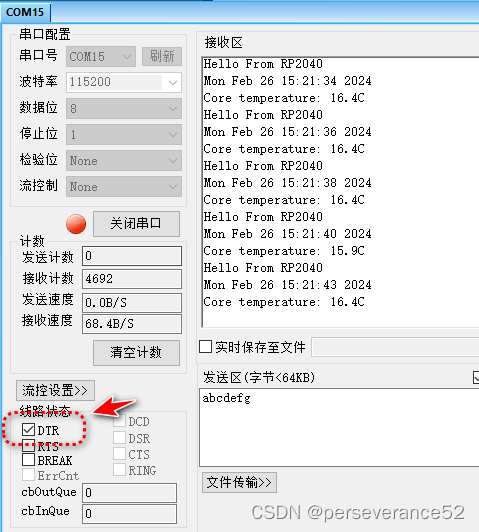
- 👉如果使用Arduino IDE自带的串口监视器查看信息没有问题,如果使用串口调试助手单独查看信息,需要将串口参数
DTR勾选,否则没有输出。


 6160
6160


 被折叠的 条评论
为什么被折叠?


