


当我们在工作中需要批量识别同一区域内的一些数字时候可以用Python实现
需要用到这些库 easyocr openvc os matplotlib 核心是前两个
opevc实现图象裁剪,easyocr实现文字识别
安装方法
pip config set global.index-url https://pypi.tuna.tsinghua.edu.cn/simple
pip install opencv-contrib-python
pip install opencv-python
pip install opencv-python-headless
pip install easyocr
# -*- coding: utf-8 -*-
import easyocr
import os
import cv2
import pandas as  pd
遍历图片并裁剪
# im_path:图片路径

def clip_image(im_path):
    i=0
    filelist = os.listdir(im_path)
    for file in filelist:
        file_path=os.path.join(im_path,file)
        im=cv2.imread(file_path)
        #[h,w]根据自己图片中目标的位置修改
        im=im[19:38,256:353]
        b=str(i)   #数字变为字符串方便后面命名
        save_path = r'E:\pythonprograms\easyocr\img\img2' #裁剪后路径
        save_path_file = os.path.join(save_path,b+".jpg")
        cv2.imwrite(save_path_file,im)
        i=i+1

im_path = r'E:\pythonprograms\easyocr\img\img'  #裁剪前路径
clip_image(im_path)
批量文字识别、拼接合并、转为excel存储
render = easyocr.Reader(['ch_sim','en'])
filepath =r'E:\pythonprograms\easyocr\img\img2' #裁剪后路径
file = os.listdir(filepath)
spa =[]
for f in file :
    url =os.path.join(filepath,f)
    content = render.readtext(url,detail=0) #detail=0 表示去掉细节
    s = ' '.join(content)
    spa.append(s)
b2=pd.DataFrame(spa )
b2.to_excel("results.xls")
b2| 0 | 4.818 ruicms |
|---|---|
| 1 | 8.907 ruicms |
| 2 | 2.556 ruicms |
| 3 | 3.280 ruicms |
| 4 | 3.189 rnicms |
| 5 | 3.028 rnicm |
相关知识
读取图片有三种方式,分别是matplotlib,opencv,PIL,展示用matplotlib比较简单
定位图像想要提取的区域,可以通过画图软件查看
比如鼠标移动在上面可以看到定位像素详细。就可以对应像素位置提取图片了
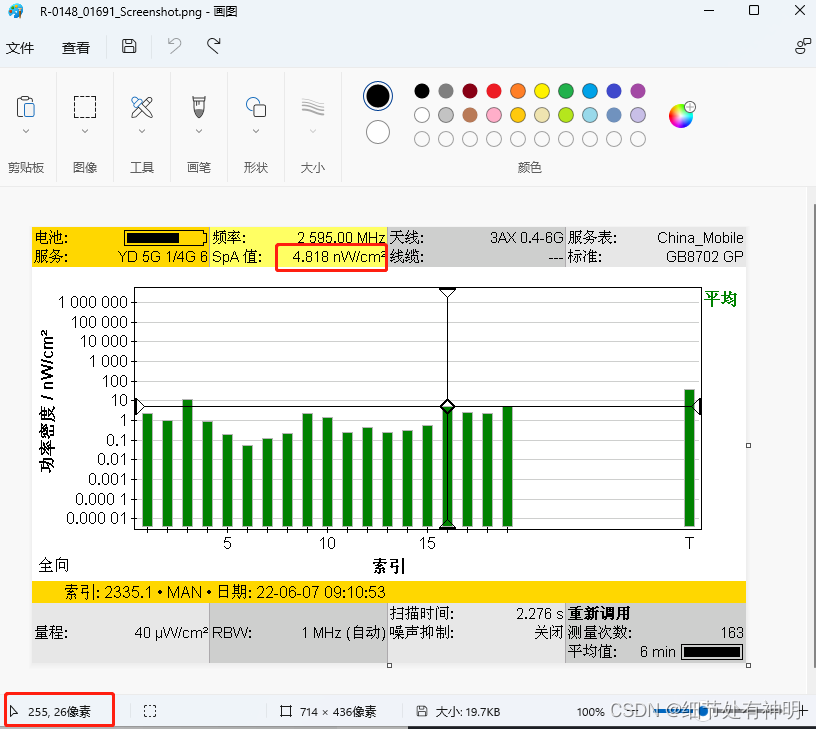
image1=r'E:\pythonprograms\easyocr\img\img\R-0148_01692_Screenshot.png'
im=cv2.imread(image1)
im2=im[19:38,256:353]
cv2读取图片后,可以获取图像属性,可以裁剪图像
https://blog.csdn.net/yukinoai/article/details/86423937
# 获取图像属性
shape = im.shape
print('图像的形状为: ', shape)  # 打印图像形状,包括行、列、通道
size = im.size
print('图像的像素数目为: ', size)  # 打印图像的像素数目
dtype = im.dtype
print('图像的数据类型为: ', dtype)  # 打印图像的数据类型
用matplotlib读取图片
import matplotlib.image as mpimg#读取图片
import matplotlib.pyplot as plt #显示图片
%matplotlib inline

image = mpimg.imread(image1)
plt.title('展示部分')
plt.axis('off')# 不显示坐标轴
plt.imshow(im2)
plt.show()
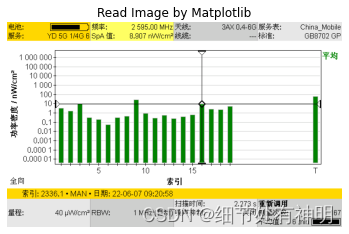
import matplotlib.image as mpimg#读取图片
import matplotlib.pyplot as plt #显示图片
%matplotlib inline

image = mpimg.imread(image1)
plt.title('Read Image by Matplotlib')
plt.axis('off')# 不显示坐标轴
plt.imshow(image)
plt.show()
过程中遇到的问题记录
easyocr import 报错
easyocr安装没问题 但 import 报错
py运行错误为:
OMP: Error #15: Initializing libiomp5md.dll, but found libiomp5md.dll already initialized.
OMP: Hint This means that multiple copies of the OpenMP runtime have been linked into the program. That is dangerous, since it can degrade performance or cause incorrect results. The best thing to do is to ensure that only a single OpenMP runtime is linked into the process, e.g. by avoiding static linking of the OpenMP runtime in any library. As an unsafe, unsupported, undocumented workaround you can set the environment variable KMP_DUPLICATE_LIB_OK=TRUE to allow the program to continue to execute, but that may cause crashes or silently produce incorrect results. For more information, please see Intel® Product Support
ipynb 同样会报错
方法:
删除了E:\Anaconda\anacanda3\Library\bin下的这个libiomp5md.dll文件。也可以修改后缀名。
然后就可以了。
cv2 展示图片报错
使用,cv2.imshow(" ", img) 一直报错,最终也没解决,用的matplotlib展示图片。


 6443
6443

 被折叠的 条评论
为什么被折叠?
被折叠的 条评论
为什么被折叠?
 到【灌水乐园】发言


