


目录
方案二:改造platform_setup_interrupts()来统一中断控制器实例
前言
最近在开发的项目使用到了7020的PS端网口,发现Vitis提供了关于以太网的工程模板lwip_echo_server甚是好用,免去了手动移植lwIP的痛苦,但是很快发现了新的问题,PL端给出的MIO中断一直无法触发,但是使用其他不带有lwIP的模板又能正常触发,于是怀疑是中断与lwIP使用的中断冲突所导致的,经过一顿查找,最终找到合理的解决方案。
发现问题的版本是Vitis 2022.2 lwIP213 下面文章都是在此版本基础上;但是后来在Vitis 2023.2 lwIP220版本也发现了这个问题,但是解决办法却完全不同,甚至对赛灵思的代码有些无语。
问题现象
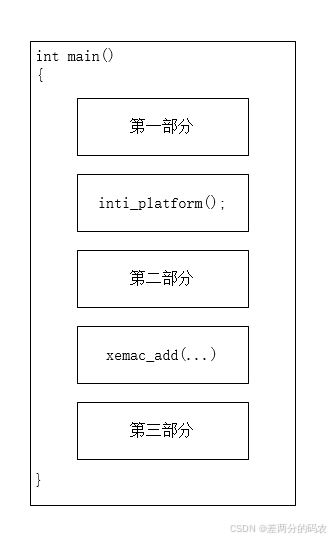
打开Vitis,生成工程模板lwip_echo_server,在源文件中的main文件可以找到main函数, 为了便于后面的叙述、暂且将主函数分为以下部分:
然后是需要使用的EMIO中断正常的初始化函数
int emio_interrupt_init(XScuGic * int_ins_ptr)
{
    int status;

	XScuGic_Config *intc_config;
	//初始化中断控制器驱动
	intc_config = XScuGic_LookupConfig(XPAR_PS7_SCUGIC_0_DEVICE_ID);
	if (NULL == intc_config) {
		return XST_FAILURE;
	}
	status = XScuGic_CfgInitialize(int_ins_ptr, intc_config,
			intc_config->CpuBaseAddress);
	if (status != XST_SUCCESS) {
		return XST_FAILURE;
	}
    //启用来自硬件的中断
    Xil_ExceptionInit();
    Xil_ExceptionRegisterHandler(XIL_EXCEPTION_ID_INT,
            (Xil_ExceptionHandler) XScuGic_InterruptHandler,
            (void *) int_ins_ptr);
    Xil_ExceptionEnable();

    //设置优先级和触发类型
    XScuGic_SetPriorityTriggerType(int_ins_ptr, GPIO_INTERRUPT_ID, 0xB0, 0x3);

    //为中断设置中断处理函数
    status = XScuGic_Connect(int_ins_ptr, GPIO_INTERRUPT_ID,
            (Xil_InterruptHandler) intr_handler, (void*)1);
    if (status != XST_SUCCESS) {
        return XST_FAILURE;
    }
    XScuGic_Enable(int_ins_ptr, GPIO_INTERRUPT_ID);
    return XST_SUCCESS;
}
如果将此初始化放到图1里main函数的第二部分或者第三部分,则初始化后lwIP会无法正常工作,如果将其放到第1部分,则EMIO中断不执行,显然是init_platform()里的函数与EMIO中断初始化发生了冲突。
原因分析
打开init_platform()
void init_platform()
{
	platform_setup_timer();
	platform_setup_interrupts();

	return;
}
这里初始化了定时器和一个中断,打开platform_setup_interrupts(),原来这里初始化了这个定时器的中断回调
void platform_setup_interrupts(void)
{
	Xil_ExceptionInit();

	XScuGic_DeviceInitialize(INTC_DEVICE_ID);

	/*
	 * Connect the interrupt controller interrupt handler to the hardware
	 * interrupt handling logic in the processor.
	 */
	Xil_ExceptionRegisterHandler(XIL_EXCEPTION_ID_IRQ_INT,
			(Xil_ExceptionHandler)XScuGic_DeviceInterruptHandler,
			(void *)INTC_DEVICE_ID);
	/*
	 * Connect the device driver handler that will be called when an
	 * interrupt for the device occurs, the handler defined above performs
	 * the specific interrupt processing for the device.
	 */
	XScuGic_RegisterHandler(INTC_BASE_ADDR, TIMER_IRPT_INTR,
					(Xil_ExceptionHandler)timer_callback,
					(void *)&TimerInstance);
	/*
	 * Enable the interrupt for scu timer.
	 */
	XScuGic_EnableIntr(INTC_DIST_BASE_ADDR, TIMER_IRPT_INTR);

	return;
}
打开回调函数timer_callback,果然这里是给lwIP提供的服务的
timer_callback(XScuTimer * TimerInstance)
{
	static int DetectEthLinkStatus = 0;
	/* we need to call tcp_fasttmr & tcp_slowtmr at intervals specified
	 * by lwIP. It is not important that the timing is absoluetly accurate.
	 */
	static int odd = 1;
#if LWIP_DHCP==1
    static int dhcp_timer = 0;
#endif
	DetectEthLinkStatus++;
	 TcpFastTmrFlag = 1;

	odd = !odd;
#ifndef USE_SOFTETH_ON_ZYNQ
	ResetRxCntr++;
#endif
	if (odd) {
#if LWIP_DHCP==1
		dhcp_timer++;
		dhcp_timoutcntr--;
#endif
		TcpSlowTmrFlag = 1;
#if LWIP_DHCP==1
		dhcp_fine_tmr();
		if (dhcp_timer >= 120) {
			dhcp_coarse_tmr();
			dhcp_timer = 0;
		}
#endif
	}

	/* For providing an SW alternative for the SI #692601. Under heavy
	 * Rx traffic if at some point the Rx path becomes unresponsive, the
	 * following API call will ensures a SW reset of the Rx path. The
	 * API xemacpsif_resetrx_on_no_rxdata is called every 100 milliseconds.
	 * This ensures that if the above HW bug is hit, in the worst case,
	 * the Rx path cannot become unresponsive for more than 100
	 * milliseconds.
	 */
#ifndef USE_SOFTETH_ON_ZYNQ
	if (ResetRxCntr >= RESET_RX_CNTR_LIMIT) {
		xemacpsif_resetrx_on_no_rxdata(echo_netif);
		ResetRxCntr = 0;
	}
#endif
	/* For detecting Ethernet phy link status periodically */
	if (DetectEthLinkStatus == ETH_LINK_DETECT_INTERVAL) {
		eth_link_detect(echo_netif);
		DetectEthLinkStatus = 0;
	}

	XScuTimer_ClearInterruptStatus(TimerInstance);
}那么问题的原因就显而易见了。在platform_setup_interrupts中执行了XScuGic_DeviceInitialize(INTC_DEVICE_ID),这里的INTC_DEVICE_ID就是中断控制器的ID,这个函数会情况中断控制器的中断分发器配置;而我们在初始化EMIO的中断控制器时使用了XScuGic_CfgInitialize这个函数,会重置中断控制器,因此才出现了谁后初始化谁可以正常使用的现象。
解决方案
方案一:直接使用lwIP初始化好的中断控制器
优点是非常简单,缺点是拓展性差,因为我们还是没有得到中断控制器实例。
既然init_platform()已经初始化了中断控制器,那我们可以直接拿来用,只需要在已经初始化好的中断控制器中注册我们需要中断源的回调函数、配置优先级和触发方式即可,因为我们得不到中断控制器实例,因此可以通过xscugic_hw.c中的函数,通过中断控制器ID直接注册和配置,代码如下:
int emio_interrupt_init()
{
	//注册EMIO中断回调函数
	XScuGic_RegisterHandler(XPAR_SCUGIC_0_CPU_BASEADDR, GPIO_INTERRUPT_ID,
					(Xil_ExceptionHandler)intr_handler, NULL);
	//配置优先级和触发方式
	XScuGic_SetPriTrigTypeByDistAddr(XPAR_SCUGIC_0_DIST_BASEADDR, GPIO_INTERRUPT_ID, 0xB0, 0x3);
	//启动此ID的中断
	XScuGic_EnableIntr(XPAR_SCUGIC_0_DIST_BASEADDR, GPIO_INTERRUPT_ID);
}
需要注意的时,这个方法依赖于一个已经初始化好的中断控制器,因此他必须放在init_platform()函数后才能正常工作;
方案二:改造platform_setup_interrupts()来统一中断控制器实例
优点是拓展性好,直接获得了中断控制器实例,缺点是稍微复杂一点点。
这种方式可以获取到中断控制器实例,因此配置起来会更加灵活,我们把platform_zynq.c中的init_platform()里调用的的void platform_setup_interrupts(void)改写成以下这种需要中断控制器实例形参的形式:
void platform_setup_interrupts(XScuGic *intc_ins_ptr)
{
	int status;

    //判断这个实例有没有被初始化
	if(!intc_ins_ptr->IsReady)
	{
		XScuGic_Config *intc_config;
		intc_config = XScuGic_LookupConfig(XPAR_SCUGIC_SINGLE_DEVICE_ID);
		if (NULL == intc_config) {
			xil_printf("XScuGic_LookupConfig Failure!\r\n");
	        return;
		}
		status = XScuGic_CfgInitialize(intc_ins_ptr, intc_config,
				intc_config->CpuBaseAddress);
		if (status != XST_SUCCESS) {
			xil_printf("XScuGic_CfgInitialize Failure!\r\n");
	        return;
		}
	}

	Xil_ExceptionInit();
	Xil_ExceptionRegisterHandler(XIL_EXCEPTION_ID_INT,
			(Xil_ExceptionHandler) XScuGic_InterruptHandler,
			(void *) intc_ins_ptr);
	Xil_ExceptionEnable();

	//设置优先级和触发类型
	XScuGic_SetPriorityTriggerType(intc_ins_ptr, TIMER_IRPT_INTR, 0xA0, 0x3);

	//为中断设置中断处理函数
	status = XScuGic_Connect(intc_ins_ptr, TIMER_IRPT_INTR,
			(Xil_InterruptHandler) timer_callback,
			(void *)&TimerInstance);
	if (status != XST_SUCCESS) {
		xil_printf("XScuGic_Connect Failure!\r\n");
	    return;
	}
	XScuGic_Enable(intc_ins_ptr, TIMER_IRPT_INTR);
	xil_printf("XScuGic Initialize Success!\r\n");

	return;
}
然后在platform_zynq.c中引用主函数里的中断控制器,例如:
extern XScuGic XScuGicInstance;

void init_platform()
{
	platform_setup_timer();
    //不要忘记在这里使用更改后的platform_setup_interrupts
	platform_setup_interrupts(&XScuGicInstance);

	return;
}
这样我们就可以在主函数中初始化一个我们要使用的中断控制器,并且进行更加灵活的配置。
附:Vitis 2023.2 lwIP220解决方法
这个比较特殊,这个版本的中断控制器并没有在init_platform()中初始化,而是放在了一个藏的很深的函数里,再加上Vitis 2023.2无法跳转到函数定义、而且不会对条件编译进行虚化显示(为了兼容老版本,Vitis 2023使用了大量的SDT宏进行条件编译)的bug,可以说是很难找的到了,不过解决办法简单了许多,直接上图,从main函数到中断初始化调用步骤如下:
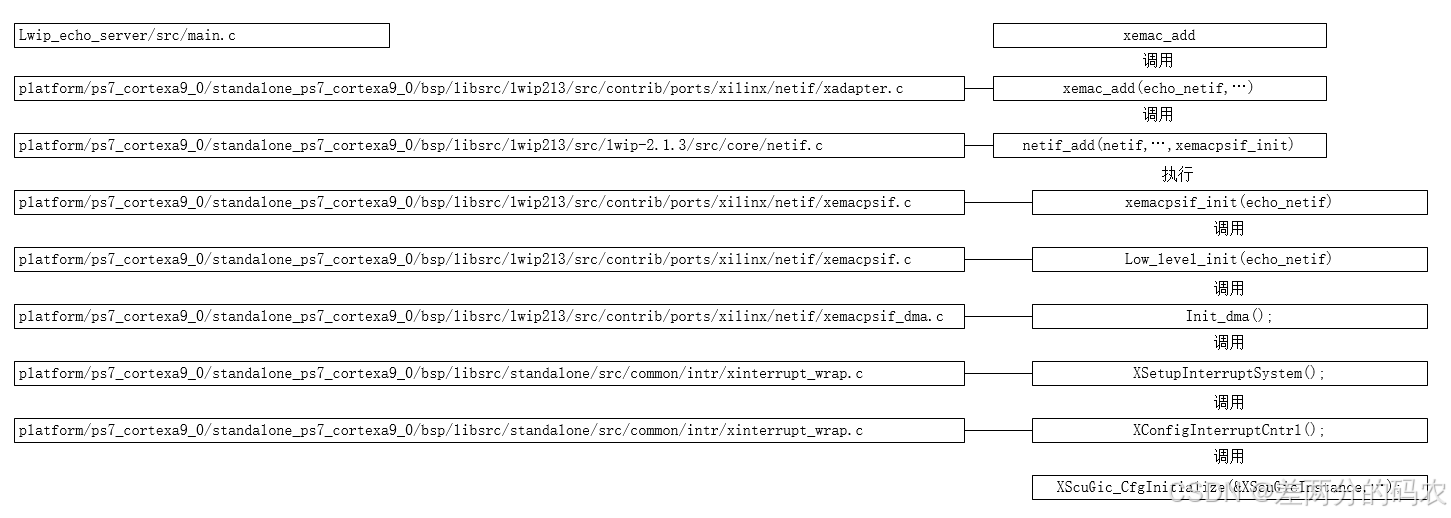
可以看到,lwIP所需要的中断是在main()函数内xemac_add里完成的,因此如果使用上述的方案一进行修改,则需要将用户中断注册放到xemac_add后才可以正常运行,而方案二,则需要打开图中的XConfigInterruptCntrl()函数所在的位置xinterrupt_wrap.c,找到全局变量位于文件头部的中断控制器声明,
#if defined (XPAR_SCUGIC) /* available in xscugic.h */
static XScuGic XScuGicInstance;    //改为跨文件引用或者在main内跨文件引用
static int ScuGicInitialized;
#endif将其改为跨文件引用或者在main函数内跨文件引用即可获得中断控制器实例。
另外因为XConfigInterruptCntrl()会判断中断控制器实例有没有被初始化过,所以我们使用这个实例的时候如果在xemac_add前,则需要我们初始化中断控制器实例,在其之后直接使用即可。
总结
本身这个问题不是很复杂,但因为之前一直不知道zynq的中断回调可以直接通过中断控制器的基地址注册、而且大部分的教程都是使用ID及实例的方式,所以还是耽误了一些时间;而在Vitis2023.2上耽误的时间,纯纯是因为这个软件实在是太恶心人了、简直就是我用过最逆天的编辑器,无法跳转到定义、无法区分条件编译(但为了兼容老版本又大量使用的条件编译)、无法更新DSP等等吐槽不完,资料还少的离谱,如果是初学者,还是安装2022.2及以前的版本吧,之后的版本踩不完的坑。


 2122
2122

 被折叠的 条评论
为什么被折叠?
被折叠的 条评论
为什么被折叠?
 到【灌水乐园】发言


