


安装准备:
         操作系统: Windows 10

       Python版本: 3.7.3
        安装Anaconda3-2019.03-Windows-x86_64自带python3.7.3
        下载地址:https://mirrors.tuna.tsinghua.edu.cn/anaconda/archive/
        参考链接:https://blog.csdn.net/junchengberry/article/details/81217645

        TensorFlow-GPU版本: 1.14.0

        Cuda版本: cuda_10.0.130_411.31_win10
        下载地址:https://developer.nvidia.com/cuda-10.0-download-archive

        Cudnn版本: cudnn-10.0-windows10-x64-v7.6.1.34.zip
        下载地址:https://developer.nvidia.com/rdp/cudnn-download

       清华镜像:
       -i https://pypi.tuna.tsinghua.edu.cn/simple some-package

       conda config --add channels https://mirrors.tuna.tsinghua.edu.cn/anaconda/pkgs/free/
       conda config --set show_channel_urls yes
安装过程:
1.安装python
安装anaconda即可
2.安装cuda
在系统变量环境变量中path配置(已经有的不用再次配置):
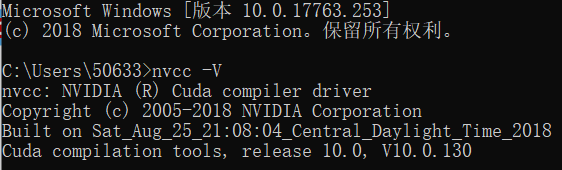
在cmd命令窗口中输入

nvcc -V
查看cuda是否安装成功:
3. 安装Cudnn,解压cudnn-9.0-windows10-x64-v7.zip
将Cudnn包中所带的文件放到Cuda目录(上面的CUDA_PATH的路径)下对应的文件夹即可
Cudnn文件夹下的: bin/cudnn64_7.dll 拷贝到 Cuda文件夹下的 bin/ 目录下
Cudnn文件夹下的: include/cudnn.h 拷贝到Cuda文件夹下的 include/ 目录下
Cudnn文件夹下的: lib/x64/cudnn.lib 拷贝到Cuda文件夹下的 lib/x64/cudnn.lib目录下
(cuda默认安装路径为C:\Program Files\NVIDIA GPU Computing Toolkit\CUDA\v10.0)
4.安装tensorflow-gpu
pip install tensorflow-gpu==1.14.0 -i https://pypi.tuna.tsinghua.edu.cn/simple some-package
5.测试
  import tensorflow as tf
    a = tf.constant(1)
    b = tf.constant(2)
    sess = tf.Session()
    print(sess.run(a + b))
输出为 3


 1931
1931


 被折叠的 条评论
为什么被折叠?
被折叠的 条评论
为什么被折叠?
 到【灌水乐园】发言


