


一、实验目的
利用Arduino控制器模拟SOS求救信号灯。
即使用三个规格相同的LED小灯泡,利用不同的频闪,来实现SOS信号灯的闪烁频率,从而达到模拟SOS信号灯的目的。
二、实验材料
Arduino UNO、面包板一个、USB数据线一根、三个规格相同的LED小灯泡、三个阻值相同的电阻
三、电路图
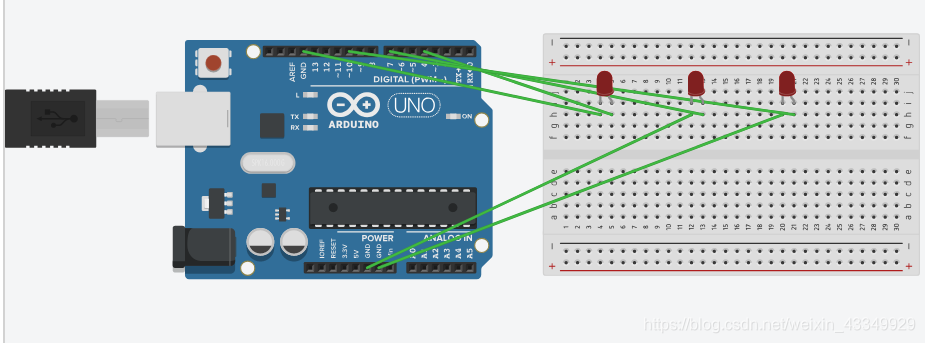
将三个LED小灯泡
串联在面包板上。
四、实验过程
1.将Arduino UNO控制器连接到电脑上,并在电脑上成功安装驱动。
2.将三个LED小灯泡用导线如下图连接到面包板上。
端口分别为:4、7、10.
事先了解到SOS求救信号的闪烁频率为:三长三短三长,根据这个频率编辑代码。

3.输入代码,完成连接安装,导出,实验成功。
五、代码块
void setup () {
  //inititialize the digital pin as anoutput.
  //pin 4 has an LED connected on mostArduino boards;
  //pin 7 has an LED connected on mostArduino boards;
  //pin 10 has an LED connected on mostArduino boards;
  pinMode(4,OUTPUT);
  pinMode(7,OUTPUT);
  pinMode(10,OUTPUT);
}
void loop() {
  digitalWrite(4,HIGH); //set the LED on
  delay(100);        //wait foy a second
  digitalWrite(4,LOW); //set the LED off
  delay(100);        //wait for a second
  digitalWrite(4,HIGH); //set the LED on
  delay(100);        //wait foy a second
  digitalWrite(4,LOW); //set the LED off
  delay(100);        //wait for a second
  digitalWrite(4,HIGH); //set the LED on
  delay(100);        //wait foy a second
  digitalWrite(4,LOW); //set the LED off
  delay(100);        //wait for a second
   digitalWrite(7,HIGH); //set the LED on
  delay(100);        //wait foy a second
  digitalWrite(7,LOW); //set the LED off
  delay(500);        //wait for a second
  digitalWrite(7,HIGH); //set the LED on
  delay(100);        //wait foy a second
  digitalWrite(7,LOW); //set the LED off
  delay(500);        //wait for a second
  digitalWrite(7,HIGH); //set the LED on
  delay(100);        //wait foy a second
  digitalWrite(7,LOW); //set the LED off
  delay(500);        //wait for a second
   digitalWrite(10,HIGH); //set the LED on
  delay(100);        //wait foy a second
  digitalWrite(10,LOW); //set the LED off
  delay(100);        //wait for a second
  digitalWrite(10,HIGH); //set the LED on
  delay(100);        //wait foy a second
  digitalWrite(10,LOW); //set the LED off
  delay(100);        //wait for a second
  digitalWrite(10,HIGH); //set the LED on
  delay(100);        //wait foy a second
  digitalWrite(10,LOW); //set the LED off
  delay(100);        //wait for a second
}
六、实验效果(视频)
LED灯泡成功以“三长三短三长”的频率闪烁,模拟出SOS求救信号。
视频地址


 3908
3908

 被折叠的 条评论
为什么被折叠?
被折叠的 条评论
为什么被折叠?
 到【灌水乐园】发言


