


Remi教程第三弹
一、前言
这一系列教程的例程会放在wzcwzc05/remi-study
在这一篇教程中,将介绍:
- 介绍页面布局方式(分为默认和Grid法)
- 页面弹出提示
二、默认页面布局格式
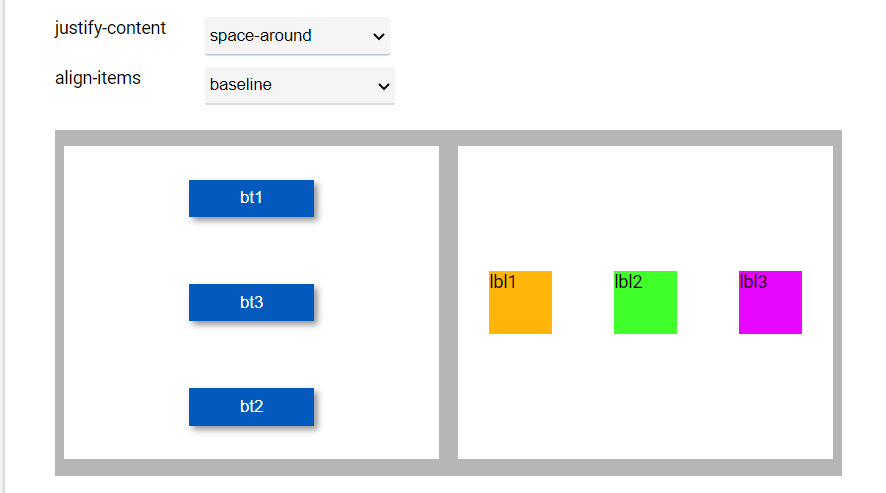
虽然在第一弹中已经介绍过,但是在这里我将详细讲解remi中的HelloWorld,以便大家更好地理解这个库。
# -*- coding:utf-8 -*-

""" VBox和HBox的布局设计.
    不同的样式参数在布局安排中起着特别的作用,
     这个例程可以展示不同的参数的样式.
"""

import remi.gui as gui
from remi.gui import *
from remi import start, App


class untitled(App):
    def main(self):
        mainContainer = Container(width=706, height=445, margin='0px auto', style="position: relative")
        subContainer = HBox(width=630, height=277, style='position: absolute; left: 40px; top: 150px; background-color: #b6b6b6')

        vbox = VBox(width=300, height=250)
        bt1 = Button('bt1', width=100, height=30)
        vbox.append(bt1,'bt1')
        bt3 = Button('bt3', width=100, height=30)
        vbox.append(bt3,'bt3')
        bt2 = Button('bt2', width=100, height=30)
        vbox.append(bt2,'bt2')
        subContainer.append(vbox,'vbox')

        hbox = HBox(width=300, height=250)
        lbl1 = Label('lbl1', width=50, height=50, style='background-color: #ffb509')
        hbox.append(lbl1,'lbl1')
        lbl2 = Label('lbl2', width=50, height=50, style='background-color: #40ff2b')
        hbox.append(lbl2,'lbl2')
        lbl3 = Label('lbl3', width=50, height=50, style='background-color: #e706ff')
        hbox.append(lbl3,'lbl3')
        subContainer.append(hbox,'hbox')

        mainContainer.append(subContainer,'subContainer')

        comboJustifyContent = gui.DropDown.new_from_list(('flex-start','flex-end','center','space-between','space-around'),
                                    style='left: 160px; position: absolute; top: 60px; width: 148px; height: 30px')
        mainContainer.append(comboJustifyContent,'comboJustifyContent')

        lblJustifyContent = Label('justify-content', style='left: 40px; position: absolute; top: 60px; width: 100px; height: 30px')
        mainContainer.append(lblJustifyContent,'lblJustifyContent')

        comboAlignItems = gui.DropDown.new_from_list(('stretch','center','flex-start','flex-end','baseline'),
                                    style='left:160px; position:absolute; top:100px; width:152px; height: 30px')
        mainContainer.append(comboAlignItems,'comboAlignItems')

        lblAlignItems = Label('align-items', style='left:40px; position:absolute; top:100px; width:100px; height:30px')
        mainContainer.append(lblAlignItems,'lblAlignItems')

        mainContainer.children['comboJustifyContent'].onchange.do(self.onchange_comboJustifyContent,vbox,hbox)
        mainContainer.children['comboAlignItems'].onchange.do(self.onchange_comboAlignItems,vbox,hbox)

        lblTitle = gui.Label("下来的例子展示了两种Vbox和Hbox主要的布局格式特性.",
                                    style='position:absolute; left:0px; top:0px')
        mainContainer.append(lblTitle)

        self.mainContainer = mainContainer
        return self.mainContainer

    def onchange_comboJustifyContent(self,emitter,new_value,vbox,hbox):
        vbox.style['justify-content'] = new_value
        hbox.style['justify-content'] = new_value

    def onchange_comboAlignItems(self,emitter,new_value,vbox,hbox):
        vbox.style['align-items'] = new_value
        hbox.style['align-items'] = new_value


#配置文件
configuration = {'config_enable_file_cache': True, 'config_multiple_instance': True, 'config_port': 0, 'config_address': '0.0.0.0', 'config_start_browser': True, 'config_project_name': 'untitled', 'config_resourcepath': './res/'}

if __name__ == "__main__":
    # start(MyApp,address='127.0.0.1', port=8081, multiple_instance=False,enable_file_cache=True, update_interval=0.1, start_browser=True)
    start(untitled, address=configuration['config_address'], port=configuration['config_port'],
                        multiple_instance=configuration['config_multiple_instance'],
                        enable_file_cache=configuration['config_enable_file_cache'],
                        start_browser=configuration['config_start_browser'])
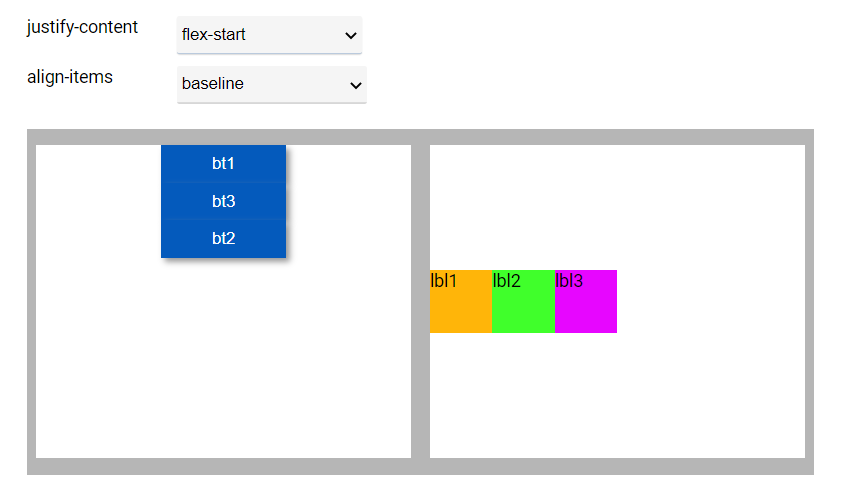
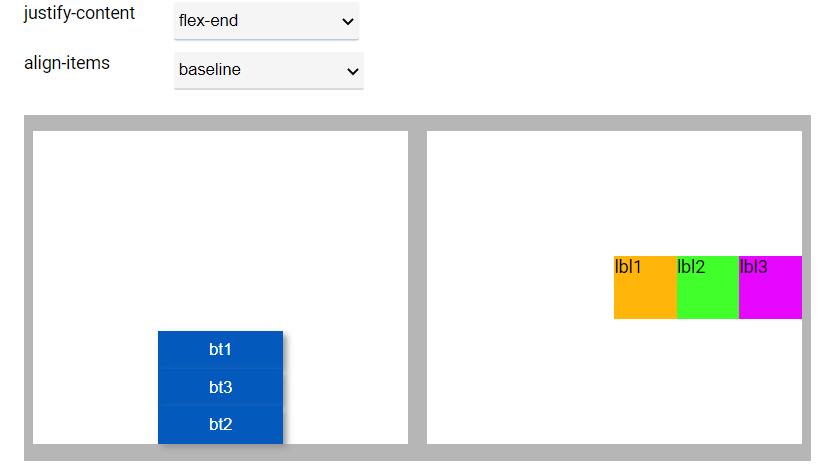
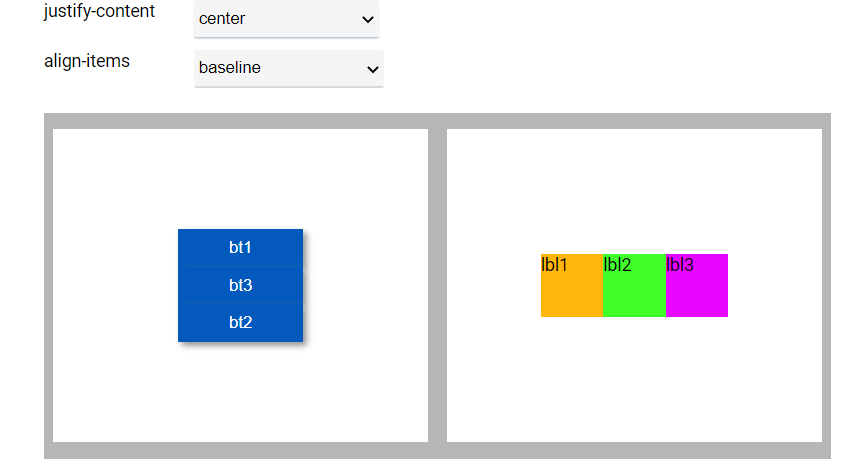
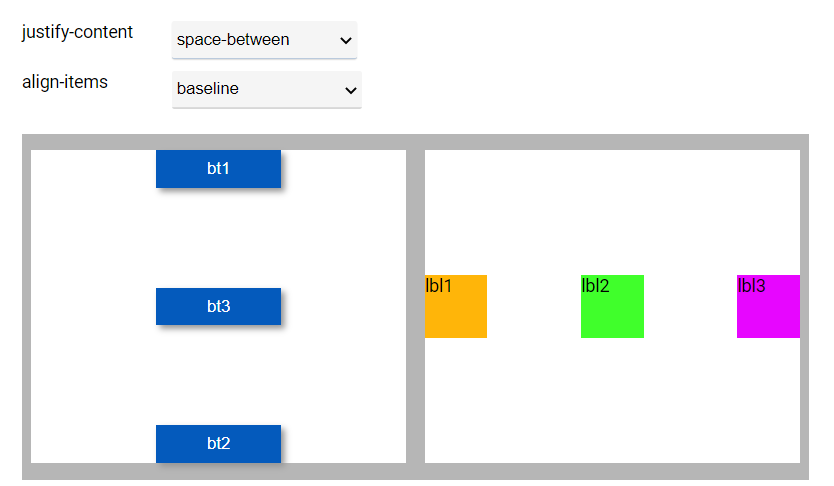
对于这种remi默认自带的布局方式可以运行这个程序.
下面以其中的一种为例,其余的可以自行进行测试,选择最适合的布局方式
三、Grid布局方式(推荐)
"""这个展示了GridBox方式的布局.
    grid布局允许以一种灵活的方式定义布局
    使用GridBox.define_grid,传递一个二维可迭代对象作为参数。
    被定义在grid中的每个元素, 是一个关键部分对于GridBox.append函数
    在这个例子中, 模型是一些字符串, 每个字符都被用来当作key.
    一个key可以在定义的模型中出现多次, 使组件覆盖更大的空间.
    每个在布局中的纵列和横行的大小都可以通过GridBox.style被定义,
     style参数是类似这样的
     {'grid-template-columns':'10% 90%', 'grid-template-rows':'10% 90%'}.
"""

import remi.gui as gui
from remi import start, App
import os


class MyApp(App):
    def main(self):
        #创建一个grid格式的容器
        main_container = gui.GridBox(width='100%', height='100%', style={'margin':'0px auto'})

        label = gui.Label('This is a label')
        label.style['background-color'] = 'lightgreen'

        button = gui.Button('Change layout', height='100%')
        button.onclick.do(self.redefine_grid, main_container)

        text = gui.TextInput()


        main_container.set_from_asciiart("""
            |label |button                      |
            |label |text                        |
            |label |text                        |
            |label |text                        |
            |label |text                        |
            """, 10, 10)

        main_container.append({'label':label, 'button':button, 'text':text})

        # returning the root widget
        return main_container

    def redefine_grid(self, emitter, container):
        #redefining grid layout
        container.define_grid([ ['text','label','button'],['text','.','.']])
        container.style.update({'grid-template-columns':'33% 33% 33%', 'grid-template-rows':'50% 50%'})
        container.set_column_gap("0%")
        container.set_row_gap("0%")
        emitter.set_text("Done")


if __name__ == "__main__":
    start(MyApp, debug=True)
可见这个方法是非常可视化,非常便捷的,关键在于 main_container.set_from_asciiart()函数,我找到了以下的解释:
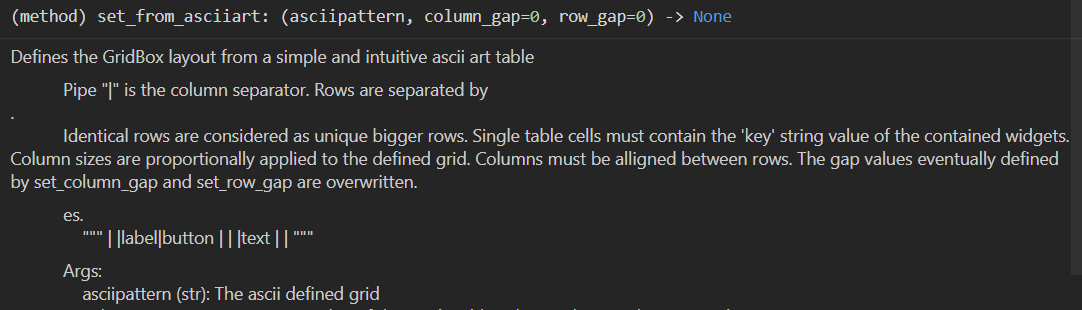
列之间分隔由“|”完成,行之间的分隔由"."完成
style的参数类似于 {'grid-template-columns':'10% 90%', 'grid-template-rows':'10% 90%'}
四、网页弹出提示
"""
   Licensed under the Apache License, Version 2.0 (the "License");
   you may not use this file except in compliance with the License.
   You may obtain a copy of the License at

       http://www.apache.org/licenses/LICENSE-2.0

   Unless required by applicable law or agreed to in writing, software
   distributed under the License is distributed on an "AS IS" BASIS,
   WITHOUT WARRANTIES OR CONDITIONS OF ANY KIND, either express or implied.
   See the License for the specific language governing permissions and
   limitations under the License.
"""
"""网页弹出提示的例程
"""

import remi.gui as gui
from remi import start, App


class MyApp(App):
    def __init__(self, *args):
        super(MyApp, self).__init__(*args)

    def main(self):
        wid = gui.VBox(width=300, height=200, margin='0px auto')
        self.lbl = gui.Label('Press the button', width='80%', height='50%')
        self.lbl.style['margin'] = 'auto'
        self.bt = gui.Button('Press me!', width=200, height=30)
        self.bt.style['margin'] = 'auto 50px'

        self.bt.onclick.do(self.on_button_pressed)

        wid.append(self.lbl)
        wid.append(self.bt)

        return wid

    # listener function
    def on_button_pressed(self, widget):
        self.lbl.set_text('A notification message should appear.')#修改标签内容
        self.bt.set_text('Hi!')#修改按钮文本内容
        self.notification_message("Message title", "Hello world!", "")#弹出提示


if __name__ == "__main__":
    #可选的:start(MyApp,address='127.0.0.1', port=8081, multiple_instance=False,enable_file_cache=True, update_interval=0.1,
    start(MyApp, debug=True, address='0.0.0.0', port=0, )
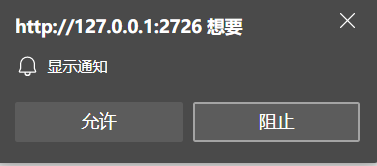
需要注意的是有些浏览器会弹出提示“是否允许此网页弹出提示”,这时选择”是“,就可以弹出提示了。
五、写在后面
对于布局方式,教程中无法过多地介绍,需要自己亲自去一个个的试,才能得到效果。
对于GUI的界面设计,remi提供了一套GUI可视化设计工具,将在Remi教程GUI设计番外篇中介绍
(未完待续)


 960
960


 被折叠的 条评论
为什么被折叠?
被折叠的 条评论
为什么被折叠?
 到【灌水乐园】发言


