


上一篇讲了数据封装,接下来来看看模型的搭建。我们以经典的VGG网络为例。
随着卷积网络在计算机视觉领域的应用越来越广泛,为了获得更高的准确率,越来越多的人尝试在krizhevsky2012imagenet中的原始框架上进行改进。例如,ILSVRC-2013最好的参赛模型在第一个卷积层上使用了较小的接受域窗口以及较小的滑动步长。另一种改进方案是在整幅图像以及它的多个尺寸上,稠密的训练和测试网络。本文中,我们关注了卷积网络结构设计中的另一个重要因素——深度。为此,我们固定了网络框架的其他参数,然后通过增加更多的卷积层来增加网络的深度,这是可行的,因为我们在所有层都是用非常小(3×3)的卷积滤波器。
VGG网络结构
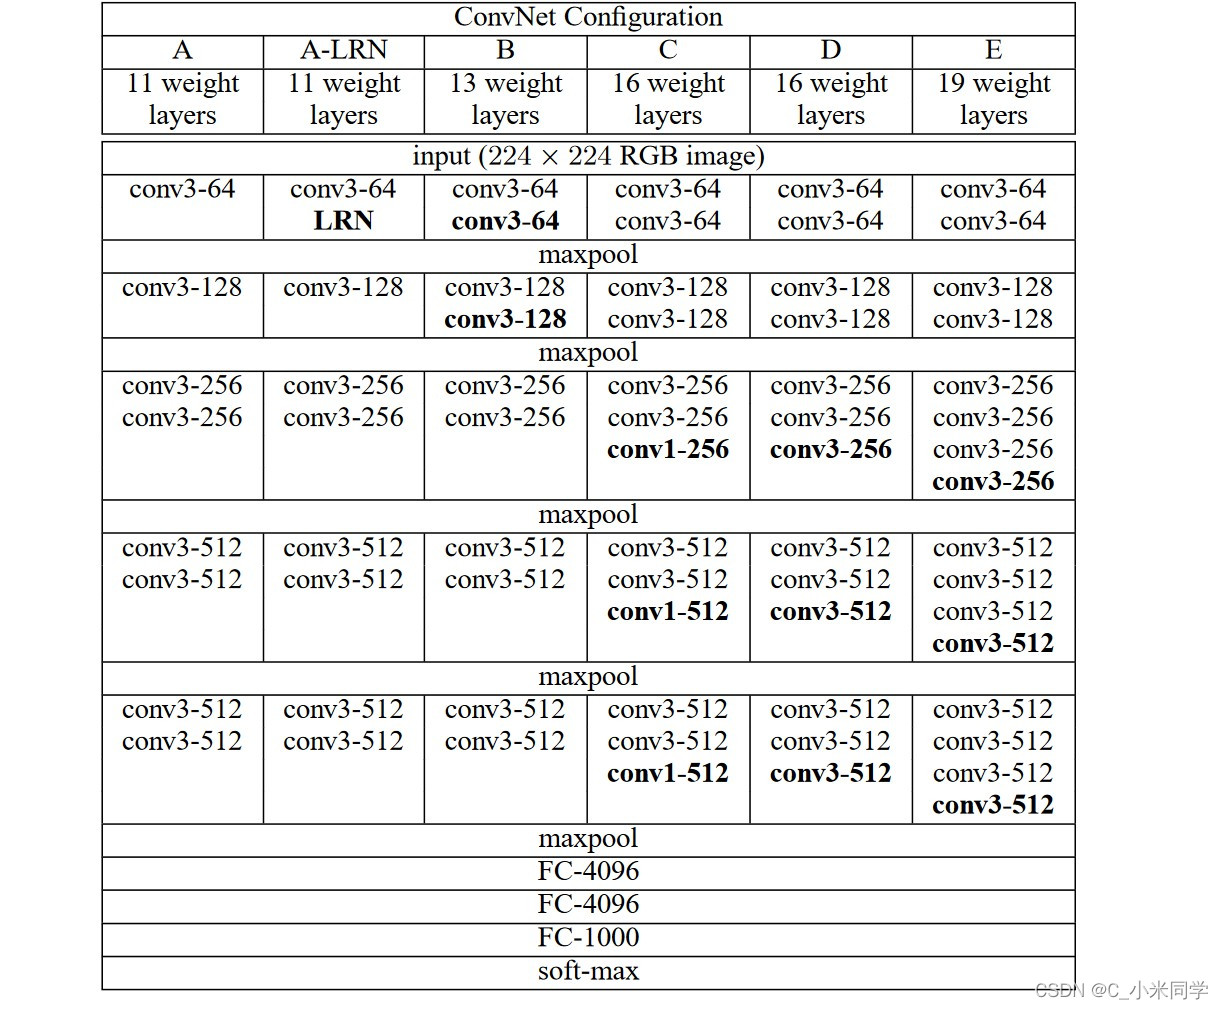
图1
VGG网络使用的基本都是3x3的小卷积,我们知道,2个3x3的卷积可以代替一个7x7的卷积,并且参数量会减少一个数量级。VGG整体的架构是:特征提取(卷积实现)+分类(全连接层是实现)。
VGG网络搭建
import torch.nn as nn
import torch

# official pretrain weights
model_urls = {
    'vgg11': 'https://download.pytorch.org/models/vgg11-bbd30ac9.pth',
    'vgg13': 'https://download.pytorch.org/models/vgg13-c768596a.pth',
    'vgg16': 'https://download.pytorch.org/models/vgg16-397923af.pth',
    'vgg19': 'https://download.pytorch.org/models/vgg19-dcbb9e9d.pth'
}


class VGG(nn.Module):
    def __init__(self, features, num_classes=1000, init_weights=False):
        super(VGG, self).__init__()
        self.features = features #特征提取层
        self.classifier = nn.Sequential(
            nn.Linear(512*7*7, 4096),
            nn.ReLU(True),
            nn.Dropout(p=0.5),
            nn.Linear(4096, 4096),
            nn.ReLU(True),
            nn.Dropout(p=0.5),
            nn.Linear(4096, num_classes)
        )
        if init_weights:
            self._initialize_weights()

    def forward(self, x):
        # N x 3 x 224 x 224
        x = self.features(x)
        # N x 512 x 7 x 7
        x = torch.flatten(x, start_dim=1) #延通道维度进行展平
        # N x 512*7*7
        x = self.classifier(x)
        return x

    #权重初始化
    def _initialize_weights(self):
        for m in self.modules():
            if isinstance(m, nn.Conv2d):
                # nn.init.kaiming_normal_(m.weight, mode='fan_out', nonlinearity='relu')
                nn.init.xavier_uniform_(m.weight)
                if m.bias is not None:
                    nn.init.constant_(m.bias, 0)
            elif isinstance(m, nn.Linear):
                nn.init.xavier_uniform_(m.weight)
                # nn.init.normal_(m.weight, 0, 0.01)
                nn.init.constant_(m.bias, 0)


def make_features(cfg: list):  #特征提取层搭建
    layers = []
    in_channels = 3
    for v in cfg:
        if v == "M":
            layers += [nn.MaxPool2d(kernel_size=2, stride=2)]
        else:
            conv2d = nn.Conv2d(in_channels, v, kernel_size=3, padding=1)
            layers += [conv2d, nn.ReLU(True)]
            in_channels = v
    return nn.Sequential(*layers)


cfgs = {
    'vgg11': [64, 'M', 128, 'M', 256, 256, 'M', 512, 512, 'M', 512, 512, 'M'],
    'vgg13': [64, 64, 'M', 128, 128, 'M', 256, 256, 'M', 512, 512, 'M', 512, 512, 'M'],
    'vgg16': [64, 64, 'M', 128, 128, 'M', 256, 256, 256, 'M', 512, 512, 512, 'M', 512, 512, 512, 'M'],
    'vgg19': [64, 64, 'M', 128, 128, 'M', 256, 256, 256, 256, 'M', 512, 512, 512, 512, 'M', 512, 512, 512, 512, 'M'],
}


def vgg(model_name="vgg16", **kwargs):
    assert model_name in cfgs, "Warning: model number {} not in cfgs dict!".format(model_name)
    cfg = cfgs[model_name]

    model = VGG(make_features(cfg), **kwargs) #**kwargs-可以传入num_classes=1000, init_weights=False等字典信息
    return model
简单分析:cfgs是一个参数列表,我们可以选择哪一种VGG模式,这里我们默认选择的是VGG16,我们先通过make_features来构建特增提取层,最后特征提取层传图VGG函数,进行整体的封装。


 5709
5709


 被折叠的 条评论
为什么被折叠?
被折叠的 条评论
为什么被折叠?
 到【灌水乐园】发言


