


基本图形绘制
绘制矩形
pygame.draw.rect(screen,BLACK,(50, 50, 150, 50), 0)
#Surface :矩形绘制在哪个Surface对象上
# color:边框颜色
# Rect:指定矩形范围,就是四个左边点的位置
# width: 指定边框大小,0表示填充这个矩形,1表示边框一个像素
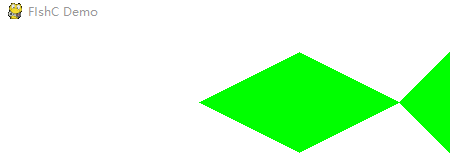
绘制多边形
polygon(Surface, color, pointlist, width=0)
#Surface :矩形绘制在哪个Surface对象上
# color:边框颜色
# Rect:指定矩形范围,就是顶点的位置
# width: 指定边框大小,0表示填充这个矩形,1表示边框一个像素
例:
    import pygame
import sys
from pygame.locals import *
pygame.init()
GREEN = (0, 255, 0)
points = [(200, 75), (300, 25), (400, 75), (450, 25), (450, 125), (400, 75), (300, 125)]

size = width, height = 640, 480
screen = pygame.display.set_mode(size)
pygame.display.set_caption("FIshC Demo")
clock = pygame.time.Clock()

while True:
    for event in pygame.event.get():
        if event.type == QUIT:
            sys.exit()
    screen.fill(WHITE)
    pygame.draw.polygon(screen, GREEN,points, 0)
    #把内存中的画面翻转到屏幕上
    pygame.display.flip()
    #帧率 一秒10帧
    clock.tick(10)
结果:
circle(Surface, color, pos, radius, width=0)
pos:圆心的位置
radius:半径的大小
import pygame
import sys
from pygame.locals import *
pygame.init()

GREEN = (0, 255, 0)
RED = (255, 0, 0)
BLUE = (0, 0, 255)

size = width, height = 640, 480
screen = pygame.display.set_mode(size)
pygame.display.set_caption("FIshC Demo")

position = size[0]//2, size[1]//2 #两个除号表示整除

clock = pygame.time.Clock()
moving = False
while True:
    for event in pygame.event.get():
        if event.type == QUIT:
            sys.exit()
        if event.type == MOUSEBUTTONDOWN:
            if  event.button == 1: #1鼠标左键2鼠标滚轮3鼠标右键4滚轮向上5滚轮向下
                moving = True
        if event.type  == MOUSEBUTTONUP:
            if event.button == 1:
                moving = False

    if moving:
        position = pygame.mouse.get_pos()  #获得鼠标当前位置

    screen.fill(WHITE)
    pygame.draw.circle(screen, RED,position, 25, 1)
    pygame.draw.circle(screen, BLUE, position, 75, 1)
    pygame.draw.circle(screen, GREEN, position, 125, 1)
    #把内存中的画面翻转到屏幕上
    pygame.display.flip()
    #帧率 一秒10帧
    clock.tick(10)
结果:鼠标点击会随鼠标移动

绘制椭圆
ellipse(Surface, color, Rect, width=0)
Rect是一个矩形,如果椭圆限制在一个长方形内就是椭圆,如果限制在一个正方形内,就是正圆。
import pygame
import sys
from pygame.locals import *
pygame.init()

WHITE = (255, 255, 255)
BLACK = (0, 0, 0)
GREEN = (0, 255, 0)
RED = (255, 0, 0)
BLUE = (0, 0, 255)

size = width, height = 640, 480
screen = pygame.display.set_mode(size)
pygame.display.set_caption("FIshC Demo")

clock = pygame.time.Clock()
moving = False
while True:
    for event in pygame.event.get():
        if event.type == QUIT:
            sys.exit()
    screen.fill(WHITE)
    pygame.draw.ellipse(screen, BLACK, (100, 100, 400,  100) , 1)
    pygame.draw.ellipse(screen, BLACK, (200, 50, 200, 200), 1)
    pygame.display.flip()
    #帧率 一秒10帧
    clock.tick(10)

绘制弧线
act(Surface, color,Rect, start_angle, stop_angle, width=1)
start_angle:表示从椭圆的哪一部分角度开始
stop_angle:表示从椭圆的哪一部分角度结束
例:画了个死鱼眼
import pygame
import sys
import math
from pygame.locals import *
pygame.init()

WHITE = (255, 255, 255)
BLACK = (0, 0, 0)
GREEN = (0, 255, 0)
RED = (255, 0, 0)
BLUE = (0, 0, 255)


size = width, height = 640, 480
screen = pygame.display.set_mode(size)
pygame.display.set_caption("FIshC Demo")


clock = pygame.time.Clock()
moving = False
while True:
    for event in pygame.event.get():
        if event.type == QUIT:
            sys.exit()


    screen.fill(WHITE)

    pygame.draw.arc(screen, BLACK, (100, 100, 400,  100) , 0, math.pi, 1)
    pygame.draw.arc(screen, BLACK, (200, 50, 200, 200),math.pi, math.pi * 2, 1)
    pygame.draw.arc(screen, BLACK, (100, 200, 400, 100), math.pi, math.pi * 2, 1)
    pygame.display.flip()
    #帧率 一秒10帧
    clock.tick(10)

画线段,一条线和多条线
line(Surface, color, start_pos, end_pos, width=1)
lines(Surface, color, closed, pointlist, width=1)


 267
267


 被折叠的 条评论
为什么被折叠?
被折叠的 条评论
为什么被折叠?
 到【灌水乐园】发言


