


引入导航栏组件时,需要前往page.js里页面配置增加"navigationStyle": "custom"的属性,放page数组对象里定义个别页面,或者放globalStyle对象里直接全局自定义
如果没有使用插槽的话,默认展示小程序默认的样式【左边距可以自己在.nav-body调整】
<template>
<view
class="custom-nav-head"
:style="{
height: headHeight + 'rpx',
background: backgroundColor,
color: textColor,
}"
>
<view
:style="{
height: navHeight + 'rpx',
'padding-top': navTop + 'rpx',
'padding-right': navPaddingRight + 'rpx',
}"
>
<!-- 小程序目前不支持插槽里放默认值,因此通过样式来实现分发的功能 -->
<view class="default-slot">
<slot></slot>
</view>
<view class="nav-body">
<view class="left-slot">
<slot name="left"></slot>
</view>
<view class="nav-body-left">
<van-icon
v-if="isShowBackBtn"
name="arrow-left"
color="#000000"
size="32rpx"
@click="backPage()"
/>
</view>
<view class="conent-slot">
<slot name="conent"></slot>
</view>
<view
class="nav-body-conent"
:style="{ paddingLeft: textPaddingLeft + 'rpx' }"
>
{{ titleText }}
</view>
</view>
</view>
</view>
</template>
<script>
export default {
name: "navigationBar",
props: {
// 导航栏的背景颜色
backgroundColor: {
type: String,
default: "#fff",
},
// 文字颜色
textColor: {
type: String,
default: "black",
},
// 显示的文本
titleText: {
type: String,
default: "小锦",
},
// 文字的左边距
textPaddingLeft: {
type: Number,
default: 222,
},
// 返回的页数
deltaPageNum: {
type: Number,
default: 1,
},
// 是否显示返回按钮
isShowBackBtn: {
type: Boolean,
default: true,
},
},
mounted() {
// 获取胶囊的位置
const menuButtonObject = uni.getMenuButtonBoundingClientRect();
// 获取系统信息
uni.getSystemInfo({
success: (res) => {
// 获取状态栏的高度
const statusBarHeight = res.statusBarHeight;
// 获取胶囊顶部的距离【拿到的是px需要转化为rpx * 2】
this.navTop = menuButtonObject.top * 2;
this.navHeight = menuButtonObject.height * 2;
this.navPaddingRight = (menuButtonObject.width + 6) * 2;
console.log(menuButtonObject);
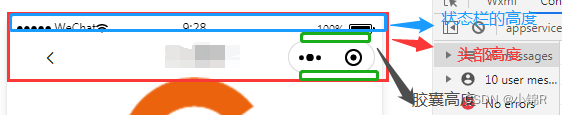
// 头部的高度 = 状态栏的高度 + 胶囊的高度 + (胶囊顶部的距离 - 状态栏的高度 ) * 2 【胶囊顶部的距离 - 状态栏的高度 * 2 = 胶囊的上下外边距】
this.headHeight =
(statusBarHeight +
menuButtonObject.height +
(menuButtonObject.top - statusBarHeight) * 2) *
2;
},
});
},
data() {
return {
// 头部的高度
headHeight: "",
// 导航栏的右边距
navPaddingRight: "",
// 导航栏的高度
navHeight: "",
// 导航栏距离顶部的距离
navTop: "",
};
},
methods: {
backPage() {
uni.navigateBack({
delta: this.deltaPageNum,
success: (res) => {
this.$emit("backSuccess", res);
},
fail: () => {
this.$emit("backFail", res);
},
complete: () => {
this.$emit("backComplete", res);
},
});
},
},
};
</script>
<style lang="scss" scoped>
.custom-nav-head {
width: 750rpx;
color: #fff;
top: 0;
z-index: 999;
.default-slot:empty + .nav-body {
display: flex;
}
.nav-body {
display: none;
align-items: center;
padding-left: 70rpx; // 导航栏左边距
height: 100%;
// 左部的标签
.left-slot:empty + .nav-body-left {
display: block;
}
.nav-body-left {
display: none;
}
// 中间部分
.conent-slot:empty + .nav-body-conent {
display: block;
}
.nav-body-conent {
display: none;
flex: 1;
padding-left: 227rpx;
font-family: "PingFang SC";
font-style: normal;
font-weight: 500;
font-size: 20px;
}
}
}
</style>
计算头部高度的示意图
有错误或者需要改进的地方,欢迎提出来。
与君共勉!


 1916
1916


 被折叠的 条评论
为什么被折叠?
被折叠的 条评论
为什么被折叠?
 到【灌水乐园】发言


