python中的mesa包预制了一些类,提供了一些基础模型,可以大大简化abm建模的工作量。在python中实现,也有利于和其它算法相结合。本文是一次作业,按照个人理解把mesa包教程整理,代码压缩成了两大部分。如果是新手上手,建议查看下方的官方链接,在jupyter notebook里一步一步运行代码。
https://mesa.readthedocs.io/en/latest/tutorials/intro_tutorial.html
模型构造
建模一个简单的模型:
强假设(只要有钱就把钱给邻居)下财富的流动,观察基尼系数变化
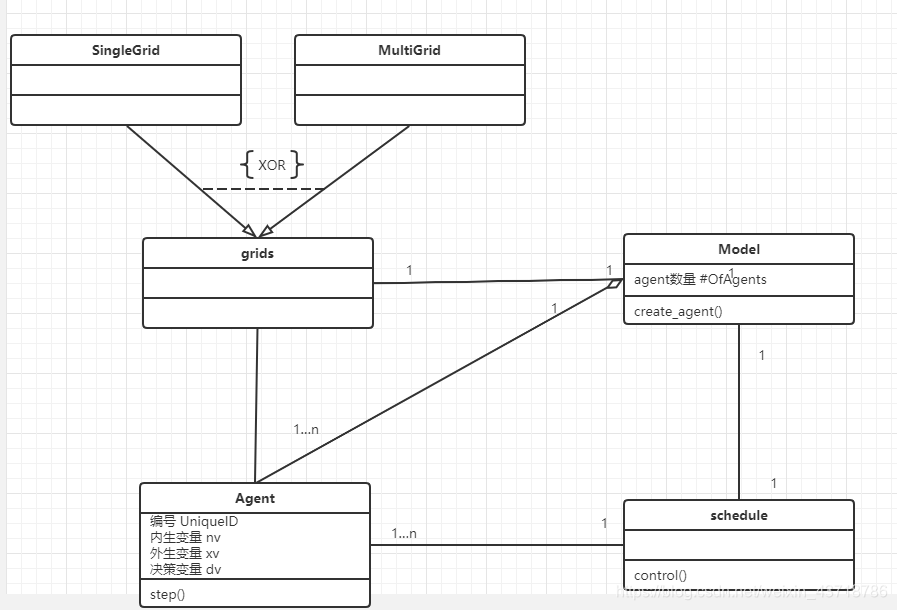
主要的类与类图
一个未明确任何功能的,简单的agent模型,含有如下类,分别是:
- 实例化的模型,对于每一个具体问题应当是唯一的
- 主体或智能体(agent),在启动模型前应对其进行实例化,通常一个模型有多个agent(实现观察涌现性等功能)
- 调度器(schedule),控制每一个时间步(ticks)里agent的动作(step())顺序,如同时(即并行),随机串行运行。随机串行是最常见也是最简单的控制方式
- 网格(grids)提供两种SingleGrid和MultiGrid,前者一个格子空间上只能有一个agent,而后者一个格子上可以由多个agent
- 数据收集类(DataCollector),收集模型级变量, agent级别变量和其它变量(下图省略)
- 控制模型运行类(BatchRunner),使用固定的参数多次生成和运行模型,查看结果的情况。可消除随机误差(下图省略)
类图:
代码
不考虑agent的位置,随机把钱给其它agent
注意,下面的代码使用的是jupyter notebook,可以复制到自己的jupyter里面按顺序运行
from mesa import Agent, Model
from mesa.time import RandomActivation
先定义MoneyModel类,因为下面MoneyAgent类实现时要调用,具体参见上方类图,二者存在一对多的组合关系
class MoneyModel(Model):
"""A model with some number of agents."""
def __init__(self, N):
self.num_agents = N
self.schedule = RandomActivation(self)
# Create agents
for i in range(self.num_agents):
a = MoneyAgent(i, self)
self.schedule.add(a)
def step(self):
'''Advance the model by one step.'''
self.schedule.step()
定义MoneyAgent类
class MoneyAgent(Agent):
""" An agent with fixed initial wealth."""
def __init__(self, unique_id, model):
super().__init__(unique_id, model)
self.wealth = 1
def step(self):
# The agent's step will go here.
# For demonstration purposes we will print the agent's unique_id
if self.wealth == 0:
return
other_agent = self.random.choice(self.model.schedule.agents) # 需要随机从所有agent中选择,同时可能会选中自己
other_agent.wealth += 1
self.wealth -= 1
创建10个agent,并运行10步
model = MoneyModel(10)
for i in range(10):
model.step()
输出结果:
# For a jupyter notebook add the following line:
%matplotlib inline
# The below is needed for both notebooks and scripts
import matplotlib.pyplot as plt
agent_wealth = [a.wealth for a in model.schedule.agents]
plt.hist(agent_wealth)
反复使用100个模型,每个模型运行10步,统计所有结果的分布
all_wealth = []
# 反复使用100个模型,每个模型运行10步,统计所有结果的分布
for j in range(100):
# Run the model
model = MoneyModel(10)
for i in range(10):
model.step()
# Store the results
for agent in model.schedule.agents:
all_wealth.append(agent.wealth)
plt.hist(all_wealth, bins=range(max(all_wealth)+1)) # histgram的柱含下界但不含上界
考虑agent移动时
每个agent只给钱到邻居节点。如何快速获得邻居节点,收集数据,反复运行模型
from mesa.space import MultiGrid
from mesa.datacollection import DataCollector
from mesa.batchrunner import BatchRunner
重新定义类,增添了一些方法
此处进行了修改,定义了 def posible_move(self)和另一种同样功能的写法。两种方法功能都是选择周围八个邻居节点,不过posible_move()选择的包含自身。在下方进行了展示,可以切换注释进行尝试,两个函数功能和结果完全相同。
class MoneyAgent(Agent):
"""A model with some number of agents."""
def __init__(self, unique_id, model):
super().__init__(unique_id, model)
self.wealth = 1
def move(self):
possible_steps = self.model.grid.get_neighborhood(
self.pos,
moore=True, # moore包含周边八个结构,如果使用Neumann只包含正交的四个位置
include_center=False) # 不包含自己
new_position = self.random.choice(possible_steps)
# 另一种同样功能写法
# new_position = self.posible_move()
self.model.grid.move_agent(self, new_position)
def posible_move(self):
neighbors = []
x, y = self.pos
for dx in [-1, 0, 1]:
for dy in [-1, 0, 1]:
neighbors.append((x+dx, y+dy))
return neighbors
def give_money(self):
cellmates = self.model.grid.get_cell_list_contents([self.pos]) # 判断是否存在邻居节点
if len(cellmates) > 1: # 如果存在则随机给邻居钱
other = self.random.choice(cellmates)
other.wealth += 1
self.wealth -= 1
def step(self):
self.move() # f
if self.wealth > 0:
self.give_money()
定义基尼系数计算函数
def compute_gini(model): # 计算基尼系数
agent_wealths = [agent.wealth for agent in model.schedule.agents]
x = sorted(agent_wealths)
N = model.num_agents
B = sum( xi * (N-i) for i,xi in enumerate(x) ) / (N * sum(x))
return (1 + (1/N) - 2 * B)
class MoneyModel(Model):
"""A model with some number of agents."""
def __init__(self, N, width, height):
self.num_agents = N
self.grid = MultiGrid(width, height, True) # True意味着边界是循环的,从一端出去,将从二维平面相反边进入
self.schedule = RandomActivation(self) # 串行随机调用
self.running = True
# Create agents
for i in range(self.num_agents):
a = MoneyAgent(i, self)
self.schedule.add(a)
# Add the agent to a random grid cell
x = self.random.randrange(self.grid.width)
y = self.random.randrange(self.grid.height)
self.grid.place_agent(a, (x, y))
self.datacollector = DataCollector(
model_reporters={"Gini": compute_gini}, # 计算模型的基尼系数
agent_reporters={"Wealth": "wealth"})
def step(self):
self.datacollector.collect(self)
self.schedule.step()
生成一个10*10的panel,放入50个agents,根据上方MoneyModel类实例化里面定义的界面,界面是循环的。
运行模型20步
model = MoneyModel(50, 10, 10)
for i in range(20):
model.step()
计算每个位置上点的密度
import numpy as np
agent_counts = np.zeros((model.grid.width, model.grid.height))
for cell in model.grid.coord_iter():
cell_content, x, y = cell
agent_count = len(cell_content)
agent_counts[x][y] = agent_count
plt.imshow(agent_counts, interpolation='nearest') #根据每个位置(实际上是二维数组计数)上agents
plt.colorbar()
# If running from a text editor or IDE, remember you'll need the following:
# plt.show()
结果:
与上面类似,变动为让模型运行100步
model = MoneyModel(50, 10, 10)
for i in range(100):
model.step()
输出基尼系数图像
gini = model.datacollector.get_model_vars_dataframe() # 上一个代码模块,运行一百步过程中基尼系数的变化
gini.plot()
输出模型未运行时的点的状态,只看header(默认ID前5个的agent)
agent_wealth = model.datacollector.get_agent_vars_dataframe()
agent_wealth.head()
结果
查看运行结束后(第99步执行完成)agent财富的分布图像
end_wealth = agent_wealth.xs(99, level="Step")["Wealth"]
end_wealth.hist(bins=range(agent_wealth.Wealth.max()+1))
结果
one_agent_wealth = agent_wealth.xs(14, level="AgentID") # 使用angentID14观察这个agent的财富变化
one_agent_wealth.Wealth.plot()
结果
如果想要让模型多次运行,除了for循环实例化model外,一种更便捷的方法由mesa提供
# 如果想要让模型多次运行
fixed_params = {"width": 10,
"height": 10}
variable_params = {"N": range(10, 500, 10)}
batch_run = BatchRunner(MoneyModel,
variable_params,
fixed_params,
iterations=5,
max_steps=100,
model_reporters={"Gini": compute_gini})
batch_run.run_all()
收集每个模型的最终运行结果。纵轴代表基尼系数,横轴代表模型运行的总ticks
# BatchRunner的数据收集
run_data = batch_run.get_model_vars_dataframe()
run_data.head()
plt.scatter(run_data.N, run_data.Gini)
最后,更多ABM建模内容可参见国科大贺舟老师的网页