


【第一部分】历史文章:
Android学习笔记(一)——创建第一个Android项目
Android学习笔记(二)android studio基本控件及布局(实现图片查看器)
Android学习笔记(三)android studio中CheckBox自定义样式(更换复选框左侧的勾选图像)
Android学习笔记(四)Android 中Activity页面的跳转及传值
Android学习笔记(五)——Toast提示、Dialog对话框、Menu菜单
Android学习笔记(六)——自定义ListView布局+AsyncTask异步任务
Android学习笔记(七)——数据存储(共享参数SharedPreferences)
Android学习笔记(八)——数据存储(SD卡文件操作)
Android学习笔记(九)——网络技术
【第二部分】主要问题解决:
Android Studio(存)读取不了SD卡上的文件——【已解决】
在上一篇的网络技术的文章中,主要介绍了数据的获取,没有对数据进行解析。那么这篇文章,用一个综合的案例,介绍数据的解析及以前知识的应用。
首先我们拿到头条新闻的API接口地址:http://v.juhe.cn/toutiao/index?type=top&key=a1a755458cc22f129942b34904feb820
下面就来开始我们的案例:
1、在activity_main.xml中添加ListView控件和自定义列表布局。
这里我们下只需要显示每一个列表项中的内容有:新闻图片、新闻标题、新闻的来源、时间等内容。
activity_main.xml
<?xml version="1.0" encoding="utf-8"?>
<RelativeLayout
    xmlns:android="http://schemas.android.com/apk/res/android"
    xmlns:tools="http://schemas.android.com/tools"
    android:id="@+id/activity_main"
    android:layout_width="match_parent"
    android:layout_height="match_parent"
    tools:context="cn.edu.hznu.ex10_news.MainActivity">
    <ListView
        android:id="@+id/listview"
        android:layout_width="match_parent"
        android:layout_height="match_parent" />
</RelativeLayout>
new_item_layout.xml
<?xml version="1.0" encoding="utf-8"?>
<RelativeLayout xmlns:android="http://schemas.android.com/apk/res/android"
    android:layout_width="match_parent"
    android:layout_height="wrap_content"
    android:orientation="vertical">
    <ImageView
        android:id="@+id/imgsrc"
        android:layout_width="100dp"
        android:layout_height="75dp"
        android:layout_centerVertical="true"
        android:padding="3dp"
        android:src="@mipmap/ic_launcher" />
    <TextView
        android:id="@+id/title"
        android:layout_width="match_parent"
        android:layout_height="wrap_content"
        android:layout_toRightOf="@id/imgsrc"
        android:paddingTop="4dp"
        android:text="显示新闻的标题"
        android:textColor="@android:color/darker_gray"
        android:textSize="20sp" />
    <LinearLayout
        android:layout_width="match_parent"
        android:layout_height="wrap_content"
        android:layout_below="@id/title"
        android:layout_toRightOf="@id/imgsrc"
        android:orientation="horizontal"
        android:layout_alignParentBottom="true"
        android:paddingBottom="2dp"
        android:paddingTop="4dp">
        <TextView
            android:id="@+id/author_name"
            android:layout_width="0dp"
            android:layout_height="wrap_content"
            android:layout_marginLeft="2dp"
            android:layout_weight="1"
            android:text="新闻的来源"
            android:textColor="@android:color/darker_gray"
            android:textSize="15sp" />
        <TextView
            android:id="@+id/date"
            android:layout_width="wrap_content"
            android:layout_height="wrap_content"
            android:layout_marginRight="8dp"
            android:text="2019.5.13 16:35"
            android:textColor="@android:color/darker_gray"
            android:textSize="15sp" />
    </LinearLayout>
</RelativeLayout>
2、创建JAVABean,保存新闻数据。
news.java
package cn.edu.hznu.ex10_news.bean;
public class News {
    private String title;  //标题
    private String date;   //时间
    private String author_name;   //来源——作者名字
    private String thumbnail_pic_s;   //头像
    private String url;     //具体的内容
    public String getTitle() {
        return title;
    }

public void setTitle(String title) {
        this.title = title;
    }

    public String getDate() {
        return date;
    }

    public void setDate(String date) {
        this.date = date;
    }

    public String getAuthor_name() {
        return author_name;
    }

    public void setAuthor_name(String author_name) {
        this.author_name = author_name;
    }

    public String getThumbnail_pic_s() {
        return thumbnail_pic_s;
    }

    public void setThumbnail_pic_s(String thumbnail_pic_s) {
        this.thumbnail_pic_s = thumbnail_pic_s;
    }

    public String getUrl() {
        return url;
    }

    public void setUrl(String url) {
        this.url = url;
    }
}
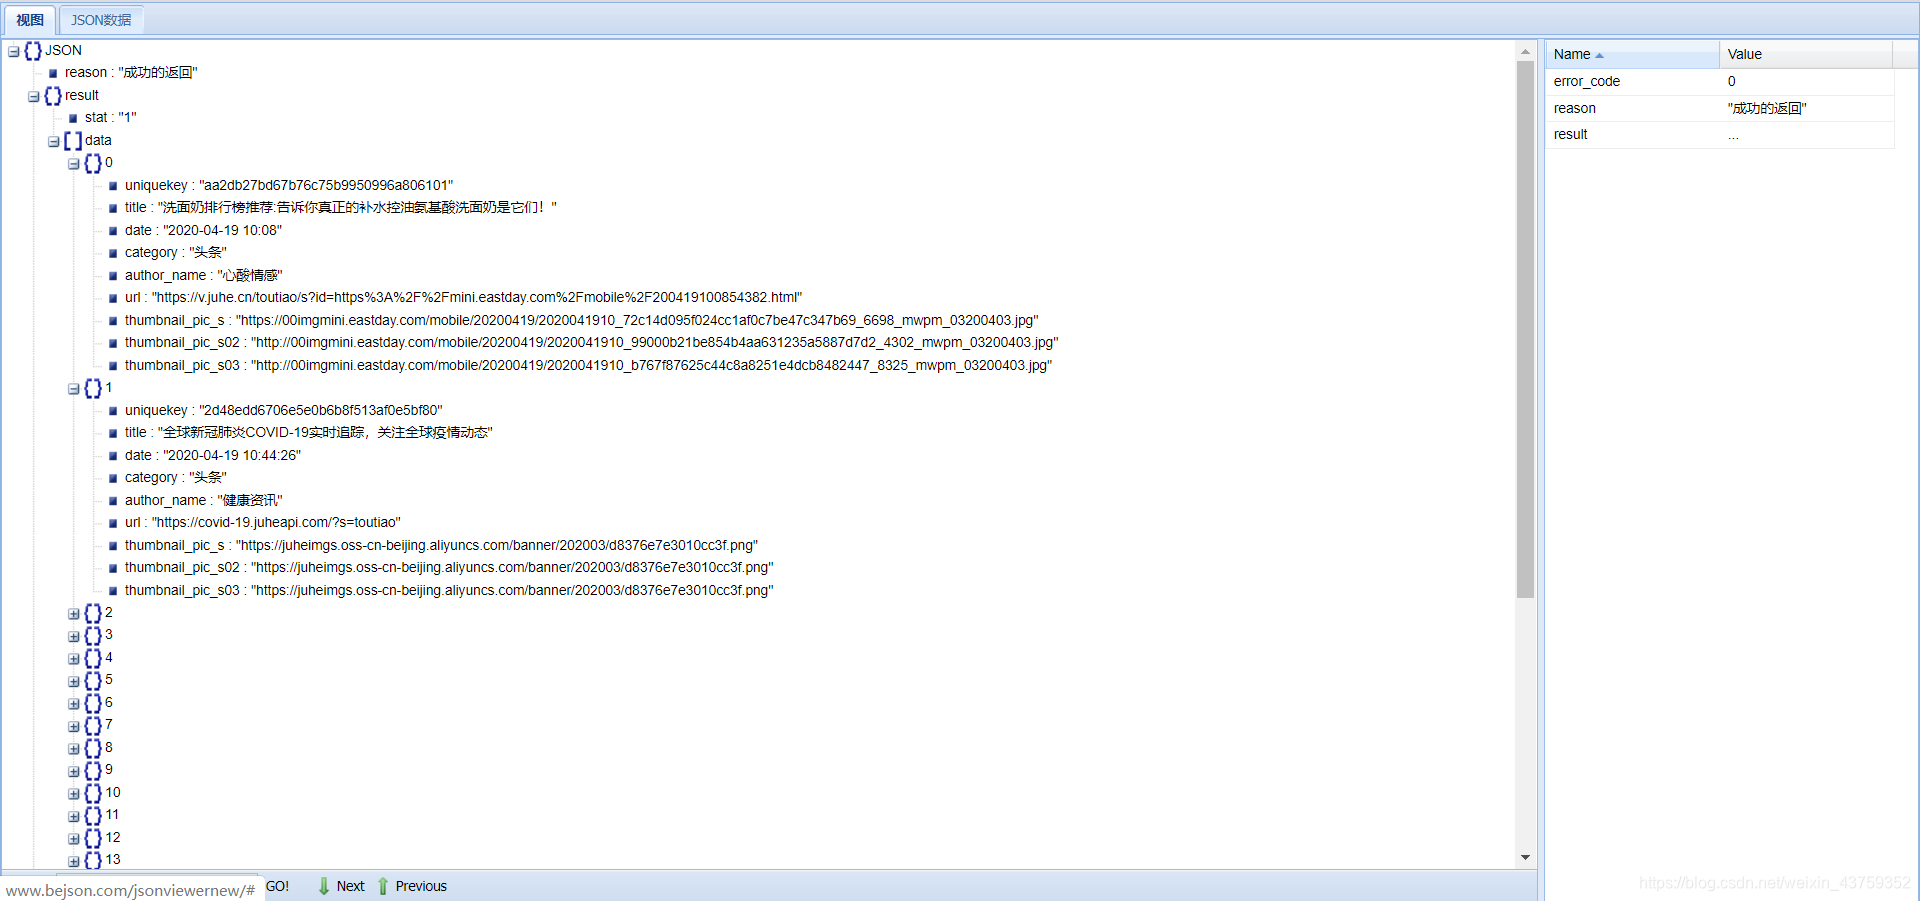
3、在创建访问网络异步类前,首先自己定义一个解析网络返回的JSON数据的类。
JSONUtils.java
package cn.edu.hznu.ex10_news.utils;
import org.json.JSONArray;
import org.json.JSONException;
import org.json.JSONObject;
import java.util.ArrayList;
import cn.edu.hznu.ex10_news.bean.News;
public class JSONUtils {
    public static ArrayList<News> parseJson(String jsonData) {
        ArrayList<News> result = new ArrayList<>();
        JSONObject jo = null;
        News news;
        try {
            jo = new JSONObject(jsonData);
            if (jo.getString("reason").equals("成功的返回")) {
                JSONObject jo1 = jo.getJSONObject("result");
                JSONArray ja = jo1.getJSONArray("data");
                for (int i = 0; i < ja.length(); i++) {
                    news = new News();
                    JSONObject obj = ja.getJSONObject(i);
                    news.setTitle(obj.getString("title"));
                    news.setDate(obj.getString("date"));
                    news.setAuthor_name(obj.getString("author_name"));
                    news.setThumbnail_pic_s(obj.getString("thumbnail_pic_s"));
                    news.setUrl(obj.getString("url"));
                    result.add(news);
                }
            }
            return  result;
        } catch (JSONException e) {
            e.printStackTrace();
        }
        return null;
    }
}
4、创建访问网络异步类。
NewsTask.java
package cn.edu.hznu.ex10_news.task;
import android.os.AsyncTask;
import java.io.IOException;
import java.util.ArrayList;
import cn.edu.hznu.ex10_news.bean.News;
import cn.edu.hznu.ex10_news.utils.JSONUtils;
import okhttp3.OkHttpClient;
import okhttp3.Request;
import okhttp3.Response;
public class NewsTask  extends AsyncTask<String,Void,ArrayList<News>> {
    private NewsCallBack  newsCallBack;
    public NewsTask(NewsCallBack newsCallBack) {
        this.newsCallBack = newsCallBack;
    }
    @Override
    protected ArrayList<News> doInBackground(String... strings) {
        //************************访问网络获取数据,得到列表项的数据*****************
        ArrayList<News> result=null;  //创建arraylist ,接收数据

        OkHttpClient client=new OkHttpClient();
        Request request=new Request.Builder().url(strings[0]).build();
        try {
            Response response=client.newCall(request).execute();
            String jsonData=response.body().string();
            result=  JSONUtils.parseJson(jsonData);   //调用,返回Arraylist

        } catch (IOException e) {
            e.printStackTrace();
        }
        return result;
    }

    @Override
    protected void onPostExecute(ArrayList<News> result) {
        //在主线程中执行
        if(newsCallBack!=null)
            newsCallBack.getResults(result);
        super.onPostExecute(result);
    }


    @Override
    protected void onPreExecute() {
        //在主线程执行
        super.onPreExecute();
    }

    @Override
    protected void onProgressUpdate(Void... values) {
        //做进度显示的操作
        super.onProgressUpdate(values);
    }
    //定义接口
    public interface NewsCallBack{
        void getResults(ArrayList<News> result);
    }
}
5、创建访问网络异步类,来获取具体的图片数据。
ImageTask.java
package cn.edu.hznu.ex10_news.task;
import android.graphics.Bitmap;
import android.os.AsyncTask;
import java.io.IOException;
import cn.edu.hznu.ex10_news.utils.Thumbnail;
import okhttp3.OkHttpClient;
import okhttp3.Request;
import okhttp3.Response;
public class ImageTask extends AsyncTask<String,Void,Bitmap> {
    private CallBack back;
    public ImageTask(CallBack back) {
        this.back = back;
    }
    @Override
    protected Bitmap doInBackground(String... strings) {
        Bitmap result=null;
        OkHttpClient client=new OkHttpClient();
        Request request=new Request.Builder().url(strings[0]).build();
        try {
            Response response=client.newCall(request).execute();
            byte[]imageData= response.body().bytes() ;
            result= Thumbnail.getThumbnail(imageData,400,500);  //调用工具类

        } catch (IOException e) {
            e.printStackTrace();
        }
        return result;
    }
    @Override
    protected void onPostExecute(Bitmap bitmap) {
        super.onPostExecute(bitmap);
        if(back!=null){
            back.getResults(bitmap);
        }
    }
    public interface  CallBack{
        void getResults(Bitmap result);
    }
}
6、创建工具类,用于转化图片。
Thumbnail.java
package cn.edu.hznu.ex10_news.utils;
import android.graphics.Bitmap;
import android.graphics.BitmapFactory;
import android.media.ThumbnailUtils;
public class Thumbnail {
    public static Bitmap getThumbnail(byte[] imageData,int width,int height){
        Bitmap img_bitmap = null;
        BitmapFactory.Options options=new BitmapFactory.Options();
        options.inPreferredConfig = Bitmap.Config.ARGB_4444;/*设置让解码器以最佳方式解码*/
        options.inJustDecodeBounds = true;
        img_bitmap = BitmapFactory.decodeByteArray(imageData,0,imageData.length, options);
        options.inJustDecodeBounds = false;//设为 false
        //计算缩放比
        int h = options.outHeight;
        int w = options.outWidth;
        int beWidth = w / width;
        int beHeight = h / height;
        int be = 1;
        if (beWidth < beHeight) {
            be = beWidth;
        } else {
            be = beHeight;
        }
        if (be <= 0) {
            be = 1;
        }
        options.inSampleSize = be;
        img_bitmap = BitmapFactory.decodeByteArray(imageData,0,imageData.length, options);
        img_bitmap = ThumbnailUtils.extractThumbnail(img_bitmap, width, height,
                ThumbnailUtils.OPTIONS_RECYCLE_INPUT);
        return img_bitmap;
    }
}
7、自定义数据适配器。
NewsAdapter .java
package cn.edu.hznu.ex10_news.adapter;
import android.content.Context;
import android.graphics.Bitmap;
import android.support.annotation.NonNull;
import android.text.TextUtils;
import android.view.LayoutInflater;
import android.view.View;
import android.view.ViewGroup;
import android.widget.ArrayAdapter;
import android.widget.ImageView;
import android.widget.TextView;
import java.util.List;
import cn.edu.hznu.ex10_news.R;
import cn.edu.hznu.ex10_news.bean.News;
import cn.edu.hznu.ex10_news.task.ImageTask;
public class NewsAdapter extends ArrayAdapter<News> {
    private int item_layout_id;
    public NewsAdapter(Context context, int resource, List objects) {
        super(context, resource,objects);
        item_layout_id=resource;
    }
    @NonNull
    @Override
    public View getView(int position, View convertView, ViewGroup parent) {
        View view=null;
        final  ViewHolder holder;
        if(convertView==null){//回收站为空\
            /**
             * LayoutInflater.from()得到布局填充器对象
             * getContext()获取当前上下文
             * inflate() 加载填充布局
             */
            view= LayoutInflater.from(getContext())
                    .inflate(item_layout_id,parent,false);
            holder=new ViewHolder(view);
            view.setTag(holder);

        }else {//显示后续的列表项
            view=convertView;
            holder= (ViewHolder) view.getTag();
        }
        News itemData=getItem(position);
        holder.title.setText(itemData.getTitle());
        holder.date.setText(itemData.getDate());
        holder.author_name.setText(itemData.getAuthor_name());
        if(!TextUtils.isEmpty(itemData.getThumbnail_pic_s())){
            new ImageTask(new ImageTask.CallBack() {
                @Override
                public void getResults(Bitmap result) {
                    holder.thumbnail_pic_s.setImageBitmap(result);


                }
            }).execute(itemData.getThumbnail_pic_s()) ;  //执行异步任务
        }else{
            holder.thumbnail_pic_s.setVisibility(View.GONE);
        }
        return view;
    }
    class  ViewHolder{
        TextView title;
        TextView date;
        TextView author_name;
        ImageView thumbnail_pic_s;

        public ViewHolder(View view) {
            title=(TextView) view.findViewById(R.id.title);
            date=(TextView)view.findViewById(R.id.date);
            author_name=(TextView)view.findViewById(R.id.author_name);
            thumbnail_pic_s=(ImageView)view.findViewById(R.id.imgsrc);
        }
    }
}
8、编写底部布局文件。
异步任务结合进度显示,,可以很好的给予用户焦急等待的体验。
footer_layout.xml
<?xml version="1.0" encoding="utf-8"?>
<LinearLayout xmlns:android="http://schemas.android.com/apk/res/android"
    android:orientation="horizontal"
    android:layout_width="match_parent"
    android:layout_height="wrap_content">
    <ProgressBar
        style="?android:attr/progressBarStyleSmall"
        android:layout_width="wrap_content"
        android:layout_height="wrap_content"
        android:id="@+id/progressBar"
        android:layout_weight="1" />

    <TextView
        android:text="正在加载数据........"
        android:textSize="24sp"
        android:layout_width="wrap_content"
        android:layout_height="wrap_content"
        android:id="@+id/textView"
        android:layout_weight="1" />
</LinearLayout>
具体的效果是这样的:

9、MainActivity.java
package cn.edu.hznu.ex10_news;
import android.content.Intent;
import android.support.v7.app.AppCompatActivity;
import android.os.Bundle;
import android.view.LayoutInflater;
import android.view.Menu;
import android.view.MenuItem;
import android.view.View;
import android.widget.AbsListView;
import android.widget.AdapterView;
import android.widget.ListView;
import android.widget.Toast;
import java.util.ArrayList;
import cn.edu.hznu.ex10_news.adapter.NewsAdapter;
import cn.edu.hznu.ex10_news.bean.News;
import cn.edu.hznu.ex10_news.task.NewsTask;
public class MainActivity extends AppCompatActivity  {
    private ListView listView;  //定义listview
    private ArrayList<News> data=new ArrayList<>();
    private NewsAdapter adapter;
    private boolean isLoading=true,isDown=false;
    //**************************************
    private static String URL = "http://v.juhe.cn/toutiao/index?type=top&key=6928eda123d4aef596b726b4addadf48";
    private String citySubing;
    @Override
    protected void onCreate(Bundle savedInstanceState) {
        super.onCreate(savedInstanceState);
        setContentView(R.layout.activity_main);
        listView= (ListView) findViewById(R.id.listview);  //绑定
        //**********************添加带有底部视图**************************************
        View view= LayoutInflater.from(this).inflate(R.layout.footer_layout,null);
        listView.addFooterView(view);

        loadData(URL);   //将列表项的数据加载到数据源(顺序表)中
        adapter=new NewsAdapter(MainActivity.this, R.layout.new_item_layout,data);
        listView.setAdapter(adapter);

        //添加列表的滚动事件
        listView.setOnScrollListener(new AbsListView.OnScrollListener() {
            @Override
            public void onScrollStateChanged(AbsListView absListView, int scrollState) {
                if(isDown==true&&scrollState==SCROLL_STATE_IDLE){
                    loadData(URL);
                }
            }

            @Override
            public void onScroll(AbsListView absListView, int i, int i1, int i2) {
                if(i+i1==i2){
                    isDown=true;
                }else{
                    isDown=false;
                }
            }
        });
    }
     private void loadData(String URL) {
        if(isLoading){
            isLoading=false;
            new NewsTask(new NewsTask.NewsCallBack() {
                @Override
                public void getResults(ArrayList<News> result) {//重写接接口方法
                    data.clear();
                    data.addAll(result);
                    adapter.notifyDataSetChanged();
                }
            }).execute(URL);
            isLoading=true;
        }
    }
10、运行效果。

注意点:
(1)由于我们使用的是Okhttp访问网络,在使用之前,我们需要在项目中添加Okhttp库的依赖。在app/build.gradle文件中,dependencies闭包中添加以下内容:
compile 'com.squareup.okhttp3:okhttp:3.4.1'
(2)在AndroidManifest.xml中添加网络访问权限:
<uses-permission android:name="android.permission.INTERNET" />


 1973
1973

 被折叠的 条评论
为什么被折叠?
被折叠的 条评论
为什么被折叠?
 到【灌水乐园】发言


