


计算机视觉基础:图像处理(下)-Task02 LBP特征描述算子-人脸检测
2.1 简介
LBP指局部二值模式(Local Binary Pattern),是一种用来描述图像局部特征的算子,具有灰度不变性和旋转不变性等显著优点。LBP常应用于人脸识别和目标检测中,在OpenCV中有使用LBP特征进行人脸识别的接口,也有用LBP特征训练目标检测分类器的方法,OpenCV实现了LBP特征的计算,但没有提供一个单独的计算LBP特征的接口。也就是说OpenCV中使用了LBP算法,但是没有提供函数接口。
2.2 学习目标
- 了解人脸检测相关流程
- 理解LBP算法相关原理
- 掌握基于OpenCV的LBP算法实现
2.3 算法理论介绍
2.3.1 LBP原理介绍
LBP特征用图像的局部领域的联合分布 T T T 来描述图像的纹理特征,如果假设局部邻域中像素个数为 P ( P > 1 ) P(P >1) P(P>1),那么纹理特征的联合分布 T T T 可以表述成:
T = t ( g c , g 0 , … , g p − 1 ) p = 0 , … , P − 1 (2-1) T=t\left(g_{c}, g_{0}, \ldots, g_{p-1}\right) \quad p=0, \ldots, P-1\tag{2-1} T=t(gc,g0,…,gp−1)p=0,…,P−1(2-1)
其中, g c g_c gc 表示相应局部邻域的中心像素的灰度值, g p g_p gp 表示以中心像素圆心,以R为半径的圆上的像素的灰度值。
假设中心像素和局部邻域像素相互独立,那么这里可以将上面定义式写成如下形式:
T = t ( g c , g 0 − g c , … , g p − 1 − g c ) p = 0 , … , P − 1 ≈ t ( g c ) t ( g 0 − g c , … , g p − 1 − g c ) (2-2) \begin{aligned} T &=t\left(g_{c}, g_{0}-g_{c}, \ldots, g_{p-1}-g_{c}\right) \quad p=0, \ldots, P-1 \ & \approx t\left(g_{c}\right) t\left(g_{0}-g_{c}, \ldots, g_{p-1}-g_{c}\right) \end{aligned}\tag{2-2} T=t(gc,g0−gc,…,gp−1−gc)p=0,…,P−1 ≈t(gc)t(g0−gc,…,gp−1−gc)(2-2)
其中 t ( g c ) t(g_c) t(gc)决定了局部区域的整体亮度,对于纹理特征,可以忽略这一项,最终得到:
T ≈ t ( g 0 − g c , … , g p − 1 − g c ) p = 0 , … , P − 1 (2-3) T \approx t\left(g_{0}-g_{c}, \ldots, g_{p-1}-g_{c}\right) \quad p=0, \ldots, P-1\tag{2-3} T≈t(g0−gc,…,gp−1−gc)p=0,…,P−1(2-3)
上式说明,将纹理特征定义为邻域像素和中心像素的差的联合分布函数,因为 g p − g c g_p − g_c gp−gc是基本不受亮度均值影响的,所以从上式可以看出,此时统计量T 是一个跟亮度均值,即灰度级无关的值。
最后定义特征函数如下: KaTeX parse error: Expected '}', got '\right' at position 184: …x<0 \end{array}\̲r̲i̲g̲h̲t̲. \end{array}\t…
定义灰度级不变LBP为:
L B P P , R = ∑ p = 0 P − 1 s ( g p − g c ) 2 p (2-5) L B P_{P, R}=\sum_{p=0}^{P-1} s\left(g_{p}-g_{c}\right) 2^{p}\tag{2-5} LBPP,R=p=0∑P−1s(gp−gc)2p(2-5)
即二进制编码公式。
通俗解释:
原始的LBP算子定义在像素 33 33 33的邻域内,以邻域中心像素为阈值,相邻的8个像素的灰度值与邻域中心的像素值进行比较,若周围像素大于中心像素值,则该像素点的位置被标记为1,否则为0。这样, 33 33 33邻域内的8个点经过比较可产生8为二进制数,将这8位二进制数依次排列形成一个二进制数字,这个二进制数字就是中心像素的LBP值,LBP值共有28种可能,因此LBP值有256种可能。中心像素的LBP值反映了该像素周围区域的纹理信息。
注意:计算LBP特征的图像必须是灰度图,如果是彩色图,需要先转换成灰度图
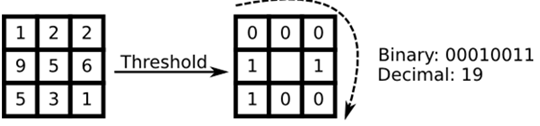
图 2.3.1 LBP计算示意图
2.3.2 圆形LBP算子
基本的 LBP算子的最大缺陷在于它只覆盖了一个固定半径范围内的小区域,这显然不能满足不同尺寸和频率纹理的需要。为了适应不同尺度的纹理特征,并达到灰度级和旋转不变性的要求,Ojala等对 LBP算子进行了改进,将 3×3邻域扩展到任意邻域,并用圆形邻域代替了正方形邻域,改进后的 LBP算子允许在半径为 R的圆形邻域内有任意多个像素点。从而得到了诸如半径为R的圆形区域内含有P个采样点的LBP算子,表示为
L
B
P
P
R
LBP^{R}_P
LBPPR;

图 2.3.2 圆形LBP示意图
对于给定中心点 ( x c , y c ) (x_c,y_c) (xc,yc),其邻域像素位置为 ( x p , y p ) (x_p,y_p) (xp,yp), p ∈ P p∈P p∈P,其采样点 ( x p , y p ) (x_p,y_p) (xp,yp)用如下公式计算:
x p = x c + Rcos ( 2 π p P ) y p = y c + Rsin ( 2 π p P ) (2-6) \begin{array}{l} x_{p}=x_{c}+\operatorname{Rcos}\left(\frac{2 \pi p}{P}\right) \ y_{p}=y_{c}+\operatorname{Rsin}\left(\frac{2 \pi p}{P}\right) \end{array}\tag{2-6} xp=xc+Rcos(P2πp) yp=yc+Rsin(P2πp)(2-6)
R是采样半径,p是第p个采样点,P是采样数目。如果近邻点不在整数位置上,就需要进行插值运算,可以参考这篇博客 OpenCV框架下的插值算法。
https://blog.csdn.net/weixin_39940512/article/details/105343418
3.3.3 LBP旋转不变性及等价模式
LPB特征是灰度不变,但不是旋转不变的,同一幅图像,进行旋转以后,其特征将会有很大的差别,影响匹配的精度。Ojala在LBP算法上,进行改进,实现了具有旋转不变性的LPB的特征。
实现方法:不断旋转圆形邻域得到一系列初始定义的LPB值,取最小值作为该邻域的值。
L B P P R r i = min ( R O R ( L B P P , R r i , i ) ∣ i = 0 , 1 , … , P − 1 ) (2-7) L B P_{P R}^{ri}=\min \left(R O R\left(L B P_{P, R}^{ri}, i\right) | i=0,1, \ldots, P-1\right)\tag{2-7} LBPPRri=min(ROR(LBPP,Rri,i)∣i=0,1,…,P−1)(2-7)
其中
L
B
P
P
R
r
i
L B P_{P R}^{ri}
LBPPRri表示具有旋转不变性的LBP特征。
R
O
R
(
x
,
i
)
ROR(x, i)
ROR(x,i)为旋转函数,表示将
x
x
x右循环
i
i
i位。

图 2.3.3 求取旋转不变的LPB特征示意图
等价模式:
一个LBP算子可以产生不同的二进制模式,对于 L B P p R LBP^{R}_p LBPpR将会产生 2 p 2^p 2p种模式。比如 7 ∗ 7 7*7 7∗7邻域内有 2 36 2^{36} 236种模式。如此多的二值模式对于信息的提取和识别都是不利的。
Ojala等认为,在实际图像中,绝大多数LPB模式最多只包含两次从1到0或从0到1的跳变。
等价模式:当某个局部二进制模式所对应的循环二进制数从0到1或从1到0最多有两次跳变时,该局部二进制模式所对应的二进制就称为一个等价模式。
比如:00000000,11111111,11110010,10111111都是等价模式。
检查某种模式是否是等价模式: U ( G p ) = ∣ s ( g p − 1 − g c ) − s ( g 0 − g c ) ∣ + ∑ p = 1 P − 1 ∣ s ( g p − g c ) − s ( g P − 1 − g c ) ∣ (2-8) U\left(G_{p}\right)=\left|s\left(g_{p_{-1}}-g_{c}\right)-s\left(g_{0}-g_{c}\right)\right|+\sum_{p=1}^{P_{-1}}\left|s\left(g_{p}-g_{c}\right)-s\left(g_{P-1}-g_{c}\right)\right|\tag{2-8} U(Gp)=∣s(gp−1−gc)−s(g0−gc)∣+p=1∑P−1∣s(gp−gc)−s(gP−1−gc)∣(2-8)
将其和其移动一位后的二进制模式按位相减。并绝对值求和。若U ( G p ) \left(G_{p}\right) (Gp) 小于等于2,则为等价模式。
混合模式:除了等价模式之外的称为混合模式。
改进后的LPB模式数由2
p
^{p}
p(p为邻域集内的采集点数 ) 降维为
p
∗
(
p
−
1
)
+
2
p*(p-1)+2
p∗(p−1)+2 。维数减少,可以降低高频噪声的影响。Ojala认为等价模式占总模式中的绝大数。图2.4 ( a ), ( b ), ( c )等价模式分别占88%,93%和76%。
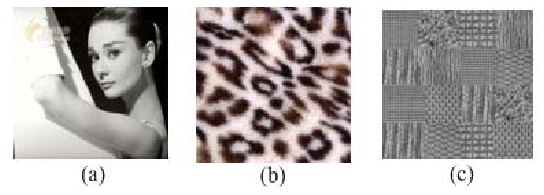
图 2.3.4
可以通过低通滤波的方法来增强等价模式所占的比例。图2.4( c )经过高斯滤波后,其等价模式所占比可以增加到90%。
2.3.4 人脸检测流程
人脸检测过程采用多尺度滑窗搜索方式,每个尺度通过一定步长截取大小为20x20的窗口,然后将窗口放到分类器中进行是不是人脸的判决,如果是人脸则该窗口通过所有分类器;反之,会在某一级分类器被排除。

图 2.3.5 人脸检测流程图
2.4 基于OpenCV的实现
python
使用OpenCV的LBP于预训练模型
将haarcascade_frontalface_default.xml下载至本地以方便调用,下载链接:
https://github.com/opencv/opencv/blob/master/data/lbpcascades/lbpcascade_frontalface_improved.xml
#coding:utf-8
import cv2 as cv

# 读取原始图像
img= cv.imread('*.png')
#face_detect = cv2.CascadeClassifier('haarcascade_frontalface_default.xml')

face_detect = cv.CascadeClassifier("lbpcascade_frontalface_improved.xml")
# 检测人脸
# 灰度处理
gray = cv.cvtColor(img, code=cv.COLOR_BGR2GRAY)

# 检查人脸 按照1.1倍放到 周围最小像素为5
face_zone = face_detect.detectMultiScale(gray, scaleFactor = 2, minNeighbors = 2) # maxSize = (55,55)
print ('识别人脸的信息:\n',face_zone)

# 绘制矩形和圆形检测人脸
for x, y, w, h in face_zone:
    # 绘制矩形人脸区域
    cv.rectangle(img, pt1 = (x, y), pt2 = (x+w, y+h), color = [0,0,255], thickness=2)
    # 绘制圆形人脸区域 radius表示半径
    cv.circle(img, center = (x + w//2, y + h//2), radius = w//2, color = [0,255,0], thickness = 2)

# 设置图片可以手动调节大小
cv.namedWindow("Easmount-CSDN", 0)

# 显示图片
cv.imshow("Easmount-CSDN", img)

# 等待显示 设置任意键退出程序
cv.waitKey(0)
cv.destroyAllWindows()
lbpcascade_frontalface_improved.xml的文件下载GitHub地址:
https://github.com/opencv/opencv/tree/master/data/lbpcascades
存在问题及解决方案:
1、error:(-215:Assertion failed) !empty() in function ‘cv::CascadeClassifier::detectMultiScale’
解决方案:https://blog.csdn.net/qq_20156437/article/details/80702022
2、error:‘cv2.CascadeClassifier’’ returned a result with an error set
解决方案:
https://blog.csdn.net/qq_42621977/article/details/89315619
参考博客链接:
https://blog.csdn.net/yuanlulu/article/details/80706305
C++代码实现如下:
uchar GetMinBinary(uchar *binary)
{
	// 计算8个二进制
	uchar LBPValue[8] = { 0 };
	for (int i = 0; i <= 7; ++i)
	{
		LBPValue[0] += binary[i] << (7 - i);
		LBPValue[1] += binary[(i + 7) % 8] << (7 - i);
		LBPValue[2] += binary[(i + 6) % 8] << (7 - i);
		LBPValue[3] += binary[(i + 5) % 8] << (7 - i);
		LBPValue[4] += binary[(i + 4) % 8] << (7 - i);
		LBPValue[5] += binary[(i + 3) % 8] << (7 - i);
		LBPValue[6] += binary[(i + 2) % 8] << (7 - i);
		LBPValue[7] += binary[(i + 1) % 8] << (7 - i);
	}
	// 选择最小的
	uchar minValue = LBPValue[0];
	for (int i = 1; i <= 7; ++i)
	{
		if (LBPValue[i] < minValue)
		{
			minValue = LBPValue[i];
		}
	}

	return minValue;
}

//计算9种等价模式
int ComputeValue9(int value58)
{
	int value9 = 0;
	switch (value58)
	{
	case 1:
		value9 = 1;
		break;
	case 2:
		value9 = 2;
		break;
	case 4:
		value9 = 3;
		break;
	case 7:
		value9 = 4;
		break;
	case 11:
		value9 = 5;
		break;
	case 16:
		value9 = 6;
		break;
	case 22:
		value9 = 7;
		break;
	case 29:
		value9 = 8;
		break;
	case 58:
		value9 = 9;
		break;
	}
	return value9;
}

//灰度不变常规LBP(256)
void NormalLBPImage(const Mat &srcImage, Mat &LBPImage)
{
	CV_Assert(srcImage.depth() == CV_8U && srcImage.channels() == 1);
	LBPImage.create(srcImage.size(), srcImage.type());


	Mat extendedImage;
	copyMakeBorder(srcImage, extendedImage, 1, 1, 1, 1, BORDER_DEFAULT);

	// 计算LBP特征图
	int heightOfExtendedImage = extendedImage.rows;
	int widthOfExtendedImage = extendedImage.cols;
	int widthOfLBP = LBPImage.cols;
	uchar *rowOfExtendedImage = extendedImage.data + widthOfExtendedImage + 1;
	uchar *rowOfLBPImage = LBPImage.data;
	for (int y = 1; y <= heightOfExtendedImage - 2; ++y, rowOfExtendedImage += widthOfExtendedImage, rowOfLBPImage += widthOfLBP)
	{
		// 列
		uchar *colOfExtendedImage = rowOfExtendedImage;
		uchar *colOfLBPImage = rowOfLBPImage;
		for (int x = 1; x <= widthOfExtendedImage - 2; ++x, ++colOfExtendedImage, ++colOfLBPImage)
		{
			// 计算LBP值
			int LBPValue = 0;
			if (colOfExtendedImage[0 - widthOfExtendedImage - 1] >= colOfExtendedImage[0])
				LBPValue += 128;
			if (colOfExtendedImage[0 - widthOfExtendedImage] >= colOfExtendedImage[0])
				LBPValue += 64;
			if (colOfExtendedImage[0 - widthOfExtendedImage + 1] >= colOfExtendedImage[0])
				LBPValue += 32;
			if (colOfExtendedImage[0 + 1] >= colOfExtendedImage[0])
				LBPValue += 16;
			if (colOfExtendedImage[0 + widthOfExtendedImage + 1] >= colOfExtendedImage[0])
				LBPValue += 8;
			if (colOfExtendedImage[0 + widthOfExtendedImage] >= colOfExtendedImage[0])
				LBPValue += 4;
			if (colOfExtendedImage[0 + widthOfExtendedImage - 1] >= colOfExtendedImage[0])
				LBPValue += 2;
			if (colOfExtendedImage[0 - 1] >= colOfExtendedImage[0])
				LBPValue += 1;
			colOfLBPImage[0] = LBPValue;
		}
	}
}
// 等价灰度不变LBP(58)
void UniformNormalLBPImage(const Mat &srcImage, Mat &LBPImage)// 计算等价模式LBP特征图
{
	// 参数检查,内存分配
	CV_Assert(srcImage.depth() == CV_8U && srcImage.channels() == 1);
	LBPImage.create(srcImage.size(), srcImage.type());

	// 计算LBP图
	// 扩充原图像边界,便于边界处理
	Mat extendedImage;
	copyMakeBorder(srcImage, extendedImage, 1, 1, 1, 1, BORDER_DEFAULT);

	// 构建LBP 等价模式查找表
	//int table[256];
	//BuildUniformPatternTable(table);

	// LUT(256种每一种模式对应的等价模式)
	static const int table[256] = { 1, 2, 3, 4, 5, 0, 6, 7, 8, 0, 0, 0, 9, 0, 10, 11, 12, 0, 0, 0, 0, 0, 0, 0, 13, 0, 0, 0, 14, 0, 15, 16, 17, 0, 0, 0,
		0, 0, 0, 0, 0, 0, 0, 0, 0, 0, 0, 0, 18, 0, 0, 0, 0, 0, 0, 0, 19, 0, 0, 0, 20, 0, 21, 22, 23, 0, 0, 0, 0, 0, 0, 0, 0,
		0, 0, 0, 0, 0, 0, 0, 0, 0, 0, 0, 0, 0, 0, 0, 0, 0, 0, 0, 0, 0, 0, 0, 24, 0, 0, 0, 0, 0, 0, 0, 0, 0, 0, 0, 0, 0, 0, 0, 25,
		0, 0, 0, 0, 0, 0, 0, 26, 0, 0, 0, 27, 0, 28, 29, 30, 31, 0, 32, 0, 0, 0, 33, 0, 0, 0, 0, 0, 0, 0, 34, 0, 0, 0, 0
		, 0, 0, 0, 0, 0, 0, 0, 0, 0, 0, 0, 35, 0, 0, 0, 0, 0, 0, 0, 0, 0, 0, 0, 0, 0, 0, 0, 0, 0, 0, 0, 0, 0, 0, 0, 0, 0, 0, 0,
		0, 0, 0, 0, 36, 37, 38, 0, 39, 0, 0, 0, 40, 0, 0, 0, 0, 0, 0, 0, 41, 0, 0, 0, 0, 0, 0, 0, 0, 0, 0, 0, 0, 0, 0, 0, 42
		, 43, 44, 0, 45, 0, 0, 0, 46, 0, 0, 0, 0, 0, 0, 0, 47, 48, 49, 0, 50, 0, 0, 0, 51, 52, 53, 0, 54, 55, 56, 57, 58 };

	// 计算LBP
	int heightOfExtendedImage = extendedImage.rows;
	int widthOfExtendedImage = extendedImage.cols;
	int widthOfLBP = LBPImage.cols;
	uchar *rowOfExtendedImage = extendedImage.data + widthOfExtendedImage + 1;
	uchar *rowOfLBPImage = LBPImage.data;
	for (int y = 1; y <= heightOfExtendedImage - 2; ++y, rowOfExtendedImage += widthOfExtendedImage, rowOfLBPImage += widthOfLBP)
	{
		// 列
		uchar *colOfExtendedImage = rowOfExtendedImage;
		uchar *colOfLBPImage = rowOfLBPImage;
		for (int x = 1; x <= widthOfExtendedImage - 2; ++x, ++colOfExtendedImage, ++colOfLBPImage)
		{
			// 计算LBP值
			int LBPValue = 0;
			if (colOfExtendedImage[0 - widthOfExtendedImage - 1] >= colOfExtendedImage[0])
				LBPValue += 128;
			if (colOfExtendedImage[0 - widthOfExtendedImage] >= colOfExtendedImage[0])
				LBPValue += 64;
			if (colOfExtendedImage[0 - widthOfExtendedImage + 1] >= colOfExtendedImage[0])
				LBPValue += 32;
			if (colOfExtendedImage[0 + 1] >= colOfExtendedImage[0])
				LBPValue += 16;
			if (colOfExtendedImage[0 + widthOfExtendedImage + 1] >= colOfExtendedImage[0])
				LBPValue += 8;
			if (colOfExtendedImage[0 + widthOfExtendedImage] >= colOfExtendedImage[0])
				LBPValue += 4;
			if (colOfExtendedImage[0 + widthOfExtendedImage - 1] >= colOfExtendedImage[0])
				LBPValue += 2;
			if (colOfExtendedImage[0 - 1] >= colOfExtendedImage[0])
				LBPValue += 1;

			colOfLBPImage[0] = table[LBPValue];
		}
	}
}

// 等价旋转不变LBP(9)
void UniformRotInvLBPImage(const Mat &srcImage, Mat &LBPImage)
{
	// 参数检查,内存分配
	CV_Assert(srcImage.depth() == CV_8U && srcImage.channels() == 1);
	LBPImage.create(srcImage.size(), srcImage.type());

	// 扩充图像,处理边界情况
	Mat extendedImage;
	copyMakeBorder(srcImage, extendedImage, 1, 1, 1, 1, BORDER_DEFAULT);

	// 构建LBP 等价模式查找表
	//int table[256];
	//BuildUniformPatternTable(table);

	// 通过查找表
	static const int table[256] = { 1, 2, 3, 4, 5, 0, 6, 7, 8, 0, 0, 0, 9, 0, 10, 11, 12, 0, 0, 0, 0, 0, 0, 0, 13, 0, 0, 0, 14, 0, 15, 16, 17, 0, 0, 0,
		0, 0, 0, 0, 0, 0, 0, 0, 0, 0, 0, 0, 18, 0, 0, 0, 0, 0, 0, 0, 19, 0, 0, 0, 20, 0, 21, 22, 23, 0, 0, 0, 0, 0, 0, 0, 0,
		0, 0, 0, 0, 0, 0, 0, 0, 0, 0, 0, 0, 0, 0, 0, 0, 0, 0, 0, 0, 0, 0, 0, 24, 0, 0, 0, 0, 0, 0, 0, 0, 0, 0, 0, 0, 0, 0, 0, 25,
		0, 0, 0, 0, 0, 0, 0, 26, 0, 0, 0, 27, 0, 28, 29, 30, 31, 0, 32, 0, 0, 0, 33, 0, 0, 0, 0, 0, 0, 0, 34, 0, 0, 0, 0
		, 0, 0, 0, 0, 0, 0, 0, 0, 0, 0, 0, 35, 0, 0, 0, 0, 0, 0, 0, 0, 0, 0, 0, 0, 0, 0, 0, 0, 0, 0, 0, 0, 0, 0, 0, 0, 0, 0, 0,
		0, 0, 0, 0, 36, 37, 38, 0, 39, 0, 0, 0, 40, 0, 0, 0, 0, 0, 0, 0, 41, 0, 0, 0, 0, 0, 0, 0, 0, 0, 0, 0, 0, 0, 0, 0, 42
		, 43, 44, 0, 45, 0, 0, 0, 46, 0, 0, 0, 0, 0, 0, 0, 47, 48, 49, 0, 50, 0, 0, 0, 51, 52, 53, 0, 54, 55, 56, 57, 58 };

	uchar binary[8] = { 0 };// 记录每个像素的LBP值
	int heigthOfExtendedImage = extendedImage.rows;
	int widthOfExtendedImage = extendedImage.cols;
	int widthOfLBPImage = LBPImage.cols;

	uchar *rowOfExtendedImage = extendedImage.data + widthOfExtendedImage + 1;
	uchar *rowOfLBPImage = LBPImage.data;
	for (int y = 1; y <= heigthOfExtendedImage - 2; ++y, rowOfExtendedImage += widthOfExtendedImage, rowOfLBPImage += widthOfLBPImage)
	{
		// 列
		uchar *colOfExtendedImage = rowOfExtendedImage;
		uchar *colOfLBPImage = rowOfLBPImage;
		for (int x = 1; x <= widthOfExtendedImage - 2; ++x, ++colOfExtendedImage, ++colOfLBPImage)
		{
			// 计算旋转不变LBP(最小的二进制模式)
			binary[0] = colOfExtendedImage[0 - widthOfExtendedImage - 1] >= colOfExtendedImage[0] ? 1 : 0;
			binary[1] = colOfExtendedImage[0 - widthOfExtendedImage] >= colOfExtendedImage[0] ? 1 : 0;
			binary[2] = colOfExtendedImage[0 - widthOfExtendedImage + 1] >= colOfExtendedImage[0] ? 1 : 0;
			binary[3] = colOfExtendedImage[0 + 1] >= colOfExtendedImage[0] ? 1 : 0;
			binary[4] = colOfExtendedImage[0 + widthOfExtendedImage + 1] >= colOfExtendedImage[0] ? 1 : 0;
			binary[5] = colOfExtendedImage[0 + widthOfExtendedImage] >= colOfExtendedImage[0] ? 1 : 0;
			binary[6] = colOfExtendedImage[0 + widthOfExtendedImage - 1] >= colOfExtendedImage[0] ? 1 : 0;
			binary[7] = colOfExtendedImage[0 - 1] >= colOfExtendedImage[0] ? 1 : 0;
			int minValue = GetMinBinary(binary);
			// 计算58种等价模式LBP
			int value58 = table[minValue];
			// 计算9种等价模式
			colOfLBPImage[0] = ComputeValue9(value58);
		}
	}
}
//灰度不变常规LBP(256)特征
void NormalLBPFeature(const Mat &srcImage, Size cellSize, Mat &featureVector)
{
	// 参数检查,内存分配
	CV_Assert(srcImage.depth() == CV_8U && srcImage.channels() == 1);
	Mat LBPImage;
	NormalLBPImage(srcImage, LBPImage);
	// 计算cell个数
	int widthOfCell = cellSize.width;
	int heightOfCell = cellSize.height;
	int numberOfCell_X = srcImage.cols / widthOfCell;// X方向cell的个数
	int numberOfCell_Y = srcImage.rows / heightOfCell;

	// 特征向量的个数
	int numberOfDimension = 256 * numberOfCell_X*numberOfCell_Y;
	featureVector.create(1, numberOfDimension, CV_32FC1);
	featureVector.setTo(Scalar(0));

	// 计算LBP特征向量
	int stepOfCell = srcImage.cols;
	int pixelCount = cellSize.width*cellSize.height;
	float *dataOfFeatureVector = (float *)featureVector.data;

	// cell的特征向量在最终特征向量中的起始位置
	int index = -256;
	for (int y = 0; y <= numberOfCell_Y - 1; ++y)
	{
		for (int x = 0; x <= numberOfCell_X - 1; ++x)
		{
			index += 256;
			// 计算每个cell的LBP直方图
			Mat cell = LBPImage(Rect(x * widthOfCell, y * heightOfCell, widthOfCell, heightOfCell));
			uchar *rowOfCell = cell.data;
			for (int y_Cell = 0; y_Cell <= cell.rows - 1; ++y_Cell, rowOfCell += stepOfCell)
			{
				uchar *colOfCell = rowOfCell;
				for (int x_Cell = 0; x_Cell <= cell.cols - 1; ++x_Cell, ++colOfCell)
				{
					++dataOfFeatureVector[index + colOfCell[0]];
				}
			}

			// 一定要归一化!否则分类器计算误差很大
			for (int i = 0; i <= 255; ++i)
				dataOfFeatureVector[index + i] /= pixelCount;
		}
	}
}
// 等价灰度不变LBP(58)特征
void UniformNormalLBPFeature(const Mat &srcImage, Size cellSize, Mat &featureVector)
{
	// 参数检查,内存分配
	CV_Assert(srcImage.depth() == CV_8U && srcImage.channels() == 1);

	Mat LBPImage;
	UniformNormalLBPImage(srcImage, LBPImage);

	// 计算cell个数
	int widthOfCell = cellSize.width;
	int heightOfCell = cellSize.height;
	int numberOfCell_X = srcImage.cols / widthOfCell;// X方向cell的个数
	int numberOfCell_Y = srcImage.rows / heightOfCell;

	// 特征向量的个数
	int numberOfDimension = 58 * numberOfCell_X*numberOfCell_Y;
	featureVector.create(1, numberOfDimension, CV_32FC1);
	featureVector.setTo(Scalar(0));

	// 计算LBP特征向量
	int stepOfCell = srcImage.cols;
	int index = -58;// cell的特征向量在最终特征向量中的起始位置
	float *dataOfFeatureVector = (float *)featureVector.data;
	for (int y = 0; y <= numberOfCell_Y - 1; ++y)
	{
		for (int x = 0; x <= numberOfCell_X - 1; ++x)
		{
			index += 58;

			// 计算每个cell的LBP直方图
			Mat cell = LBPImage(Rect(x * widthOfCell, y * heightOfCell, widthOfCell, heightOfCell));
			uchar *rowOfCell = cell.data;
			int sum = 0; // 每个cell的等价模式总数
			for (int y_Cell = 0; y_Cell <= cell.rows - 1; ++y_Cell, rowOfCell += stepOfCell)
			{
				uchar *colOfCell = rowOfCell;
				for (int x_Cell = 0; x_Cell <= cell.cols - 1; ++x_Cell, ++colOfCell)
				{
					if (colOfCell[0] != 0)
					{
						// 在直方图中转化为0~57,所以是colOfCell[0] - 1
						++dataOfFeatureVector[index + colOfCell[0] - 1];
						++sum;
					}
				}
			}
			// 一定要归一化!否则分类器计算误差很大
			for (int i = 0; i <= 57; ++i)
				dataOfFeatureVector[index + i] /= sum;
		}
	}
}
// 等价旋转不变LBP(9)特征
void UniformRotInvLBPFeature(const Mat &srcImage, Size cellSize, Mat &featureVector)
{
	// 参数检查,内存分配
	CV_Assert(srcImage.depth() == CV_8U && srcImage.channels() == 1);

	Mat LBPImage;
	UniformRotInvLBPImage(srcImage, LBPImage);

	// 计算cell个数
	int widthOfCell = cellSize.width;
	int heightOfCell = cellSize.height;
	int numberOfCell_X = srcImage.cols / widthOfCell;// X方向cell的个数
	int numberOfCell_Y = srcImage.rows / heightOfCell;

	// 特征向量的个数
	int numberOfDimension = 9 * numberOfCell_X*numberOfCell_Y;
	featureVector.create(1, numberOfDimension, CV_32FC1);
	featureVector.setTo(Scalar(0));

	// 计算LBP特征向量
	int stepOfCell = srcImage.cols;
	int index = -9;// cell的特征向量在最终特征向量中的起始位置
	float *dataOfFeatureVector = (float *)featureVector.data;
	for (int y = 0; y <= numberOfCell_Y - 1; ++y)
	{
		for (int x = 0; x <= numberOfCell_X - 1; ++x)
		{
			index += 9;

			// 计算每个cell的LBP直方图
			Mat cell = LBPImage(Rect(x * widthOfCell, y * heightOfCell, widthOfCell, heightOfCell));
			uchar *rowOfCell = cell.data;
			int sum = 0; // 每个cell的等价模式总数
			for (int y_Cell = 0; y_Cell <= cell.rows - 1; ++y_Cell, rowOfCell += stepOfCell)
			{
				uchar *colOfCell = rowOfCell;
				for (int x_Cell = 0; x_Cell <= cell.cols - 1; ++x_Cell, ++colOfCell)
				{
					if (colOfCell[0] != 0)
					{
						// 在直方图中转化为0~8,所以是colOfCell[0] - 1
						++dataOfFeatureVector[index + colOfCell[0] - 1];
						++sum;
					}
				}
			}
			// 直方图归一化
			for (int i = 0; i <= 8; ++i)
				dataOfFeatureVector[index + i] /= sum;
		}
	}
}
2.5 总结
LBP曾广泛应用于人脸检测及人脸识别应用中,但在深度学习与卷积神将网络迅猛发展的今天,以LBP为特征的检测及识别算法并不具有竞争力,但是作为学习案例还是很有借鉴意义的,后续也会陆续写一些基于深度学习的人脸检测、人脸识别算法的博客,可以继续关注。


 1341
1341


 被折叠的 条评论
为什么被折叠?
被折叠的 条评论
为什么被折叠?
 到【灌水乐园】发言


