


一 项目搭建
1:springboot搭建
1.1 导入基本依赖

注意这里版本使用2.5.1,而非2.6.6

1.2 pom中引入依赖
引入kaptcha
 <dependency>
            <groupId>com.github.penggle</groupId>
            <artifactId>kaptcha</artifactId>
            <version>2.3.2</version>
            <exclusions>
                <exclusion>
                    <artifactId>javax.servlet-api</artifactId>
                    <groupId>javax.servlet</groupId>
                </exclusion>
            </exclusions>
        </dependency>
1.3 完整的Pom依赖文件
<?xml version="1.0" encoding="UTF-8"?>
<project xmlns="http://maven.apache.org/POM/4.0.0" xmlns:xsi="http://www.w3.org/2001/XMLSchema-instance"
         xsi:schemaLocation="http://maven.apache.org/POM/4.0.0 https://maven.apache.org/xsd/maven-4.0.0.xsd">
    <modelVersion>4.0.0</modelVersion>
    <parent>
        <groupId>org.springframework.boot</groupId>
        <artifactId>spring-boot-starter-parent</artifactId>
        <version>2.5.1</version>
        <relativePath/> <!-- lookup parent from repository -->
    </parent>
    <groupId>com.example</groupId>
    <artifactId>code</artifactId>
    <version>0.0.1-SNAPSHOT</version>
    <name>code</name>
    <description>Demo project for Spring Boot</description>
    <properties>
        <java.version>1.8</java.version>
    </properties>
    <dependencies>
        <dependency>
            <groupId>org.springframework.boot</groupId>
            <artifactId>spring-boot-starter-data-redis</artifactId>
        </dependency>
        <dependency>
            <groupId>org.springframework.boot</groupId>
            <artifactId>spring-boot-starter-web</artifactId>
        </dependency>
        <dependency>
            <groupId>com.alibaba</groupId>
            <artifactId>fastjson</artifactId>
            <version>1.2.79</version>
        </dependency>
        <dependency>
            <groupId>org.apache.commons</groupId>
            <artifactId>commons-pool2</artifactId>
        </dependency>
        <dependency>
            <groupId>mysql</groupId>
            <artifactId>mysql-connector-java</artifactId>
            <scope>runtime</scope>
        </dependency>
        <dependency>
            <groupId>org.projectlombok</groupId>
            <artifactId>lombok</artifactId>
            <optional>true</optional>
        </dependency>
        <dependency>
            <groupId>org.springframework.boot</groupId>
            <artifactId>spring-boot-starter-test</artifactId>
            <scope>test</scope>
        </dependency>
        <dependency>
            <groupId>com.github.penggle</groupId>
            <artifactId>kaptcha</artifactId>
            <version>2.3.2</version>
            <exclusions>
                <exclusion>
                    <artifactId>javax.servlet-api</artifactId>
                    <groupId>javax.servlet</groupId>
                </exclusion>
            </exclusions>
        </dependency>
    </dependencies>
</project>
1.4 配置yml文件
server:
  port: 8082 # VUE前端端口是8080,我们这里设置为8082
spring:
  redis:
    # 地址
    host: 你自己的IP
    # 端口,默认为6379
    port: 6379
    # 数据库索引
    database: 0
    # 密码
    password: 你自己的密码
    # 连接超时时间
    timeout: 10s
    # 使用lettuce链接方式
    lettuce:
      pool:
        # 连接池中的最小空闲连接
        min-idle: 0
        # 连接池中的最大空闲连接
        max-idle: 8
        # 连接池的最大数据库连接数
        max-active: 8
        # #连接池最大阻塞等待时间(使用负值表示没有限制)
        max-wait: -1ms
1.5 编写Redis配置类

主要思路是:
1:在后端生成的验证码 要以 key-value的形式保存到redis中,将key和value保存一并发送给前端。
下列代码在后续案例中,将使用springsecurity进行验证。
2:vue前端点击登录后,将Key和验证码发送给后端
3:后端通过key 从redis中获取验证码,如果正确向下处理,不正确,返回给login.Vue中
下列代码是我从rouyi中粘贴过来的,有兴趣的可以研究,一般都是复制就OK了
RedisConfig类
package com.example.code.config;

import com.fasterxml.jackson.annotation.JsonAutoDetect;
import com.fasterxml.jackson.annotation.JsonTypeInfo;
import com.fasterxml.jackson.annotation.PropertyAccessor;
import com.fasterxml.jackson.databind.ObjectMapper;
import com.fasterxml.jackson.databind.jsontype.impl.LaissezFaireSubTypeValidator;
import org.springframework.cache.annotation.CachingConfigurerSupport;
import org.springframework.cache.annotation.EnableCaching;
import org.springframework.context.annotation.Bean;
import org.springframework.context.annotation.Configuration;
import org.springframework.data.redis.connection.RedisConnectionFactory;
import org.springframework.data.redis.core.RedisTemplate;
import org.springframework.data.redis.core.script.DefaultRedisScript;
import org.springframework.data.redis.serializer.StringRedisSerializer;

/**
 * redis配置
 *
 * @author ruoyi
 */
@Configuration
@EnableCaching
public class RedisConfig extends CachingConfigurerSupport
{
    @Bean
    @SuppressWarnings(value = { "unchecked", "rawtypes" })
    public RedisTemplate<Object, Object> redisTemplate(RedisConnectionFactory connectionFactory)
    {
        RedisTemplate<Object, Object> template = new RedisTemplate<>();
        template.setConnectionFactory(connectionFactory);

        FastJson2JsonRedisSerializer serializer = new FastJson2JsonRedisSerializer(Object.class);

        ObjectMapper mapper = new ObjectMapper();
        mapper.setVisibility(PropertyAccessor.ALL, JsonAutoDetect.Visibility.ANY);
        mapper.activateDefaultTyping(LaissezFaireSubTypeValidator.instance, ObjectMapper.DefaultTyping.NON_FINAL, JsonTypeInfo.As.PROPERTY);
        serializer.setObjectMapper(mapper);

        // 使用StringRedisSerializer来序列化和反序列化redis的key值
        template.setKeySerializer(new StringRedisSerializer());
        template.setValueSerializer(serializer);

        // Hash的key也采用StringRedisSerializer的序列化方式
        template.setHashKeySerializer(new StringRedisSerializer());
        template.setHashValueSerializer(serializer);

        template.afterPropertiesSet();
        return template;
    }

    @Bean
    public DefaultRedisScript<Long> limitScript()
    {
        DefaultRedisScript<Long> redisScript = new DefaultRedisScript<>();
        redisScript.setScriptText(limitScriptText());
        redisScript.setResultType(Long.class);
        return redisScript;
    }

    /**
     * 限流脚本
     */
    private String limitScriptText()
    {
        return "local key = KEYS[1]\n" +
                "local count = tonumber(ARGV[1])\n" +
                "local time = tonumber(ARGV[2])\n" +
                "local current = redis.call('get', key);\n" +
                "if current and tonumber(current) > count then\n" +
                "    return tonumber(current);\n" +
                "end\n" +
                "current = redis.call('incr', key)\n" +
                "if tonumber(current) == 1 then\n" +
                "    redis.call('expire', key, time)\n" +
                "end\n" +
                "return tonumber(current);";
    }
}
FastJson2JsonRedisSerializer
package com.example.code.config;

import com.alibaba.fastjson.JSON;
import com.alibaba.fastjson.parser.ParserConfig;
import com.alibaba.fastjson.serializer.SerializerFeature;
import com.fasterxml.jackson.databind.JavaType;
import com.fasterxml.jackson.databind.ObjectMapper;
import com.fasterxml.jackson.databind.type.TypeFactory;
import org.springframework.data.redis.serializer.RedisSerializer;
import org.springframework.data.redis.serializer.SerializationException;
import org.springframework.util.Assert;

import java.nio.charset.Charset;

/**
 * Redis使用FastJson序列化
 *
 * @author ruoyi
 */
public class FastJson2JsonRedisSerializer<T> implements RedisSerializer<T>
{
    @SuppressWarnings("unused")
    private ObjectMapper objectMapper = new ObjectMapper();

    public static final Charset DEFAULT_CHARSET = Charset.forName("UTF-8");

    private Class<T> clazz;

    static
    {
        ParserConfig.getGlobalInstance().setAutoTypeSupport(true);
    }

    public FastJson2JsonRedisSerializer(Class<T> clazz)
    {
        super();
        this.clazz = clazz;
    }

    @Override
    public byte[] serialize(T t) throws SerializationException
    {
        if (t == null)
        {
            return new byte[0];
        }
        return JSON.toJSONString(t, SerializerFeature.WriteClassName).getBytes(DEFAULT_CHARSET);
    }

    @Override
    public T deserialize(byte[] bytes) throws SerializationException
    {
        if (bytes == null || bytes.length <= 0)
        {
            return null;
        }
        String str = new String(bytes, DEFAULT_CHARSET);

        return JSON.parseObject(str, clazz);
    }

    public void setObjectMapper(ObjectMapper objectMapper)
    {
        Assert.notNull(objectMapper, "'objectMapper' must not be null");
        this.objectMapper = objectMapper;
    }

    protected JavaType getJavaType(Class<?> clazz)
    {
        return TypeFactory.defaultInstance().constructType(clazz);
    }
}
1.6 编写跨域请求的配置类
我们前台使用的是vue,两个不同的主机地址,所以这个地方必须设置跨域请求,否则会阻拦请求
package com.example.code.config;

import org.springframework.context.annotation.Bean;
import org.springframework.context.annotation.Configuration;
import org.springframework.web.cors.CorsConfiguration;
import org.springframework.web.cors.UrlBasedCorsConfigurationSource;
import org.springframework.web.filter.CorsFilter;
import org.springframework.web.servlet.config.annotation.CorsRegistry;
import org.springframework.web.servlet.config.annotation.WebMvcConfigurer;

@Configuration
public class CorsConfig implements WebMvcConfigurer {
    private CorsConfiguration buildConfig() {
        CorsConfiguration corsConfiguration = new CorsConfiguration();
        corsConfiguration.addAllowedOrigin("*");
        corsConfiguration.addAllowedHeader("*");
        corsConfiguration.addAllowedMethod("*");
        corsConfiguration.addExposedHeader("Authorization");
        return corsConfiguration;
    }

    /**
     * 跨域过滤器
     */
    @Bean
    public CorsFilter corsFilter() {
        UrlBasedCorsConfigurationSource source = new UrlBasedCorsConfigurationSource();
        source.registerCorsConfiguration("/**", buildConfig());
        return new CorsFilter(source);
    }
    @Override
    public void addCorsMappings(CorsRegistry corsRegistry){
        corsRegistry.addMapping("/**").exposedHeaders("Authorization")
                .allowedOrigins("*")
                .allowedMethods("GET","POST","PUT","DELETE")
                .maxAge(3600);
    }
}
2:vue前端搭建
该项目 node版本 node-v14.17.6-x64 (1)
vue2版本

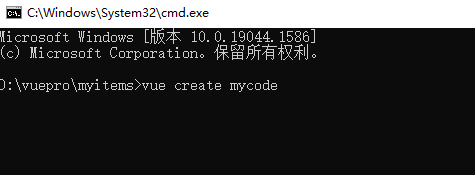
创建项目目录,在高亮处,输入cmd按回车
输入 vue create myblog命令 创建vue项目
2.1 选择手动设置

2.2 按图示选择

tips
选择方式:
上下箭头 将光标调到选择项
点击 space箭头选择 (显示 * 代表选中)
选择VUE2.x版本

选择完该项,后一项提示你是否保存,选择n 即可。回车后,再按回车键开始安装项目所有依赖

如图所示 mycode是你的项目名称,使用npm run serve 运行项目
2.3 安装element
如图所示 打开项目文件夹

如图所示,安装element
npm i element-ui -S

2.4 将element导入到项目中
如下如图:打开main.js,引入如下element代码
import ElementUI from 'element-ui';

import 'element-ui/lib/theme-chalk/index.css';

Vue.use(ElementUI);

2.5 导入axios
如下图:输入命令 npm install --save axios vue-axios

同导入element一样,在main.js中导入axios组件
import axios from 'axios'
import VueAxios from 'vue-axios'
Vue.use(VueAxios, axios)
main.js中的完整代码
import Vue from 'vue'
import App from './App.vue'
import router from './router'
import store from './store'
import ElementUI from 'element-ui';
import 'element-ui/lib/theme-chalk/index.css';
import axios from 'axios'
import VueAxios from 'vue-axios'
Vue.config.productionTip = false
Vue.use(VueAxios, axios)
Vue.use(ElementUI);
new Vue({
  router,
  store,
  render: h => h(App)
}).$mount('#app')
将红框内的文件 删除,不删除也没事,就是留着多余的 感觉不爽。
2.5 删除修改无用文件
2.5.1 删除文件
分别是:
public: index.html

src/component: HelloWord.vue

src/views: About.vue  Homr.vue

2.5.2 修改App.vue文件
删除红框代码

完整App.Vue代码
<template>
  <div id="app">
    <router-view/>
  </div>
</template>

<style>
#app {
  font-family: Avenir, Helvetica, Arial, sans-serif;
  -webkit-font-smoothing: antialiased;
  -moz-osx-font-smoothing: grayscale;
  text-align: center;
  color: #2c3e50;
}

</style>
2.6 创建Login和Admin组件
再 view文件夹中创建Login.vue 和 Admin.vue,临时创建,看看项目能否正常启动
<template>
    <div class="login">
        this is login
    </div>
</template>
<script>
export default {

}
</script>
2.7 配置路由
import Vue from 'vue'
import VueRouter from 'vue-router'
import Login from '../views/Login.vue' //使用预加载Login视图组件
Vue.use(VueRouter)

const routes = [
  {
    path: '/',
    name: 'Login',
    component: Login
  },
  {
    path: '/admin',
    name: 'Admin',
    component: () => import('../views/Admin.vue') // 懒加载Admin组件
  }
]

const router = new VueRouter({
  mode: 'history',
  base: process.env.BASE_URL,
  routes
})

export default router
2.8 项目运行测试
在终端中启动项目
npm run serve

3 使用element编写登录界面,
login.vue代码
页面布局自己处理,可以直接拷贝下面的代码,也可以到element form表单项拷贝代码,
<template>
    <div class="login">
        <el-row type="flex" class="row-bg" justify="center">
            <el-col :span="24" class="loginform">
                <h2>验证码代码</h2>
                <div class="loginform">

                    <el-form :model="ruleForm" :rules="rules" ref="ruleForm" label-width="100px" class="demo-ruleForm">
                        <el-form-item label="姓名" prop="name" >
                            <el-input v-model="ruleForm.username" style="width:100%"></el-input>
                        </el-form-item>
                        <el-form-item label="密码" prop="name" >
                            <el-input v-model="ruleForm.password" style="width:100%"></el-input>
                        </el-form-item>
                        <el-form-item label="验证码" prop="name" >
                        <!--  关键在这里,要留出填写验证码 和 显示capImg图片的位置 -->
                            <el-input v-model="ruleForm.code" style="width:45%"></el-input>
                            <!-- 在这调用验证码图片 -->
                            <el-image :src="capImg" style="width:54%;float:right"></el-image>
                        </el-form-item>

                        <el-form-item>
                            <el-button type="primary" @click="submitForm('ruleForm')">立即创建</el-button>
                        </el-form-item>
                    </el-form>
                </div>
            </el-col>
        </el-row>
    </div>
</template>
<script>
export default {
    name:'Login',
     data() {
      return {
        ruleForm: {
          username: '',
          password: '',
          code: '',
        },
        rules: {
          username: [
            { required: true, message: '请输入姓名', trigger: 'blur' },
          ],
          password: [
            { required: true, message: '请输入密码', trigger: 'change' }
          ],
          code: [
            { type: 'date', required: true, message: '请输入验证码', trigger: 'change' }
          ],
        },
        capImg:''
      };
    },
    methods: {
      submitForm(formName) {
        this.$refs[formName].validate((valid) => {
          if (valid) {
            alert('submit!');
          } else {
            console.log('error submit!!');
            return false;
          }
        });
      }

    }
}
</script>
<style scope>
    .loginform{
        margin-top:20px;
        width:500px;
    }
     h2{display:block;width:100%;margin-top:25px;}
    .el-row{
       width:100%;
       height:100vh;  /* 自适应高度100% */
       justify-items: center;
       align-items: center;  /* flex布局,页面组件中间居中 */
       background-color: #2c1d6d; /* 随便找个背景色 ,我这里是紫色背景*/
    }
    .el-col{
        background: #fff;
    }

</style>
4: 后台生成验证码
4.1 编写kaptcha配置类
该代码向容器注册DefaultKaptcha, 到网上就能找到 无需自己编写,主要功能是设置生成图片的各种属性
package com.example.code.config;

import com.google.code.kaptcha.impl.DefaultKaptcha;
import com.google.code.kaptcha.util.Config;
import org.springframework.context.annotation.Bean;
import org.springframework.context.annotation.Configuration;

import java.util.Properties;

@Configuration
public class KaptchaConfig {
    @Bean
    public DefaultKaptcha defaultKaptcha(){
        DefaultKaptcha dk = new DefaultKaptcha();
        Properties properties = new Properties();
        // 图片边框
        properties.setProperty("kaptcha.border", "no");
        // 图片高
        properties.setProperty("kaptcha.image.height", "40");
        // session key
        properties.setProperty("kaptcha.session.key", "code");
        // 验证码长度
        properties.setProperty("kaptcha.textproducer.char.length", "4");
        // 字体
        properties.setProperty("kaptcha.textproducer.font.names", "宋体,楷体,微软雅黑");
        // 字体大小
        properties.setProperty("kaptcha.textproducer.font.size", "25");
        // 向config中注册配置属性
        Config config = new Config(properties);
        dk.setConfig(config);
        return dk;
    }
}
我们需要知道是,属性来自于com.google.code.kaptcha.util.Config 这个类

4.2 编写验证码生成类
主要步骤为:
1: 使用defaultKaptcha类 生成验证码
2: 将该验证码保存在redis中,供后续验证时调用,同时设置有效期为30分种
3: 把生成的图像文件写入到字节流中声明,该图片为jpg文件
4: 使用base64对生成的字节流进行转码并生成图像字符串
5: 将转码后的文件返回到前台
package com.example.code.controller;

import com.google.code.kaptcha.impl.DefaultKaptcha;
import org.springframework.beans.factory.annotation.Autowired;
import org.springframework.data.redis.core.RedisTemplate;
import org.springframework.web.bind.annotation.GetMapping;
import org.springframework.web.bind.annotation.RequestMapping;
import org.springframework.web.bind.annotation.RestController;
import sun.misc.BASE64Encoder;

import javax.imageio.ImageIO;
import java.awt.image.BufferedImage;
import java.io.ByteArrayOutputStream;
import java.io.IOException;
import java.util.HashMap;
import java.util.Map;
import java.util.concurrent.TimeUnit;

@RestController
public class KaptchaController {
    @Autowired
    private DefaultKaptcha defaultKaptcha;
    @Autowired
    private RedisTemplate redisTemplate;
    @GetMapping("kaptcha")
    public Map<String,String> getKaptcha() throws IOException {
        // 以当前毫秒数生成随机key,注意高并发情况下,这不是一种好的选择
        String key = System.currentTimeMillis()+"";
        String text = defaultKaptcha.createText();
        // 将生成的验证码保存到redis中,并设置有效期为30分种
        redisTemplate.opsForValue().set(key,text,60*30, TimeUnit.SECONDS);
        BufferedImage image = defaultKaptcha.createImage(text);
        ByteArrayOutputStream outputStream = new ByteArrayOutputStream();
        ImageIO.write(image,"png",outputStream);
        BASE64Encoder encoder = new BASE64Encoder();
        String encode = encoder.encode(outputStream.toByteArray());
        encode= "data:image/png;base64,"+encode;
        Map<String,String> codes = new HashMap<>();
        codes.put("key",key);
        codes.put("code",encode);
        return codes;
    }
}
5:前端VUE调用
1:生成请求函数
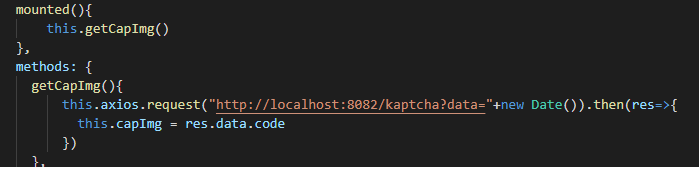
页面加载的时候,通过mounted钩子函数自动调用getCapImg()方法
注意:
调用验证码请求的链接必须添加data参数,参数的值是当前时间,防止缓存不产生变化。
2:设置点击事件
当需要更换验证码图片时,可以点击验证码 调用getCapImg()函数

6:完成后的效果

代码下载地址
vue+springboot+kaptcha生成验证码


 192
192


 被折叠的 条评论
为什么被折叠?
被折叠的 条评论
为什么被折叠?
 到【灌水乐园】发言


