


Android-Service详解
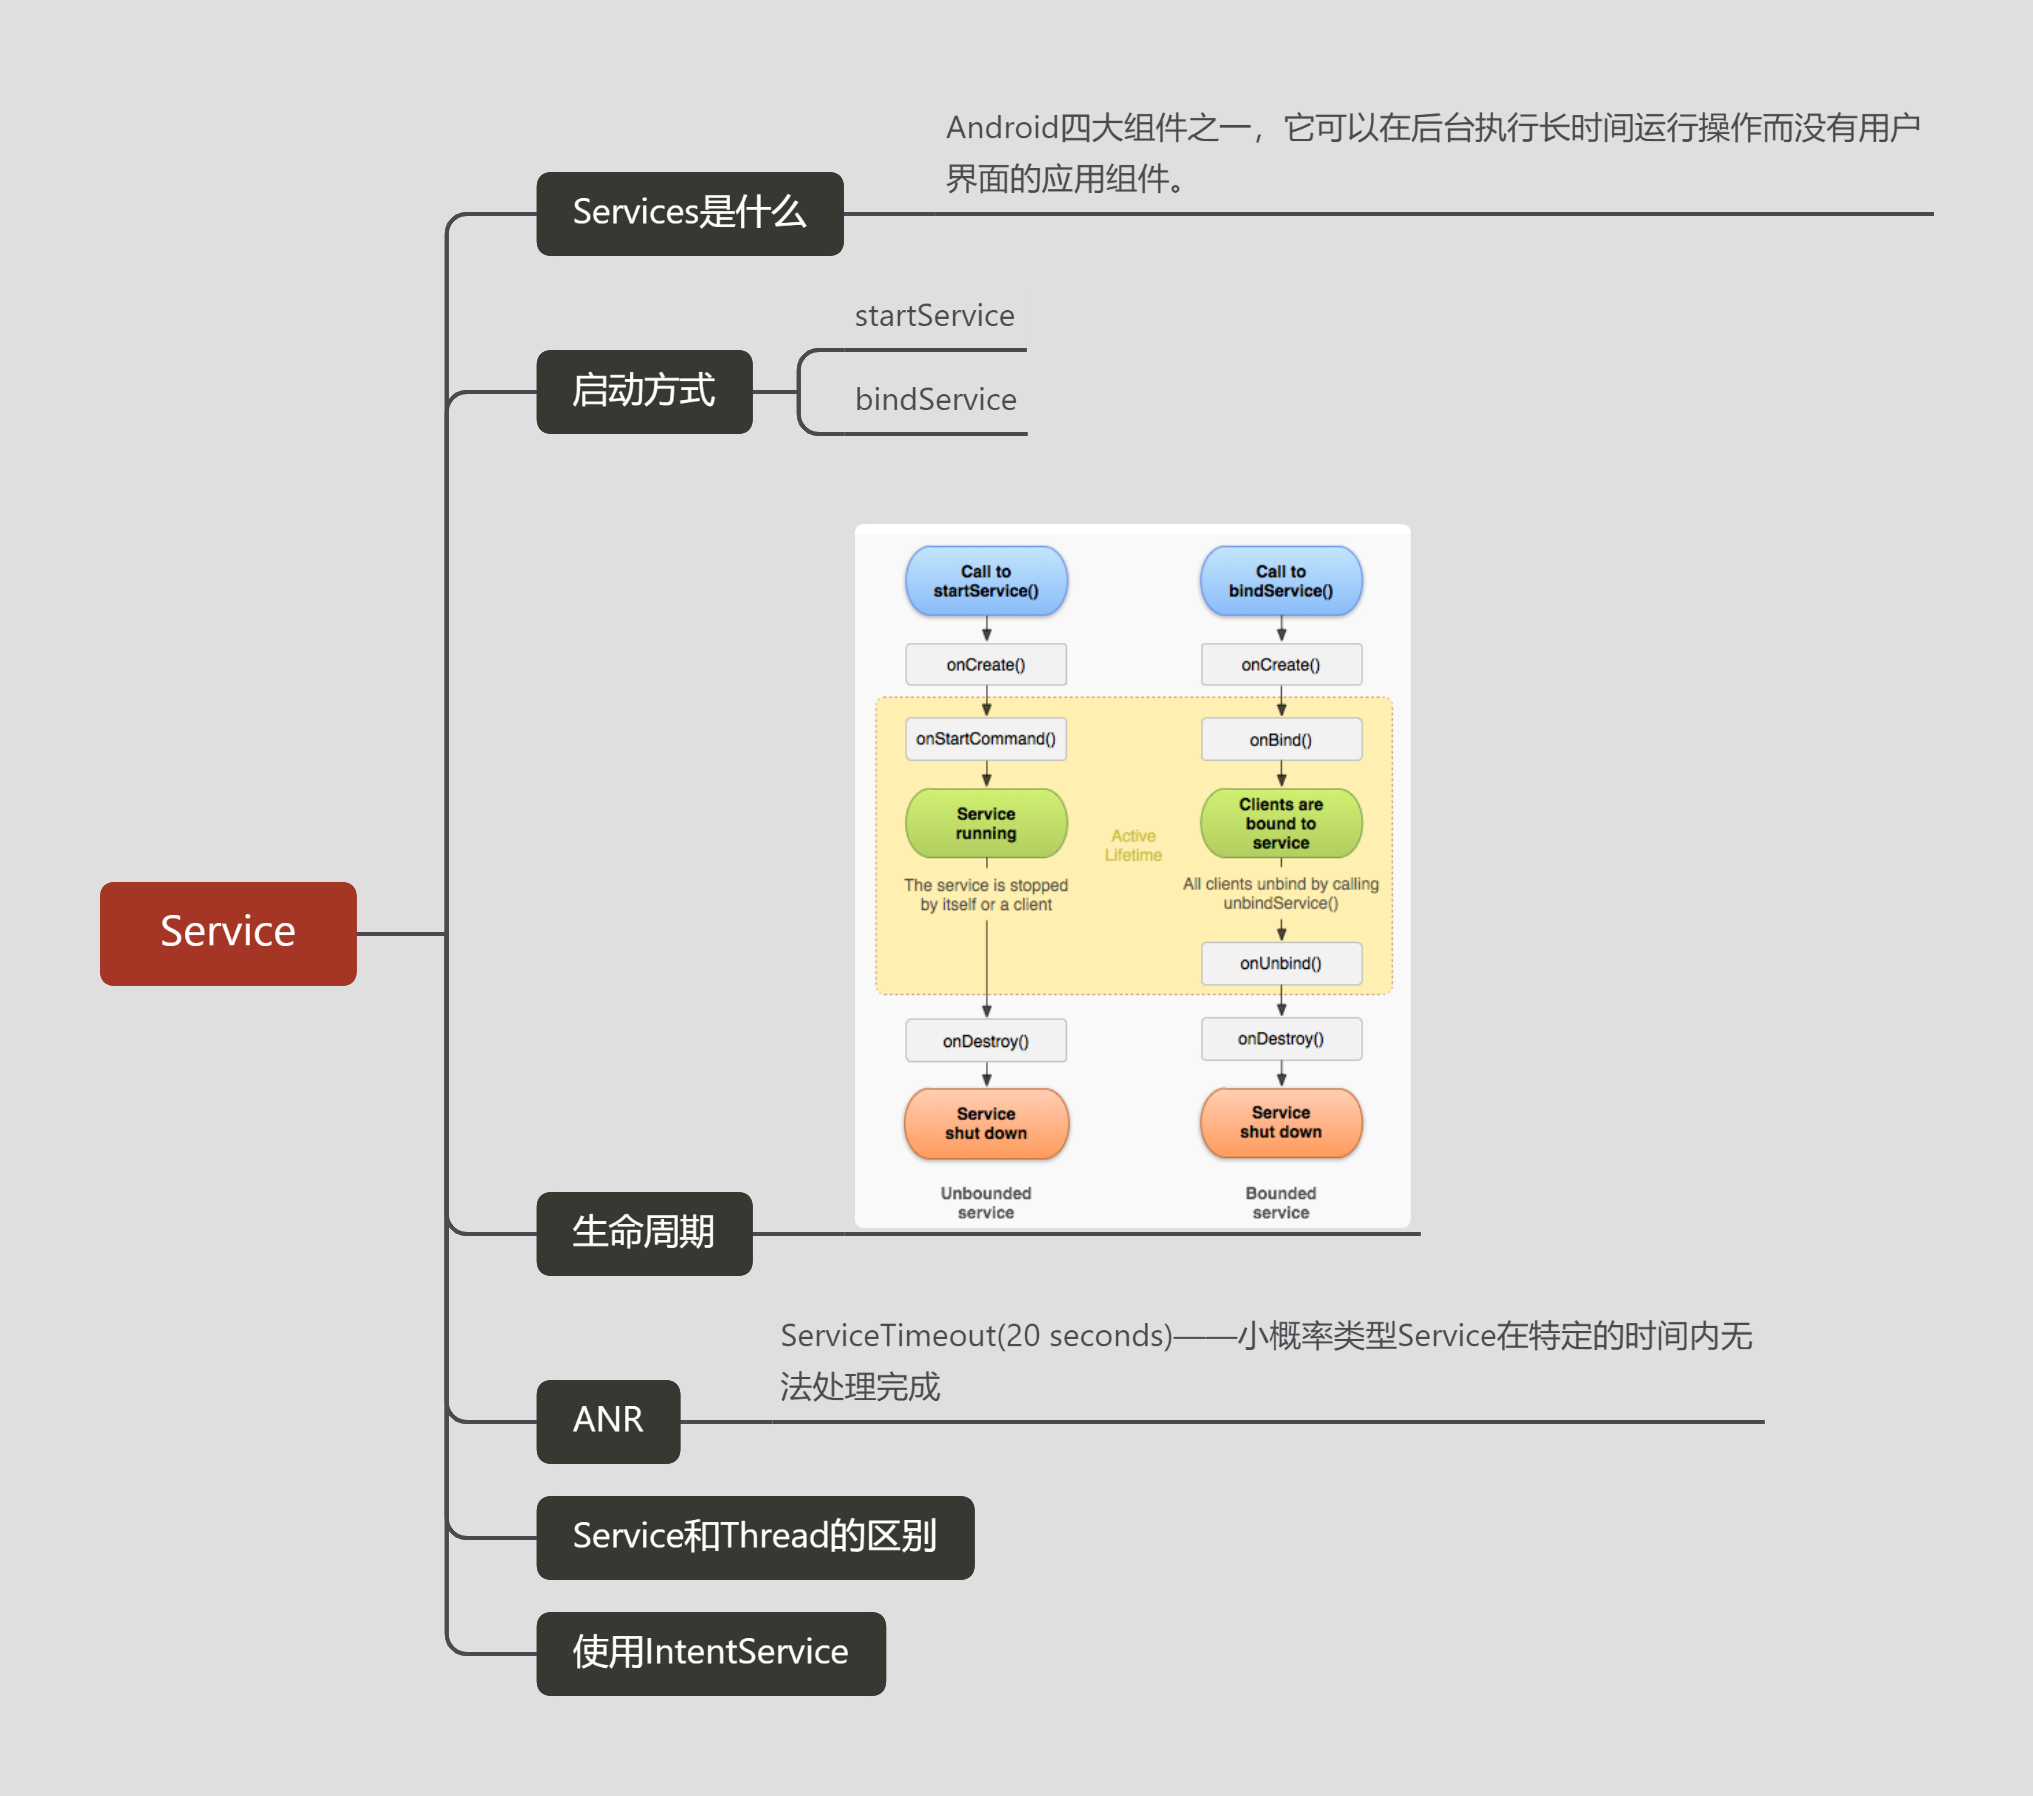
一、Service是什么
Service是Android四大组件之一,它可以在后台执行长时间运行操作而没有用户界面的应用组件。
Service的启动方式有两种:startService启动和bindService启动。
注意:服务与其他应用程序对象一样,在其托管进程的主线程中运行。这意味着,如果你的服务要执行任何CPU密集型(例如 MP3 播放)或阻塞(例如网络)操作,它应该在Service中再创建一个子线程,然后在这里去处理耗时操作就没问题了。
二、Service启动方式
startService
- 启动Service
显式启动通过类名称来启动,需要在Intent中指明Service所在的类,并调用startService (lntent)启动service,显式启动代码如下:
final Intent intentStart = new Intent(ServiceActivity.this, StartService.class);
 startService(intentStart);
在上面的代码中,Intent指明了启动的Service所在类为StartService。
「通过该方式启动Service,访问者与Service之间没有关联,即使访问者退出了,Service也仍然运行。」
- 停止service
显式启动停止Service,需要将启动Service的Intent传递给stopService (Intent)函数,代码如下:
stopService(intentStart);
「因Android5.0开始,Google要求必须使用显示Intent启动Service,所以隐式启动咱就不介绍了。」
bindService
- 使用bindService()方法启动Service
绑定模式使用bindService()方法启动Service,其格式如下:
bindService(Intent service,ServiceConnection conn,int flags);
其中的参数说明如下:
- service:该参数通过Intent指定需要启动的service。
- conn:该参数是ServiceConnnection对象,当绑定成功后,系统将调用serviceConnnection的onServiceConnected ()方法,当绑定意外断开后,系统将调用ServiceConnnection中的onServiceDisconnected方法。
- flags:该参数指定绑定时是否自动创建Service。如果指定为BIND_AUTO_CREATE,则自动创建,指定为0,则不自动创建。
绑定方式中,当调用者通过bindService()函数绑定Service时,onCreate()函数和onBinde ( )函数将被先后调用。
「通过该方式启动Service,访问者与Service绑定在一起,访问者一旦退出了,Service也就终止了。」
- 使用unbindService()方法取消绑定
取消绑定仅需要使用unbindService()方法,并将ServiceConnnection传递给unbindService()方法。
但需要注意的是,unbindService()方法成功后,系统并不会调用onServiceConnected(),因为onServiceConnected()仅在意外断开绑定时才被调用。
当调用者通过unbindService()函数取消绑定Service时,onUnbind()函数将被调用。如果onUnbind()函数返回true,则表示重新绑定服务时,onRebind ()函数将被调用。
startService样例
- 创建StartService.java继承自Service类,重写onCreate()方法、onStartCommand()方法、onBind()方法、onDestroy()方法,其代码如下:
public class StartService extends Service {
    @Override
    public void onCreate() {
        super.onCreate();
        MLog.e(getClass().getName(), "onCreate");
    }
    @Override
    public int onStartCommand(Intent intent, int flags, int startId) {
        MLog.e(getClass().getName(), "onStartCommand");
        return super.onStartCommand(intent, flags, startId);
    }
    @Override
    public void onDestroy() {
        MLog.e(getClass().getName(), "onDestroy");
        super.onDestroy();
    }

    @Nullable
    @Override
    public IBinder onBind(Intent intent) {
        return null;
    }
}
- 创建ServiceActivity.java和配套的activity_service.xml文件,其代码如下:
public class ServiceActivity extends ActivityBase {
    @Override
    protected void onCreate(Bundle savedInstanceState) {
        super.onCreate(savedInstanceState);
        setContentView(R.layout.activity_service);
        Intent intentStart = new Intent(ServiceActivity.this, StartService.class);
        findViewById(R.id.btn_start).setOnClickListener(new View.OnClickListener() {
            @Override
            public void onClick(View v) {
                startService(intentStart);
            }
        });
        findViewById(R.id.btn_stop).setOnClickListener(new View.OnClickListener() {
            @Override
            public void onClick(View v) {
                stopService(intentStart);
            }
        });
    }
}
- 配套的activity_service.xml文件
<?xml version="1.0" encoding="utf-8"?>
<LinearLayout xmlns:android="http://schemas.android.com/apk/res/android"
    android:id="@+id/ll_bg"
    android:layout_width="match_parent"
    android:layout_height="match_parent"
    android:orientation="vertical"
    android:background="@color/color_666666">
    <Button
        android:id="@+id/btn_start"
        android:layout_width="wrap_content"
        android:layout_height="wrap_content"
        android:text="start启动服务"/>
    <Button
        android:id="@+id/btn_stop"
        android:layout_width="wrap_content"
        android:layout_height="wrap_content"
        android:text="start停止服务"/>
</LinearLayout>
- 添加Service组件声明,在AndroidManifest.xml文件中声明一个Service组件,其代码如下:
<?xml version="1.0" encoding="utf-8"?>
<manifest xmlns:android="http://schemas.android.com/apk/res/android"
    package="com.scc.demo">
    <application
        ...>
        <activity
           ...>
            <intent-filter>
                ...
            </intent-filter>
        </activity>
        <service android:name=".service.StartService"/>
    </application>
</manifest>
- 运行结果
07-07 16:41:11.474 E/-SCC-: com.scc.demo.actvitiy.ServiceActivityonCreate
07-07 16:41:11.481 E/-SCC-: com.scc.demo.actvitiy.ServiceActivityonStart
07-07 16:41:11.482 E/-SCC-: com.scc.demo.actvitiy.ServiceActivityonResume
07-07 16:41:13.313 E/-SCC-com.scc.demo.service.StartService: onCreate
07-07 16:41:13.334 E/-SCC-com.scc.demo.service.StartService: onStartCommand
07-07 16:41:16.705 E/-SCC-com.scc.demo.service.StartService: onDestroy
bindService样例
- 创建BindService.java继承自Service类,重写onCreate()方法、onBind()方法、onUnbind()方法、onDestroy()方法,实现本地通知栏显示,其代码如下:
public class BindService extends Service {
    //声明IBinder接口的一个接口变量mBinder
    public final IBinder mBinder = new LocalBinder();
    private NotificationManager mNM;
    private int NOTIFICATION = R.string.local_service_started;
    //LocalBinder是继承Binder的一个内部类
    public class LocalBinder extends Binder {
        public BindService getService() {
            return BindService.this;
        }
    }
    @Override
    public void onCreate() {
        mNM = (NotificationManager)getSystemService(NOTIFICATION_SERVICE);
        MLog.e(getClass().getName(), "onCreate");
        showNotification();
    }

    @Override
    public void onDestroy() {
        MLog.e(getClass().getName(), "onDestroy");
        mNM.cancel(NOTIFICATION);
        Toast.makeText(this, R.string.local_service_stopped, Toast.LENGTH_SHORT).show();
    }
    @Override
    public IBinder onBind(Intent intent) {
        MLog.e(getClass().getName(), "onBind");
        return mBinder;
    }
    @Override
    public boolean onUnbind(Intent intent) {
        MLog.e(getClass().getName(), "onUnbind");
        return super.onUnbind(intent);
    }
    private void showNotification() {
        CharSequence text = getText(R.string.local_service_started);
        PendingIntent contentIntent = PendingIntent.getActivity(this, 0,
                new Intent(this, ServiceActivity.class), 0);
        Notification notification = new Notification.Builder(this)
                .setSmallIcon(R.mipmap.ic_launcher)
                .setTicker(text)
                .setWhen(System.currentTimeMillis())
                .setContentTitle(getText(R.string.local_service_label))
                .setContentText(text)
                .setContentIntent(contentIntent)
                .build();
        mNM.notify(NOTIFICATION, notification);
        MLog.e(getClass().getName(), "通知栏已出");
    }
}
- 创建ServiceActivity.java和配套的activity_service.xml文件,其代码如下:
public class ServiceActivity extends ActivityBase {
    private BindService bindService;
    private boolean isBind = false;
    @Override
    protected void onCreate(Bundle savedInstanceState) {
        super.onCreate(savedInstanceState);
        setContentView(R.layout.activity_service);
        findViewById(R.id.btn_bind).setOnClickListener(new View.OnClickListener() {
            @Override
            public void onClick(View v) {
                if (!isBind) {
                    Intent intentBind = new Intent(ServiceActivity.this, BindService.class);
                    bindService(intentBind, serviceConnection, Context.BIND_AUTO_CREATE);
                    isBind = true;
                }
            }
        });
        findViewById(R.id.btn_unbing).setOnClickListener(new View.OnClickListener() {
            @Override
            public void onClick(View v) {
                if (isBind) {
                    isBind = false;
                    unbindService(serviceConnection);
                    bindService = null;
                }
            }
        });
    }

    private ServiceConnection serviceConnection = new ServiceConnection() {
        @Override
        public void onServiceConnected(ComponentName name, IBinder service) {
            MLog.e(getClass().getName(), "onServiceConnected");
            bindService = ((BindService.LocalBinder) service).getService();
        }

        @Override
        public void onServiceDisconnected(ComponentName name) {
            MLog.e(getClass().getName(), "onServiceDisconnected");
            bindService = null;
        }
    };
}
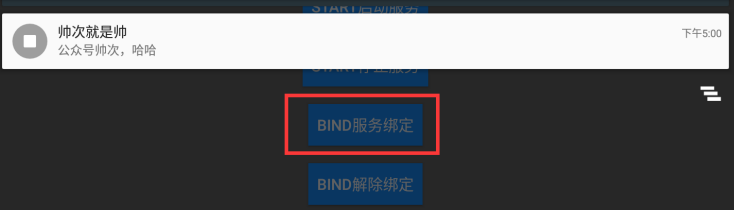
- 配套的activity_service.xml文件
<?xml version="1.0" encoding="utf-8"?>
<LinearLayout xmlns:android="http://schemas.android.com/apk/res/android"
    android:id="@+id/ll_bg"
    android:layout_width="match_parent"
    android:layout_height="match_parent"
    android:orientation="vertical"
    android:background="@color/color_666666">
    <Button
        android:id="@+id/btn_bind"
        android:layout_width="wrap_content"
        android:layout_height="wrap_content"
        android:text="bind服务绑定"/>
    <Button
        android:id="@+id/btn_unbing"
        android:layout_width="wrap_content"
        android:layout_height="wrap_content"
        android:text="bind解除绑定"/>
</LinearLayout>
- 添加Service组件声明,在AndroidManifest.xml文件中声明一个Service组件,其代码如下:
<?xml version="1.0" encoding="utf-8"?>
<manifest xmlns:android="http://schemas.android.com/apk/res/android"
    package="com.scc.demo">
    <application
        ...>
        <activity
           ...>
            <intent-filter>
                ...
            </intent-filter>
        </activity>
        <service android:name=".service.BindService"/>
    </application>
</manifest>
- 运行结果
07-07 17:00:04.309 E/-SCC-: com.scc.demo.actvitiy.ServiceActivityonCreate
07-07 17:00:04.350 E/-SCC-: com.scc.demo.actvitiy.ServiceActivityonStart
07-07 17:00:04.350 E/-SCC-: com.scc.demo.actvitiy.ServiceActivityonResume
07-07 17:00:10.088 E/-SCC-com.scc.demo.service.BindService: onCreate
07-07 17:00:10.120 E/-SCC-com.scc.demo.service.BindService: 通知栏已出
07-07 17:00:10.145 E/-SCC-com.scc.demo.service.BindService: onBind
07-07 17:00:10.164 E/-SCC-com.scc.demo.actvitiy.ServiceActivity$5: onServiceConnected
07-07 17:00:39.111 E/-SCC-com.scc.demo.service.BindService: onUnbind
07-07 17:00:39.134 E/-SCC-com.scc.demo.service.BindService: onDestroy
三、Service生命周期
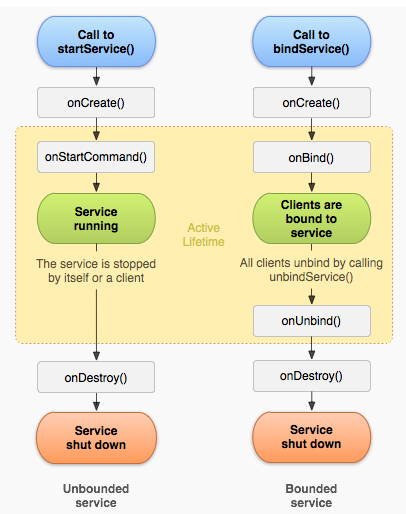
「onBind()」 是Service必须实现的方法,返回的IBinder对象相当于Service组件的代理对象,Service允许其他程序组件通过IBinder对象来访问Service内部数据,这样即可实现其他程序组件与Service之间的通信。
startService启动的生命周期
「onCreate()」 当Service第一次被创建时,由系统调用。
「onStartCommand()」 当startService方法启动Service时,该方法被调用。
「onDestroy()」 当Service不再使用时,由系统调用。
注意:一个startService只会创建一次,销毁一次,但可以开始多次,因此,onCreate()和onDestroy()方法只会被调用一次,而onStart()方法会被调用多次。
bindService启动的生命周期
「onCreate()」 当Service被创建时,由系统调用。
「onBind()」 当bindService方法启动Service时,该方法被调用。
「onUnbind()」 当unbindService方法解除绑定时,该方法被调用。
「onDestroy()」 当Service不再使用时,由系统调用。
注意:一个bindService可以创建多次,销毁多次,重复使用。
四、Service和Thread的区别
Service是安卓中系统的组件,它运行在独立进程的主线程中,不可以执行耗时操作。
Thread是程序执行的最小单元,分配CPU的基本单位,可以开启子线程执行耗时操作。
Service在不同Activity中可以获取自身实例,可以方便的对Service进行操作。
Thread在不同的Activity中难以获取自身实例,如果Activity被销毁,Thread实例就很难再获取得到。
五、使用IntentService
IntentService是 Scrvice 的子类,因此它不是普通的Service,它比普通的Service增加了额外的功能。
先看Service本身存在的两个问题。
- Service不会专门启动一个单独的进程,Service与它所在应用位于同一个进程中。
- Service不是一条新的线程,因此不应该在Service中直接处理耗时的任务。
IntentService正好弥补了Service的不足。
IntentService的特点:
- IntentService会创建单独的worker线程来处理所有的Intent请求。
- IntentService会创建单独的worker线程来处理onHandleIntent()方法实现的代码,因此开发者无须处理多线程问题。
IntentService实例
- 创建SccIntentService.java继承自IntentService类,重写onHandleIntent()方法、创建一个无参构造函数,其代码如下:
public class SccIntentService extends IntentService {
    public SccIntentService() {
        super("SccIntentService");
    }
    @Override
    protected void onHandleIntent(Intent intent) {
        MLog.e(getClass().getName(), "onHandleWork");
        for (int i = 0; i < 3; i++) {
            try {
                MLog.e(getClass().getName(), "Number:开始"+i);
                Thread.sleep(10000);
                MLog.e(getClass().getName(), "Number:结束"+i);
            } catch (InterruptedException e) {
                e.printStackTrace();
            }
        }
    }
    @Override
    public void onDestroy() {
        super.onDestroy();
        MLog.e(getClass().getName(), "onDestroy");
    }
}
- 添加IntentService组件声明,在AndroidManifest.xml文件中声明一个Service组件,其代码如下:
<service android:name=".service.SccIntentService"/>
- 启动SccIntentService
startService(new Intent(ServiceActivity.this, SccIntentService.class));
- 运行结果
07-07 18:00:39.505 E/-SCC-: com.scc.demo.actvitiy.ServiceActivityonCreate
07-07 18:00:39.531 E/-SCC-: com.scc.demo.actvitiy.ServiceActivityonStart
07-07 18:00:39.531 E/-SCC-: com.scc.demo.actvitiy.ServiceActivityonResume
07-07 18:01:12.690 E/-SCC-com.scc.demo.service.SccIntentService: onHandleWork
07-07 18:01:12.690 E/-SCC-com.scc.demo.service.SccIntentService: Number:开始0
07-07 18:01:22.691 E/-SCC-com.scc.demo.service.SccIntentService: Number:结束0
07-07 18:01:22.697 E/-SCC-com.scc.demo.service.SccIntentService: Number:开始1
07-07 18:01:32.698 E/-SCC-com.scc.demo.service.SccIntentService: Number:结束1
07-07 18:01:32.698 E/-SCC-com.scc.demo.service.SccIntentService: Number:开始2
07-07 18:01:42.699 E/-SCC-com.scc.demo.service.SccIntentService: Number:结束2
07-07 18:01:42.716 E/-SCC-com.scc.demo.service.SccIntentService: onDestroy
普通Service直接执行20S的的耗时操作,会阻塞主线程,造成ANR(程序无响应)异常。
- IntentService执行30S的耗时操作,不会阻塞主线程,更不会产生ANR。如上图开始18:01:12>18:01:42长达30S,正常运行未产生ANR。
- IntentService还有个好处就是 「用完即走」。执行完onHandleIntent()方法里面的耗时操作后,自行调用onDestroy()方法,进行关闭。


 807
807


 被折叠的 条评论
为什么被折叠?
被折叠的 条评论
为什么被折叠?
 到【灌水乐园】发言


