


引言
使用 AI 编码代理的应用程序激增。随着 LLM 质量的提高和推理成本的降低,构建有能力的 AI 代理只会变得越来越容易。最重要的是,工具生态系统正在迅速发展,使得构建复杂的 AI 编码代理变得更加容易。Langchain框架一直是这方面的领导者。它拥有创建生产就绪型 AI 应用程序所需的所有工具和技术。
但到目前为止,它缺少一件事。这是具有周期性的多智能体协作。这对于解决复杂问题至关重要,因为在复杂问题中,问题可以被划分并委托给专门的代理。这就是 LangGraph 的用武之地,它是 Langchain 框架的一部分,旨在适应 AI 编码代理之间的多参与者有状态协作。此外,在本文中,我们将讨论 LangGraph 及其基本构建块,同时使用它构建代理。
学习目标
了解 LangGraph 是什么。
探索用于构建有状态代理的 LangGraph 的基础知识。
探索 TogetherAI 以访问 DeepSeekCoder 等开放获取模型。
使用 LangGraph 构建 AI 编码代理来编写单元测试。
本文是作为数据科学博客马拉松的一部分发表的。
什么是LangGraph?
LangGraph是LangChain生态系统的延伸。虽然LangChain允许构建可以使用多种工具执行任务的AI编码代理,但它无法跨步骤协调多个链或参与者。这是创建完成复杂任务的代理的关键行为。LangGraph 的构思牢记了这些事情。它将代理工作流视为循环图形结构,其中每个节点表示一个函数或 Langchain Runnable 对象,边是节点之间的连接。
LangGraph 的主要功能包括
- 节点:任何函数或 Langchain Runnable 对象,如工具。
- 边:定义节点之间的方向。
- 有状态图:图形的主要类型。它旨在通过其节点处理数据时管理和更新状态对象。
LangGraph 利用这一点来促进具有状态持久性的循环 LLM 调用执行,这对于代理行为至关重要。该架构的灵感来自 Pregel 和 Apache Beam。
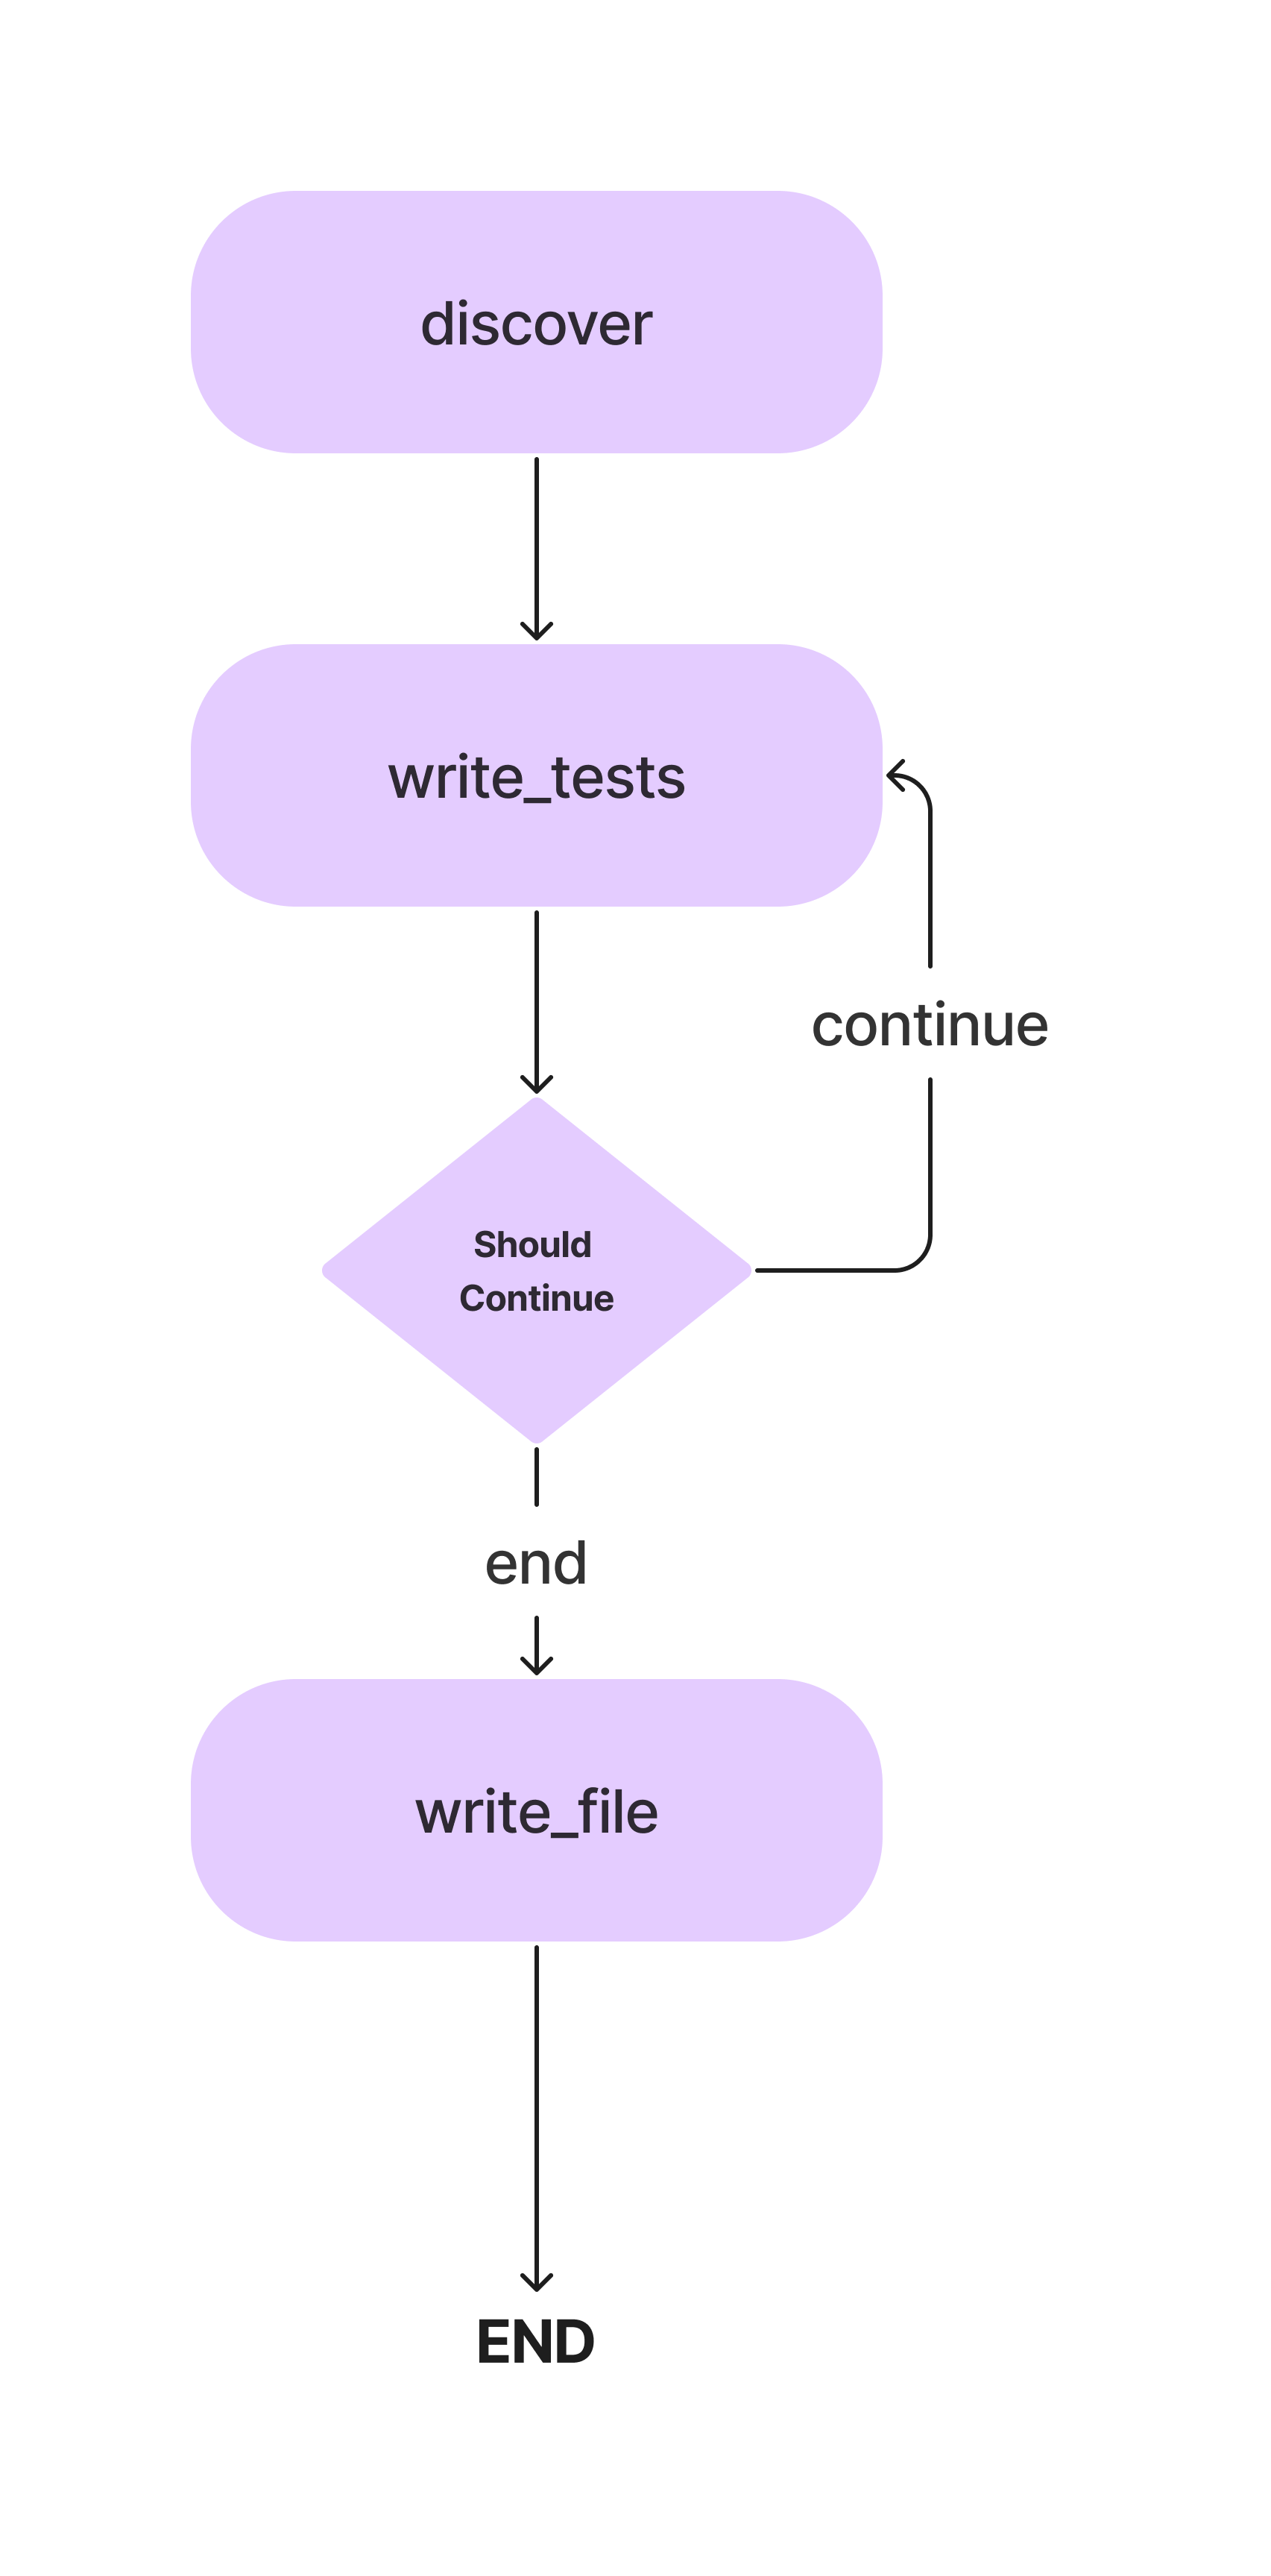
在本文中,我们将构建一个代理,用于使用方法为 Python 类编写 Pytest 单元测试。这就是工作流程。
在构建用于编写简单单元测试的 AI 编码代理时,我们将详细讨论这些概念。那么,让我们进入编码部分。
但在此之前,让我们设置我们的开发环境。
安装依赖项
第一件事。与任何 Python 项目一样,创建一个虚拟环境并激活它。
python -m venv auto-unit-tests-writer
cd auto-unit-tests-writer
source bin/activate
现在,安装依赖项。
!pip install langgraph langchain langchain_openai colorama
导入所有库及其类。
from typing import TypedDict, List
import colorama
import os

from langchain_openai import ChatOpenAI
from langchain_core.messages import SystemMessage
from langchain_core.messages import HumanMessage
from langchain_core.runnables import RunnableConfig

from langgraph.graph import StateGraph, END
from langgraph.pregel import GraphRecursionError
我们还需要为测试用例创建目录和文件。您可以手动创建文件或使用 Python。
# Define the paths.
search_path = os.path.join(os.getcwd(), "app")
code_file = os.path.join(search_path, "src/crud.py")
test_file = os.path.join(search_path, "test/test_crud.py")

# Create the folders and files if necessary.
if not os.path.exists(search_path):
    os.mkdir(search_path)
    os.mkdir(os.path.join(search_path, "src"))
    os.mkdir(os.path.join(search_path, "test"))
现在,使用内存中 CRUD 应用的代码更新 crud.py 文件。我们将使用这段代码来编写单元测试。为此,您可以使用 Python 程序。我们会将下面的程序添加到我们的 code.py 文件中。
#crud.py
code = """class Item:
    def __init__(self, id, name, description=None):
        self.id = id
        self.name = name
        self.description = description

    def __repr__(self):
        return f"Item(id={self.id}, name={self.name}, description={self.description})"

class CRUDApp:
    def __init__(self):
        self.items = []

    def create_item(self, id, name, description=None):
        item = Item(id, name, description)
        self.items.append(item)
        return item

    def read_item(self, id):
        for item in self.items:
            if item.id == id:
                return item
        return None

    def update_item(self, id, name=None, description=None):
        for item in self.items:
            if item.id == id:
                if name:
                    item.name = name
                if description:
                    item.description = description
                return item
        return None

    def delete_item(self, id):
        for index, item in enumerate(self.items):
            if item.id == id:
                return self.items.pop(index)
        return None

    def list_items(self):
        return self.items"""

with open(code_file, 'w') as f:
  f.write(code)
设置 LLM
现在,我们将指定将在此项目中使用的 LLM。此处使用哪种模型取决于任务和资源的可用性。您可以使用专有的、强大的模型,例如 GPT-4、Gemini Ultra 或 GPT-3.5。此外,您还可以使用 Mixtral 和 Llama-2 等开放获取模型。在这种情况下,由于涉及编写代码,我们可以使用微调的编码模型,如 DeepSeekCoder-33B 或 Llama-2 编码器。现在,有多个用于 LLM 推理的平台,例如 Anayscale、Abacus 和 Together。我们将使用 Together AI 来推断 DeepSeekCoder。因此,在继续之前,请从 Together 获取 API 密钥。
from langchain_openai import ChatOpenAI

llm = ChatOpenAI(base_url="https://api.together.xyz/v1",
    api_key="your-key",
    model="deepseek-ai/deepseek-coder-33b-instruct")
由于 Together API 与 OpenAI SDK 兼容,我们可以通过将 base_url 参数更改为 “https://api.together.xyz/v1”来使用 Langchain 的 OpenAI SDK 与托管在 Together 上的模型进行通信。在 api_key 中,传递 Together API 密钥,并传递 Together 上可用的模型名称来代替模型。
定义代理状态
这是LangGraph的关键部分之一。在这里,我们将定义一个 AgentState,负责在整个执行过程中跟踪 Agent 的状态。这主要是一个 TypedDict 类,其中包含维护代理状态的实体。让我们定义 AgentState
class AgentState(TypedDict):
    class_source: str
    class_methods: List[str]
    tests_source: str
在上面的 AgentState 类中,class_source存储原始 Python 类,class_methods用于存储类的方法,tests_source用于单元测试代码。我们将这些定义为 AgentState,以便在执行步骤中使用它们。
现在,使用 AgentState 定义 Graph。
# Create the graph.
workflow = StateGraph(AgentState)
如前所述,这是一个有状态图,现在我们已经添加了我们的状态对象。
定义节点
现在我们已经定义了 AgentState,我们需要添加节点。那么,究竟什么是节点?在LangGraph中,节点是执行单个操作的函数或任何可运行的对象,如Langchain工具。在我们的例子中,我们可以定义几个节点,比如一个用于查找类方法的函数,一个用于推断和更新单元测试到状态对象的函数,以及一个用于将其写入测试文件的函数。
我们还需要一种从 LLM 消息中提取代码的方法。方法如下。
def extract_code_from_message(message):
    lines = message.split("\n")
    code = ""
    in_code = False
    for line in lines:
        if "```" in line:
            in_code = not in_code
        elif in_code:
            code += line + "\n"
    return code
此处的代码片段假定代码位于三引号内。
现在,让我们定义我们的节点。
import_prompt_template = """Here is a path of a file with code: {code_file}.
Here is the path of a file with tests: {test_file}.
Write a proper import statement for the class in the file.
"""
# Discover the class and its methods.
def discover_function(state: AgentState):
    assert os.path.exists(code_file)
    with open(code_file, "r") as f:
        source = f.read()
    state["class_source"] = source

    # Get the methods.
    methods = []
    for line in source.split("\n"):
        if "def " in line:
            methods.append(line.split("def ")[1].split("(")[0])
    state["class_methods"] = methods

    # Generate the import statement and start the code.
    import_prompt = import_prompt_template.format(
        code_file=code_file,
        test_file=test_file
    )
    message = llm.invoke([HumanMessage(content=import_prompt)]).content
    code = extract_code_from_message(message)
    state["tests_source"] = code + "\n\n"

    return state


# Add a node to for discovery.
workflow.add_node(
    "discover",
    discover_function
)
在上面的代码片段中,我们定义了一个用于发现代码的函数。它从 AgentState class_source 元素中提取代码,将类分解为单独的方法,并通过提示将其传递给 LLM。输出存储在 AgentState 的 tests_source 元素中。我们只让它为单元测试用例编写 import 语句。
我们还将第一个节点添加到 StateGraph 对象中。
现在,进入下一个节点。
此外,我们可以设置一些我们需要的提示模板。这些是示例模板,您可以根据需要进行更改。
# System message template.

system_message_template = """You are a smart developer. You can do this! You will write unit
tests that have a high quality. Use pytest.

Reply with the source code for the test only.
Do not include the class in your response. I will add the imports myself.
If there is no test to write, reply with "# No test to write" and
nothing more. Do not include the class in your response.

Example:
def test_function():
…
I will give you 200 EUR if you adhere to the instructions and write a high quality test.
Do not write test classes, only methods.
"""

# Write the tests template.
write_test_template = """Here is a class:
'''
{class_source}
'''

Implement a test for the method \"{class_method}\".
"""
现在,定义节点。
# This method will write a test.
def write_tests_function(state: AgentState):

    # Get the next method to write a test for.
    class_method = state["class_methods"].pop(0)
    print(f"Writing test for {class_method}.")

    # Get the source code.
    class_source = state["class_source"]

    # Create the prompt.
    write_test_prompt = write_test_template.format(
        class_source=class_source,
        class_method=class_method
    )
    print(colorama.Fore.CYAN + write_test_prompt + colorama.Style.RESET_ALL)

    # Get the test source code.
    system_message = SystemMessage(system_message_template)
    human_message = HumanMessage(write_test_prompt)
    test_source = llm.invoke([system_message, human_message]).content
    test_source = extract_code_from_message(test_source)
    print(colorama.Fore.GREEN + test_source + colorama.Style.RESET_ALL)
    state["tests_source"] += test_source + "\n\n"

    return state

# Add the node.
workflow.add_node(
    "write_tests",
    write_tests_function
)
在这里,我们将让 LLM 为每个方法编写测试用例,将它们更新到 AgentState 的 tests_source 元素,并将它们添加到工作流 StateGraph 对象中。
边缘
现在我们有两个节点,我们将定义它们之间的边,以指定它们之间的执行方向。LangGraph 主要提供两种类型的边。
- 条件边缘:执行流程取决于代理的响应。这对于增加工作流的周期性至关重要。代理可以根据某些条件决定下一步要移动的节点。是返回到上一个节点、重复当前节点还是移动到下一个节点。
- 普通边:这是正常情况,其中节点总是在调用前一个节点之后调用。
我们不需要条件来连接发现和write_tests,因此我们将使用法线边。此外,定义一个入口点,用于指定执行应从何处开始。
# Define the entry point. This is where the flow will start.
workflow.set_entry_point("discover")

# Always go from discover to write_tests.
workflow.add_edge("discover", "write_tests")
执行从发现方法开始,然后转到编写测试的功能。我们需要另一个节点将单元测试代码写入测试文件。
# Write the file.
def write_file(state: AgentState):
    with open(test_file, "w") as f:
        f.write(state["tests_source"])
    return state

# Add a node to write the file.
workflow.add_node(
    "write_file",
    write_file)
由于这是我们的最后一个节点,我们将定义 write_tests 和 write_file 之间的边。这就是我们如何做到这一点。
# Find out if we are done.
def should_continue(state: AgentState):
    if len(state["class_methods"]) == 0:
        return "end"
    else:
        return "continue"

# Add the conditional edge.
workflow.add_conditional_edges(
    "write_tests",
    should_continue,
    {
        "continue": "write_tests",
        "end": "write_file"
    }
)
add_conditional_edge 函数采用 write_tests 函数、一个根据class_methods条目决定要执行的步骤的should_continue函数,以及将字符串作为键并将其他函数作为值的映射。
边从 write_tests 开始,并根据 should_continue 的输出执行映射中的任一选项。例如,如果 state[“class_methods”] 不为空,则我们没有为所有方法编写测试;我们重复 write_tests 函数,当我们完成编写测试时,将执行write_file。
当所有方法的测试都是从 LLM 推断出来的,这些测试将写入测试文件。
现在,将最后一条边添加到闭包的工作流对象中。
# Always go from write_file to end.
workflow.add_edge("write_file", END)
执行工作流
剩下的最后一件事就是编译工作流并运行它。
# Create the app and run it
app = workflow.compile()
inputs = {}
config = RunnableConfig(recursion_limit=100)
try:
    result = app.invoke(inputs, config)
    print(result)
except GraphRecursionError:
    print("Graph recursion limit reached.")
这将调用应用程序。递归限制是针对给定工作流推断 LLM 的次数。超过限制时,工作流将停止。
您可以在终端或笔记本中查看日志。这是简单 CRUD 应用的执行日志。
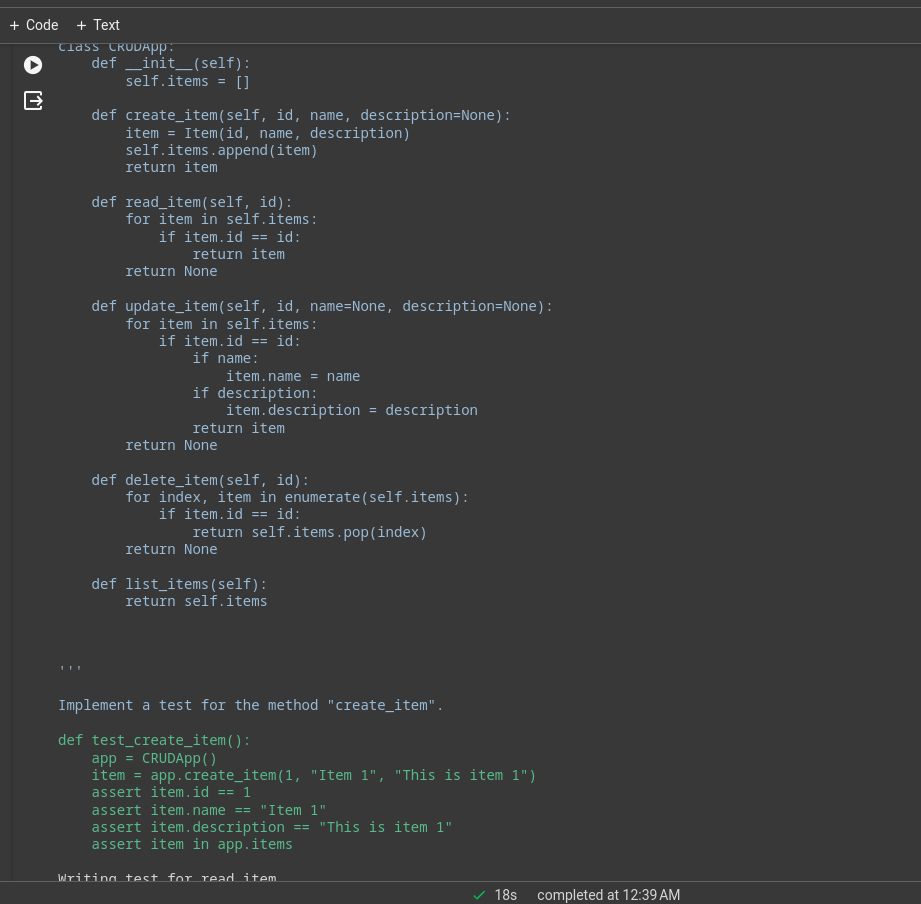
许多繁重的工作将由底层模型完成,这是一个带有 Deepseek 编码器模型的演示应用程序,为了获得更好的性能,您可以使用 GPT-4 或 Claude Opus、haiku 等。
您还可以使用 Langchain 工具进行网上冲浪、股票价格分析等。
- 完整代码的 GitHub Gist:GitHub Gist
- Colab 笔记本:LangGraph 代码代理
LangChain 与 LangGraph
现在的问题是何时使用 LangChain 与 LangGraph。
如果目标是创建一个多智能体系统,并在它们之间进行协调,那么LangGraph就是您的不二之选。但是,如果您想创建 DAG 或链来完成任务,LangChain 表达式语言最适合。
为什么使用 LangGraph?
LangGraph 是一个强大的框架,可以改进许多现有的解决方案。
- 改进 RAG 管道:LangGraph 可以通过其循环图结构来增强 RAG。我们可以引入一个反馈循环来评估检索到的对象的质量,如果需要,可以改进查询并重复该过程。
- 多智能体工作流:LangGraph 旨在支持多智能体工作流。这对于解决划分为较小子任务的复杂任务至关重要。具有共享状态和不同 LLM 和工具的不同代理可以协作解决单个任务。
- Human-in-the-loop:LangGraph 内置了对 Human-in-the-loop 工作流程的支持。这意味着人类可以在移动到下一个节点之前查看状态。
- 规划代理:LangGraph 非常适合构建规划代理,其中 LLM 规划器计划和分解用户请求,执行器调用工具和函数,LLM 根据以前的输出合成答案。
- 多模态代理:LangGraph 可以构建多模态代理,例如支持视觉的 Web 导航器。
现实生活中的用例
在许多领域,复杂的 AI 编码代理可以提供帮助。
- 个人代理:想象一下,在您的电子设备上拥有自己的类似 Jarvis的助手,随时准备根据您的命令帮助完成任务,无论是通过文本、语音还是手势。这是 AI 代理最令人兴奋的用途之一!
- AI 讲师:聊天机器人很棒,但它们有其局限性。配备正确工具的 AI 代理可以超越基本对话。可以根据用户反馈调整教学方法的虚拟 AI 讲师可以改变游戏规则。
- 软件用户体验:使用 AI 代理可以改善软件的用户体验。座席可以使用语音或手势命令完成任务,而不是手动导航应用程序。
- 空间计算:随着AR/VR技术的普及,对AI代理的需求将会增长。代理可以处理周围信息并按需执行任务。这可能是 AI 代理的最佳用例之一。
- LLM OS:人工智能优先的操作系统,其中代理是一等公民。代理将负责执行从平凡到复杂的任务。
结论
LangGraph 是一个用于构建循环状态多参与者代理系统的有效框架。它填补了原始LangChain框架的空白。由于它是LangChain的延伸,我们可以从LangChain生态系统的所有优点中受益。随着 LLM 的质量和能力的增长,创建用于自动化复杂工作流程的代理系统将变得更加容易。因此,以下是本文的关键要点。
关键要点
- LangGraph 是 LangChain 的扩展,它允许我们构建循环的、有状态的、多参与者的代理系统。
- 它实现了具有节点和边的图形结构。节点是函数或工具,边是节点之间的连接。
- 边有两种类型:条件边和法线边。条件边在从一个边到另一个边时具有条件,这对于向工作流添加循环性非常重要。
- LangGraph更适合构建循环多参与者代理,而 LangChain 更适合创建链或定向非循环系统。
来源:https://www.analyticsvidhya.com/blog/2024/03/build-an-ai-coding-agent-with-langgraph-by-langchain/


 1026
1026

 被折叠的 条评论
为什么被折叠?
被折叠的 条评论
为什么被折叠?
 到【灌水乐园】发言


