


WebGL在GPU上的工作基本上分为两部分,第一部分是将顶点(或数据流)转换到裁剪空间坐标, 第二部分是基于第一部分的结果绘制像素点。
当你调用:
var primitiveType = gl.TRIANGLES;
var offset = 0;
var count = 9;
gl.drawArrays(primitiveType, offset, count);
这里的9表示“处理9个顶点”,所以将会有9个顶点被转换。
左侧是你提供的数据。顶点着色器(Vertex Shader)是你写进GLSL 中的一个方法,每个顶点调用一次,在这个方法中做一些数学运算后设置了一个特殊的gl_Position变量, 这个变量就是该顶点转换到裁剪空间中的坐标值,GPU接收该值并将其保存起来。
假设你正在画三角形,顶点着色器每完成三次顶点处理,WebGL就会用这三个顶点画一个三角形。 它计算出这三个顶点对应的像素后,就会光栅化这个三角形,“光栅化”其实就是“用像素画出来” 的花哨叫法。对于每一个像素,它会调用你的片断着色器询问你使用什么颜色。 你通过给片断着色器的一个特殊变量gl_FragColor设置一个颜色值,实现自定义像素颜色。
使用它们可以做出非常有趣的东西,但如你所见,到目前为止的例子中, 处理每个像素时片断着色器可用信息很少,幸运的是我们可以给它传递更多信息。 想要从顶点着色器传值到片断着色器,我们可以定义“可变量(varyings)”。
一个简单的例子,将顶点着色器计算出的裁剪空间坐标从顶点着色器传递到片断着色器。
我们来画一个简单的三角形,从之前的例子继续,让我们把矩形改成三角形。
// 定义一个三角形填充到缓冲里
function setGeometry(gl) {
  gl.bufferData(
      gl.ARRAY_BUFFER,
      new Float32Array([
             0, -100,
           150,  125,
          -175,  100]),
      gl.STATIC_DRAW);
}
我们只需要画三个顶点:
// 绘制场景
function drawScene() {
  ...
  // 绘制几何体
  var primitiveType = gl.TRIANGLES;
  var offset = 0;
  var count = 3;
  gl.drawArrays(primitiveType, offset, count);
}
然后在我们的顶点着色器中定义一个varying(可变量)用来给片断着色器传值。
varying vec4 v_color;
...
void main() {
  // 将位置和矩阵相乘
  gl_Position = vec4((u_matrix * vec3(a_position, 1)).xy, 0, 1);

  // 从裁减空间转换到颜色空间
  // 裁减空间范围 -1.0 到 +1.0
  // 颜色空间范围 0.0 到 1.0
  v_color = gl_Position * 0.5 + 0.5;
}
在片断着色器中定义同名varying变量:
precision mediump float;

varying vec4 v_color;

void main() {
  gl_FragColor = v_color;
}
WebGL会将同名的可变量从顶点着色器输入到片断着色器中。
运行下面的代码:
"use strict";

function main() {
  // Get A WebGL context
  /** @type {HTMLCanvasElement} */
  var canvas = document.getElementById("canvas");
  var gl = canvas.getContext("webgl");
  if (!gl) {
    return;
  }

  // setup GLSL program
  var program = webglUtils.createProgramFromScripts(gl, ["2d-vertex-shader", "2d-fragment-shader"]);

  // look up where the vertex data needs to go.
  var positionAttributeLocation = gl.getAttribLocation(program, "a_position");

  // lookup uniforms
  var matrixLocation = gl.getUniformLocation(program, "u_matrix");

  // Create a buffer.
  var positionBuffer = gl.createBuffer();
  gl.bindBuffer(gl.ARRAY_BUFFER, positionBuffer);

  // Set Geometry.
  setGeometry(gl);

  var translation = [200, 150];
  var angleInRadians = 0;
  var scale = [1, 1];

  drawScene();

  // Setup a ui.
  webglLessonsUI.setupSlider("#x", {value: translation[0], slide: updatePosition(0), max: gl.canvas.width });
  webglLessonsUI.setupSlider("#y", {value: translation[1], slide: updatePosition(1), max: gl.canvas.height});
  webglLessonsUI.setupSlider("#angle", {slide: updateAngle, max: 360});
  webglLessonsUI.setupSlider("#scaleX", {value: scale[0], slide: updateScale(0), min: -5, max: 5, step: 0.01, precision: 2});
  webglLessonsUI.setupSlider("#scaleY", {value: scale[1], slide: updateScale(1), min: -5, max: 5, step: 0.01, precision: 2});

  function updatePosition(index) {
    return function(event, ui) {
      translation[index] = ui.value;
      drawScene();
    }
  }

  function updateAngle(event, ui) {
    var angleInDegrees = 360 - ui.value;
    angleInRadians = angleInDegrees * Math.PI / 180;
    drawScene();
  }

  function updateScale(index) {
    return function(event, ui) {
      scale[index] = ui.value;
      drawScene();
    }
  }

  // Draw the scene.
  function drawScene() {
    webglUtils.resizeCanvasToDisplaySize(gl.canvas);

    // Tell WebGL how to convert from clip space to pixels
    gl.viewport(0, 0, gl.canvas.width, gl.canvas.height);

    // Clear the canvas.
    gl.clear(gl.COLOR_BUFFER_BIT);

    // Tell it to use our program (pair of shaders)
    gl.useProgram(program);

    // Turn on the attribute
    gl.enableVertexAttribArray(positionAttributeLocation);

    // Bind the position buffer.
    gl.bindBuffer(gl.ARRAY_BUFFER, positionBuffer);

    // Tell the attribute how to get data out of positionBuffer (ARRAY_BUFFER)
    var size = 2;          // 2 components per iteration
    var type = gl.FLOAT;   // the data is 32bit floats
    var normalize = false; // don't normalize the data
    var stride = 0;        // 0 = move forward size * sizeof(type) each iteration to get the next position
    var offset = 0;        // start at the beginning of the buffer
    gl.vertexAttribPointer(
        positionAttributeLocation, size, type, normalize, stride, offset)

    // Compute the matrix
    var matrix = m3.projection(gl.canvas.clientWidth, gl.canvas.clientHeight);
    matrix = m3.translate(matrix, translation[0], translation[1]);
    matrix = m3.rotate(matrix, angleInRadians);
    matrix = m3.scale(matrix, scale[0], scale[1]);

    // Set the matrix.
    gl.uniformMatrix3fv(matrixLocation, false, matrix);

    // Draw the geometry.
    var primitiveType = gl.TRIANGLES;
    var offset = 0;
    var count = 3;
    gl.drawArrays(primitiveType, offset, count);
  }
}

// Fill the buffer with the values that define a triangle.
// Note, will put the values in whatever buffer is currently
// bound to the ARRAY_BUFFER bind point
function setGeometry(gl) {
  gl.bufferData(
      gl.ARRAY_BUFFER,
      new Float32Array([
             0, -100,
           150,  125,
          -175,  100]),
      gl.STATIC_DRAW);
}

main();
当你移动,缩放,旋转三角形时,发现颜色随位置变化,不跟着三角形移动。
回想一下,我们只计算了三个顶点,调用了三次顶点着色器,所以也只计算出了三个颜色值, 但是我们的三角形却有很多颜色,这就是称之为可变量的varying的原因啦!
WebGL先获得顶点着色器中计算的三个颜色值,在光栅化三角形时将会根据这三个值进行插值。 每一个像素在调用片断着色器时,可变量的值是与之对应的插值。
让我们从上例的三个顶点开始分析
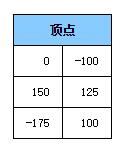
我们的给顶点着色器施加了一个包含平移,旋转和缩放的的矩阵,并将结果转换到裁剪空间。 默认平移,旋转和缩放值为:平移 = 200, 150,旋转 = 0,缩放 = 1,所以这里只进行了平移。 画布大小(背景缓冲)为 400×300,所以三个顶点在裁剪空间中为以下坐标值。
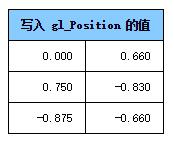
同时将这些值转换到颜色空间中赋给我们定义的可变量v_color。
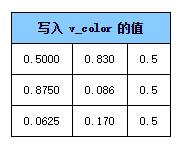
利用这三个值进行插值后传进每个像素运行的片断着色器中。

想要给片断着色器传值,我们可以先把值传递给顶点着色器然后再传给片断着色器。 让我们来画一个由两个不同颜色三角形组成的矩形。我们需要给顶点着色器添加一个属性值, 把值通过属性传递给它后它再直接传递给片断着色器。
attribute vec2 a_position;
attribute vec4 a_color;
...
varying vec4 v_color;

void main() {
   ...
  // 直接把属性值中的数据赋给可变量
  v_color = a_color;
}
现在要给WebGL提供要用的颜色。
// 寻找顶点着色器中需要的数据
  var positionLocation = gl.getAttribLocation(program, "a_position");
  var colorLocation = gl.getAttribLocation(program, "a_color");
  ...
  // 给颜色数据创建一个缓冲
  var colorBuffer = gl.createBuffer();
  gl.bindBuffer(gl.ARRAY_BUFFER, colorBuffer);
  // 设置颜色
  setColors(gl);
  ...

// 给矩形的两个三角形
// 设置颜色值并发到缓冲
function setColors(gl) {
  // 生成两个随机颜色
  var r1 = Math.random();
  var b1 = Math.random();
  var g1 = Math.random();

  var r2 = Math.random();
  var b2 = Math.random();
  var g2 = Math.random();

  gl.bufferData(
      gl.ARRAY_BUFFER,
      new Float32Array(
        [ r1, b1, g1, 1,
          r1, b1, g1, 1,
          r1, b1, g1, 1,
          r2, b2, g2, 1,
          r2, b2, g2, 1,
          r2, b2, g2, 1]),
      gl.STATIC_DRAW);
}
在渲染的时候设置颜色属性:
gl.enableVertexAttribArray(colorLocation);

// 绑定颜色缓冲
gl.bindBuffer(gl.ARRAY_BUFFER, colorBuffer);

// 告诉颜色属性怎么从 colorBuffer (ARRAY_BUFFER) 中读取颜色值
var size = 4;          // 每次迭代使用4个单位的数据
var type = gl.FLOAT;   // 单位数据类型是32位的浮点型
var normalize = false; // 不需要归一化数据
var stride = 0;        // 0 = 移动距离 * 单位距离长度sizeof(type)
                       // 每次迭代跳多少距离到下一个数据
var offset = 0;        // 从绑定缓冲的起始处开始
gl.vertexAttribPointer(
    colorLocation, size, type, normalize, stride, offset)
调整顶点的数量为6用来画两个三角形:
// 画几何体
var primitiveType = gl.TRIANGLES;
var offset = 0;
var count = 6;
gl.drawArrays(primitiveType, offset, count);
运行下面的代码:
"use strict";

function main() {
  // Get A WebGL context
  /** @type {HTMLCanvasElement} */
  var canvas = document.getElementById("canvas");
  var gl = canvas.getContext("webgl");
  if (!gl) {
    return;
  }

  // setup GLSL program
  var program = webglUtils.createProgramFromScripts(gl, ["2d-vertex-shader", "2d-fragment-shader"]);

  // look up where the vertex data needs to go.
  var positionLocation = gl.getAttribLocation(program, "a_position");
  var colorLocation = gl.getAttribLocation(program, "a_color");

  // lookup uniforms
  var matrixLocation = gl.getUniformLocation(program, "u_matrix");

  // Create a buffer for the positons.
  var positionBuffer = gl.createBuffer();
  gl.bindBuffer(gl.ARRAY_BUFFER, positionBuffer);
  // Set Geometry.
  setGeometry(gl);

  // Create a buffer for the colors.
  var colorBuffer = gl.createBuffer();
  gl.bindBuffer(gl.ARRAY_BUFFER, colorBuffer);
  // Set the colors.
  setColors(gl);

  var translation = [200, 150];
  var angleInRadians = 0;
  var scale = [1, 1];

  drawScene();

  // Setup a ui.
  webglLessonsUI.setupSlider("#x", {value: translation[0], slide: updatePosition(0), max: gl.canvas.width });
  webglLessonsUI.setupSlider("#y", {value: translation[1], slide: updatePosition(1), max: gl.canvas.height});
  webglLessonsUI.setupSlider("#angle", {slide: updateAngle, max: 360});
  webglLessonsUI.setupSlider("#scaleX", {value: scale[0], slide: updateScale(0), min: -5, max: 5, step: 0.01, precision: 2});
  webglLessonsUI.setupSlider("#scaleY", {value: scale[1], slide: updateScale(1), min: -5, max: 5, step: 0.01, precision: 2});

  function updatePosition(index) {
    return function(event, ui) {
      translation[index] = ui.value;
      drawScene();
    }
  }

  function updateAngle(event, ui) {
    var angleInDegrees = 360 - ui.value;
    angleInRadians = angleInDegrees * Math.PI / 180;
    drawScene();
  }

  function updateScale(index) {
    return function(event, ui) {
      scale[index] = ui.value;
      drawScene();
    }
  }

  // Draw the scene.
  function drawScene() {
    webglUtils.resizeCanvasToDisplaySize(gl.canvas);

    // Tell WebGL how to convert from clip space to pixels
    gl.viewport(0, 0, gl.canvas.width, gl.canvas.height);

    // Clear the canvas.
    gl.clear(gl.COLOR_BUFFER_BIT);

    // Tell it to use our program (pair of shaders)
    gl.useProgram(program);

    // Turn on the position attribute
    gl.enableVertexAttribArray(positionLocation);

    // Bind the position buffer.
    gl.bindBuffer(gl.ARRAY_BUFFER, positionBuffer);

    // Tell the position attribute how to get data out of positionBuffer (ARRAY_BUFFER)
    var size = 2;          // 2 components per iteration
    var type = gl.FLOAT;   // the data is 32bit floats
    var normalize = false; // don't normalize the data
    var stride = 0;        // 0 = move forward size * sizeof(type) each iteration to get the next position
    var offset = 0;        // start at the beginning of the buffer
    gl.vertexAttribPointer(
        positionLocation, size, type, normalize, stride, offset)

    // Turn on the color attribute
    gl.enableVertexAttribArray(colorLocation);

    // Bind the color buffer.
    gl.bindBuffer(gl.ARRAY_BUFFER, colorBuffer);

    // Tell the color attribute how to get data out of colorBuffer (ARRAY_BUFFER)
    var size = 4;          // 4 components per iteration
    var type = gl.FLOAT;   // the data is 32bit floats
    var normalize = false; // don't normalize the data
    var stride = 0;        // 0 = move forward size * sizeof(type) each iteration to get the next position
    var offset = 0;        // start at the beginning of the buffer
    gl.vertexAttribPointer(
        colorLocation, size, type, normalize, stride, offset)

    // Compute the matrix
    var matrix = m3.projection(gl.canvas.clientWidth, gl.canvas.clientHeight);
    matrix = m3.translate(matrix, translation[0], translation[1]);
    matrix = m3.rotate(matrix, angleInRadians);
    matrix = m3.scale(matrix, scale[0], scale[1]);

    // Set the matrix.
    gl.uniformMatrix3fv(matrixLocation, false, matrix);

    // Draw the geometry.
    var primitiveType = gl.TRIANGLES;
    var offset = 0;
    var count = 6;
    gl.drawArrays(primitiveType, offset, count);
  }
}


// Fill the buffer with the values that define a rectangle.
// Note, will put the values in whatever buffer is currently
// bound to the ARRAY_BUFFER bind point
function setGeometry(gl) {
  gl.bufferData(
      gl.ARRAY_BUFFER,
      new Float32Array([
          -150, -100,
           150, -100,
          -150,  100,
           150, -100,
          -150,  100,
           150,  100]),
      gl.STATIC_DRAW);
}

// Fill the buffer with colors for the 2 triangles
// that make the rectangle.
// Note, will put the values in whatever buffer is currently
// bound to the ARRAY_BUFFER bind point
function setColors(gl) {
  // Pick 2 random colors.
  var r1 = Math.random();
  var b1 = Math.random();
  var g1 = Math.random();
  var r2 = Math.random();
  var b2 = Math.random();
  var g2 = Math.random();

  gl.bufferData(
      gl.ARRAY_BUFFER,
      new Float32Array(
        [ r1, b1, g1, 1,
          r1, b1, g1, 1,
          r1, b1, g1, 1,
          r2, b2, g2, 1,
          r2, b2, g2, 1,
          r2, b2, g2, 1]),
      gl.STATIC_DRAW);
}

main();
你可能注意到这两个三角形是纯色的。我们传递给每个三角形的顶点的颜色值是相同的, 所以我们传递的varying会被插值成相同的颜色,如果我们传递不同的颜色,就会看到插值的颜色。
// 给矩形的两个三角形
// 设置颜色值并发到缓冲
function setColors(gl) {
  // 给每个顶点定义不同的颜色
  gl.bufferData(
      gl.ARRAY_BUFFER,
      new Float32Array(
        [ Math.random(), Math.random(), Math.random(), 1,
          Math.random(), Math.random(), Math.random(), 1,
          Math.random(), Math.random(), Math.random(), 1,
          Math.random(), Math.random(), Math.random(), 1,
          Math.random(), Math.random(), Math.random(), 1,
          Math.random(), Math.random(), Math.random(), 1]),
      gl.STATIC_DRAW);
}
运行下面的代码:
"use strict";

function main() {
  // Get A WebGL context
  /** @type {HTMLCanvasElement} */
  var canvas = document.getElementById("canvas");
  var gl = canvas.getContext("webgl");
  if (!gl) {
    return;
  }

  // setup GLSL program
  var program = webglUtils.createProgramFromScripts(gl, ["2d-vertex-shader", "2d-fragment-shader"]);

  // look up where the vertex data needs to go.
  var positionLocation = gl.getAttribLocation(program, "a_position");
  var colorLocation = gl.getAttribLocation(program, "a_color");

  // lookup uniforms
  var matrixLocation = gl.getUniformLocation(program, "u_matrix");

  // Create a buffer for the positons.
  var positionBuffer = gl.createBuffer();
  gl.bindBuffer(gl.ARRAY_BUFFER, positionBuffer);
  // Set Geometry.
  setGeometry(gl);

  // Create a buffer for the colors.
  var colorBuffer = gl.createBuffer();
  gl.bindBuffer(gl.ARRAY_BUFFER, colorBuffer);
  // Set the colors.
  setColors(gl);

  var translation = [200, 150];
  var angleInRadians = 0;
  var scale = [1, 1];

  drawScene();

  // Setup a ui.
  webglLessonsUI.setupSlider("#x", {value: translation[0], slide: updatePosition(0), max: gl.canvas.width });
  webglLessonsUI.setupSlider("#y", {value: translation[1], slide: updatePosition(1), max: gl.canvas.height});
  webglLessonsUI.setupSlider("#angle", {slide: updateAngle, max: 360});
  webglLessonsUI.setupSlider("#scaleX", {value: scale[0], slide: updateScale(0), min: -5, max: 5, step: 0.01, precision: 2});
  webglLessonsUI.setupSlider("#scaleY", {value: scale[1], slide: updateScale(1), min: -5, max: 5, step: 0.01, precision: 2});

  function updatePosition(index) {
    return function(event, ui) {
      translation[index] = ui.value;
      drawScene();
    }
  }

  function updateAngle(event, ui) {
    var angleInDegrees = 360 - ui.value;
    angleInRadians = angleInDegrees * Math.PI / 180;
    drawScene();
  }

  function updateScale(index) {
    return function(event, ui) {
      scale[index] = ui.value;
      drawScene();
    }
  }

  // Draw the scene.
  function drawScene() {
    webglUtils.resizeCanvasToDisplaySize(gl.canvas);

    // Tell WebGL how to convert from clip space to pixels
    gl.viewport(0, 0, gl.canvas.width, gl.canvas.height);

    // Clear the canvas.
    gl.clear(gl.COLOR_BUFFER_BIT);

    // Tell it to use our program (pair of shaders)
    gl.useProgram(program);

    // Turn on the position attribute
    gl.enableVertexAttribArray(positionLocation);

    // Bind the position buffer.
    gl.bindBuffer(gl.ARRAY_BUFFER, positionBuffer);

    // Tell the position attribute how to get data out of positionBuffer (ARRAY_BUFFER)
    var size = 2;          // 2 components per iteration
    var type = gl.FLOAT;   // the data is 32bit floats
    var normalize = false; // don't normalize the data
    var stride = 0;        // 0 = move forward size * sizeof(type) each iteration to get the next position
    var offset = 0;        // start at the beginning of the buffer
    gl.vertexAttribPointer(
        positionLocation, size, type, normalize, stride, offset)

    // Turn on the color attribute
    gl.enableVertexAttribArray(colorLocation);

    // Bind the color buffer.
    gl.bindBuffer(gl.ARRAY_BUFFER, colorBuffer);

    // Tell the color attribute how to get data out of colorBuffer (ARRAY_BUFFER)
    var size = 4;          // 4 components per iteration
    var type = gl.FLOAT;   // the data is 32bit floats
    var normalize = false; // don't normalize the data
    var stride = 0;        // 0 = move forward size * sizeof(type) each iteration to get the next position
    var offset = 0;        // start at the beginning of the buffer
    gl.vertexAttribPointer(
        colorLocation, size, type, normalize, stride, offset)

    // Compute the matrix
    var matrix = m3.projection(gl.canvas.clientWidth, gl.canvas.clientHeight);
    matrix = m3.translate(matrix, translation[0], translation[1]);
    matrix = m3.rotate(matrix, angleInRadians);
    matrix = m3.scale(matrix, scale[0], scale[1]);

    // Set the matrix.
    gl.uniformMatrix3fv(matrixLocation, false, matrix);

    // Draw the geometry.
    var primitiveType = gl.TRIANGLES;
    var offset = 0;
    var count = 6;
    gl.drawArrays(primitiveType, offset, count);
  }
}


// Fill the buffer with the values that define a rectangle.
// Note, will put the values in whatever buffer is currently
// bound to the ARRAY_BUFFER bind point
function setGeometry(gl) {
  gl.bufferData(
      gl.ARRAY_BUFFER,
      new Float32Array([
          -150, -100,
           150, -100,
          -150,  100,
           150, -100,
          -150,  100,
           150,  100]),
      gl.STATIC_DRAW);
}

// Fill the buffer with colors for the 2 triangles
// that make the rectangle.
// Note, will put the values in whatever buffer is currently
// bound to the ARRAY_BUFFER bind point
function setColors(gl) {
  // Make every vertex a different color.
  gl.bufferData(
      gl.ARRAY_BUFFER,
      new Float32Array(
        [ Math.random(), Math.random(), Math.random(), 1,
          Math.random(), Math.random(), Math.random(), 1,
          Math.random(), Math.random(), Math.random(), 1,
          Math.random(), Math.random(), Math.random(), 1,
          Math.random(), Math.random(), Math.random(), 1,
          Math.random(), Math.random(), Math.random(), 1]),
      gl.STATIC_DRAW);
}

main();
可能不值一提的是上例还演示了使用多个属性并且通过顶点着色器向片断着色器传值。 如果你看了处理图片的例子, 那里面还用了另外一个属性传递纹理坐标。
关于buffer和attribute的代码
缓冲操作是在GPU上获取顶点和其他顶点数据的一种方式。 gl.createBuffer创建一个缓冲;gl.bindBuffer是设置缓冲为当前使用缓冲; gl.bufferData将数据拷贝到缓冲,这个操作一般在初始化完成。
一旦数据存到缓冲中,还需要告诉WebGL怎么从缓冲中提取数据传给顶点着色器的属性。
要做这些,首先需要获取WebGL给属性分配的地址,如下方代码所示:
// 询问顶点数据应该放在哪里
var positionLocation = gl.getAttribLocation(program, "a_position");
var colorLocation = gl.getAttribLocation(program, "a_color");
这一步一般也是在初始化部分完成。
一旦知道了属性的地址,在绘制前还需要发出三个命令。
gl.enableVertexAttribArray(location);
这个命令是告诉WebGL我们想从缓冲中提供数据。
gl.bindBuffer(gl.ARRAY_BUFFER, someBuffer);
这个命令是将缓冲绑定到 ARRAY_BUFFER 绑定点,它是WebGL内部的一个全局变量。
gl.vertexAttribPointer(
    location,
    numComponents,
    typeOfData,
    normalizeFlag,
    strideToNextPieceOfData,
    offsetIntoBuffer);
这个命令告诉WebGL从 ARRAY_BUFFER 绑定点当前绑定的缓冲获取数据。 每个顶点有几个单位的数据(1 – 4),单位数据类型是什么(BYTE, FLOAT, INT, UNSIGNED_SHORT, 等等…), stride 是从一个数据到下一个数据要跳过多少位,最后是数据在缓冲的什么位置。
单位个数永远是 1 到 4 之间。
如果每个类型的数据都用一个缓冲存储,stride 和 offset 都是 0 。 对 stride 来说 0 表示 “用符合单位类型和单位个数的大小”。 对 offset 来说 0 表示从缓冲起始位置开始读取。 它们使用 0 以外的值时会复杂得多,虽然这样会取得一些性能能上的优势, 但是一般情况下并不值得,除非你想充分压榨WebGL的性能。
希望这些关于缓冲和属性的内容对你来说讲的足够清楚。
vertexAttribPointer 中的 normalizeFlag 参数是什么意思?
标准化标记(normalizeFlag)适用于所有非浮点型数据。如果传递false就解读原数据类型。 BYTE 类型的范围是从 -128 到 127,UNSIGNED_BYTE 类型的范围是从 0 到 255, SHORT 类型的范围是从 -32768 到 32767,等等…
如果标准化标记设为true,BYTE 数据的值(-128 to 127)将会转换到 -1.0 到 +1.0 之间, UNSIGNED_BYTE (0 to 255) 变为 0.0 到 +1.0 之间,SHORT 也是转换到 -1.0 到 +1.0 之间, 但比 BYTE 精确度高。
最常用的是标准化颜色数据。大多数情况颜色值范围为 0.0 到 +1.0。 使用4个浮点型数据存储红,绿,蓝和阿尔法通道数据时,每个顶点的颜色将会占用16字节空间, 如果你有复杂的几何体将会占用很多内存。代替的做法是将颜色数据转换为四个 UNSIGNED_BYTE , 其中 0 表示 0.0,255 表示 1.0。现在每个顶点只需要四个字节存储颜色值,省了 75% 空间。
我们来修改之前代码实现。当我们告诉WebGL如何获取颜色数据时将这样
// 告诉颜色属性如何从colorBuffer中提取数据 (ARRAY_BUFFER)
  var size = 4;                 // 每次迭代使用四个单位数据
  var type = gl.UNSIGNED_BYTE;  // 数据类型是8位的 UNSIGNED_BYTE 类型。
  var normalize = true;         // 标准化数据
  var stride = 0;               // 0 = 移动距离 * 单位距离长度sizeof(type)
                                // 每次迭代跳多少距离到下一个数据
  var offset = 0;               // 从缓冲的起始处开始
  gl.vertexAttribPointer(
      colorLocation, size, type, normalize, stride, offset)
如下向缓冲添加数据:
// 给矩形的两个三角形
// 设置颜色值并发到缓冲
function setColors(gl) {
  // 设置两个随机颜色
  var r1 = Math.random() * 256; // 0 到 255.99999 之间
  var b1 = Math.random() * 256; // 这些数据
  var g1 = Math.random() * 256; // 在存入缓冲时
  var r2 = Math.random() * 256; // 将被截取成
  var b2 = Math.random() * 256; // Uint8Array 类型
  var g2 = Math.random() * 256;

  gl.bufferData(
      gl.ARRAY_BUFFER,
      new Uint8Array(   // Uint8Array
        [ r1, b1, g1, 255,
          r1, b1, g1, 255,
          r1, b1, g1, 255,
          r2, b2, g2, 255,
          r2, b2, g2, 255,
          r2, b2, g2, 255]),
      gl.STATIC_DRAW);
}
结果:


 1302
1302


 被折叠的 条评论
为什么被折叠?
被折叠的 条评论
为什么被折叠?
 到【灌水乐园】发言


