


一、内核编译
jetson nano 的内核编译踩了不少坑,记录一下:
步骤如下:
1.下载交叉编译工具
这里的网址来自官网,可以会更新,如果下载不了,需要去官网下载。
2.解压工具
可以放在其他位置,我放在home目录下:
/home$ tar -xvf gcc-linaro-7.3.1-2018.05-x86_64_aarch64-linux-gnu.tar.xz
3.下载源码
这里的网址来自官网,可以会更新,如果下载不了,需要去官网下载。
/home$ wget https://developer.download.nvidia.cn/embedded/L4T/r32_Release_v7.1/Sources/T210/public_sources.tbz2
4.解压源码
/home$ tar -xjf public_sources.tbz2
5.进入源码目录
/home$ cd Linux_for_Tegra/source/public/
6.解压kernel
/home/Linux_for_Tegra/source/public$ tar -xjf kernel_src.tbz2
7.安装工具
/home/Linux_for_Tegra/source/public$ sudo apt install build-essential bc
8.设置内核输出目录
这里我把内核输出目录设置在了home下的kernel_out
/home/Linux_for_Tegra/source/public$ TEGRA_KERNEL_OUT=/home/kernel_out
9.设置交叉编译工具的环境变量
/home/Linux_for_Tegra/source/public$ export CROSS_COMPILE=/home/gcc-linaro-7.3.1-2018.05-x86_64_aarch64-linux-gnu/bin/aarch64-linux-gnu-
10.设置环境变量
这一步必须加
/home/Linux_for_Tegra/source/public$ export LOCALVERSION=-tegra
11.进入内核目录
/home/Linux_for_Tegra/source/public$ cd kernel/kernel-4.9/
12.新建内核输出目录
/home/Linux_for_Tegra/source/public/kernel/kernel-4.9$ mkdir -p $TEGRA_KERNEL_OUT
13.生成config文件
/home/Linux_for_Tegra/source/public/kernel/kernel-4.9$ make ARCH=arm64 O=$TEGRA_KERNEL_OUT tegra_defconfig
14.编译内核
/home/Linux_for_Tegra/source/public/kernel/kernel-4.9$ make ARCH=arm64 O=$TEGRA_KERNEL_OUT
内核编译完成以后会在设置的输出目录下生成Image文件TEGRA_KERNEL_OUT/arch/arm64/boot/Image
以及DTB
TEGRA_KERNEL_OUT/arch/arm64/boot/dts/
注意:遇到的坑!
在ubuntu下,如果在解压或者编译的时候提示没有权限,然后如果使用sudo指令,就会在最后一步14,提示编译错误!错误的log如下:LSE atomics not supported by binutils
arch/arm64/Makefile:49: LSE atomics not supported by binutils
  CHK     include/config/kernel.release
  Using /home/Linux_for_Tegra/source/public/kernel/kernel-4.9 as source for kernel
  GEN     ./Makefile
  CHK     include/generated/uapi/linux/version.h
  CHK     include/generated/utsrelease.h
  CC      kernel/bounds.s
gcc: error: unrecognized command line option ‘-mlittle-endian’; did you mean ‘-fconvert=little-endian’?
/home/Linux_for_Tegra/source/public/kernel/kernel-4.9/./Kbuild:20: recipe for target 'kernel/bounds.s' failed
make[2]: *** [kernel/bounds.s] Error 1
/home/Linux_for_Tegra/source/public/kernel/kernel-4.9/Makefile:1167: recipe for target 'prepare0' failed
make[1]: *** [prepare0] Error 2
make[1]: Leaving directory '/home/kernel_out'
Makefile:171: recipe for target 'sub-make' failed
make: *** [sub-make] Error 2
这是因为使用sudo没有root权限所致,所以在以上步骤的时候,需要获取root权限后操作,并且严格按照上面操作,需要添加sudo的地方添加,没有的地方不要加!!!
我在官网提交的以及官方的回复:
LSE atomics not supported by binutils - Jetson Nano - NVIDIA Developer Forums
另外,如果使用ubuntu远程登录默认root是不开放的,需要手动开放root登录:
1.设置密码
sudo passwd root2.修改文件
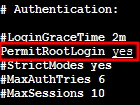
sudo vi /etc/ssh/sshd_config ,找到 #Authentication,将 PermitRootLogin 参数修改为 yes。如果 PermitRootLogin 参数被注释,请去掉首行的注释符号(#)如果没有就手动添加。如下图所示:
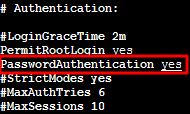
找到 #Authentication,将 PasswordAuthentication 参数修改为 yes。如下图所示:若 sshd_config 配置文件中无此配置项,则添加 PasswordAuthentication yes 项即可。
退出保存。
然后重启ssh服务:
sudo service ssh restart二、根文件系统及烧录
1.下载示例文件系统和驱动包
进入home目录:cd ~
下载文件:
root@VM-12-5-ubuntu:~# wget https://developer.download.nvidia.cn/embedded/L4T/r32_Release_v7.1/T210/Tegra_Linux_Sample-Root-Filesystem_R32.7.1_aarch64.tbz2
下载: L4TDriver Package
root@VM-12-5-ubuntu:~# wget https://developer.download.nvidia.cn/embedded/L4T/r32_Release_v7.1/T210/Jetson-210_Linux_R32.7.1_aarch64.tbz2
2. 解压驱动包
root@VM-12-5-ubuntu:~# tar -xjf Jetson-210_Linux_R32.7.1_aarch64.tbz2
解压出来会有一个文件名字为 Linux_for_Tgera的文件夹;
3.进入rootfs目录
root@VM-12-5-ubuntu:~# cd Linux_for_Tgera/rootfs
这时roofs是空的。
4.将示例文件系统解压
root@VM-12-5-ubuntu:~/Linux_for_Tegra/rootfs# tar -jxpf ../../Tegra_Linux_Sample-Root-Filesystem_R32.7.1_aarch64.tbz2
现在rootfs已经装好了文件系统。
5.运行脚本
root@VM-12-5-ubuntu:~/Linux_for_Tegra/rootfs# cd ..
root@VM-12-5-ubuntu:~/Linux_for_Tegra# sudo ./apply_binaries.sh
运行apply_binary .sh脚本将NVIDIA用户空间库复制到目标文件系统中。
注意,这里有可能出现ERROR qemu not found! 的问题,需要安装一下工具:
sudo apt-get install qemu-user-static
6.替换Image文件
root@VM-12-5-ubuntu:~/Linux_for_Tegra# cp /home/kernel_out/arch/arm64/boot/Image kernel/Image
7.替换DTB文件
root@VM-12-5-ubuntu:~/Linux_for_Tegra# cp -r /home/kernel_out/arch/arm64/boot/dts/* kernel/dtb/
8.安装内核模块
sudo make ARCH=arm64 O=$TEGRA_KERNEL_OUT modules_install ~/Linux_for_Tegra/rootfs/
如果看到报错:make: *** No rule to make target 'modules_install'. Stop.
即没有规则去做模块的安装。
这是因为,命令语句运行时依赖Makefile,所以一定需要进入到内核输出目录下即我们的kernel_out目录下运行;
root@debian:/home/kernel_out# make ARCH=arm64 O=$TEGRA_KERNEL_OUT modules_install INSTALL_MOD_PATH=~/Linux_for_Tegra/rootfs/
9.烧录驱动
首先需要载板上电,按住reset键;根据不同的板子,像我们用的nano 4G板子,需要用跳帽将pin 9 pin10连接即FC rec和GND,然后上电进入Recovery 模式,此时在linux主机上使用命令:lsusb
如果看到:Bus <bbb> Device <ddd>: ID 0955: <nnnn> Nvidia Corp.
Where:
•<bbb> is any three-digit number
•<ddd> is any three-digit number
•<nnnn> is a four-digit number that represents the type of Jetson module:
说明已经进入到Recovery 模式;
运行脚本:sudo ./flash.sh ${BOARD} mmcblk0p1
例如我们的是用sudo ./flash.sh jetson-nano-qspi-sd mmcblk0p1
如果是emmc版本的,需要将中间的参数替换为: jetson-nano-emmc
${BOARD}的值是根据你自己的设备查询得到:
官网的表格如下:
| Jetson Nano 2GB P3448-0003 |
| For educational & experimental use only. Internal QSPI‑NOR & microSD card. | |||
| Jetson Nano 4GB P3448-0000 | jetson-nano-devkit or jetson-nano-qspi-sd | For development use only. Internal built-in QSPI‑NOR & on-module microSD card. |
另外,flash脚本在驱动包解压后的~/Linux_for_Tegra# ./flash.sh文件夹下!
等待10分钟就能刷写好。完工!
10.生成镜像文件
如果没有linux主机或者不想使用脚本flash.h烧录的话,也可以生成一个跟官方镜像文件一样的img文件,然后按照官方的的方式使用ether工具烧录到sd卡内;
进入驱动文件夹的tools目录,运行构建脚本:
/Linux_for_Tegra/tools$ sudo ./jetson-disk-image-creator.sh -o my_linux_imge -b jetson-nano -r 300
其中,my_linux_imge是生成的imge文件名字,如果使用jetson-nano 4G版本,-b后面就填写jetson-nano,-r后面填300;
有可能会出现提示缺少xmllint,直接安装一个
sudo apt-get install libxml2-utils
若提示sgdisk not found,安装一个即可
sudo apt-get install gdisk
运行以后就会在当前文件夹内生成img文件,直接使用ether烧录即可。
三、内核裁剪
默认第一步已经完成了内核编译,并且没有出错,接下来进行内核裁剪;
进入到内核源码目录:
先用
make ARCH=arm64 O=$TEGRA_KERNEL_OUT tegra_defconfig
在内核输出目录里面创建对应的```.config```文件
然后以此config文件为模板,配置自己需要的内核
cp ${TEGRA_KERNEL_OUT}/.config /Linux_for_Tegra/source/public/kernel/kernel-4.9
拷贝模板配置文件
运行命令: make ARCH=arm64 menuconfig
若提示错误,则安装一个
sudo apt-get install libncurses5-dev
然后继续运行上面的命令,如果不出错的话会进入到一个内核裁剪的图形化界面;
更新.config文件
将不需要的部分去掉以后,保存在.config配置文件内;
运行内核编译指令:make ARCH=arm64 CROSS_COMPILE=aarch64-linux-gnu-
就会在当前源码根目录下生成编译好的内核文件。
上面的命令运行的前提是你将交叉编译工具在环境变量中进行了配置。
如下:
export PATH=/opt/gcc-linaro-7.3.1-2018.05-x86_64_aarch64-linux-gnu/bin/:$PATH
如果想要跟官网一样在kernel_out目录下输出内核编译的文件,则需要在kernel_out目录下运行
make ARCH=arm64 menuconfig
修改需要的配置,保存.config文件。然后回到kernel源码的目录,我的是/Linux_for_Tegra/source/public/kernel/kernel-4.9 运行如下指令:
make ARCH=arm64 O=${TEGRA_KERNEL_OUT} -j4
然后编译后的内核就会在kernel_out输出了;
其实,官网的生成默认.config文件以后,同时会生成makeifle文件,内容就是回到kernel的源码目录进行编译,我们在内核源码目录执行的指令
make ARCH=arm64 O=${TEGRA_KERNEL_OUT} -j4
就会运行内核输出目录里面的makefile,根据内核输出目录的.config配置内核编译选项。但是我发现这个.config并不能直接拷贝,例如如果在内核源码目录执行了make menuconfig,生成的.config,直接拷贝到kernel_out目录,覆盖.config编译就会报错。所以,内核编译的时候不止会用.config。还会调用include/generated/autoconf.h;这个头文件其实是跟.config同步生成的,所有的选项以宏的形式保存在这个文件中,内核中的源代码会包含这个.h文件,根据宏的定义情况进行条件编译;所以如果拷贝.confg的和还需要同步拷贝这个.h文件,并且可能还需要拷贝scripts下的所有文件。这个我没有测试。


 585
585


 被折叠的 条评论
为什么被折叠?
被折叠的 条评论
为什么被折叠?
 到【灌水乐园】发言


