


CUDA进行RGB图像灰度转换
[设计流程]
1.使用OpenCV中imread()函数传入图片;
2.读取图片像素值,使用imgHeight和imgWidth储存;
3. 直方图统计像素值,对灰度直方图数组初始化;
4.在GPU中开辟输入输出空间,分配内存空间;
5.将图片数据传入GPU;
6.并行灰度转换,clock_t统计执行时间,添加cudaDeviceSynchronize()同步CPU和GPU,否则测速结果为CPU启动内核函数的时间;
7.串行灰度转换,并统计时间;
8.将数据从GPU传回CPU,imwrite()函数生成灰度图片;
9.释放内存;
10.分析实验数据和结果。
[实验数据]
执行时间比对:


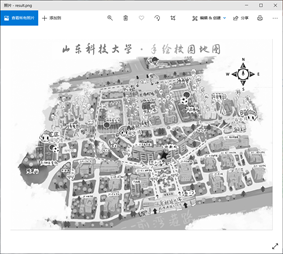
下图为未完成的灰度图像,需要继续等待:

[实验结果及分析]
CPU串行时间约为CUDA并行方式的26.63929倍。在执行时间统计过程中,有出现cuda并行执行时间为0.0000000000的情况,但串行时间正常,并且能正常输出灰度变换后的图像,查询资料后推测可能是编译器的原因导致。在进行imwrite()灰度图像生成的过程中耗费时间较多,使用的样例图片(testpic2.png)大小为46253KB,在生成灰度图片(result.png)过程中,灰度图片的大小逐渐增加,在没有完全生成灰度图片前,图片下半部分为黑色,可以得知imwrite()为逐行写入灰度值。
[源代码]
[show_image.cu]
#include "cuda_runtime.h"
#include <cuda.h>
#include <time.h>
#include <vector>
#include <opencv2/opencv.hpp>
#include  "opencv2/highgui.hpp"
#include <iostream>
#include <math.h>
using namespace std;
using namespace cv;

//输入图像为BGR图,将其转化为gray图
__global__ void rgb2grayInCuda(uchar3 *dataIn, unsigned char *dataOut, int imgHeight, int imgWidth)
{

    //图片二维扫描,分别有x方向,y方向的像素点
    int xIndex = threadIdx.x + blockIdx.x * blockDim.x;	//表示x方向上的ID
    int yIndex = threadIdx.y + blockIdx.y * blockDim.y;	//表示y方向上的ID
    //灰度变换操作
    if (xIndex < imgWidth && yIndex < imgHeight)
    {

        uchar3 rgb = dataIn[yIndex * imgWidth + xIndex];
        dataOut[yIndex * imgWidth + xIndex] = 0.299f * rgb.x + 0.58
最低0.47元/天 解锁文章


 5976
5976


 被折叠的 条评论
为什么被折叠?
被折叠的 条评论
为什么被折叠?
 到【灌水乐园】发言


