


文章目录
确认你的主机是否有16G及以上的显存
如果没有16G的显存的话后面要用量化模型
基于GPU部署ChatGLM3模型
1、查看是否有显卡驱动
nvidia-smi

报错就是没有
2、查看是否有cuda驱动
nvcc -V

报错就是没有
3、安装NVIDIA驱动
先更新一下软件源
sudo apt-get update
查看显卡硬件支持的驱动类型
ubuntu-drivers devices
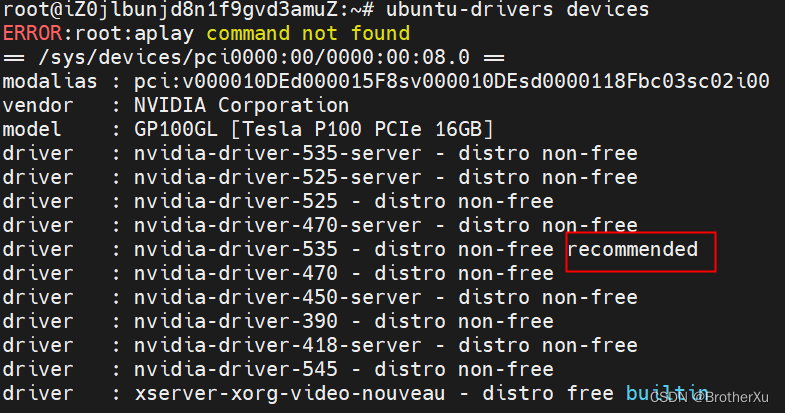
可以自动安装推荐版本
sudo ubuntu-drivers autoinstall
在安装过程中,CPU可能会打满
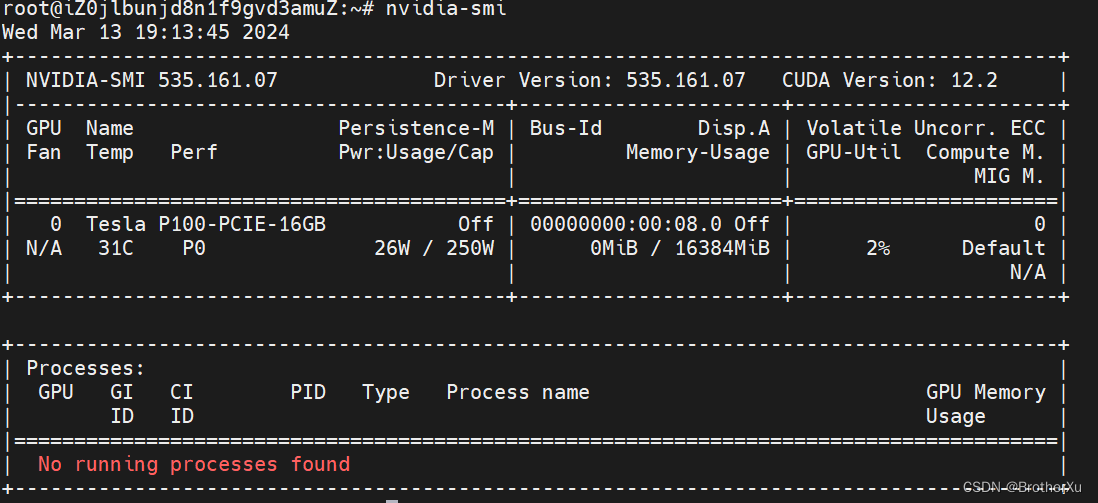
成功了,提示CUDA Version: 12.2 表示这个显卡最高可以支持CUDA12.2版本
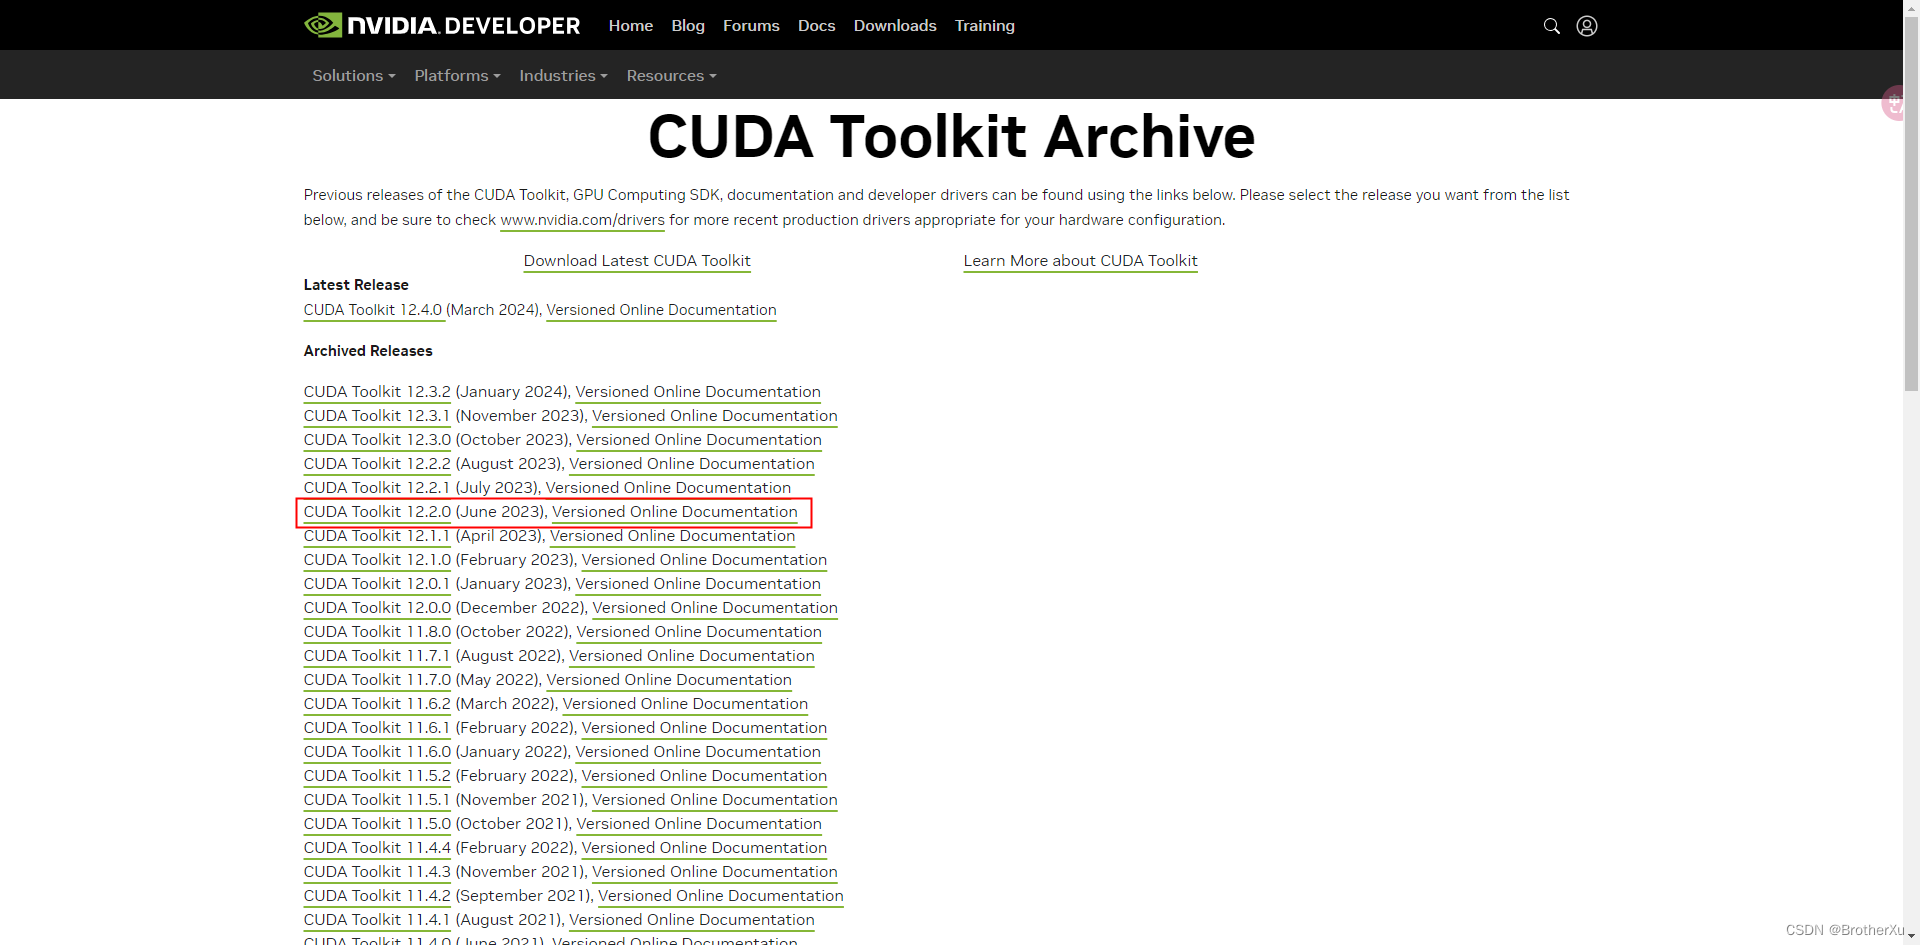
4、安装CUDA
安装CUDA Toolkit
下载地址:https://developer.nvidia.com/cuda-toolkit-archive
选择这个
根据官网提示进行安装
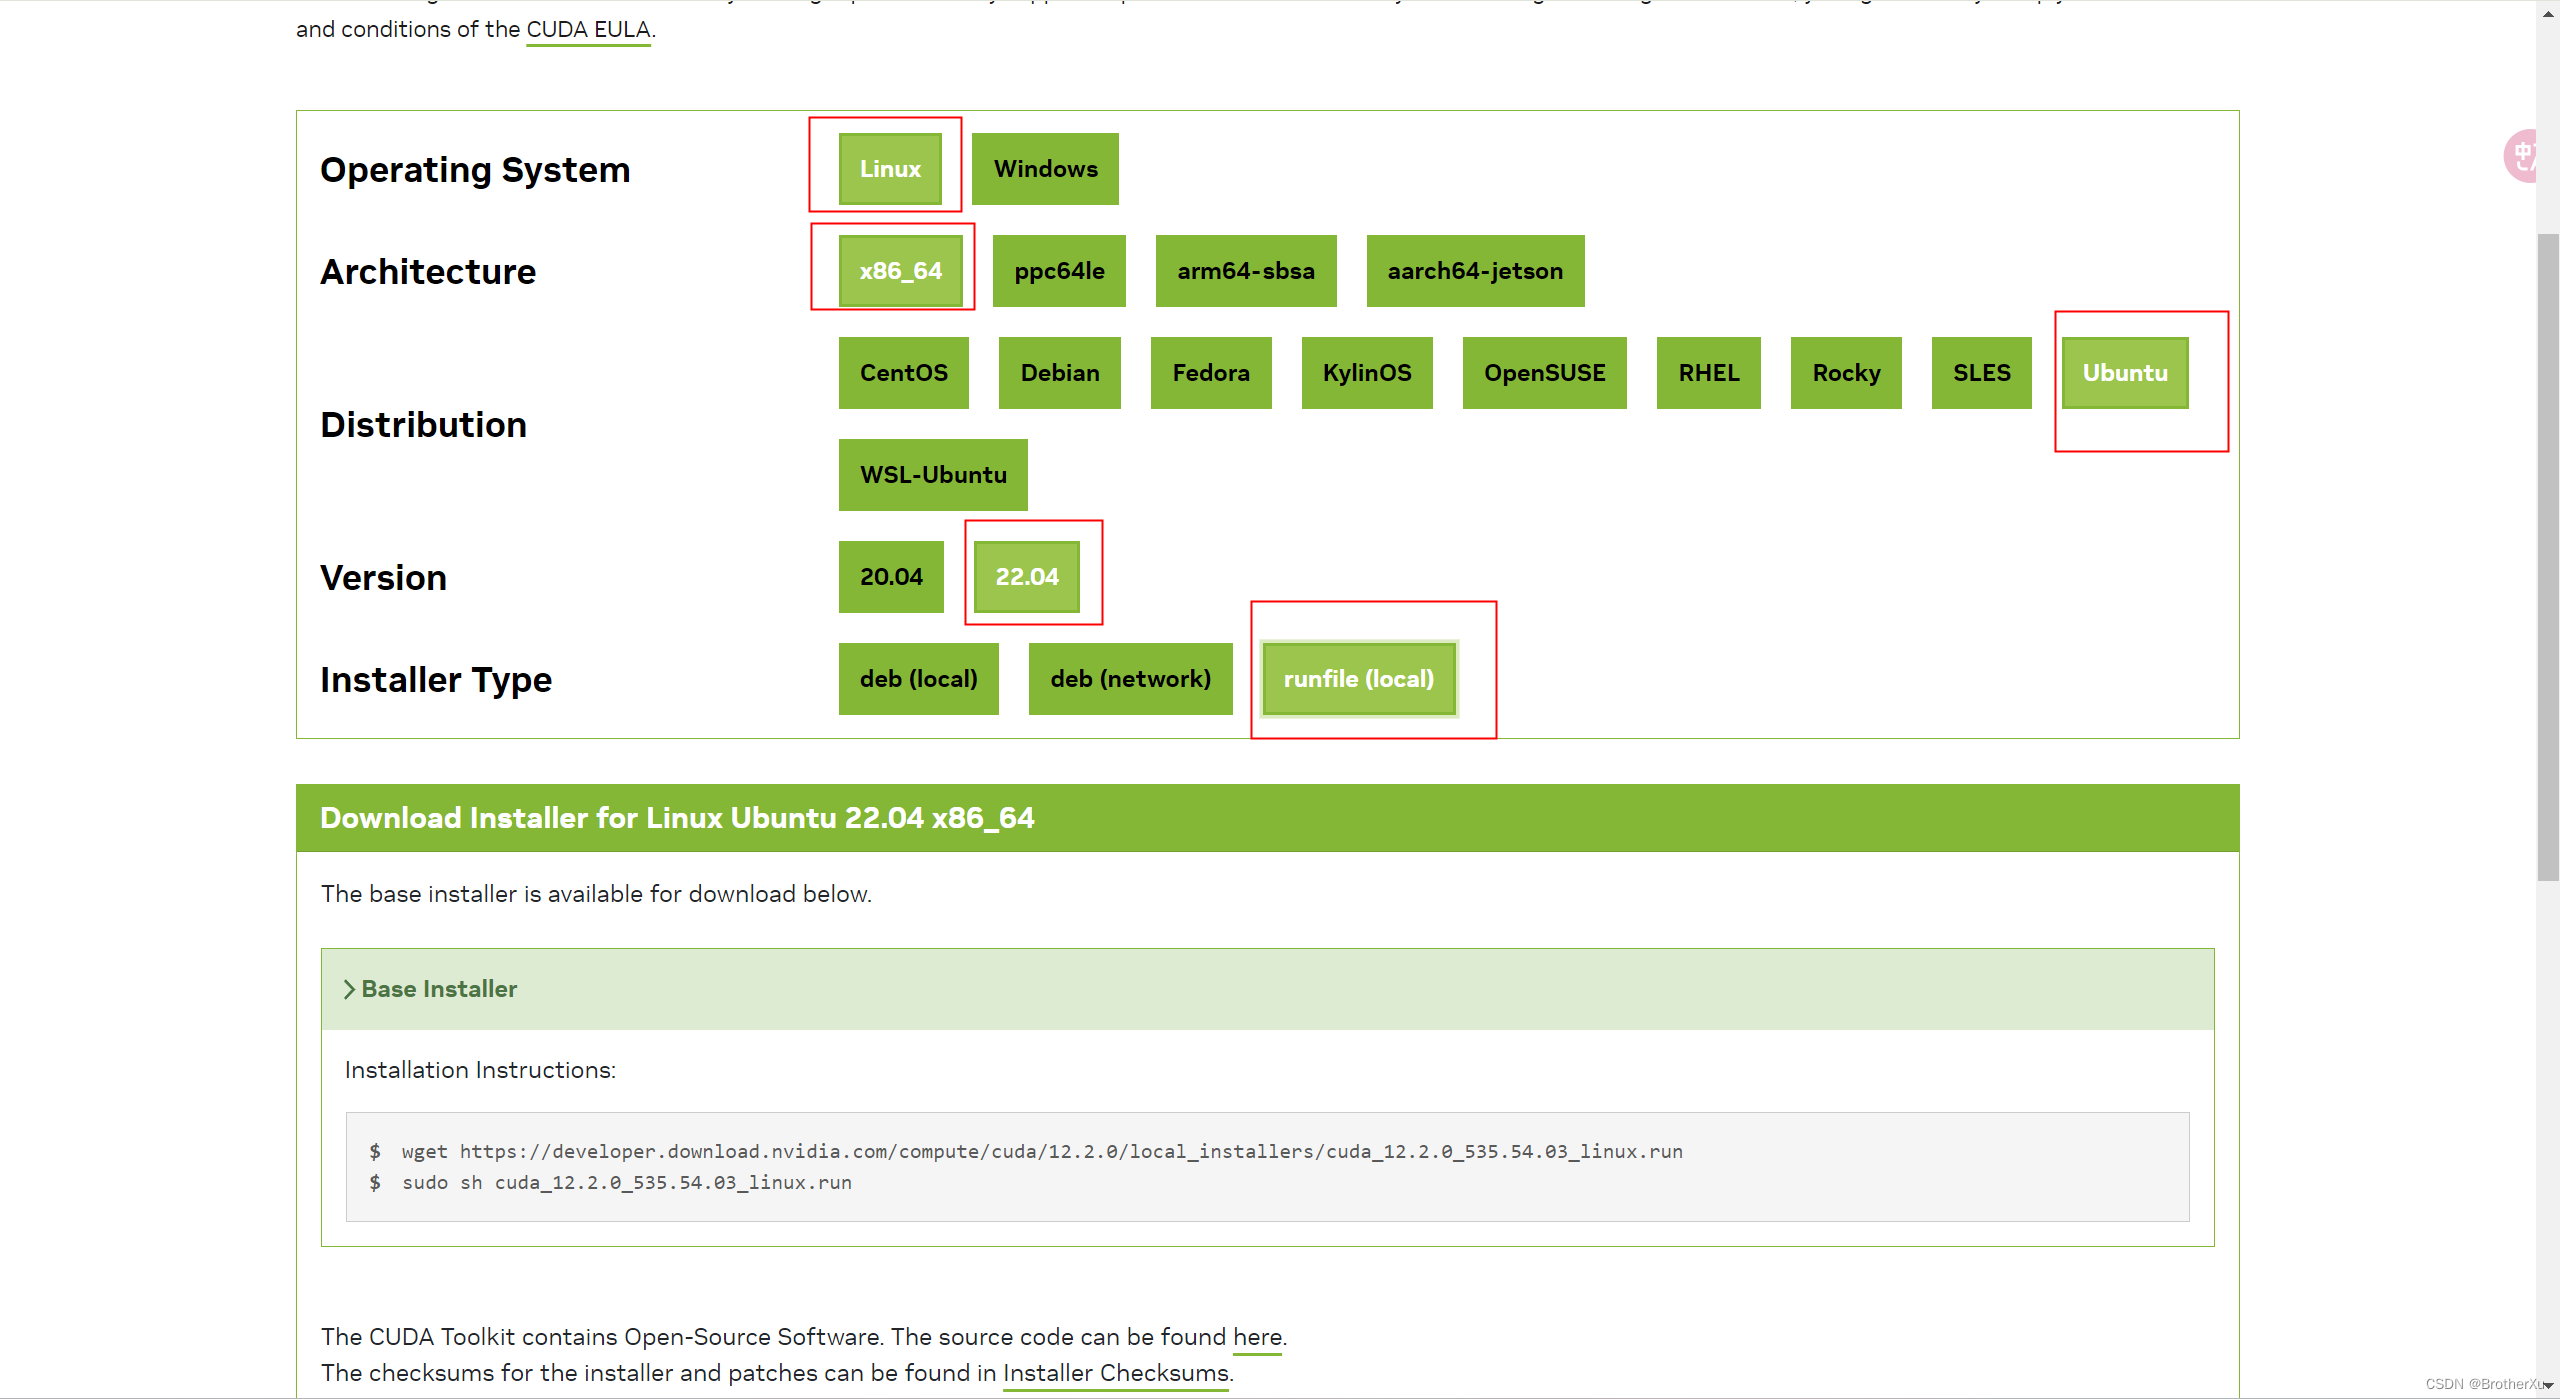
wget https://developer.download.nvidia.com/compute/cuda/12.2.0/local_installers/cuda_12.2.0_535.54.03_linux.run
sudo sh cuda_12.2.0_535.54.03_linux.run
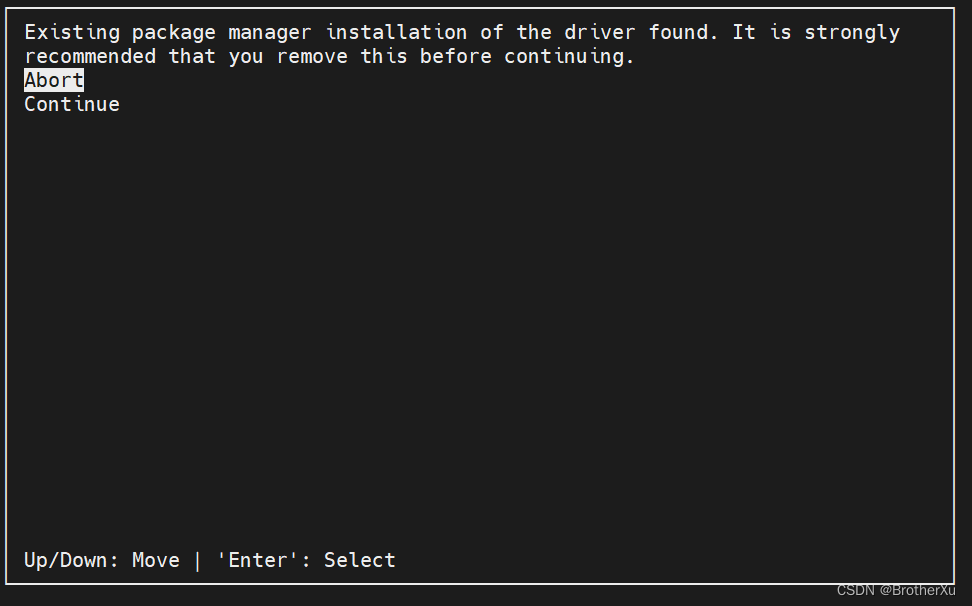
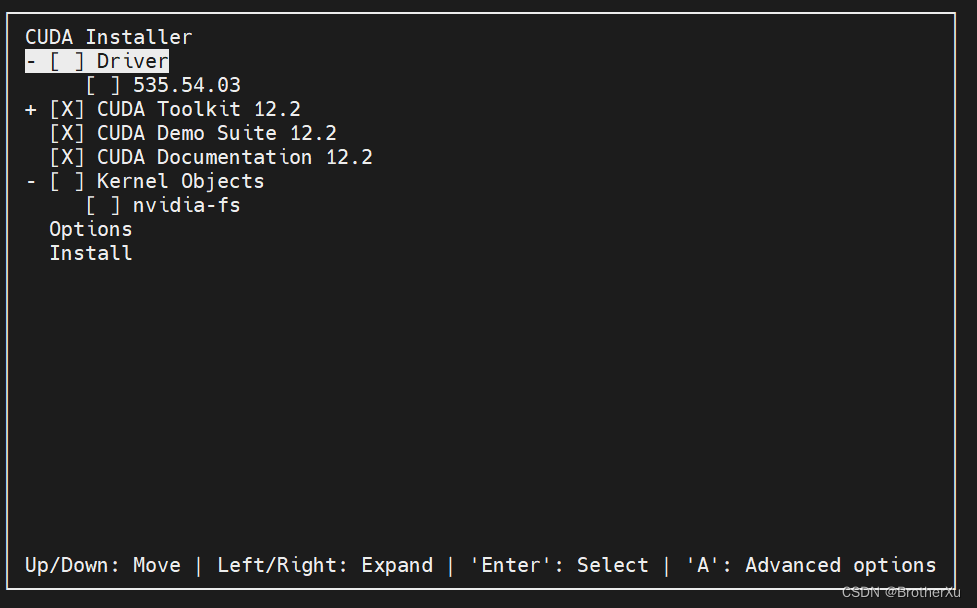
按空格把Driver取消掉,然后Install
安装完成,但还没完全完成,需要添加环境变量
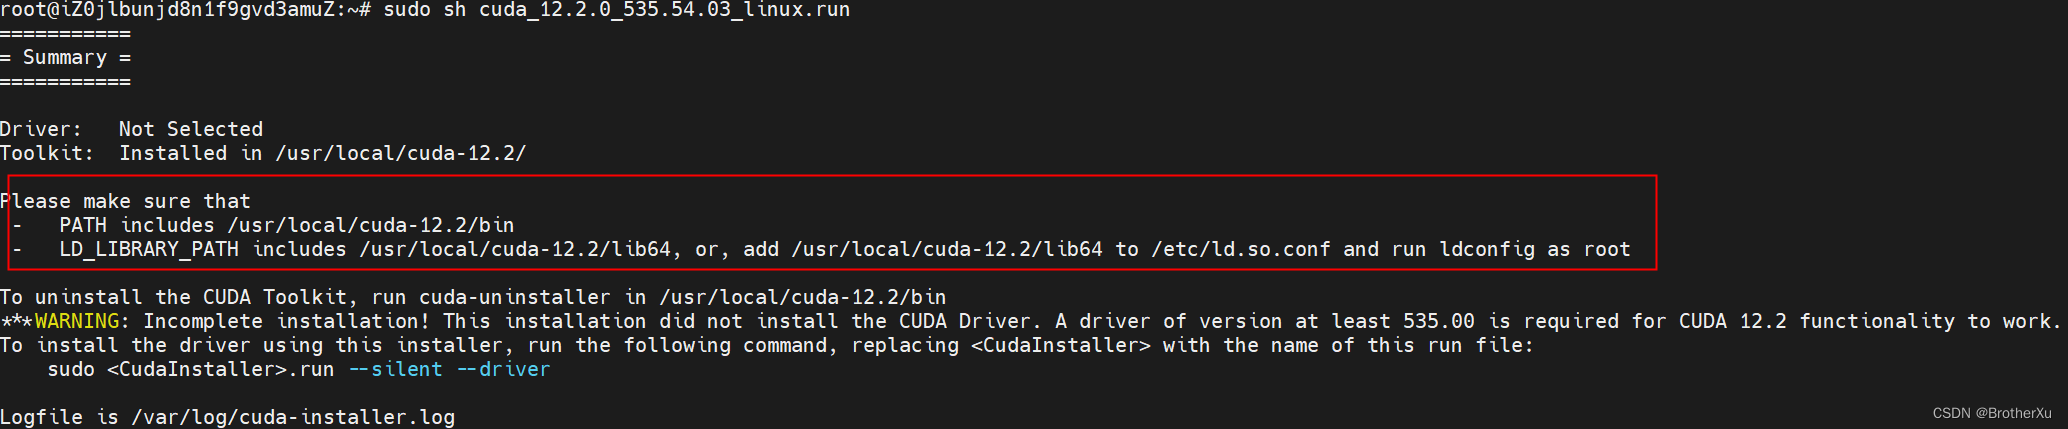
Please make sure that
 -   PATH includes /usr/local/cuda-12.2/bin
 -   LD_LIBRARY_PATH includes /usr/local/cuda-12.2/lib64, or, add /usr/local/cuda-12.2/lib64 to /etc/ld.so.conf and run ldconfig as root

vim ~/.bashrc

export PATH=$PATH:/usr/local/cuda-12.2/bin
export LD_LIBRARY_PATH=$LD_LIBRARY_PATH:/usr/local/cuda-12.2/lib64

source ~/.bashrc
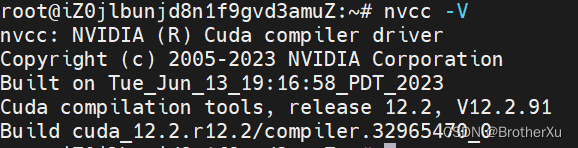
验证一下
nvcc -V
5、安装cuDNN
进官网看看cudnn 和cuda的版本对应关系:
https://developer.nvidia.com/rdp/cudnn-archive#a-collapse742-10
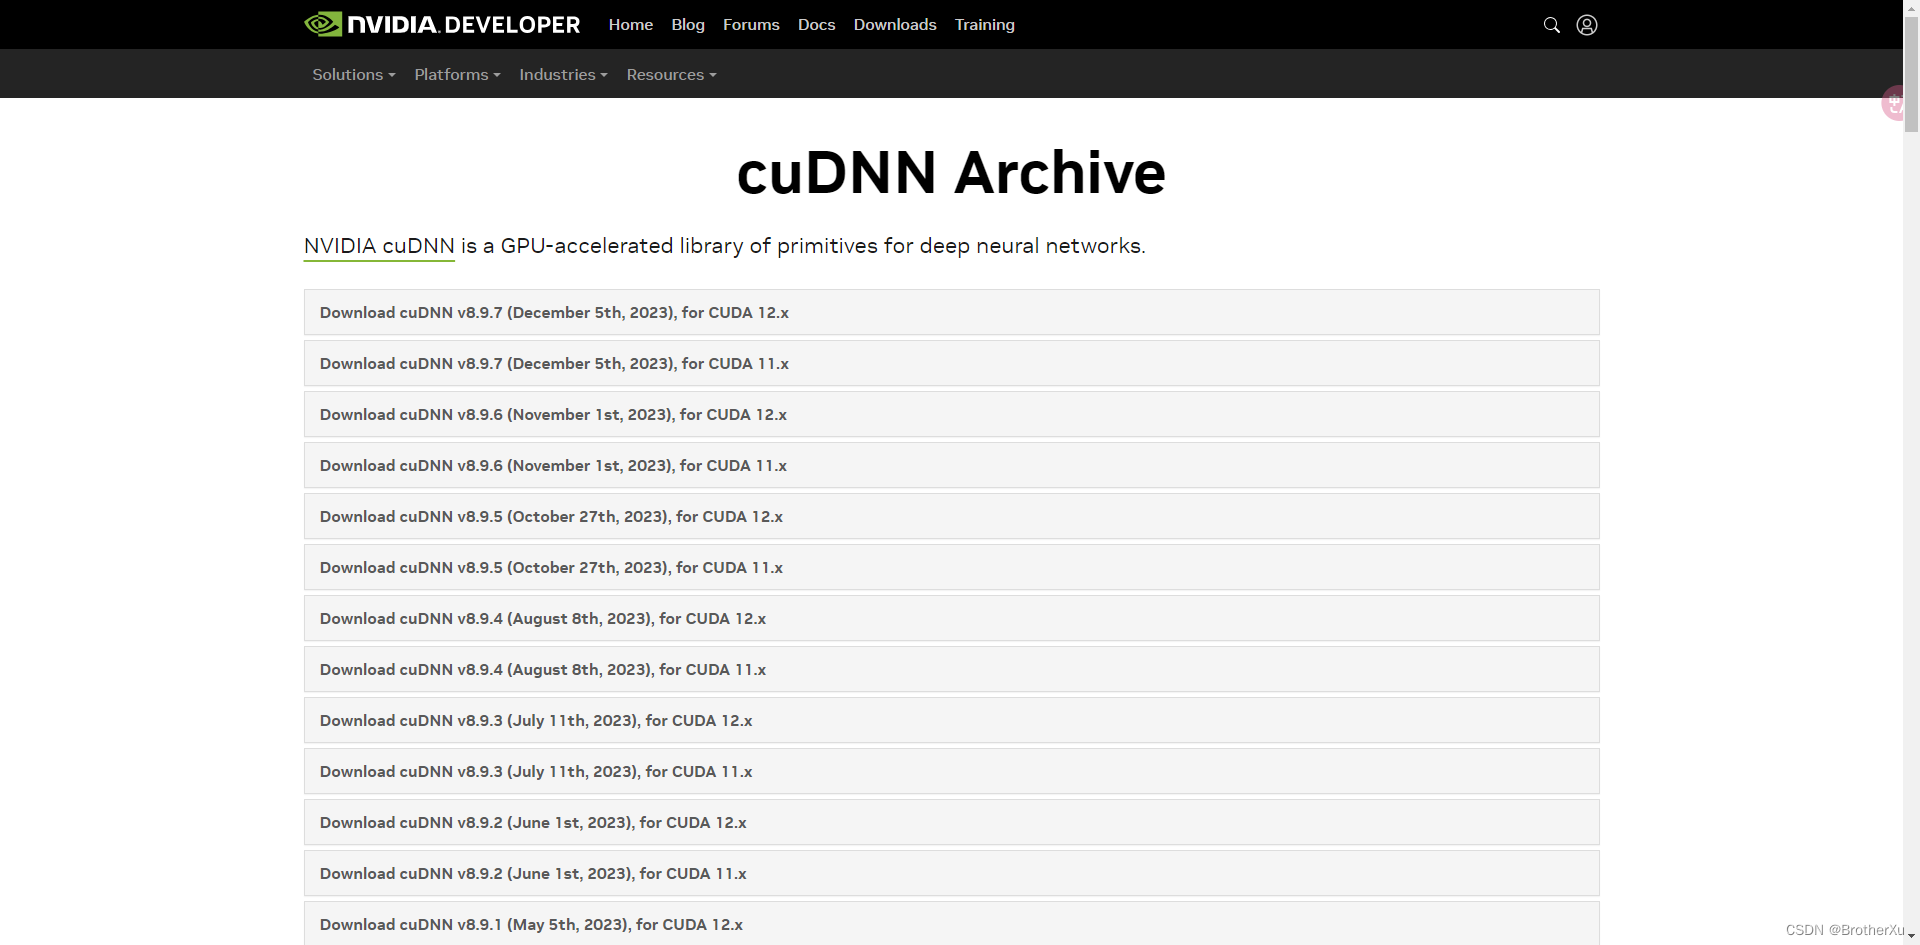
这里下载需要验证NVIDIA 的账号权限,先下载到本地后面再传到服务器
# 直接安装
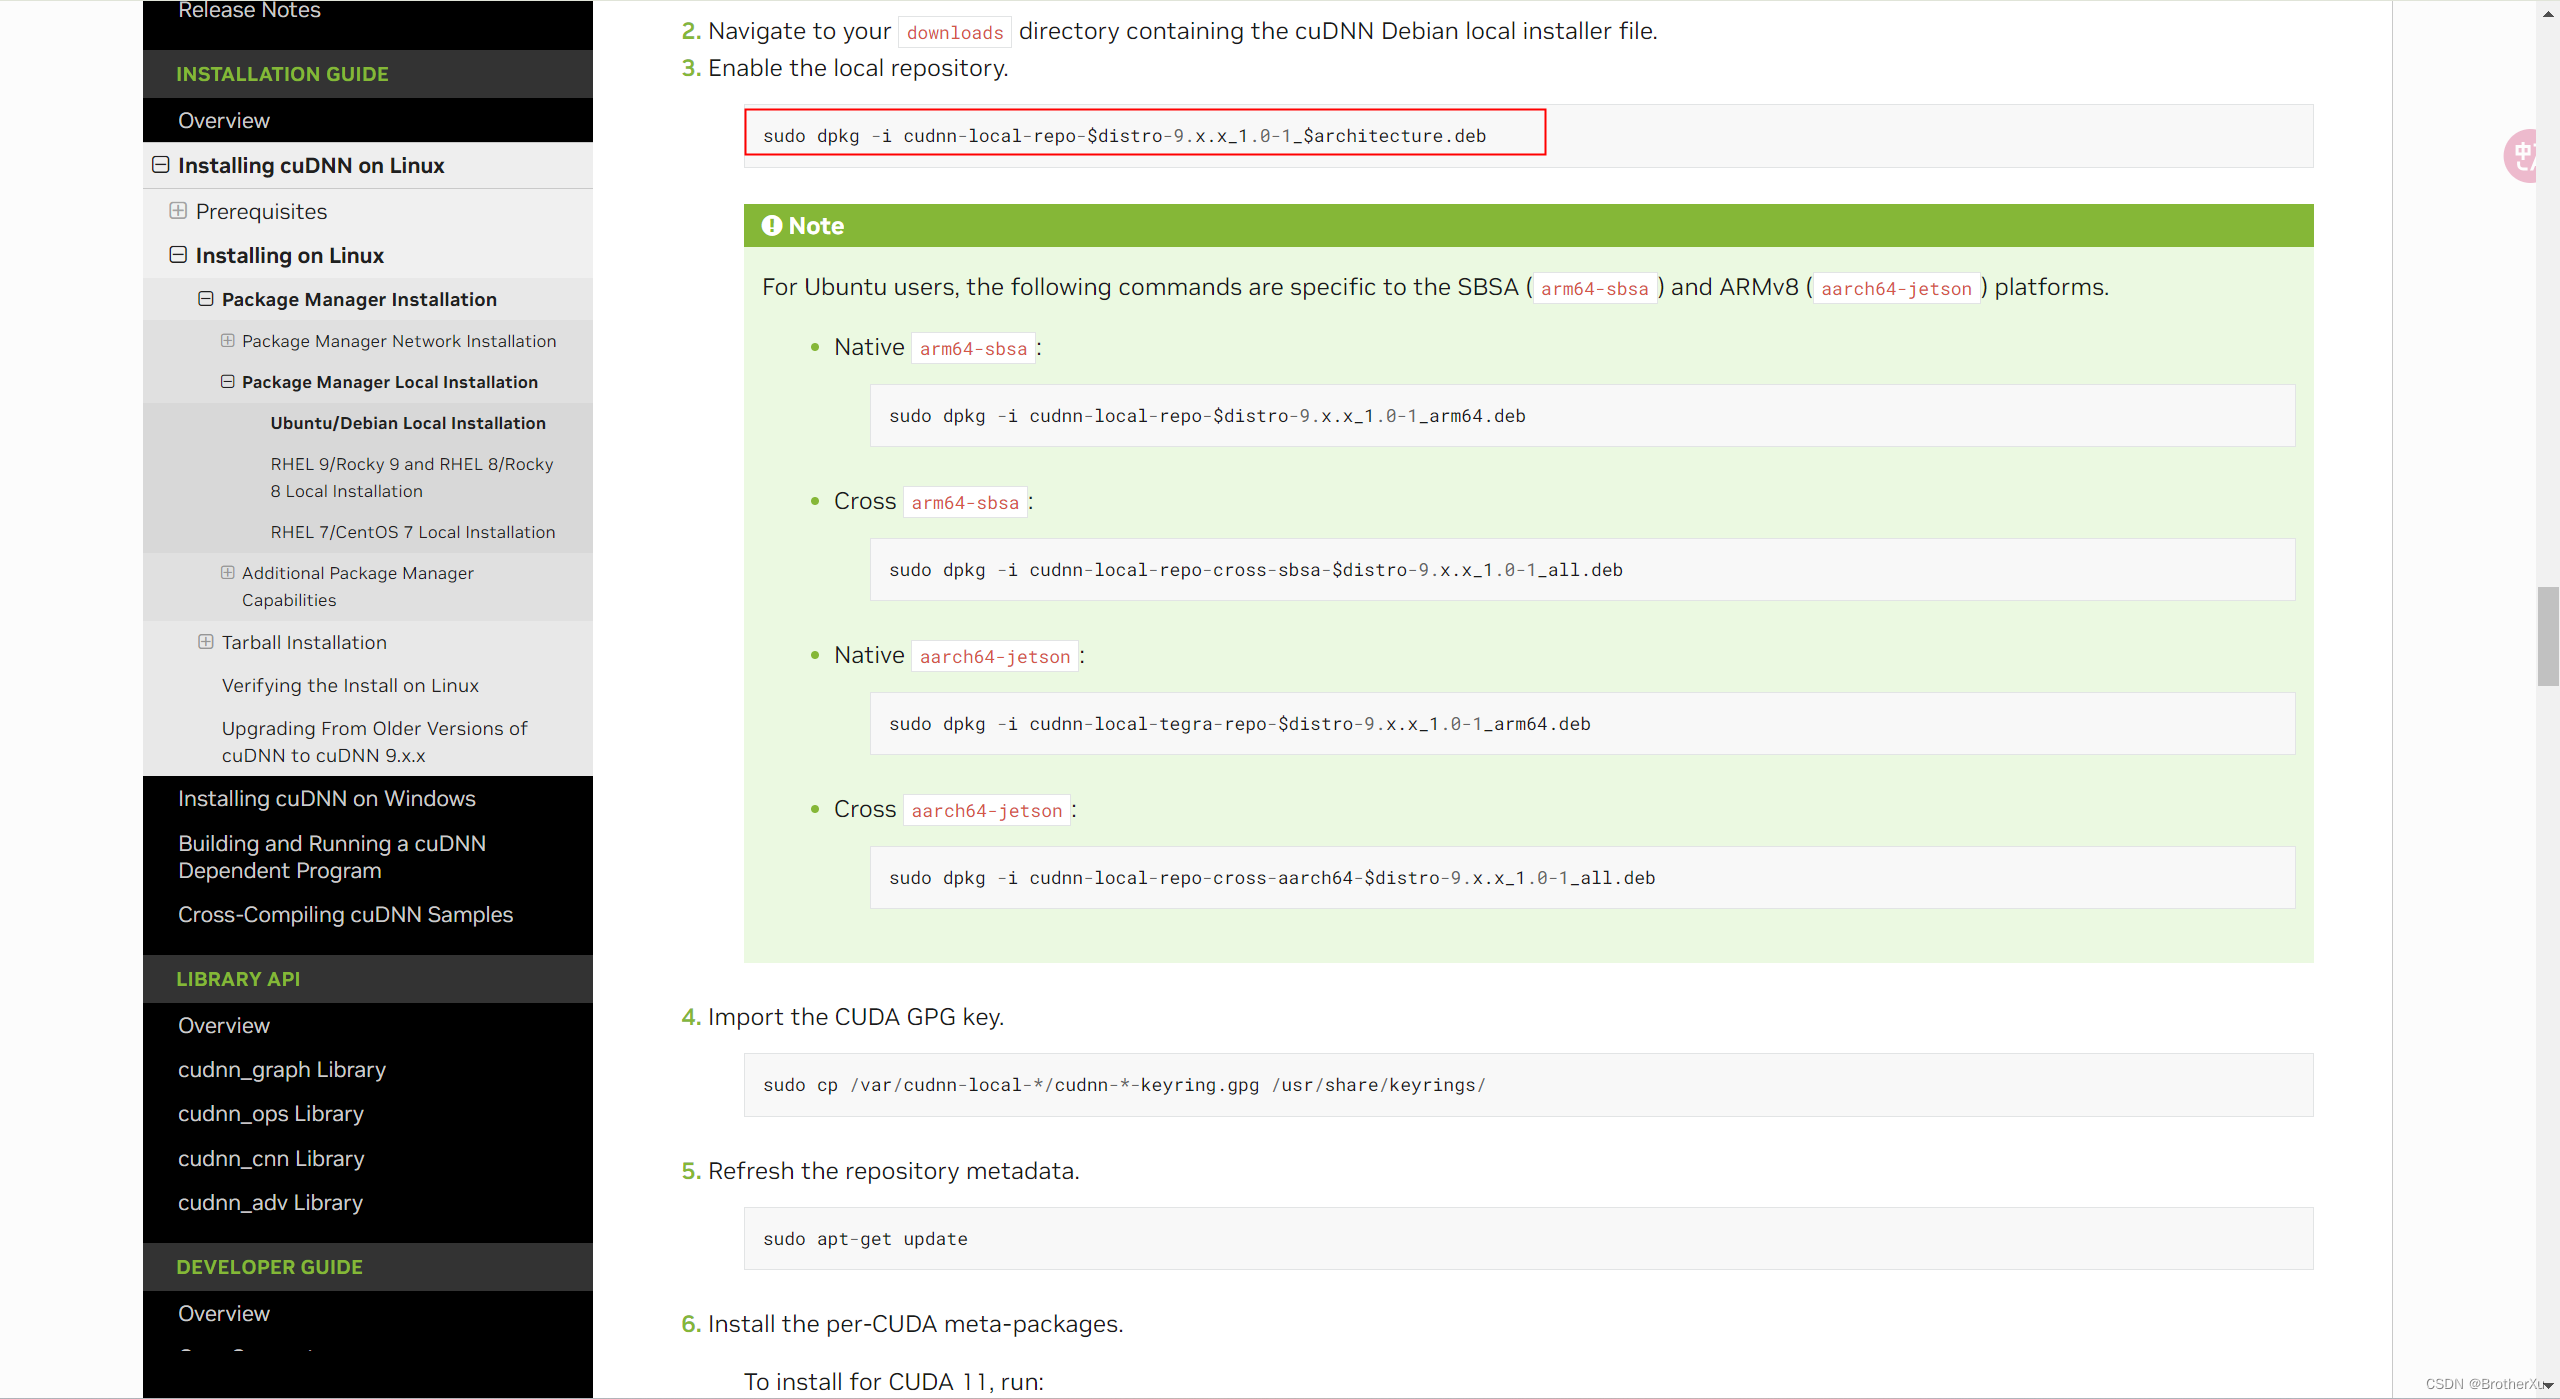
sudo dpkg -i cudnn-local-repo-ubuntu2204-8.9.7.29_1.0-1_amd64.deb

sudo cp /var/cudnn-local-repo-ubuntu2204-8.9.7.29/cudnn-local-08A7D361-keyring.gpg /usr/share/keyrings/
更新一下软件源
sudo apt-get update
# 这里需要指定具体的CUDA版本和cuDNN版本
sudo apt-get install libcudnn8=8.9.7.29-1+cuda12.2
sudo apt-get install libcudnn8-dev=8.9.7.29-1+cuda12.2
sudo apt-get install libcudnn8-samples=8.9.7.29-1+cuda12.2
# 执行如下命令
cp -r /usr/src/cudnn_samples_v8/ $HOME
cd $HOME/cudnn_samples_v8/mnistCUDNN
make clean && make
如果有报错
# 如果有报错
rm -rf *o
rm -rf mnistCUDNN
CUDA_VERSION is 12020
Linking agains cublasLt = true
CUDA VERSION: 12020
TARGET ARCH: x86_64
HOST_ARCH: x86_64
TARGET OS: linux
SMS: 50 53 60 61 62 70 72 75 80 86 87 90
test.c:1:10: fatal error: FreeImage.h: No such file or directory
    1 | #include "FreeImage.h"
      |          ^~~~~~~~~~~~~
compilation terminated.
>>> WARNING - FreeImage is not set up correctly. Please ensure FreeImage is set up correctly. <<<
[@] /usr/local/cuda/bin/nvcc -I/usr/local/cuda/include -I/usr/local/cuda/include -IFreeImage/include -ccbin g++ -m64 -gencode arch=compute_50,code=sm_50 -gencode arch=compute_53,code=sm_53 -gencode arch=compute_60,code=sm_60 -gencode arch=compute_61,code=sm_61 -gencode arch=compute_62,code=sm_62 -gencode arch=compute_70,code=sm_70 -gencode arch=compute_72,code=sm_72 -gencode arch=compute_75,code=sm_75 -gencode arch=compute_80,code=sm_80 -gencode arch=compute_86,code=sm_86 -gencode arch=compute_87,code=sm_87 -gencode arch=compute_90,code=sm_90 -gencode arch=compute_90,code=compute_90 -o fp16_dev.o -c fp16_dev.cu
[@] g++ -I/usr/local/cuda/include -I/usr/local/cuda/include -IFreeImage/include -o fp16_emu.o -c fp16_emu.cpp
[@] g++ -I/usr/local/cuda/include -I/usr/local/cuda/include -IFreeImage/include -o mnistCUDNN.o -c mnistCUDNN.cpp
[@] /usr/local/cuda/bin/nvcc -ccbin g++ -m64 -gencode arch=compute_50,code=sm_50 -gencode arch=compute_53,code=sm_53 -gencode arch=compute_60,code=sm_60 -gencode arch=compute_61,code=sm_61 -gencode arch=compute_62,code=sm_62 -gencode arch=compute_70,code=sm_70 -gencode arch=compute_72,code=sm_72 -gencode arch=compute_75,code=sm_75 -gencode arch=compute_80,code=sm_80 -gencode arch=compute_86,code=sm_86 -gencode arch=compute_87,code=sm_87 -gencode arch=compute_90,code=sm_90 -gencode arch=compute_90,code=compute_90 -o mnistCUDNN fp16_dev.o fp16_emu.o mnistCUDNN.o -I/usr/local/cuda/include -I/usr/local/cuda/include -IFreeImage/include -L/usr/local/cuda/lib64 -L/usr/local/cuda/lib64 -L/usr/local/cuda/lib64 -lcublasLt -LFreeImage/lib/linux/x86_64 -LFreeImage/lib/linux -lcudart -lcublas -lcudnn -lfreeimage -lstdc++ -lm
执行下面这两个
sudo apt-get install libfreeimage3 libfreeimage-dev
sudo apt-get install g++ freeglut3-dev build-essential libx11-dev libxmu-dev libxi-dev libglu1-mesa libglu1-mesa-dev
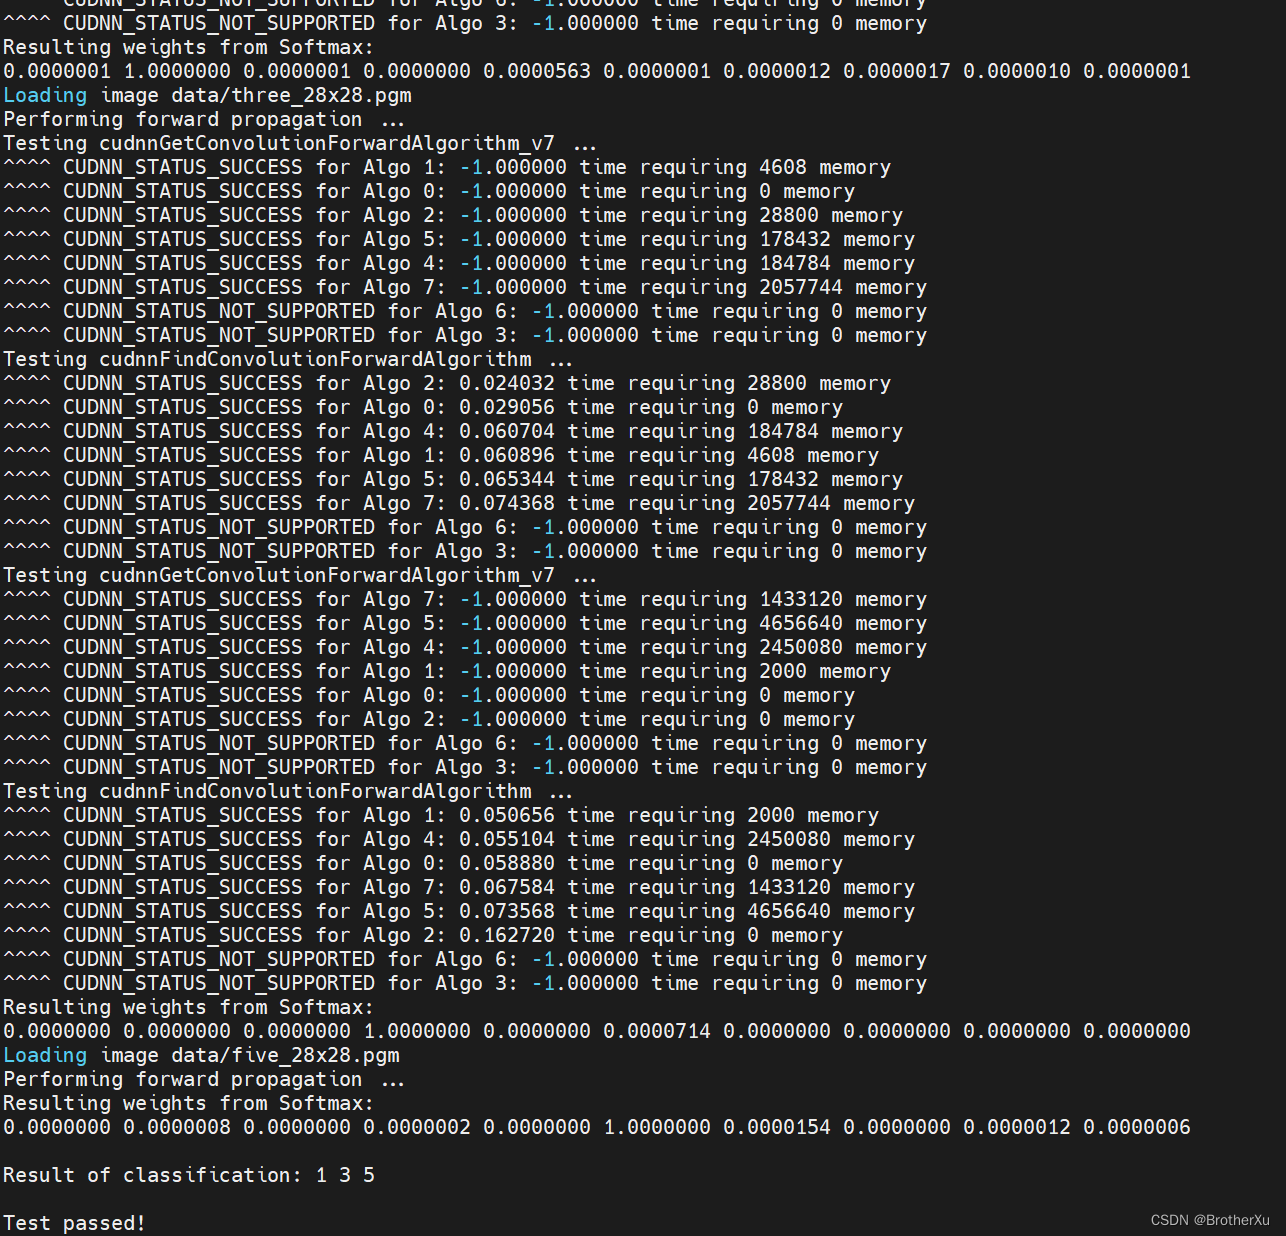
安装成功
输入这个可以看到cuudn的版本897 说明安装成功了
cat /usr/include/cudnn_version.h | grep CUDNN_MAJOR -A 2

6、部署模型
6.1、安装Anaconda(可选,如果电脑没有Python环境可以安装)
安装Anaconda:Anaconda | The World’s Most Popular Data Science Platform,选择Linux下载
sh Anaconda3-2024.02-1-Linux-x86_64.sh
vim ~/.bashrc
export PATH="/root/anaconda3/bin:$PATH" 这里换成自己的路径
source ~/.bashrc

添加镜像源(永久添加)
conda config --add channels https://mirrors.tuna.tsinghua.edu.cn/anaconda/pkgs/free/
conda config --add channels https://mirrors.tuna.tsinghua.edu.cn/anaconda/pkgs/main/
conda config --add channels https://mirrors.tuna.tsinghua.edu.cn/anaconda/cloud/conda-forge/
# 设置搜索时显示通道地址
conda config --set show_channel_urls yes
或者直接修改 .condarc 文件
vim ~/.condarc

# 替换成如下内容:
channels:
  - defaults
show_channel_urls: true
default_channels:
  - https://mirrors.tuna.tsinghua.edu.cn/anaconda/pkgs/main
  - https://mirrors.tuna.tsinghua.edu.cn/anaconda/pkgs/r
  - https://mirrors.tuna.tsinghua.edu.cn/anaconda/pkgs/msys2
custom_channels:
  conda-forge: https://mirrors.tuna.tsinghua.edu.cn/anaconda/cloud
  msys2: https://mirrors.tuna.tsinghua.edu.cn/anaconda/cloud
  bioconda: https://mirrors.tuna.tsinghua.edu.cn/anaconda/cloud
  menpo: https://mirrors.tuna.tsinghua.edu.cn/anaconda/cloud
  pytorch: https://mirrors.tuna.tsinghua.edu.cn/anaconda/cloud
  pytorch-lts: https://mirrors.tuna.tsinghua.edu.cn/anaconda/cloud
  simpleitk: https://mirrors.tuna.tsinghua.edu.cn/anaconda/cloud
清理索引缓存
conda clean --all --yes
conda clean -i
# 提前安装一些软件
apt install  python3-pip git curl
pip install protobuf 'transformers>=4.30.2' cpm_kernels 'torch>=2.0' gradio mdtex2html sentencepiece accelerate
6.2、安装Git lfs(Large File Storage) Git 的扩展,实现大文件的版本管理支持
curl -s https://packagecloud.io/install/repositories/github/git-lfs/script.deb.sh | sudo bash
sudo apt-get install git-lfs
项目地址:https://github.com/THUDM/ChatGLM3?tab=readme-ov-file
# 先克隆项目
git clone https://github.com/THUDM/ChatGLM3
cd ChatGLM3
# 然后使用 pip 安装依赖
pip install -r requirements.txt
如果你的服务器可以连接到Hugging Face Hub,可以直接用代码的方式获取模型
>> > from transformers import AutoTokenizer, AutoModel
>> > tokenizer = AutoTokenizer.from_pretrained("THUDM/chatglm3-6b", trust_remote_code=True)
>> > model = AutoModel.from_pretrained("THUDM/chatglm3-6b", trust_remote_code=True, device='cuda')
>> > model = model.eval()
>> > response, history = model.chat(tokenizer, "你好", history=[])
>> > print(response)
你好👋!我是人工智能助手
ChatGLM3 - 6
B, 很高兴见到你, 欢迎问我任何问题。
>> > response, history = model.chat(tokenizer, "晚上睡不着应该怎么办", history=history)
>> > print(response)
晚上睡不着可能会让你感到焦虑或不舒服, 但以下是一些可以帮助你入睡的方法:

1.制定规律的睡眠时间表: 保持规律的睡眠时间表可以帮助你建立健康的睡眠习惯, 使你更容易入睡。尽量在每天的相同时间上床, 并在同一时间起床。
2.创造一个舒适的睡眠环境: 确保睡眠环境舒适, 安静, 黑暗且温度适宜。可以使用舒适的床上用品, 并保持房间通风。
3.放松身心: 在睡前做些放松的活动, 例如泡个热水澡, 听些轻柔的音乐, 阅读一些有趣的书籍等, 有助于缓解紧张和焦虑, 使你更容易入睡。
4.避免饮用含有咖啡因的饮料: 咖啡因是一种刺激性物质, 会影响你的睡眠质量。尽量避免在睡前饮用含有咖啡因的饮料, 例如咖啡, 茶和可乐。
5.避免在床上做与睡眠无关的事情: 在床上做些与睡眠无关的事情, 例如看电影, 玩游戏或工作等, 可能会干扰你的睡眠。
6.尝试呼吸技巧: 深呼吸是一种放松技巧, 可以帮助你缓解紧张和焦虑, 使你更容易入睡。试着慢慢吸气, 保持几秒钟, 然后缓慢呼气。

如果这些方法无法帮助你入睡, 你可以考虑咨询医生或睡眠专家, 寻求进一步的建议。
我这里是国内的服务器,选择从魔塔下载模型https://modelscope.cn/models/ZhipuAI/chatglm3-6b/summary
# 切换到其他路径,执行下面命令拉取模型
git lfs install
git clone https://www.modelscope.cn/ZhipuAI/chatglm3-6b.git
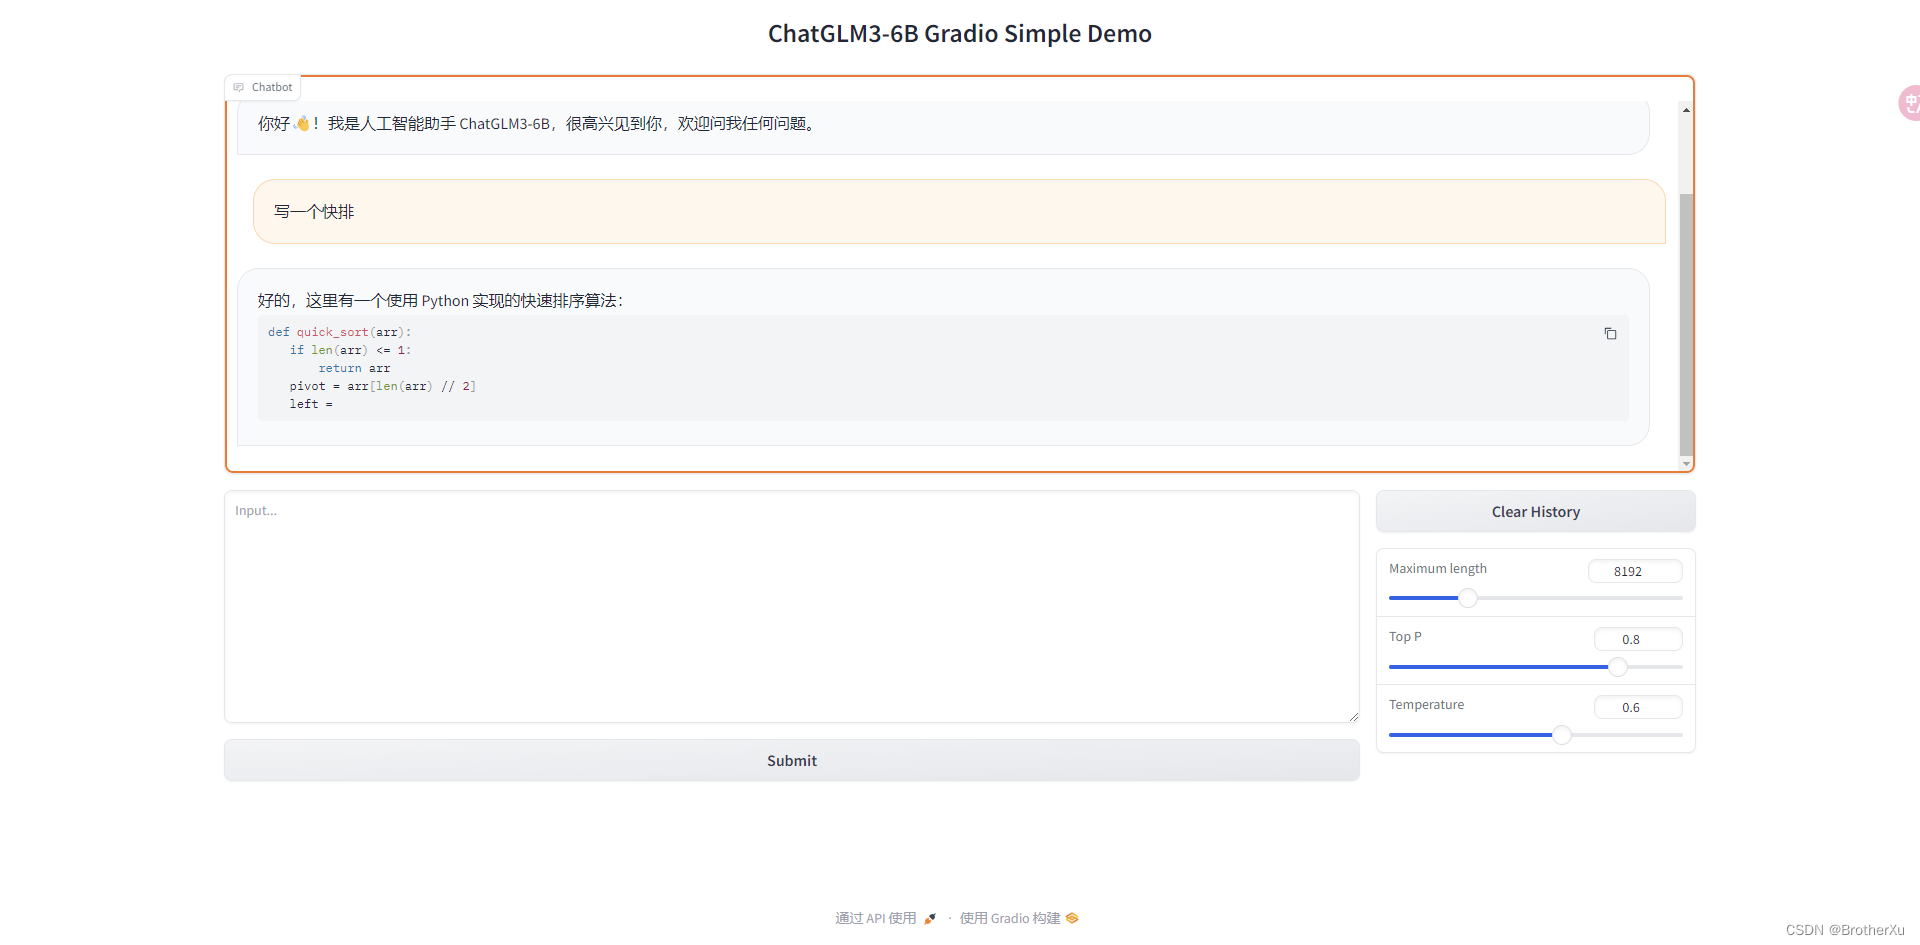
6.3、运行网页版对话 Demo
要事先把web_demo_gradio.py代码中的模型地址改为本地模型的对应位置
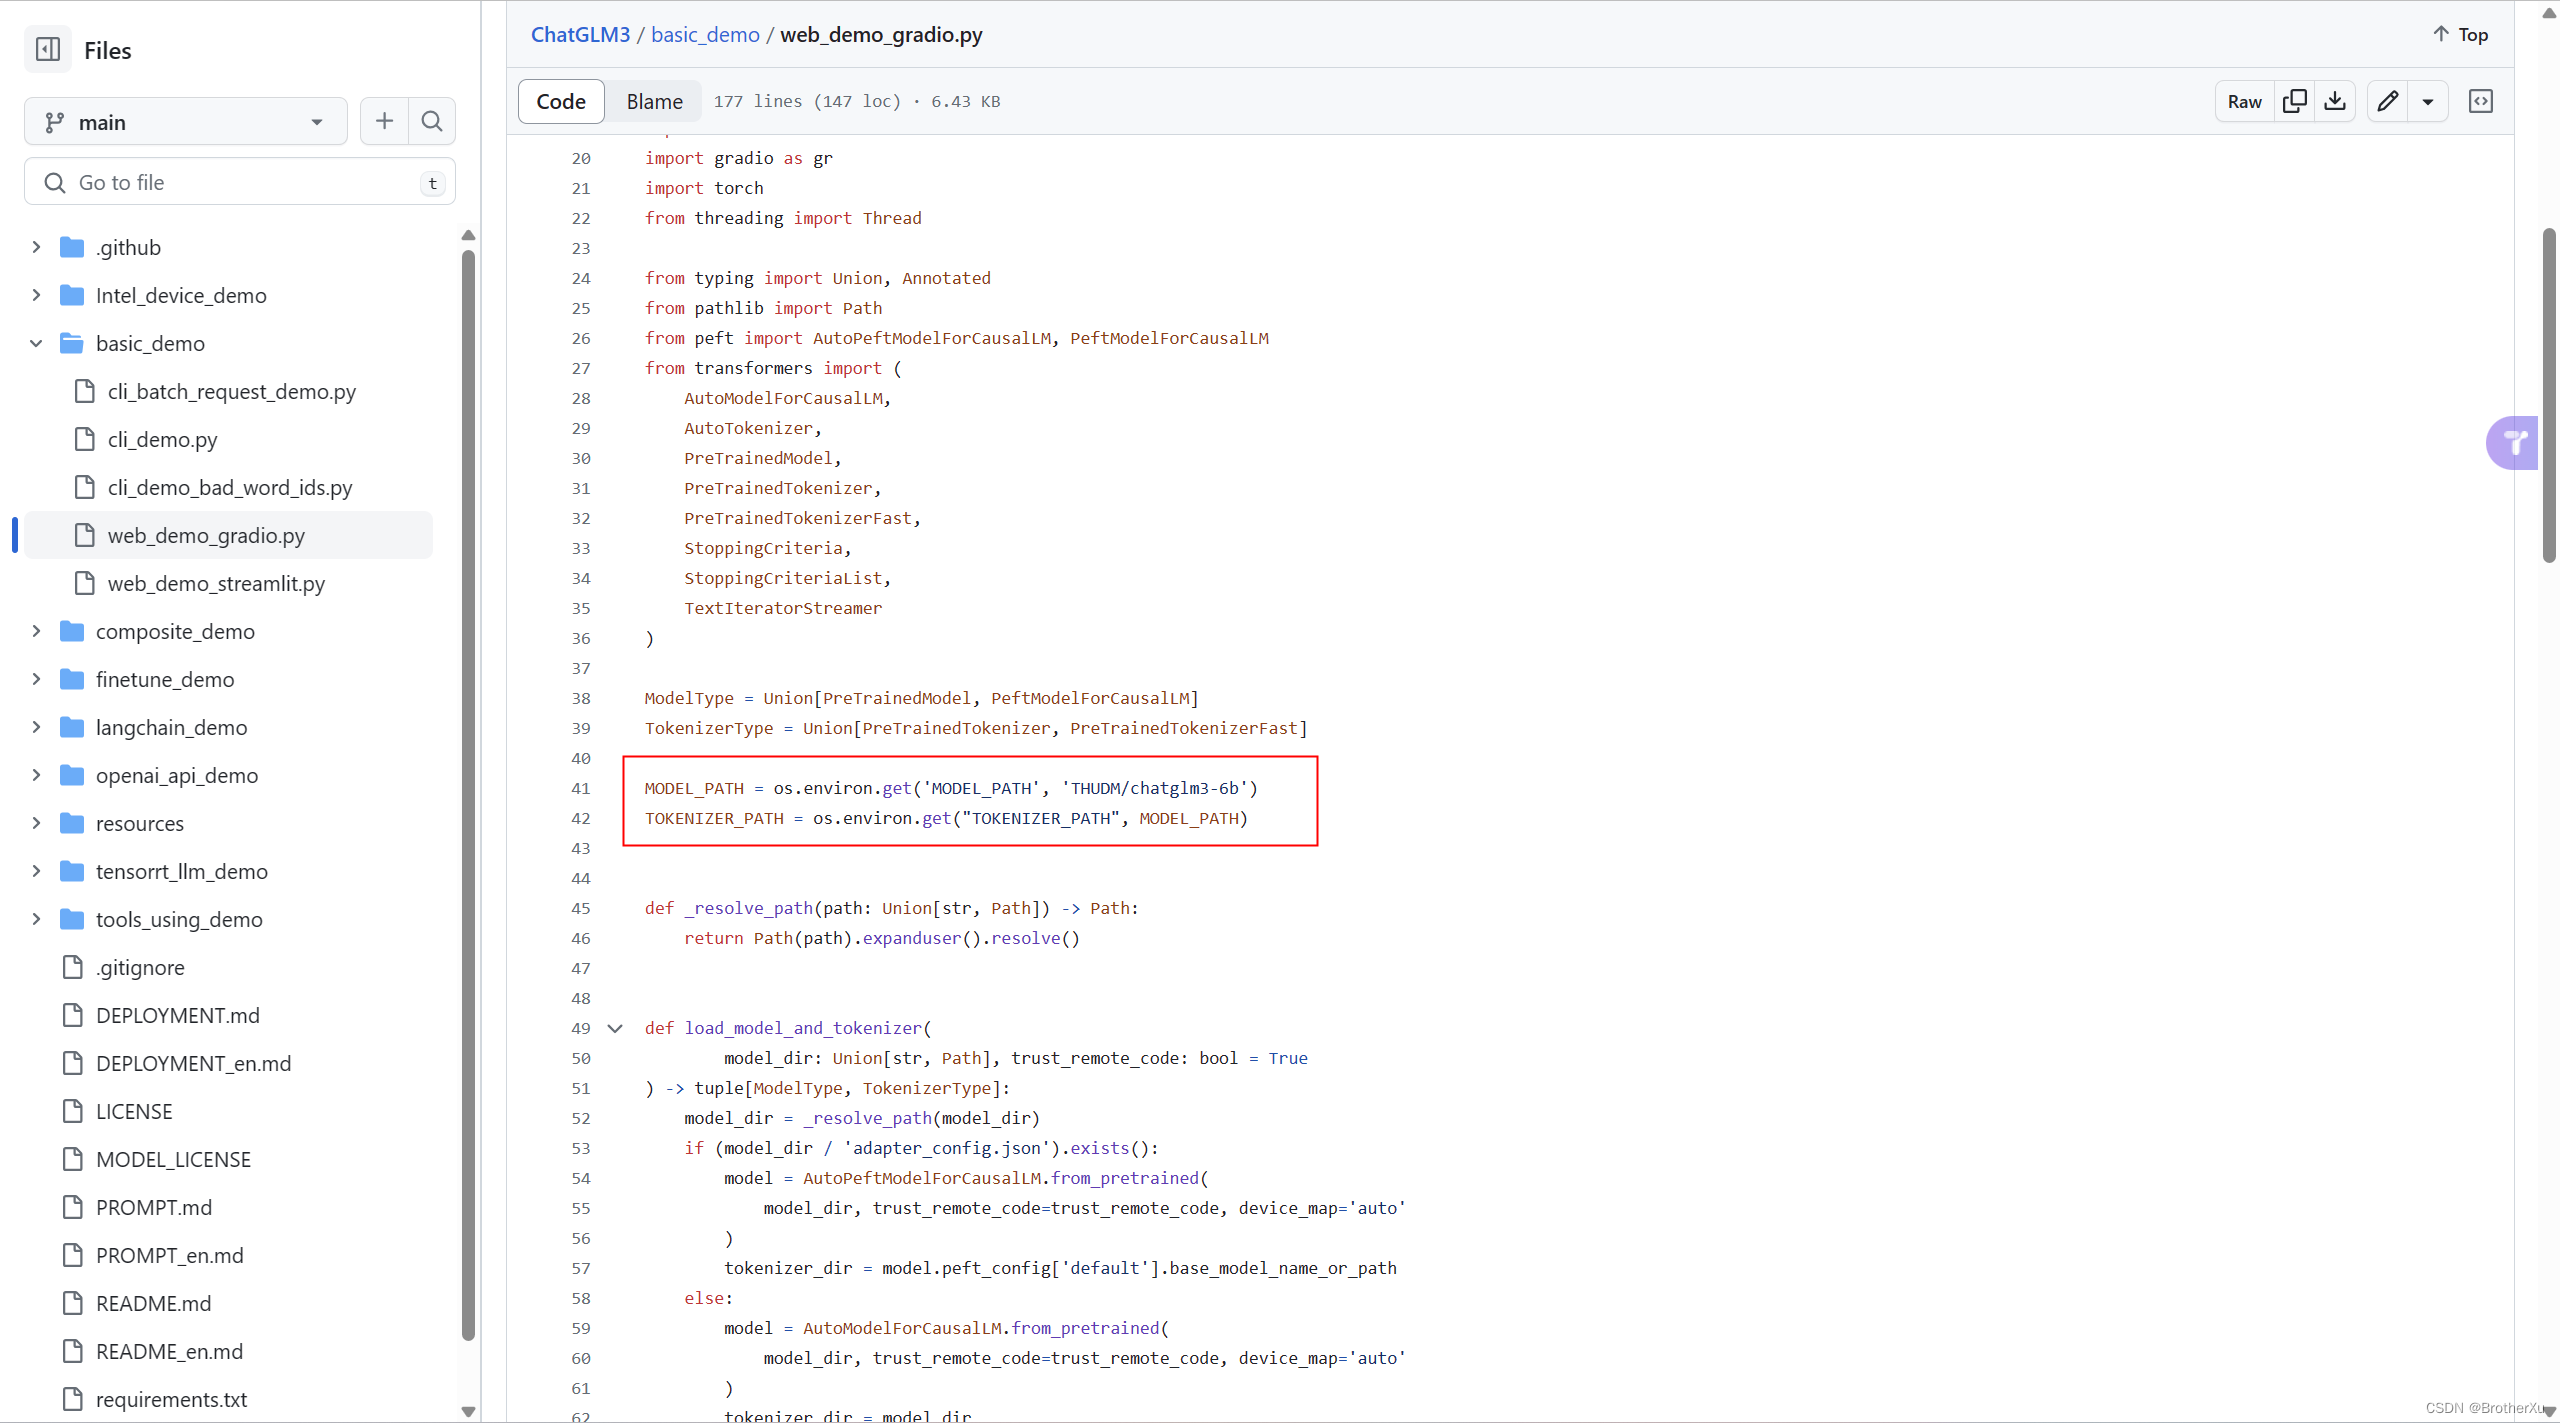
# 可以直接修改为
MODEL_PATH = ~/llm/chatglm3model
TOKENIZER_PATH = ~/llm/chatglm3model
启动webdemo
python web_demo_gradio.py
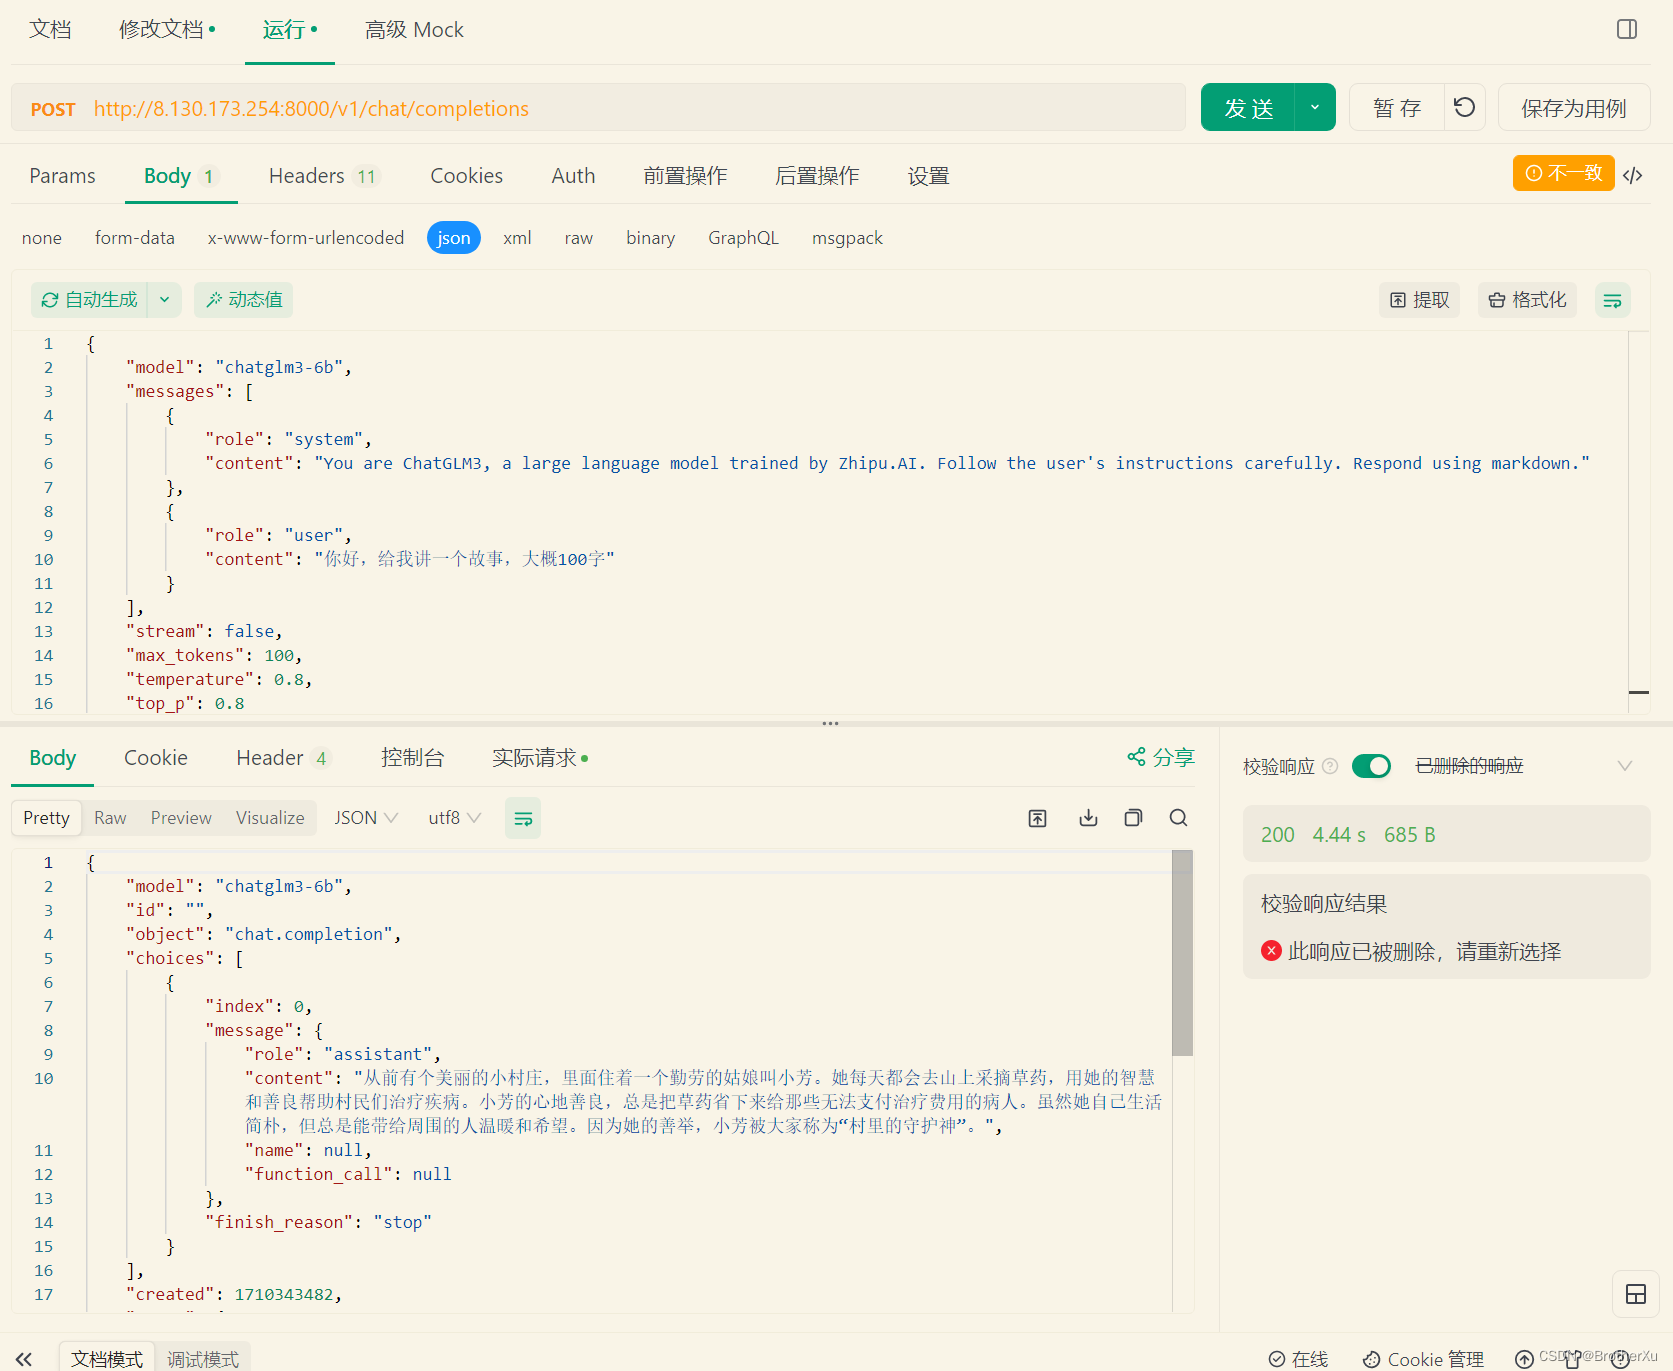
6.4、运行OpenAI API / Zhipu API Demo
要事先把api_server.py的模型地址改为本地模型的对应位置,把调用向量模型的方法注释掉,因为本地没有部署向量模型,跑不起来
python api_server.py
跑起来之后可以用curl测试一下,接口都是标准的openai接口
curl -X POST "http://127.0.0.1:8000/v1/chat/completions" \
-H "Content-Type: application/json" \
-d "{\"model\": \"chatglm3-6b\", \"messages\": [{\"role\": \"system\", \"content\": \"You are ChatGLM3, a large language model trained by Zhipu.AI. Follow the user's instructions carefully. Respond using markdown.\"}, {\"role\": \"user\", \"content\": \"你好,给我讲一个故事,大概100字\"}], \"stream\": false, \"max_tokens\": 100, \"temperature\": 0.8, \"top_p\": 0.8}"
也可以用postman或者APIFox测试一下
GitHub的README很详细,如果有其他需求可以看一下


 1278
1278

 被折叠的 条评论
为什么被折叠?
被折叠的 条评论
为什么被折叠?
 到【灌水乐园】发言


