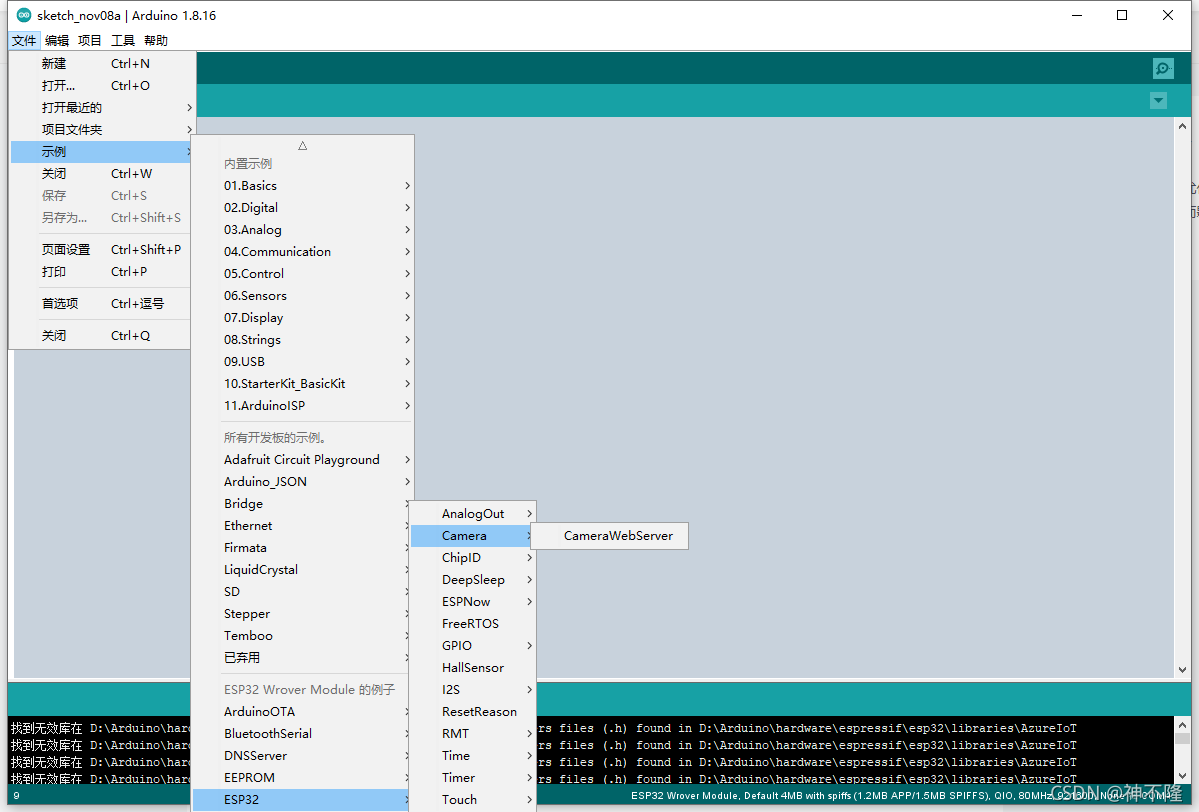
入门-ESP32CAM(3) 运行自带示例 CameraWebServer

1. 如图 找到这个自带的项目

 注释掉之前的CAMERA_MODEL_WROVER_KIT 打开 CAMERA_MODEL_AI_THINKER,填上自己的wifi名和密码

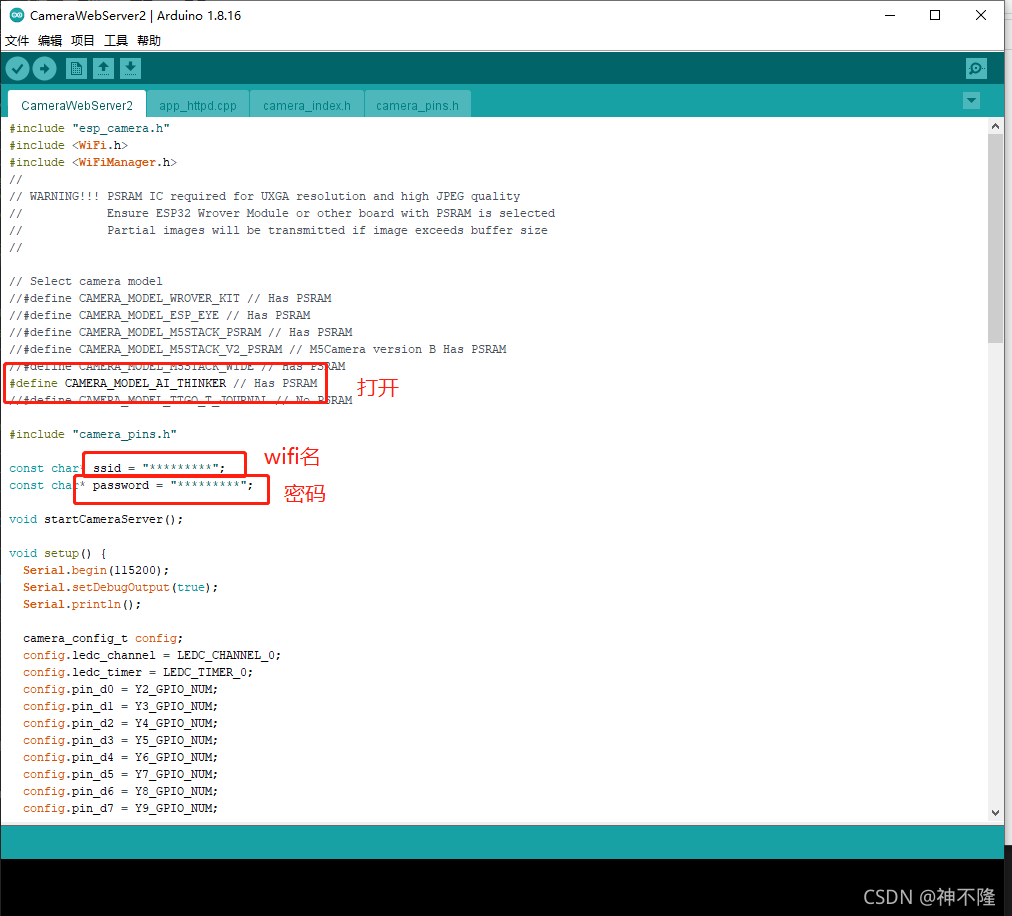
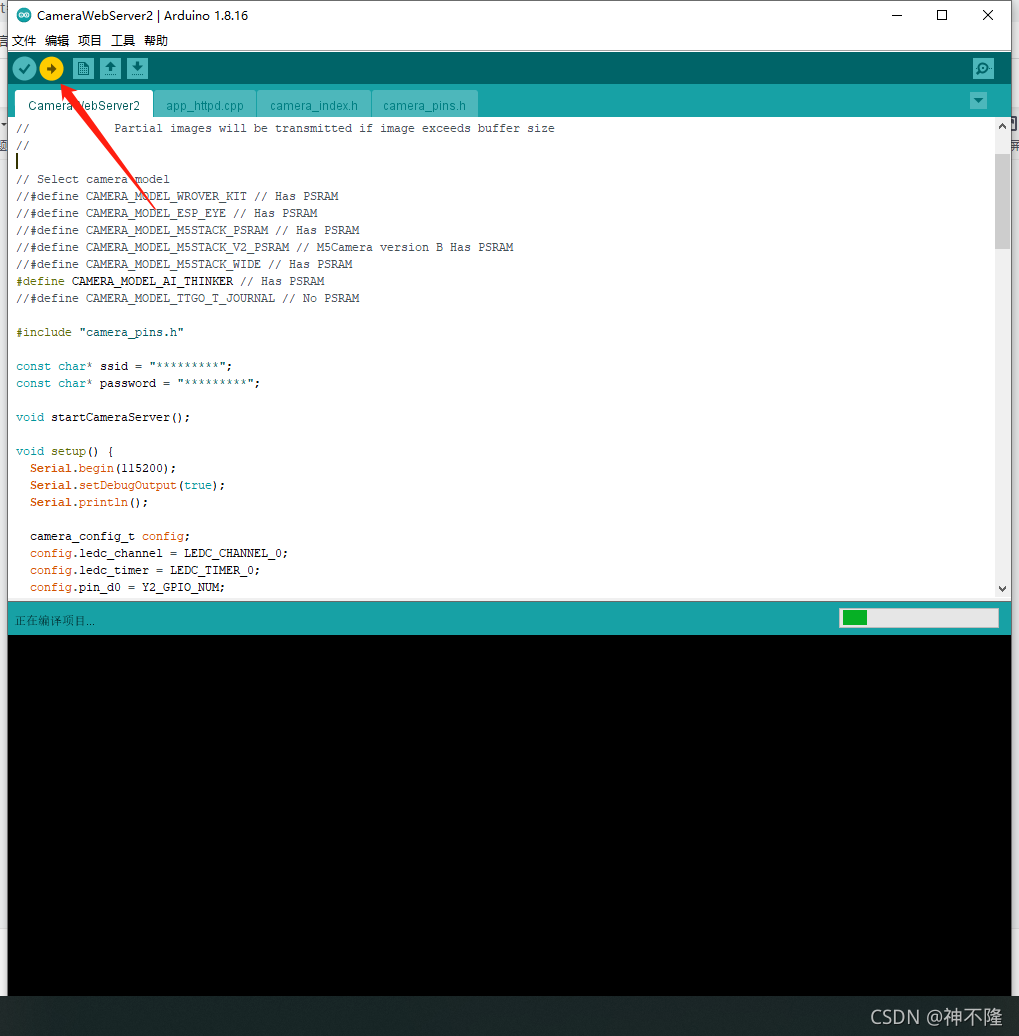
确保将开发板连接上了电脑, 点击左上角的箭头 开始编译 

 如果出现这种报错

 将这里选择为Huge App,然后重新编译
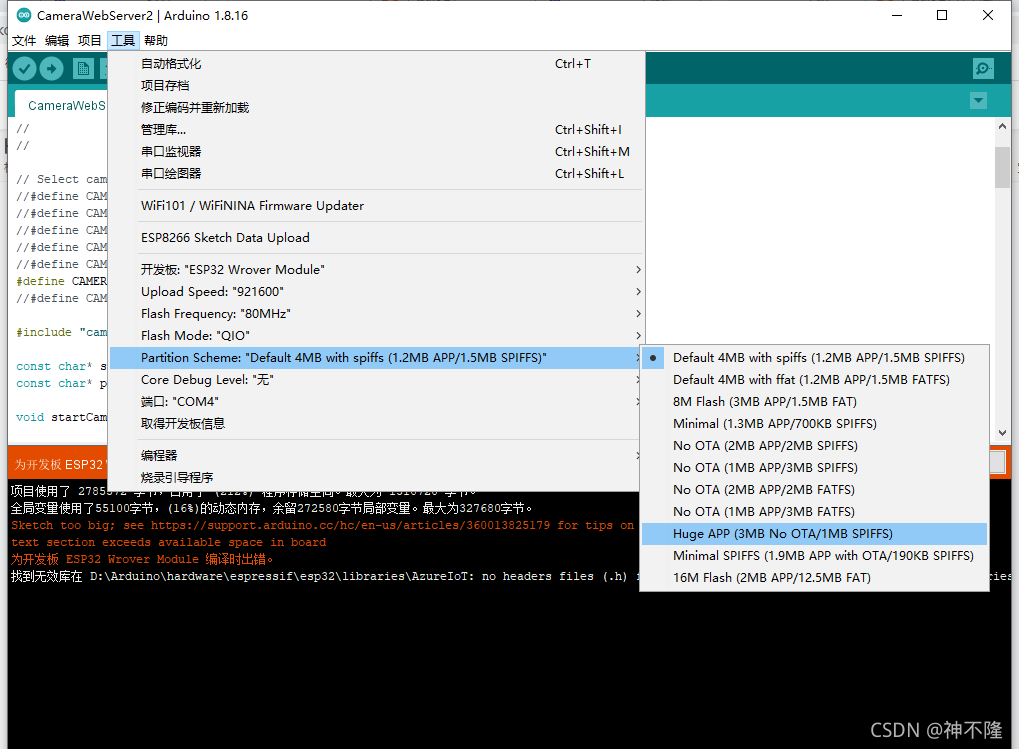
 这样就是 已经将程序传到了开发板上

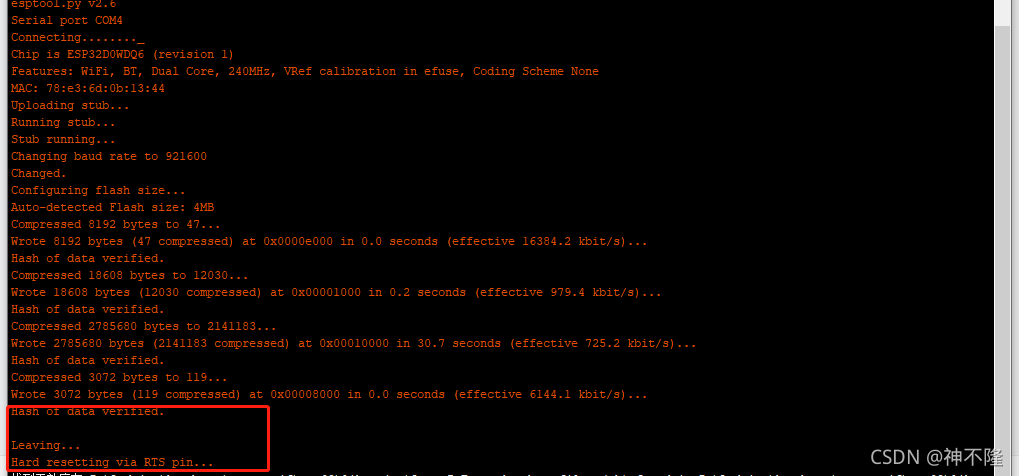
点击右上角串口监视器,选择115200波特率,点击开发版上面的RST 按钮

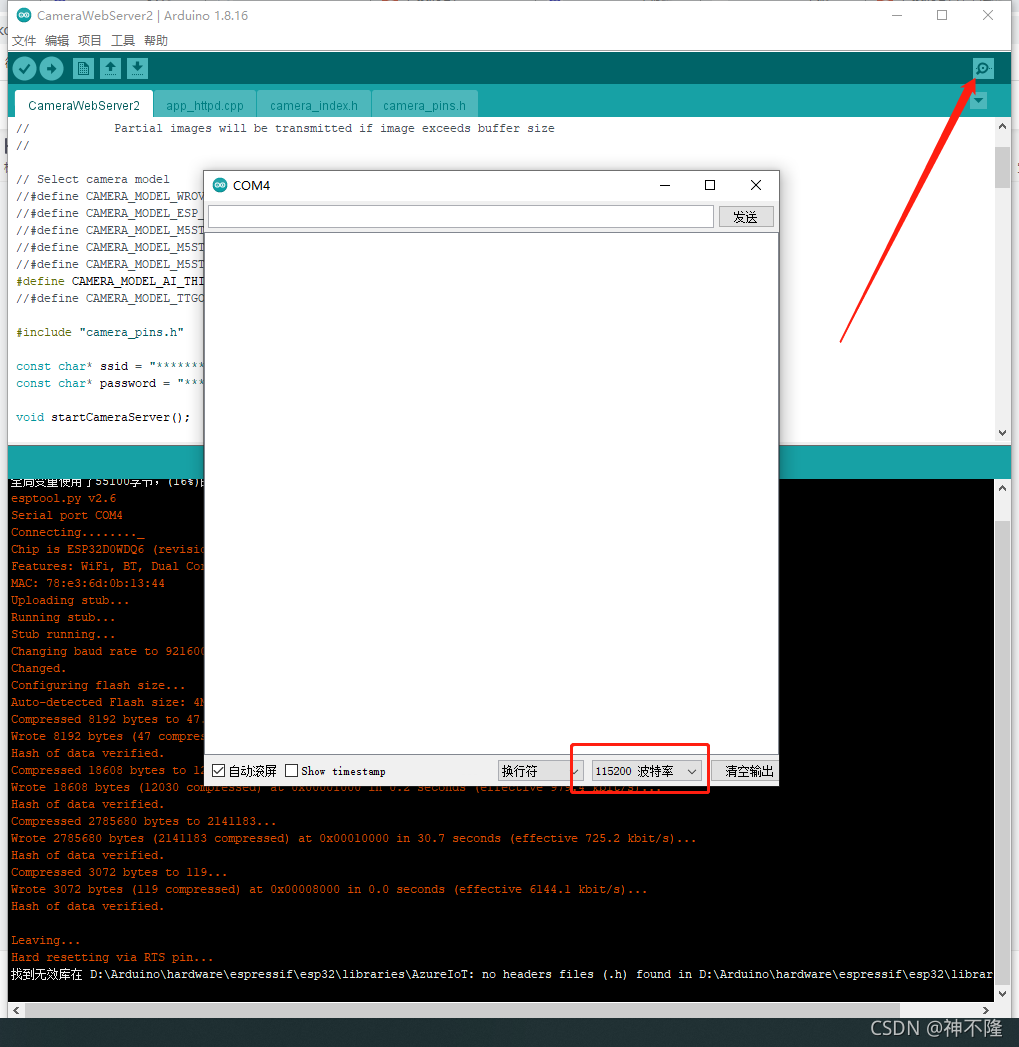
wifi 已成功连接 在浏览器 输入 http://192.168.3.25 这个ip, 这里的ip 可能会有不同,以打印的为准 


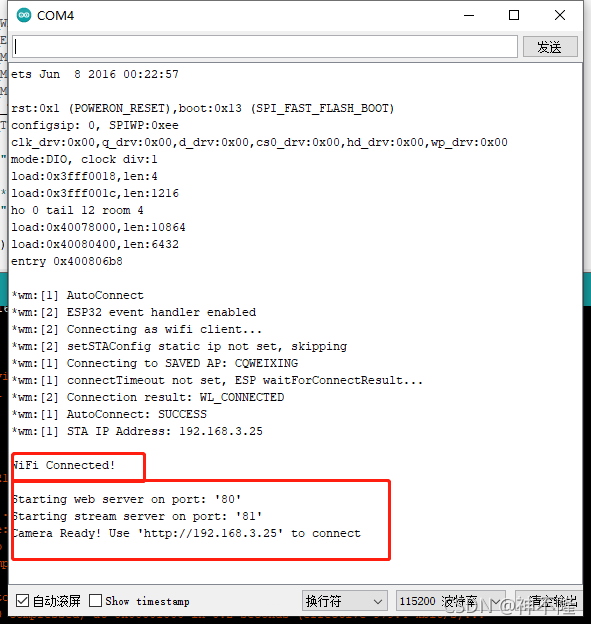
 点击做下的 Start Stream 按钮就可以看到画面了

  • 0
    点赞
  • 4
    收藏
    觉得还不错? 一键收藏
  • 0
    评论
ESP32-CAM是一款集成了WiFi和摄像头的开发板,它可以通过WiFi发送图像和视频流。camerawebServer示例程序是ESP32-CAM官方提供的一个示例程序,它可以让你通过Web界面访问ESP32-CAM的摄像头图像并进行实时预览。 camerawebServer示例程序的主要原理是在ESP32运行Web服务器,并将摄像头的图像实时传输到Web浏览器中。下面是camerawebServer示例程序的主要代码讲解: 1. 首先需要导入所需的库: ```c++ #include "esp_camera.h" #include <WiFi.h> #include <WebServer.h> ``` 其中,esp_camera.h是ESP32-CAM官方提供的摄像头库,WebServer.h是ESP32官方提供的Web服务器库。需要在Arduino IDE中安装这两个库。 2. 设置WiFi连接参数: ```c++ const char* ssid = "your_SSID"; const char* password = "your_PASSWORD"; ``` 将your_SSID和your_PASSWORD替换成你的WiFi网络的名称和密码。 3. 初始化摄像头: ```c++ camera_config_t config; config.ledc_channel = LEDC_CHANNEL_0; config.ledc_timer = LEDC_TIMER_0; config.pin_d0 = Y2_GPIO_NUM; config.pin_d1 = Y3_GPIO_NUM; config.pin_d2 = Y4_GPIO_NUM; config.pin_d3 = Y5_GPIO_NUM; config.pin_d4 = Y6_GPIO_NUM; config.pin_d5 = Y7_GPIO_NUM; config.pin_d6 = Y8_GPIO_NUM; config.pin_d7 = Y9_GPIO_NUM; config.pin_xclk = XCLK_GPIO_NUM; config.pin_pclk = PCLK_GPIO_NUM; config.pin_vsync = VSYNC_GPIO_NUM; config.pin_href = HREF_GPIO_NUM; config.pin_sscb_sda = SIOD_GPIO_NUM; config.pin_sscb_scl = SIOC_GPIO_NUM; config.xclk_freq_hz = 20000000; config.pixel_format = PIXFORMAT_JPEG; config.frame_size = FRAMESIZE_SXGA; config.jpeg_quality = 10; config.fb_count = 2; // Camera init esp_err_t err = esp_camera_init(&config); if (err != ESP_OK) { Serial.printf("Camera init failed with error 0x%x", err); return; } ``` 这里使用了ESP32-CAM官方提供的默认摄像头配置参数,你也可以根据需要进行修改。 4. 初始化Web服务器: ```c++ WebServer server(80); void handleRoot() { String html = "<html><body>"; html += "<img src='/cam.jpg' style='height: 100%;'></img>"; html += "</body></html>"; server.send(200, "text/html", html); } void handleJPG() { camera_fb_t* fb = NULL; fb = esp_camera_fb_get(); if (!fb) { Serial.println("Camera capture failed"); server.send(404, "text/plain", "Camera capture failed"); return; } server.sendHeader("Content-Type", "image/jpeg"); server.sendHeader("Content-Length", String(fb->len)); server.sendHeader("Connection", "close"); server.sendData((const char*)fb->buf, fb->len); esp_camera_fb_return(fb); } ``` 这里通过WebServer库设置了两个路由,一个是根路由"/",用于返回一个包含摄像头图像的HTML页面;另一个是"/cam.jpg",用于返回实时的摄像头图像。在handleJPG函数中,首先通过esp_camera_fb_get函数获取摄像头图像,然后将图像数据通过Web服务器发送给浏览器。 5. 设置WiFi连接并启动Web服务器: ```c++ void setup() { Serial.begin(115200); // Connect to WiFi WiFi.begin(ssid, password); while (WiFi.status() != WL_CONNECTED) { delay(1000); Serial.println("Connecting to WiFi..."); } Serial.println("WiFi connected"); // Start the server server.on("/", handleRoot); server.on("/cam.jpg", handleJPG); server.begin(); Serial.println("Server started"); } ``` 在setup函数中,首先连接到WiFi网络,然后设置路由和回调函数,并启动Web服务器。 6. 循环读取WiFi状态和处理请求: ```c++ void loop() { WiFiClient client = server.available(); if (client) { server.handleClient(); } } ``` 在循环中,通过server.available()函数判断是否有客户端连接,如果有则通过server.handleClient()函数处理请求。 以上就是camerawebServer示例程序的主要代码讲解。在Arduino IDE中打开camerawebServer示例程序,将代码上传到ESP32-CAM开发板上,然后使用Web浏览器访问开发板的IP地址,即可实时预览摄像头图像。

“相关推荐”对你有帮助么?

  • 非常没帮助
  • 没帮助
  • 一般
  • 有帮助
  • 非常有帮助
提交
评论
添加红包

请填写红包祝福语或标题

红包个数最小为10个

红包金额最低5元

当前余额3.43前往充值 >
需支付:10.00
成就一亿技术人!
领取后你会自动成为博主和红包主的粉丝 规则
hope_wisdom
发出的红包
实付
使用余额支付
点击重新获取
扫码支付
钱包余额 0

抵扣说明:

1.余额是钱包充值的虚拟货币,按照1:1的比例进行支付金额的抵扣。
2.余额无法直接购买下载,可以购买VIP、付费专栏及课程。

余额充值