


递归-树形结构数据获取
sql文件
sql文件太大了,这个博主写的非常厉害,看他的就ok了
CategoryController
package com.atguigu.gulistore.product.controller;

import java.util.Arrays;
import java.util.List;
import java.util.Map;

import org.springframework.beans.factory.annotation.Autowired;
import org.springframework.web.bind.annotation.PathVariable;
import org.springframework.web.bind.annotation.RequestBody;
import org.springframework.web.bind.annotation.RequestMapping;
import org.springframework.web.bind.annotation.RestController;

import com.atguigu.gulistore.product.entity.CategoryEntity;
import com.atguigu.gulistore.product.service.CategoryService;
import com.atguigu.common.utils.R;


/**
 * 商品三级分类
 *
 * @author lx
 * @email qazokmzjl@gmail.com
 * @date 2021-10-07 15:39:33
 */
@RestController
@RequestMapping("product/category")
public class CategoryController {
    @Autowired
    private CategoryService categoryService;

    /**
     * 查出所有分类以及子分类,以树形结构组装起来
     */
    @RequestMapping("/list/tree")
    public R list(){

        List<CategoryEntity> entities = categoryService.listWithTree();
        return R.ok().put("data", entities);
    }
}
CategoryService
package com.atguigu.gulistore.product.service;

import com.baomidou.mybatisplus.extension.service.IService;
import com.atguigu.common.utils.PageUtils;
import com.atguigu.gulistore.product.entity.CategoryEntity;

import java.util.List;
import java.util.Map;

/**
 * 商品三级分类
 *
 * @author lx
 * @email qazokmzjl@gmail.com
 * @date 2021-10-07 15:39:33
 */
public interface CategoryService extends IService<CategoryEntity> {

    PageUtils queryPage(Map<String, Object> params);

    List<CategoryEntity> listWithTree();
}
CategoryServiceImpl
这么查询,实际只查询了一次数据库
package com.atlinxi.gulimall.product.service.impl;

import org.springframework.stereotype.Service;

import java.util.List;
import java.util.Map;
import java.util.stream.Collectors;

import com.baomidou.mybatisplus.core.conditions.query.QueryWrapper;
import com.baomidou.mybatisplus.core.metadata.IPage;
import com.baomidou.mybatisplus.extension.service.impl.ServiceImpl;
import com.atlinxi.common.utils.PageUtils;
import com.atlinxi.common.utils.Query;

import com.atlinxi.gulimall.product.dao.CategoryDao;
import com.atlinxi.gulimall.product.entity.CategoryEntity;
import com.atlinxi.gulimall.product.service.CategoryService;


@Service("categoryService")
public class CategoryServiceImpl extends ServiceImpl<CategoryDao, CategoryEntity> implements CategoryService {


    //    之前是使用@Autowired注入
//    现在继承了 mybatisplus的ServiceImpl,泛型是CategoryDao,
//    我们可以直接使用baseMapper,它代表的也就是CategoryDao
//    @Autowired
//    private CategoryDao categoryDao;

    @Override
    public PageUtils queryPage(Map<String, Object> params) {
        IPage<CategoryEntity> page = this.page(
                new Query<CategoryEntity>().getPage(params),
                new QueryWrapper<CategoryEntity>()
        );

        return new PageUtils(page);
    }


    @Override
    public List<CategoryEntity> listWithTree() {

        // 1. 查出所有分类
        List<CategoryEntity> entities = baseMapper.selectList(null);

        // 2. 组装成父子的树形结构

        // 2.1 找到所有的一级分类
        List<CategoryEntity> level1Menu = entities.stream()
                // 过滤
                .filter(categoryEntity -> categoryEntity.getParentCid() == 0
                // 上面的过滤会得到一个list,
                // menu只是一个变量名,指list返回的每一个元素
                ).map(menu -> {
                    menu.setChildren(getChildrens(menu, entities));
                    return menu;
                }).sorted((menu1, menu2) -> (menu1.getSort()==null?0:menu1.getSort()) - (menu2.getSort()==null?0:menu2.getSort()))
                // 把结果收集成一个list
                .collect(Collectors.toList());

        return level1Menu;
    }

    /**
     * 递归查找所有菜单的子菜单
     *
     * @param root 当前分类
     * @param all  所有分类
     * @return
     */
    private List<CategoryEntity> getChildrens(CategoryEntity root, List<CategoryEntity> all) {

        List<CategoryEntity> children = all.stream()
                .filter(categoryEntity -> categoryEntity.getParentCid() == root.getCatId())
                .map(categoryEntity -> {categoryEntity.setChildren(getChildrens(categoryEntity,all)); return categoryEntity;})
                .sorted((menu1,menu2) -> (menu1.getSort()==null?0:menu1.getSort()) - (menu2.getSort()==null?0:menu2.getSort()))
                .collect(Collectors.toList());
        return children;
    }
}
CategoryEntity
package com.atguigu.gulistore.product.entity;

import com.baomidou.mybatisplus.annotation.TableField;
import com.baomidou.mybatisplus.annotation.TableId;
import com.baomidou.mybatisplus.annotation.TableName;

import java.io.Serializable;
import java.util.List;

import lombok.Data;

/**
 * 商品三级分类
 *
 * @author lx
 * @email qazokmzjl@gmail.com
 * @date 2021-10-07 15:39:33
 */
@Data
@TableName("pms_category")
public class CategoryEntity implements Serializable {
	private static final long serialVersionUID = 1L;

	/**
	 * 分类id
	 */
	@TableId
	private Long catId;
	/**
	 * 分类名称
	 */
	private String name;
	/**
	 * 父分类id
	 */
	private Long parentCid;
	/**
	 * 层级
	 */
	private Integer catLevel;
	/**
	 * 是否显示[0-不显示,1显示]
	 */
	private Integer showStatus;
	/**
	 * 排序
	 */
	private Integer sort;
	/**
	 * 图标地址
	 */
	private String icon;
	/**
	 * 计量单位
	 */
	private String productUnit;
	/**
	 * 商品数量
	 */
	private Integer productCount;

	/**
	 * 将当前菜单所有子分类保存到这个分类
	 */
//	这个注解代表,这个属性在数据库是没有相对应的字段的
	@TableField(exist = false)
	private List<CategoryEntity> children;

}
启动renren-fast服务和renren-fast-vue
会报set get方法找不到
lombok的依赖换到新版本就可以了
<lombok.version>1.18.14</lombok.version>
我的renren-fast在导入gulimall-common依赖的时候启动报错,大概是springboot和springcloud版本不兼容,
新增或者修改pom
<parent>
        <groupId>org.springframework.boot</groupId>
        <artifactId>spring-boot-starter-parent</artifactId>
        <version>2.5.5</version>
        <relativePath></relativePath>
    </parent>


<spring-cloud.version>2020.0.4</spring-cloud.version>


<dependencyManagement>
        <dependencies>
            <dependency>
                <groupId>org.springframework.cloud</groupId>
                <artifactId>spring-cloud-dependencies</artifactId>
                <version>${spring-cloud.version}</version>
                <type>pom</type>
                <scope>import</scope>
            </dependency>
        </dependencies>
    </dependencyManagement>
前端页面分析
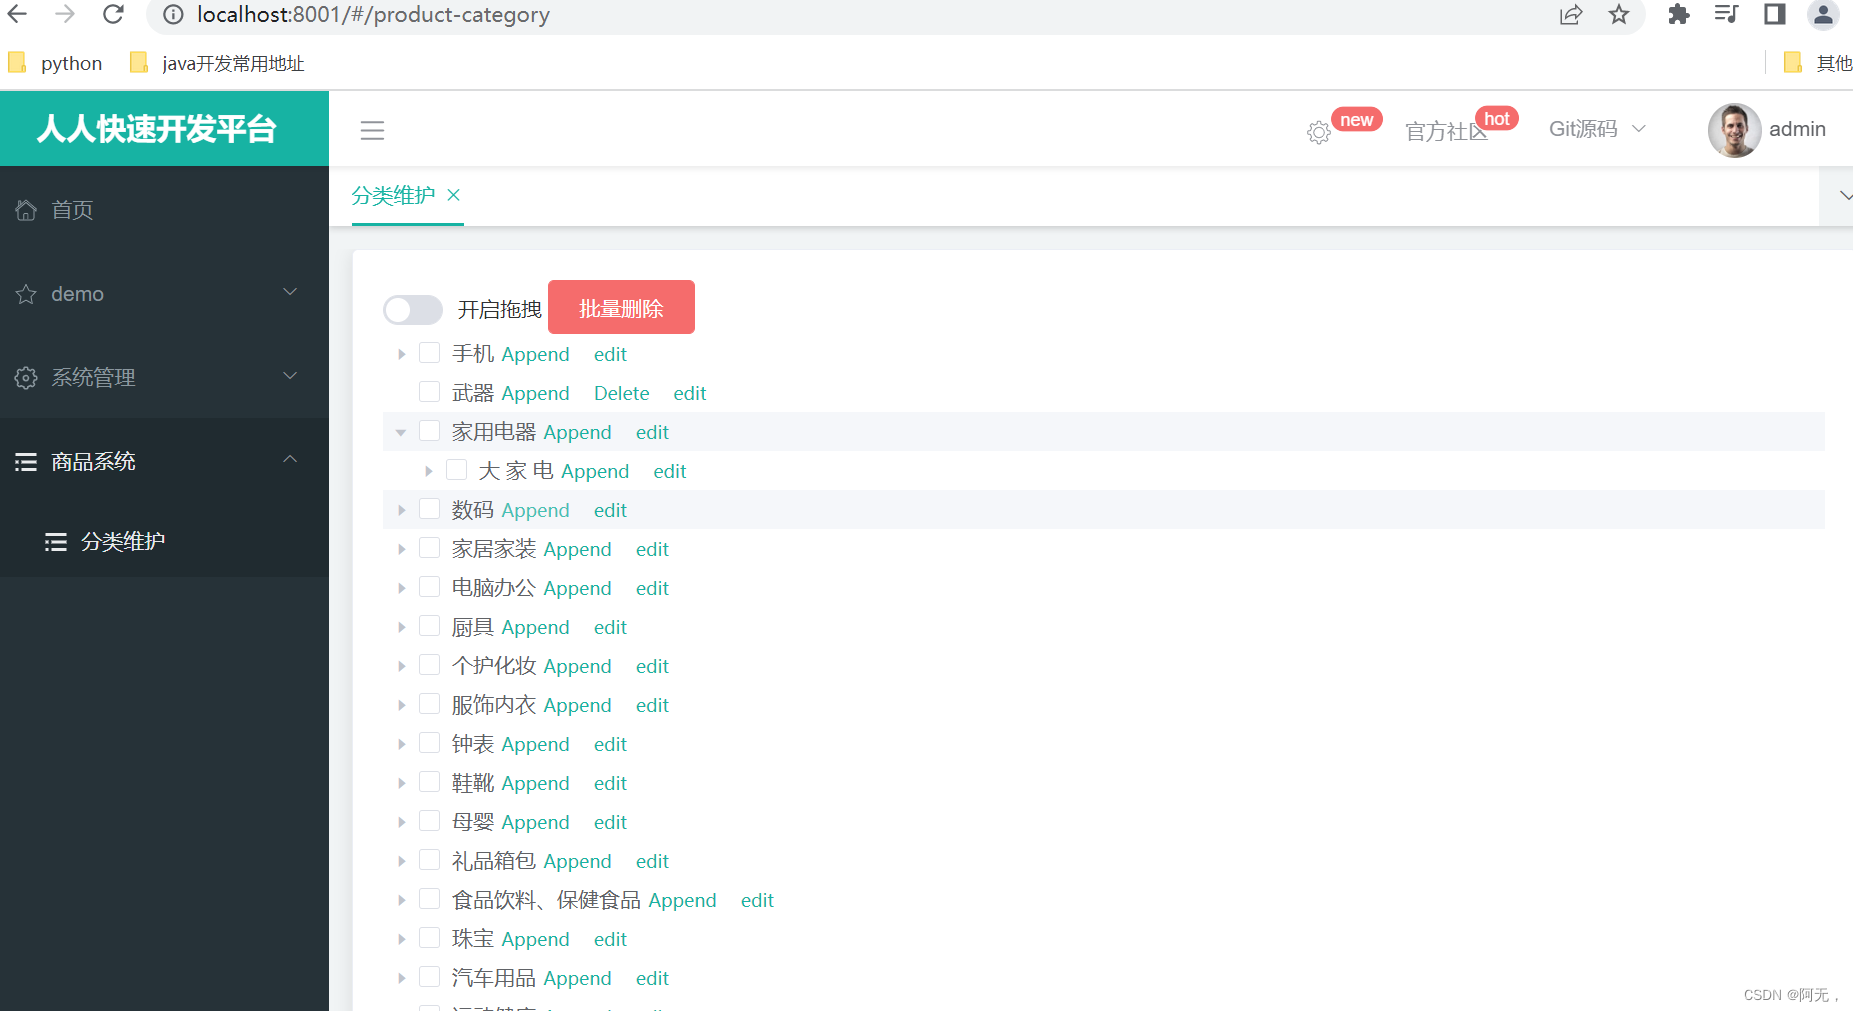
在访问页面的http://localhost:8001/#/login,菜单栏新建商品系统,商品系统下新建分类维护
分类维护的菜单url填写product/category
当点击分类维护的时候,项目就会访问 http://localhost:8001/#/product-category
系统管理下的角色管理http://localhost:8001/#/sys-role,对应的项目路径是src-views-modules-sys-role.vue
根据这个规则,http://localhost:8001/#/product-category,对应的项目路径应该是src-views-modules-product-category.vue
application.yml
spring:
  cloud:
     nacos:
      discovery:
        server-addr: 127.0.0.1:8848
  application:
    name: renren-fast

在启动类上添加@EnableDiscoveryClient
renren-fast-vue
static/config/index.js
// 访问网关gateway
window.SITE_CONFIG['baseUrl'] = 'http://localhost:88/api';
src/views/modules/product/category.vue
创建这个文件
<template>
  <div>
    <el-tree :data="data" :props="defaultProps" @node-click="handleNodeClick">
    </el-tree>
  </div>
</template>

<script>
// 这里可以导入其他文件(比如:组件,工具 js,第三方插件 js,json 文件,图片文件等等)
//例如:import 《组件名称》 from '《组件路径》';

export default {
  //import 引入的组件需要注入到对象中才能使用
  components: {},
  props: {},
  data() {
    return {
      data: [],
      defaultProps: {
        children: "children",
        label: "label",
      },
    };
  },
  methods: {
    handleNodeClick(data) {
      console.log(data);
    },
    getMenus() {
      this.$http({
        url: this.$http.adornUrl("/product/category/list/tree"),
        method: "get",
        // params: this.$http.adornParams({
        //   page: this.pageIndex,
        //   limit: this.pageSize,
        //   roleName: this.dataForm.roleName,
        // }),
      }).then(({ data }) => {
        // if (data && data.code === 0) {
        //   this.dataList = data.page.list;
        //   this.totalPage = data.page.totalCount;
        // } else {
        //   this.dataList = [];
        //   this.totalPage = 0;
        // }
        // this.dataListLoading = false;

        console.log(data)
      });
    },
  },
  //计算属性 类似于 data 概念
  computed: {},
  //监控 data 中的数据变化
  watch: {},
  //生命周期 - 创建完成(可以访问当前 this 实例)
  created() {
    this.getMenus();
  },
  //生命周期 - 挂载完成(可以访问 DOM 元素)
  mounted() {},
  beforeCreate() {}, //生命周期 - 创建之前
  beforeMount() {}, //生命周期 - 挂载之前
  beforeUpdate() {}, //生命周期 - 更新之前
  updated() {}, //生命周期 - 更新之后
  beforeDestroy() {}, //生命周期 - 销毁之前
  destroyed() {}, //生命周期 - 销毁完成
  activated() {}, //如果页面有 keep-alive 缓存功能,这个函数会触发
};
</script>
<style scoped>
</style>
gateway 网关路由配置及路径重写
这步完成之后,正常页面是会报404的,但我这儿报了503,可以简单的理解为和500差不多,就是服务器错误
原因是lb是负载均衡的操作,但是由于nacos排除了ribbon的负载均衡依赖,所以得自己引入负载均衡的依赖,我这里直接引入loadbalancer依赖
<dependency>
            <groupId>org.springframework.cloud</groupId>
            <artifactId>spring-cloud-starter-loadbalancer</artifactId>
        </dependency>
spring:
  cloud:
    gateway:
      routes:
        - id: test_route
          uri: https://www.baidu.com
          predicates:
            #              根据参数来匹配
            - Query=url,baidu


        #  前端项目发送请求都以 /api 开头
        - id: admin_route
          #  lb 负载均衡  到renren-fast服务
          uri: lb://renren-fast
          # 匹配所有以api开头的请求
          predicates:
            - Path=/api/**
          filters:
            #  路径重写
            # http://localhost:88/api/captcha.jpg 在网关匹配到相应的规则后
            #  就变成了 http://localhost:8080/api/captcha.jpg
            # 但实际上我们需要真正访问的是 http://localhost:8080/renren-fast/captcha.jpg
            # (?<segment>.*)  $\{segment} 相当于片段
            - RewritePath=/api/(?<segment>.*),/renren-fast/$\{segment}
网关统一配置跨域
完成上面的部分,发现还是不能正常访问,那是因为发生CROS(跨域)
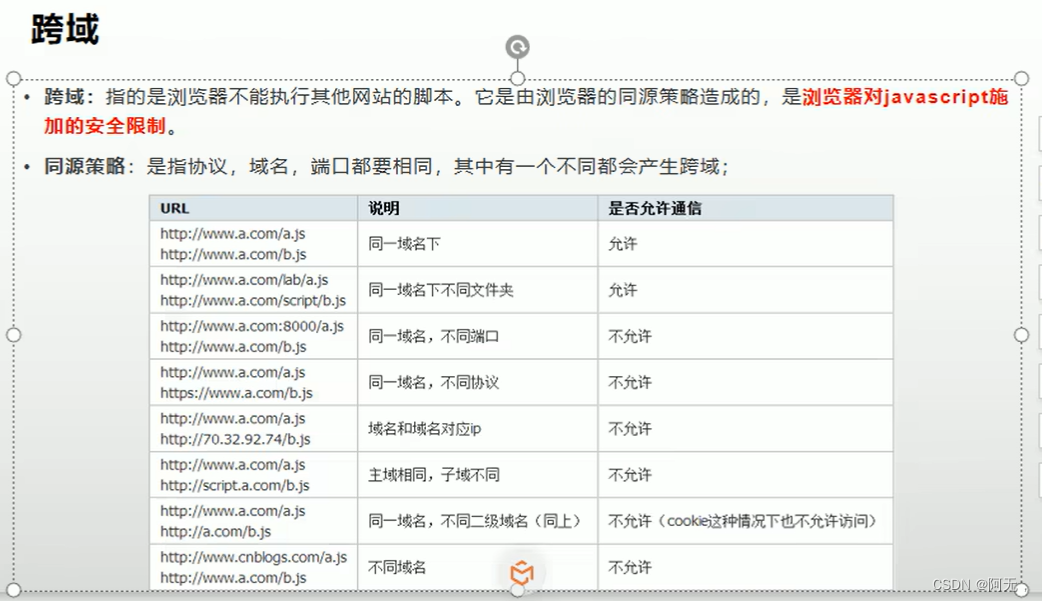
跨域
指的是浏览器不能执行远程网站的脚本或者发送请求。它是由浏览器的同源策略造成的,是浏览器对javascript添加的安全限制
同源策略:协议、域名、端口都要相同
注意:域名和其对应的ip也属于跨域
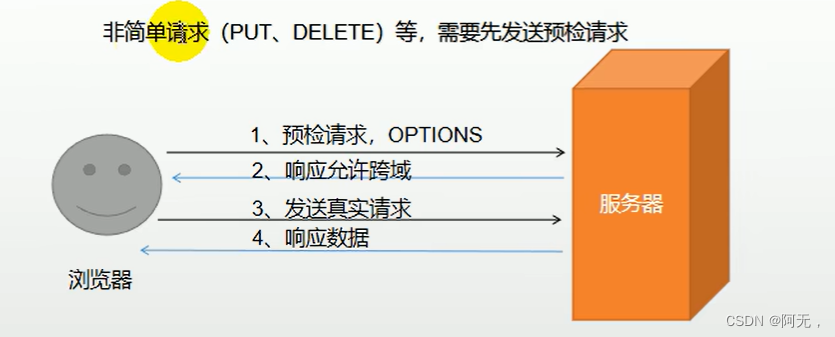
跨域流程
options,类似于get,post,也是http一种请求方式。
简单请求指,get,head,post
并且Content-Type 的值仅限于下列三者之一:
- text/plain
- multipart/form-data
- application/x-www-form-urlencoded
解决跨域方案一
使用nginx同时代理前端和后端,这种比较麻烦
- 我们将前端项目和后端项目都部署到nginx服务器,
- 浏览器访问前端项目时访问nginx地址
- nginx将静态请求都代理给前端项目,将动态请求反向代理给网关

解决跨域方案二
网关统一配置跨域
这个文件需要新建,
然后把renren-fast服务中的config/CorsConfig内容全部注释掉,否则两个解决跨域的冲突了
package com.atlinxi.gulimall.gateway.config;

import org.springframework.context.annotation.Bean;
import org.springframework.context.annotation.Configuration;
import org.springframework.web.cors.CorsConfiguration;
import org.springframework.web.cors.reactive.CorsWebFilter;
import org.springframework.web.cors.reactive.UrlBasedCorsConfigurationSource;

@Configuration
public class GulimallCorsConfiguration {

    // springboot提供的CorsWebFilter
    // 只需要将它放入容器即可
    @Bean
    public CorsWebFilter corsWebFilter(){

        UrlBasedCorsConfigurationSource source = new UrlBasedCorsConfigurationSource();

        CorsConfiguration corsConfiguration = new CorsConfiguration();
        // 配置跨域
        corsConfiguration.addAllowedHeader("*");
        corsConfiguration.addAllowedMethod("*");
        // 请求来源
        // 我的springboot版本是2.5.5,用下面那个配置
//        corsConfiguration.addAllowedOrigin("*");
        corsConfiguration.addAllowedOriginPattern("*");
        // 允许携带cookie
        corsConfiguration.setAllowCredentials(true);


        // 允许任意路径跨域
        source.registerCorsConfiguration("/**",corsConfiguration);

        return new CorsWebFilter(source);
    }
}
三级分类增删改查
我们这里的crud界面是用element ui的组件自己写的,效果是这样的
renren-fast-vue自带的crud界面是这样的
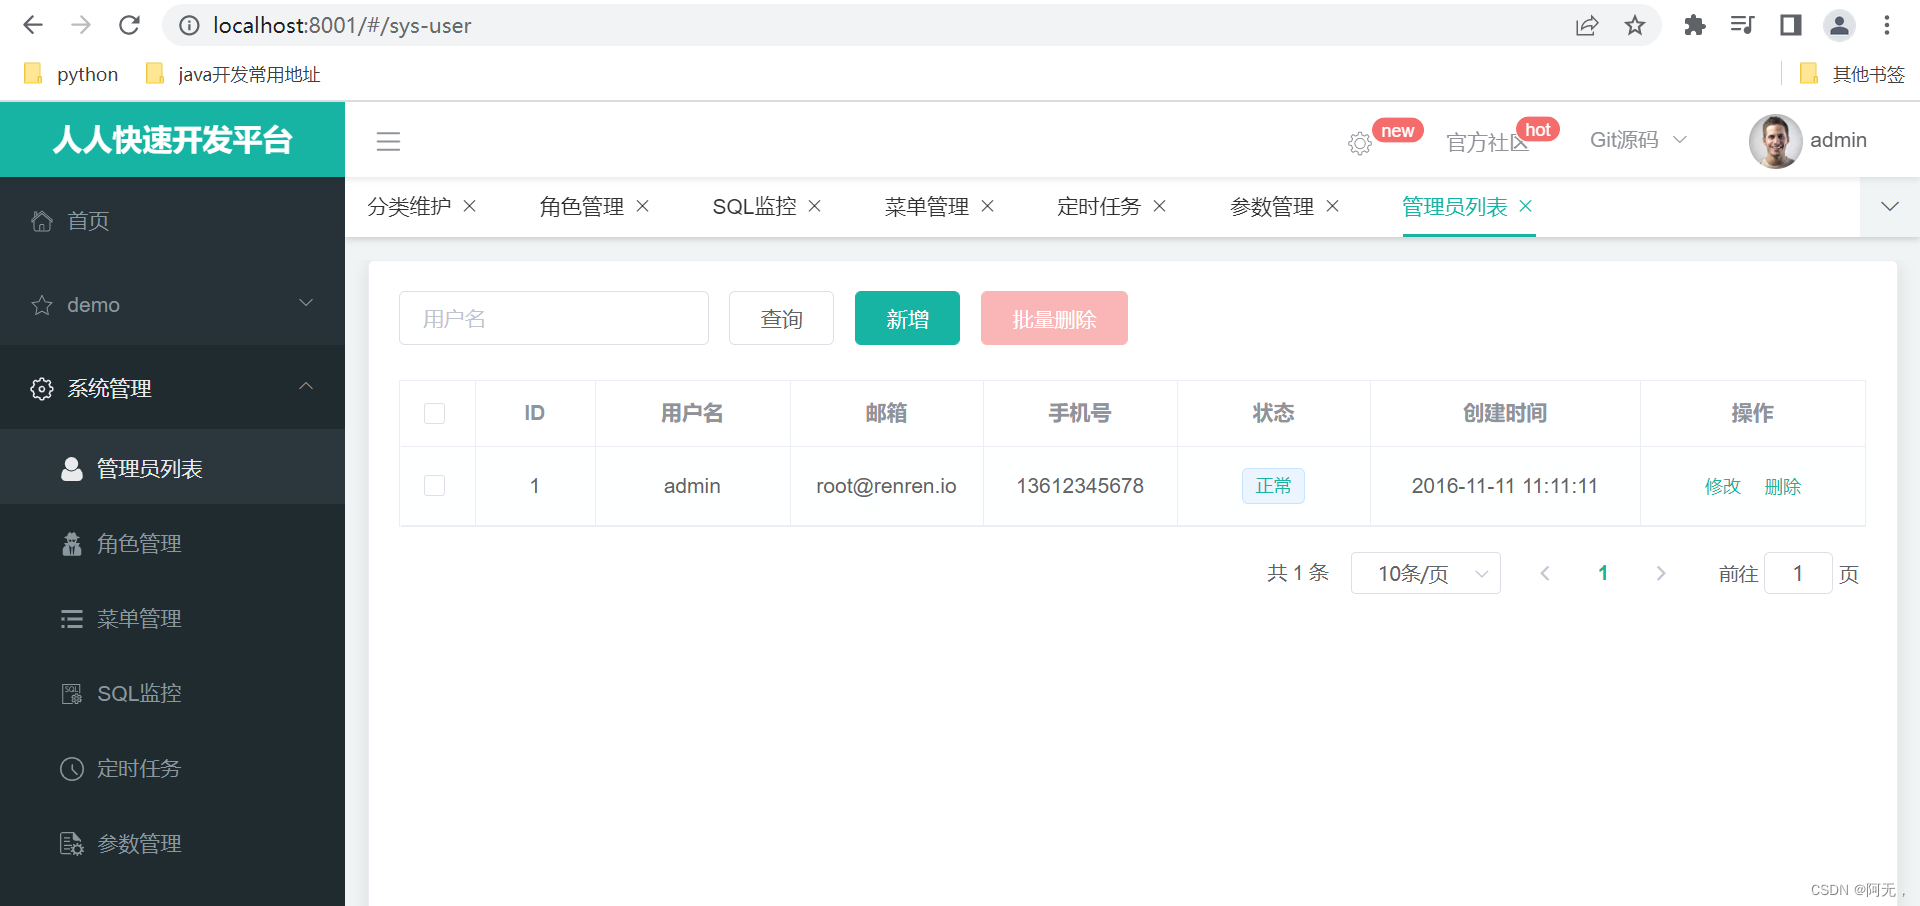
用哪个都行,但老师第一次带着做了一次完整的crud,之后将使用renren-fast-vue自带的,
我们在todo谷粒商城二本地虚拟机环境搭建及项目初始化
使用逆向工程生成代码的时候,当时是删掉了resources下的src文件,其实就是对应的前端crud的代码,我们以后就用这个
http://localhost:88/api/product/category/list/tree
此时url是这个,因为我们在gateway配置的路由是所有api都进入renren-fast,但是我们商品服务是在product服务的,所以我们需要给gateway添加路由规则
配置文件
gulimall-gateway/application.yml
spring:
  cloud:
    gateway:
      routes:
        - id: test_route
          uri: https://www.baidu.com
          predicates:
            #              根据参数来匹配
            - Query=url,baidu

        # 和admin_route顺序不能乱,否则页面访问报404,因为被它拦截了
        # 我们一般把精确的路由放在上面,优先级高
        # 匹配了这个路由之后,不会匹配下面的路由
        - id: product_route
          uri: lb://gulimall-product
          predicates:
            - Path=/api/product/**
          # 前端的请求是 http://localhost:88/api/product/category/list/tree
          # 后端实际需要的请求是,http://localhost:12000/product/category/list/tree
          filters:
            - RewritePath=/api/(?<segment>.*),/$\{segment}

        #  前端项目发送请求都以 /api 开头
        - id: admin_route
          #  lb 负载均衡  到renren-fast服务
          uri: lb://renren-fast
          # 匹配所有以api开头的请求
          predicates:
            - Path=/api/**
          filters:
            #  路径重写
            # http://localhost:88/api/captcha.jpg 在网关匹配到相应的规则后
            #  就变成了 http://localhost:8080/api/captcha.jpg
            # 但实际上我们需要真正访问的是 http://localhost:8080/renren-fast/captcha.jpg
            # (?<segment>.*)  $\{segment} 相当于片段
            - RewritePath=/api/(?<segment>.*),/renren-fast/$\{segment}
gulimall-product配置
因为之前老师是有部分的配置在nacos,部分配置在本地idea,我觉得太乱了,而且后期应该会整合到nacos
所以我这里把所有配置文件都写到了nacos
# bootstrap.properties
spring.application.name=gulimall-product
spring.cloud.nacos.config.server-addr=127.0.0.1:8848
spring.cloud.nacos.config.namespace=4853bbe2-4518-4916-b8de-37ef773f8ca6

spring.cloud.nacos.config.extension-configs[0].data-id=datasource.yml
spring.cloud.nacos.config.extension-configs[0].group=dev
spring.cloud.nacos.config.extension-configs[0].refresh=true

spring.cloud.nacos.config.extension-configs[1].data-id=mybatis.yml
spring.cloud.nacos.config.extension-configs[1].group=dev
spring.cloud.nacos.config.extension-configs[1].refresh=true

spring.cloud.nacos.config.extension-configs[2].data-id=other.yml
spring.cloud.nacos.config.extension-configs[2].group=dev
spring.cloud.nacos.config.extension-configs[2].refresh=true


# datasource.yml group dev
spring:
  datasource:
    url: jdbc:mysql://192.168.56.10:3306/gulimall_pms?useUnicode=true&characterEncoding=UTF-8&serverTimezone=Asia/Shanghai&useSSL=false
    driver-class-name: com.mysql.jdbc.Driver
    username: root
    password: root


# mybatis.yml group dev
# classpath* 依赖的依赖也扫描
mybatis-plus:
  mapper-locations: classpath:/mapper/**/*.xml
  #  主键自增
  # 在实体类中,每个主键都有@TableId,默认为None,可以设置为自增
  #  但是如果在每个实体类中都设置的话,如果有一天需要修改,将相当麻烦
  global-config:
    db-config:
      id-type: auto
      # 这里不能用这个全局配置的字段,需要在CategoryEntity
      # 的showStatus字段加@TableLogic
      # 因为其他的表也可能有这个字段,如果有的话,
      # 在使用mybatis-plus的uodate方法时,就不能更新showStatus了
      # sql语句会变成这样
      # update pms_category where catId = 1 and showStatus = 1
      # 我明明实体类传入了catId和showStatus两个值,结果我的showStatus为什么不见了。。。。
      # todo 这个有时间看吧
      # logic-delete-field: showStatus # 全局逻辑删除的实体字段名(since 3.3.0,配置后可以忽略不配置步骤2)
      logic-delete-value: 0 # 逻辑已删除值(默认为 1)
      logic-not-delete-value: 1 # 逻辑未删除值(默认为 0)


# other.yml group dev
server:
  port: 12000
spring:
  cloud:
    nacos:
      discovery:
        server-addr: 127.0.0.1:8848
logging:
  level:
    com.atlinxi.gulimall: debug
前端
renren-fast-vue/category.vue
<template>
  <div>
    <!-- data绑定数据 -->
    <!-- expand-on-click-node 是否在点击节点的时候展开或者收缩节点,
          默认值为 true,如果为 false,则只有点箭头图标的时候才会展开或者收缩节点。

        show-checkbox 节点是否可被选择,其实就是有没有复选框

        node-key 每个树节点用来作为唯一标识的属性,整棵树应该是唯一的

        default-expanded-keys 默认展开的节点的 key 的数组
        allow-drop  拖拽时判定目标节点能否被放置。
          type 参数有三种情况:'prev'、'inner' 和 'next',分别表示放置在目标节点前、插入至目标节点和放置在目标节点后

        draggable 是否开启拖拽节点功能

        @node-drop  拖拽成功完成时触发的事件

          共四个参数,依次为:
            被拖拽节点对应的 Node、结束拖拽时最后进入的节点、被拖拽节点的放置位置(before、after、inner)、event


        ref="menuTree"
            给 <el-tree></el-tree> 起个名字,可以通过vue实例来进行调用该组件
    -->
    <el-switch v-model="draggable" active-text="开启拖拽" inactive-text="">
    </el-switch>
    <el-button v-if="draggable" @click="batchSave">批量保存</el-button>
    <el-button type="danger" @click="batchDelete">批量删除</el-button>
    <el-tree
      :data="menus"
      :props="defaultProps"
      :expand-on-click-node="false"
      show-checkbox
      node-key="catId"
      :default-expanded-keys="expandedKey"
      :draggable="draggable"
      :allow-drop="allowDrop"
      @node-drop="handleDrop"
      ref="menuTree"
    >
      <!-- 每一个分类都会跟一个这个span 也就是 Append Delete -->
      <!-- node为当前节点,例如有没有展开,有没有选中之类
            data是这个节点真正的数据 -->
      <span class="custom-tree-node" slot-scope="{ node, data }">
        <span>{{ node.label }}</span>
        <span>
          <el-button
            v-if="node.level <= 2"
            type="text"
            size="mini"
            @click="() => append(data)"
          >
            Append
          </el-button>
          <el-button
            v-if="node.childNodes.length == 0"
            type="text"
            size="mini"
            @click="() => remove(node, data)"
          >
            Delete
          </el-button>
          <el-button type="text" size="mini" @click="() => edit(data)">
            edit
          </el-button>
        </span>
      </span>
    </el-tree>
    <!-- dialogVisible 打开或者关闭对话框
        close-on-click-modal 是否可以点击对话框的外面关闭对话框
    -->
    <el-dialog
      :close-on-click-modal="false"
      :title="title"
      :visible.sync="dialogVisible"
      width="30%"
    >
      <!-- model 表单数据 -->
      <el-form :model="category">
        <el-form-item label="分类名称" :label-width="formLabelWidth">
          <el-input v-model="category.name" autocomplete="off"></el-input>
        </el-form-item>
        <el-form-item label="图标" :label-width="formLabelWidth">
          <el-input v-model="category.icon" autocomplete="off"></el-input>
        </el-form-item>
        <el-form-item label="计量单位" :label-width="formLabelWidth">
          <el-input
            v-model="category.productUnit"
            autocomplete="off"
          ></el-input>
        </el-form-item>
      </el-form>
      <span slot="footer" class="dialog-footer">
        <el-button @click="dialogVisible = false">取 消</el-button>
        <el-button type="primary" @click="submitData()">确 定</el-button>
      </span>
    </el-dialog>
  </div>
</template>

<script>
//这里可以导入其他文件(比如:组件,工具 js,第三方插件 js,json 文件,图片文件等等)
//例如:import 《组件名称》 from '《组件路径》';

export default {
  //import 引入的组件需要注入到对象中才能使用
  components: {},
  props: {},
  data() {
    return {
      pCid: [],
      draggable: false,
      updateNodes: [],
      maxLevel: 0,
      title: "",
      dialogType: "", // edit,add
      formLabelWidth: "",
      category: {
        name: "",
        parentCid: 0,
        catLevel: 0,
        showStatus: 1,
        sort: 0,
        catId: null,
        productUnit: "",
        icon: "",
      },
      dialogVisible: false,
      menus: [],
      expandedKey: [],
      defaultProps: {
        // 以哪个字段展开分类
        children: "children",
        // 哪个字段为分类名称
        label: "name",
      },
    };
  },
  //计算属性 类似于 data 概念
  computed: {},
  //监控 data 中的数据变化
  watch: {},
  //方法集合
  methods: {
    getMenus() {
      this.$http({
        url: this.$http.adornUrl("/product/category/list/tree"),
        method: "get",
      }).then(({ data }) => {
        this.menus = data.data;
      });
    },
    // 批量删除
    batchDelete() {
      // this vue实例,refs 获取vue实例的所有组件,

      // getCheckedNodes
      //       若节点可被选择(即 show-checkbox 为 true),则返回目前被选中的节点所组成的数组

      //         (leafOnly, includeHalfChecked) 接收两个 boolean 类型的参数,
      //           1. 是否只是叶子节点(子节点),默认值为 false
      //           2. 是否包含半选节点(当子节点没有被全部选中,父节点则是半选节点),默认值为 false
      let catIds = [];
      let checkedNodes = this.$refs.menuTree.getCheckedNodes();
      console.log(checkedNodes);
      for (let i = 0; i < checkedNodes.length; i++) {
        catIds.push(checkedNodes[i].catId);
      }

      this.$confirm(`是否批量删除【${catIds}】菜单?`, "提示", {
        confirmButtonText: "确定",
        cancelButtonText: "取消",
        type: "warning",
      })
        .then(() => {
          this.$http({
            url: this.$http.adornUrl("/product/category/delete"),
            method: "post",
            data: this.$http.adornData(catIds, false),
          }).then(({ data }) => {
            this.$message({
              type: "success",
              message: "菜单批量删除成功",
            });
            this.getMenus();
          });
        })
        .catch(() => {
          this.$message({
            type: "info",
            message: "已取消删除",
          });
        });
    },
    // 多次拖拽排序的時候,统一提交数据库更新,避免了每拖拽一次就和后端交互一次
    batchSave() {
      this.$http({
        url: this.$http.adornUrl("/product/category/update/sort"),
        method: "post",
        data: this.$http.adornData(this.updateNodes, false),
      }).then(({ data }) => {
        this.$message({
          type: "success",
          message: "菜单顺序等修改成功",
        });
        this.getMenus();
        this.expandedKey = this.pCid;
        this.updateNodes = [];
        this.maxLevel = 0;
        // this.pCid = 0;
      });
    },
    // 拖拽成功完成时触发的事件

    // 我们需要收集的信息有,
    // 1. 拖拽节点的父节点,
    // 2. 拖拽节点最新的排序(就是将父节点的children重新排序)
    // 3. 拖拽节点的层级
    handleDrop(draggingNode, dropNode, dropType) {
      // 1. 当前节点最新的父节点id
      let pCid = 0;
      let siblings = null;

      // 被拖拽节点的放置位置 如果是dropNode 之前或者之后
      if (dropType == "before" || dropType == "after") {
        // 被拖拽节点的父节点,也就是dropNode的父节点
        // 如果把二级分类和三级分类拖拽到一级分类的前后,那么此时dropNode的parent的data不是一个节点,而是所有一级分类的数组
        //    此时pCid将会是undefined
        pCid =
          dropNode.parent.data.catId == undefined
            ? 0
            : dropNode.parent.data.catId;

        // 重新排序的就是父节点的children
        siblings = dropNode.parent.childNodes;
      } else {
        // 被拖拽节点的放置位置 如果是dropNode 内
        // 那么被拖拽节点的父节点 就是 dropNode
        pCid = dropNode.data.catId;

        // 这里的siblings,实际上是已经排序好的一个数组

        // 重新排序的就是dropNode的children
        siblings = dropNode.childNodes;
      }
      this.pCid.push(pCid);

      // 2. 当前拖拽节点的最新顺序
      // for (let i = 0; i < siblings.length; i++) {
      //   // 如果遍历的层级和拖拽节点的层级不一样,说明拖拽节点的层级发生了变化
      //   let catLevel = draggingNode.level;
      //   if (siblings[i].level != draggingNode.level) {
      //     // 在拖拽的时候,层级发生变化,element ui是会将level改变的,我们只需要将我们的level与其同步即可
      //     catLevel = siblings[i].level;

      //     console.log("层级发生变化的节点是,", siblings[i]);
      //     // 修改子节点的层级
      //     this.updateChildNodeLevel(siblings[i]);
      //   }

      //   this.updateNodes.push({
      //     catgId: siblings[i].data.catId,
      //     sort: i,
      //     parentCid: pCid,
      //     name: siblings[i].data.name,
      //     catLevel: catLevel,
      //   });
      // }
      for (let i = 0; i < siblings.length; i++) {
        // 如果遍历的层级和拖拽节点的层级不一样,说明拖拽节点的层级发生了变化
        if (siblings[i].data.catId == draggingNode.data.catId) {
          let catLevel = draggingNode.level;
          if (siblings[i].level != draggingNode.level) {
            // 3. 当前拖拽节点的最新层级
            // element ui 给我们提供了一个字段 level,直接赋值就可以了
            // 如果有子节点的话,它的子节点的层级也是需要变化的
            // 在拖拽的时候,层级发生变化,element ui是会将level改变的,我们只需要将我们的level与其同步即可
            catLevel = siblings[i].level;

            // 修改子节点的层级
            this.updateChildNodeLevel(siblings[i]);
          }

          this.updateNodes.push({
            catId: siblings[i].data.catId,
            sort: i,
            parentCid: pCid,
            catLevel: catLevel,
          });
        } else {
          this.updateNodes.push({
            catId: siblings[i].data.catId,
            sort: i,
          });
        }
      }
    },
    updateChildNodeLevel(node) {
      if (node.childNodes != null && node.childNodes.length > 0) {
        for (let i = 0; i < node.childNodes.length; i++) {
          let cNode = node.childNodes[i].data;

          this.updateNodes.push({
            catId: cNode.catId,
            catLevel: node.childNodes[i].level,
          });

          this.updateChildNodeLevel(node.childNodes[i]);
        }
      }
    },
    // draggingNode 当前正在拖拽的节点
    // dropNode 插入的节点
    // type 参数有三种情况:'prev'、'inner' 和 'next',分别表示放置在目标节点前、插入至目标节点和放置在目标节点后

    // 拖拽的层级这块儿有些不太好理解
    // draggingNode,dropNode level 代表的是当前节点的level,而不是该节点我们数据库存储的level

    // 拖拽时判断目标节点能否被放置
    allowDrop(draggingNode, dropNode, type) {
      // todo data代表的是数据库中的数据,我理解这儿做任何level的操作,都不应该用data的level
      // 因为如果你拖动多次的话,数据库中的catLevel肯定暂时是没有变的,
      // 而draggingNode 本身node的level已经和dta中的level可能不一样了
      // 因此用data中的level有可能是出错的
      // 但现在我没有时间去验证这个事情,先跟着老师敲下面的代码吧,

      // todo 果然,上面的是被我说中了的,老师在后面两级都改了,但是我是由于自己实现的部分方法
      // 而数据依然是跟着老师的,所以这块儿实在是不好改,会耗费大量精力,所以这块儿暂时先这样

      // 1. 被拖动的当前节点及所在的父节点总层数不能大于3

      // // 1)递归找出被拖动的当前节点的总层数

      // // 例如:手机-iphone-iphone12  其对应的总层数为3,2,1
      // this.countNodeLevel(draggingNode.data);

      // // 这个算出来的是被拖动的当前节点共有
      // let deep = this.maxLevel - draggingNode.data.catLevel + 1;

      // if (type == "inner") {
      //   return deep + dropNode.level <= 3;
      // } else {
      //   return deep + dropNode.parent.level <= 3;
      // }

      // 算出当前节点一共有多少层,手机-iphone-iphone12  其对应的总层数为3,2,1
      this.countNodeLevel(draggingNode.data);

      if (type == "inner") {
        return this.maxLevel + dropNode.level <= 3;
      } else {
        return this.maxLevel + dropNode.parent.level <= 3;
      }
    },
    // 这个方法我重新实现了,老师的方法我实在不好理解
    countNodeLevel(node) {
      // 找到所有子节点,求出最大深度
      // if (node.children != null && node.children.length > 0) {
      //   for (let i = 0; i < node.children.length; i++) {
      //     if (node.children[i].catLevel > this.maxLevel) {
      //       this.maxLevel = node.children[i].catLevel;
      //     }
      //     this.countNodeLevel(node.children[i]);
      //   }
      // }
      if (node.children != null && node.children.length > 0) {
        // 只要被拖动的当前节点有子节点,那层级最少是2级
        this.maxLevel = 2;
        for (let i = 0; i < node.children.length; i++) {
          // 循环当前节点的子节点是否有子节点,如果有,当前节点的层级就是3层
          if (
            node.children[i].children != null &&
            node.children[i].children.length > 0
          ) {
            this.maxLevel = 3;
            break;
          }
        }
      } else {
        // 如果被拖动的当前节点没有子节点,那层级就是1级
        // maxLevel 此时变量叫这个名字就不太对了,但是还是和老师保持一致吧
        this.maxLevel = 1;
      }
    },
    edit(data) {
      this.dialogVisible = true;
      // 回显直接拿前端的数据有风险
      // 假设10分钟前的页面回显,那数据肯定是错误的,所以回显是需要调后台接口的
      // this.category.name = data.name;
      // this.category.catId = data.catId;
      this.$http({
        url: this.$http.adornUrl(`/product/category/info/${data.catId}`),
        method: "get",
      }).then(({ data }) => {
        this.category.name = data.category.name;
        this.category.catId = data.category.catId;
        this.category.icon = data.category.icon;
        this.category.productUnit = data.category.productUnit;
        this.category.parentCid = data.category.parentCid;
      });

      this.dialogType = "edit";
      this.title = "修改分类";
    },
    append(data) {
      this.dialogVisible = true;
      // 父分类的id
      this.category.parentCid = data.catId;
      // *1 可以将字符串转换为数字
      this.category.catLevel = data.catLevel * 1 + 1;
      this.dialogType = "add";
      this.title = "添加分类";
      this.category.catId = null;
      this.category.name = "";
      this.category.icon = "";
      this.category.productUnit = "";
    },
    submitData() {
      if (this.dialogType == "add") {
        this.addCategory();
      }
      if (this.dialogType == "edit") {
        this.editCategory();
      }
    },
    editCategory() {
      var { catId, name, icon, productUnit } = this.category;
      var data = { catId, name, icon, productUnit };

      this.$http({
        url: this.$http.adornUrl("/product/category/update"),
        method: "post",
        data: this.$http.adornData(data, false),
      }).then(({ data }) => {
        this.$message({
          type: "success",
          message: "菜单修改成功",
        });
        // 关闭对话框
        this.dialogVisible = false;
        this.getMenus();
        this.expandedKey = [this.category.parentCid];
        this.category.name = "";
      });
    },
    // 添加三级分类
    addCategory() {
      this.$http({
        url: this.$http.adornUrl("/product/category/save"),
        method: "post",
        data: this.$http.adornData(this.category, false),
      }).then(({ data }) => {
        this.$message({
          type: "success",
          message: "菜单保存成功",
        });
        // 关闭对话框
        this.dialogVisible = false;
        this.getMenus();
        this.expandedKey = [this.category.parentCid];
        this.category.name = "";
      });
    },
    remove(node, data) {
      var ids = [data.catId];

      this.$confirm(`是否删除【${data.name}】菜单?`, "提示", {
        confirmButtonText: "确定",
        cancelButtonText: "取消",
        type: "warning",
      })
        .then(() => {
          this.$http({
            url: this.$http.adornUrl("/product/category/delete"),
            method: "post",
            data: this.$http.adornData(ids, false),
          }).then(({ data }) => {
            this.$message({
              type: "success",
              message: "菜单删除成功",
            });
            this.getMenus();
            this.expandedKey = [node.parent.data.catId];
          });
        })
        .catch(() => {
          this.$message({
            type: "info",
            message: "已取消删除",
          });
        });
    },
  },

  //生命周期 - 创建完成(可以访问当前 this 实例)
  created() {
    this.getMenus();
  },

  //生命周期 - 挂载完成(可以访问 DOM 元素)
  mounted() {},
  beforeCreate() {}, //生命周期 - 创建之前
  beforeMount() {}, //生命周期 - 挂载之前
  beforeUpdate() {}, //生命周期 - 更新之前
  updated() {}, //生命周期 - 更新之后
  beforeDestroy() {}, //生命周期 - 销毁之前
  destroyed() {}, //生命周期 - 销毁完成
  activated() {}, //如果页面有 keep-alive 缓存功能,这个函数会触发
};
</script>
<style scoped>
</style>
后端
CategoryController
package com.atlinxi.gulimall.product.controller;

import java.util.Arrays;
import java.util.List;
import java.util.Map;

import org.springframework.beans.factory.annotation.Autowired;
import org.springframework.web.bind.annotation.PathVariable;
import org.springframework.web.bind.annotation.RequestBody;
import org.springframework.web.bind.annotation.RequestMapping;
import org.springframework.web.bind.annotation.RequestParam;
import org.springframework.web.bind.annotation.RestController;

import com.atlinxi.gulimall.product.entity.CategoryEntity;
import com.atlinxi.gulimall.product.service.CategoryService;
import com.atlinxi.common.utils.PageUtils;
import com.atlinxi.common.utils.R;


/**
 * 商品三级分类
 *
 * @author linxi
 * @email qazokmzjl@gmail.com
 * @date 2022-10-12 23:06:12
 */
@RestController
@RequestMapping("product/category")
public class CategoryController {
    @Autowired
    private CategoryService categoryService;

    /**
     * 查出所有分类以及子分类,以树形结构组装起来
     */
    @RequestMapping("/list/tree")
    public R list() {

        List<CategoryEntity> entities = categoryService.listWithTree();

        return R.ok().put("data", entities);
    }


    /**
     * 信息
     */
    @RequestMapping("/info/{catId}")
    public R info(@PathVariable("catId") Long catId) {
        CategoryEntity category = categoryService.getById(catId);

        return R.ok().put("category", category);
    }

    /**
     * 保存
     */
    @RequestMapping("/save")
    public R save(@RequestBody CategoryEntity category) {
        categoryService.save(category);

        return R.ok();
    }

    /**
     * 修改
     */
    @RequestMapping("/update/sort")
    public R updateSort(@RequestBody CategoryEntity[] category) {
        categoryService.updateBatchById(Arrays.asList(category));

        return R.ok();
    }

    /**
     * 修改
     */
    @RequestMapping("/update")
    public R update(@RequestBody CategoryEntity category) {
        categoryService.updateById(category);

        return R.ok();
    }

    /**
     * 删除
     */
    @RequestMapping("/delete")
    public R delete(@RequestBody Long[] catIds) {


//		categoryService.removeByIds(Arrays.asList(catIds));

        categoryService.removeMenuByIds(Arrays.asList(catIds));

        return R.ok();
    }

}
CategoryServiceImpl
package com.atlinxi.gulimall.product.service.impl;

import org.springframework.stereotype.Service;

import java.util.List;
import java.util.Map;
import java.util.stream.Collectors;

import com.baomidou.mybatisplus.core.conditions.query.QueryWrapper;
import com.baomidou.mybatisplus.core.metadata.IPage;
import com.baomidou.mybatisplus.extension.service.impl.ServiceImpl;
import com.atlinxi.common.utils.PageUtils;
import com.atlinxi.common.utils.Query;

import com.atlinxi.gulimall.product.dao.CategoryDao;
import com.atlinxi.gulimall.product.entity.CategoryEntity;
import com.atlinxi.gulimall.product.service.CategoryService;


@Service("categoryService")
public class CategoryServiceImpl extends ServiceImpl<CategoryDao, CategoryEntity> implements CategoryService {


    //    之前是使用@Autowired注入
//    现在继承了 mybatisplus的ServiceImpl,泛型是CategoryDao,
//    我们可以直接使用baseMapper,它代表的也就是CategoryDao
//    @Autowired
//    private CategoryDao categoryDao;

    @Override
    public PageUtils queryPage(Map<String, Object> params) {
        IPage<CategoryEntity> page = this.page(
                new Query<CategoryEntity>().getPage(params),
                new QueryWrapper<CategoryEntity>()
        );

        return new PageUtils(page);
    }


    @Override
    public List<CategoryEntity> listWithTree() {

        // 1. 查出所有分类
        List<CategoryEntity> entities = baseMapper.selectList(null);

        List<CategoryEntity> entities2 = entities.stream()
                .sorted((categoryEntity1,categoryEntity2)->(categoryEntity1.getCatLevel() - categoryEntity2.getCatLevel()))
                .collect(Collectors.toList());

        // 2. 组装成父子的树形结构

        // 2.1 找到所有的一级分类
        List<CategoryEntity> level1Menu = entities.stream()
                // 过滤
                // 这里用的是 == ,0应该是int,categoryEntity.getParentCid() 是Long,==就是true,equals就是false,因为equals底层会先比较类型
                // getChildrens 中 categoryEntity.getParentCid().equals(root.getCatId()) 这俩都是Long类型,==就是false,equals就是true
                // equals是true很好理解,因为类型一样,值一样,==是false是因为,不是在常量池中创建的对象就是在堆中创建的对象,所以地址值肯定是不一样的
                .filter(categoryEntity -> categoryEntity.getParentCid() == 0
                // 上面的过滤会得到一个list,
                // menu只是一个变量名,指list返回的每一个元素
                ).map(menu -> {
                    menu.setChildren(getChildrens(menu, entities2));
                    return menu;
                }).sorted((menu1, menu2) -> (menu1.getSort()==null?0:menu1.getSort()) - (menu2.getSort()==null?0:menu2.getSort()))
                // 把结果收集成一个list
                .collect(Collectors.toList());

        return level1Menu;
    }


    /**
     * 递归查找所有菜单的子菜单
     *
     * @param root 当前分类
     * @param all  所有分类
     * @return
     */
    private List<CategoryEntity> getChildrens(CategoryEntity root, List<CategoryEntity> all) {

        List<CategoryEntity> children = all.stream()
                .filter(categoryEntity -> categoryEntity.getParentCid().equals(root.getCatId()))
                .map(categoryEntity -> {categoryEntity.setChildren(getChildrens(categoryEntity,all)); return categoryEntity;})
                .sorted((menu1,menu2) -> (menu1.getSort()==null?0:menu1.getSort()) - (menu2.getSort()==null?0:menu2.getSort()))
                .collect(Collectors.toList());
        return children;
    }


    @Override
    public void removeMenuByIds(List<Long> asList) {
        //todo 1.检查当前删除的菜单,是否被别的地方引用

        // 逻辑删除
        baseMapper.deleteBatchIds(asList);
    }
}
所有内容全部来源于尚硅谷视频:
https://www.bilibili.com/video/BV1np4y1C7Yf?p=36&spm_id_from=pageDriver
因为他最清楚,识字多的人会做出什么样的事。
房思琪的初恋乐园
林奕含


 487
487


 被折叠的 条评论
为什么被折叠?
被折叠的 条评论
为什么被折叠?
 到【灌水乐园】发言


