


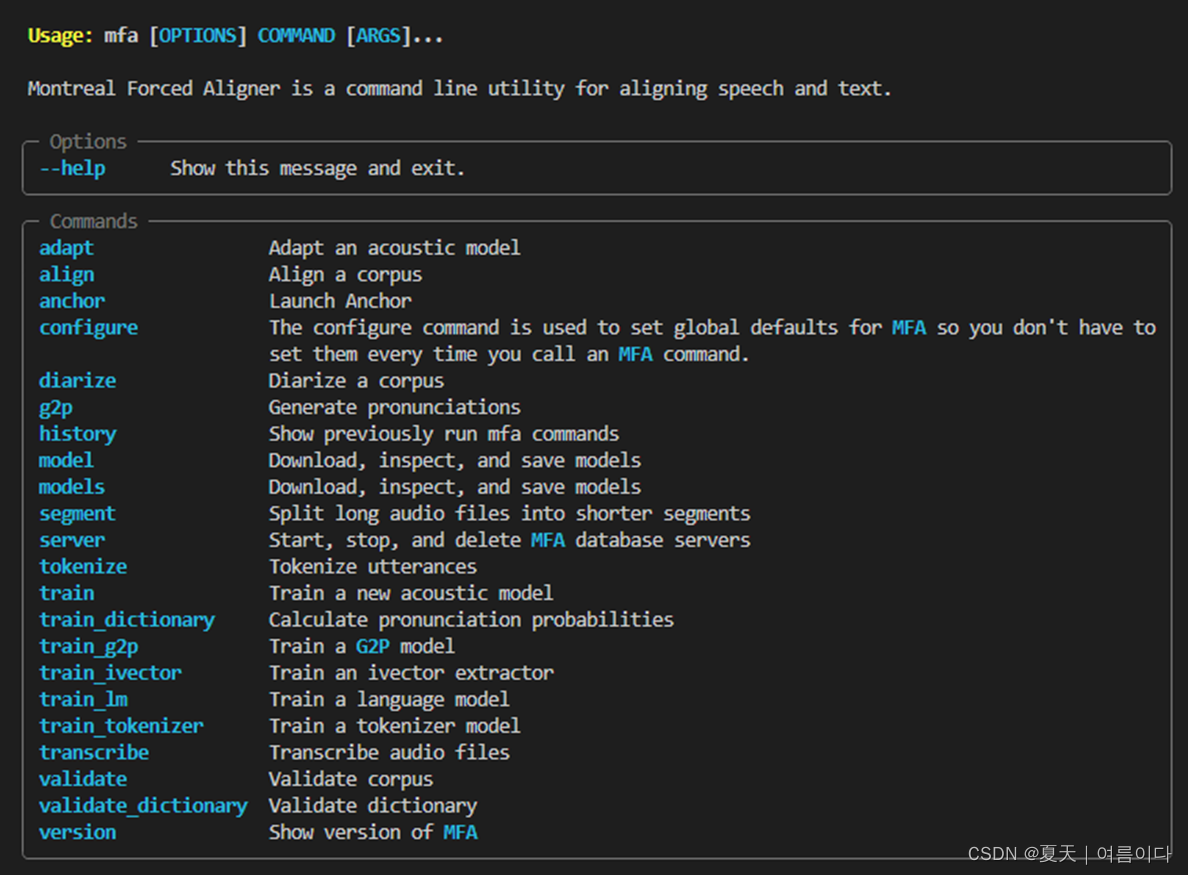
 本文介绍了如何在Linux环境下安装和使用MontrealForcedAligner(MFA)工具,包括通过不同方法安装MFA,创建词典文件,使用预训练模型进行中文和韩文的数据对齐,以及训练自定义的声学模型。此外,还讨论了在使用过程中遇到的问题及解决方案。
Montreal Forced Aligner(MFA)[1]是一个用于将音频和文本进行对齐的工具。它可以用于语音识别、语音合成和发音研究等领域。MFA支持多种语言和语音,用户可以根据需要自定义训练模型。
本博客介绍如何使用MFA对音频和文本进行对齐,其中使用的是MFA的最新版本(版本v2.2.12)。
目录
[PS1]the global mfa database server does not exist, initializing it first .
【PS3】Exception ignored in atexit callback: >
MFA的安装
MFA 支持 Windows、macOS 和 Linux 操作系统。
本博客是基于 Linux 操作系统(Ubuntu20.04)其他可参考MFA安装。
安装方法1:
conda create -n aligner -c conda-forge montreal-forced-aligner
conda activate aligner
conda update --all
conda install -c conda-forge montreal-forced-aligner


pip install g2pk
安装方法2:
 git clone https://github.com/pyrasis/MFARunner

conda create -n mfa -c conda-forge montreal-forced-aligner
source activate
conda activate mfa

conda install montreal-forced-aligner==2.0.6
cd MFARunner
pip install -r requirements.txt
sudo apt-get install g++ openjdk-8-jdk python3-dev python3-pip curl
pip install konlpy==0.6.0 ffmpeg==1.4
bash <(curl -s https://raw.githubusercontent.com/konlpy/konlpy/master/scripts/mecab.sh)

pip install tgt chardet mecab
修改config.py中的数据集路径地址
*这里需要注意的是,语音数据和txt文件不能放在同一个文件夹内。
然后运行main.py生成字典。
python main.py安装方法3:Docker
docker image pull mmcauliffe/montreal-forced-aligner:latest


docker run -it -v /home/elena/tts/:/data --name mfa  mmcauliffe/montreal-forced-aligner:latest
# docker run -it -v /path/to/data/directory:/data mmcauliffe/montreal-forced-aligner:latest 
安装的MFA默认地址为: /root/Documents/MFA

无论下载的声学模型还是预训练模型,字典等都在此位置
/root/Documents/MFA/pretrained_models/g2p/korean_jamo_mfa.zip
生成词典文件
输入数据格式
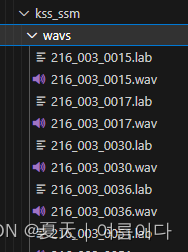
+-- prosodylab_corpus_directory
| +-- speaker1
| --- recording1.wav
| --- recording1.lab
| --- recording2.wav
| --- recording2.lab
| +-- speaker2
| --- recording3.wav
| --- recording3.lab
| --- ...
1.下载预训练模型
包含:字典,G2P(字节变音素)模型,声学模型,
- 使用预训练的字节到音素 (G2P) 模型生成词典。
#英文
mfa model download g2p english_uk_mfa#中文
mfa model download g2p mandarin_pinyin_g2p
# 也可到官网上直接下载
#韩文
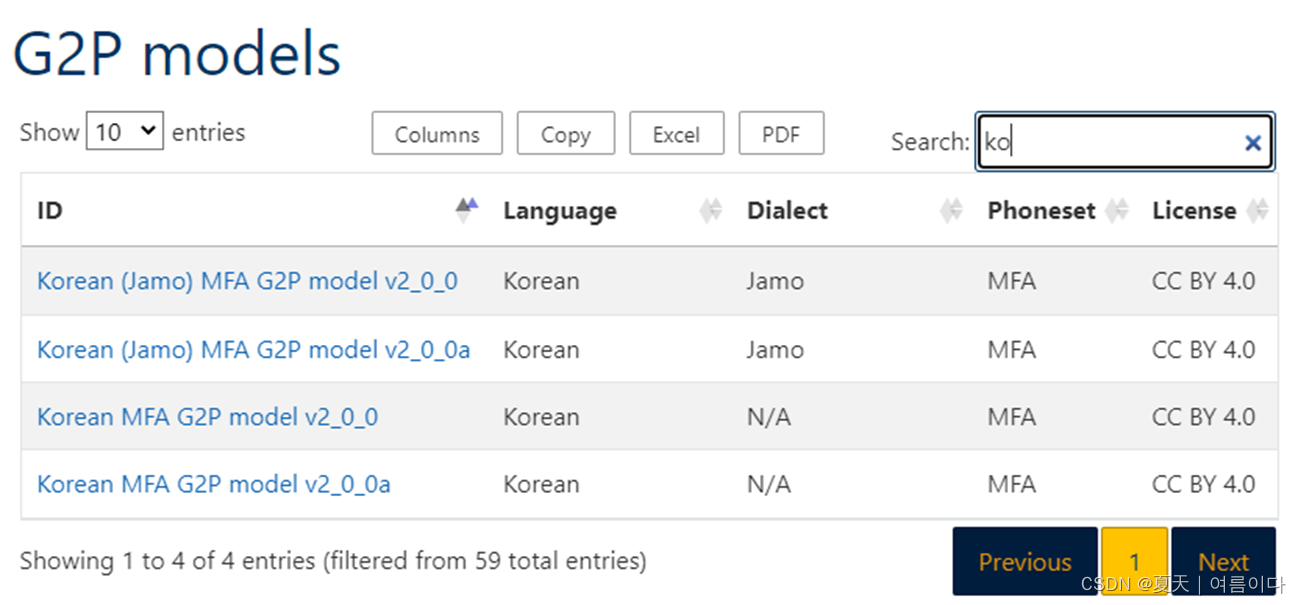
mfa model download g2p korean_jamo_mfa
2.1.示例数据集中文
mfa g2p mandarin_pinyin_g2p 数据集路径/dataset 保存路径/mandarin_dict.txt.wav文件为数据集中的语音文件,.lab文件为语音文件对应的文本,其中文本的语言应与你使用的声学模型所能识别的文本以及词典文件中的语言相一致。如:声学模型所识别的文本为汉字,而你的语言文件说的内容为“我爱你”,则你的.lab文件中应存储着“我爱你”的文本,若是声学模型识别的文本为拼音,则.lab文件中应为“wo3 ai4 ni3“,同时词典文件中也应有着汉字-音素或者拼音-音素的对应信息。
2.2.示例韩文数据集G2P模型
Korean Single Speaker Speech Dataset | Kaggle
新建kss-align.py,生成.lab/.txt文件
import os, tqdm, re
from tqdm import tqdm
from jamo import h2j
from glob import glob

text = '/workspace/dataset/kss/transcript.v.1.4.txt'
base_dir = '/workspace/dataset/kss'

filters = '([.,!?])'

with open(text, 'r', encoding='utf-8') as f:
    for line in f.readlines():
        temp = line.split('|')
        file_dir, script = temp[0], temp[3]
        script = re.sub(re.compile(filters), '', script)
        file_dir = file_dir.split('/')
        fn = file_dir[0] + '/' + file_dir[1][:-3] + 'lab'
        file_dir = os.path.join(base_dir, fn)
        with open(file_dir, 'w', encoding='utf-8') as f:
            f.write(script)

file_list = sorted(glob(os.path.join(base_dir, '**/*.lab')))
jamo_dict = {}
for file_name in tqdm(file_list):
    sentence =  open(file_name, 'r', encoding='utf-8').readline()
    jamo = h2j(sentence).split(' ')

    for i, s in enumerate(jamo):
        if s not in jamo_dict:
            jamo_dict[s] = ' '.join(jamo[i])

dict_name = 'korean_dict.txt'
with open(dict_name, 'w', encoding='utf-8') as f:
    for key in jamo_dict.keys():
        content = '{}\t{}\n'.format(key, jamo_dict[key])
        f.write(content)
#pip install jamo

#生成.lab文件
python kss-align.py 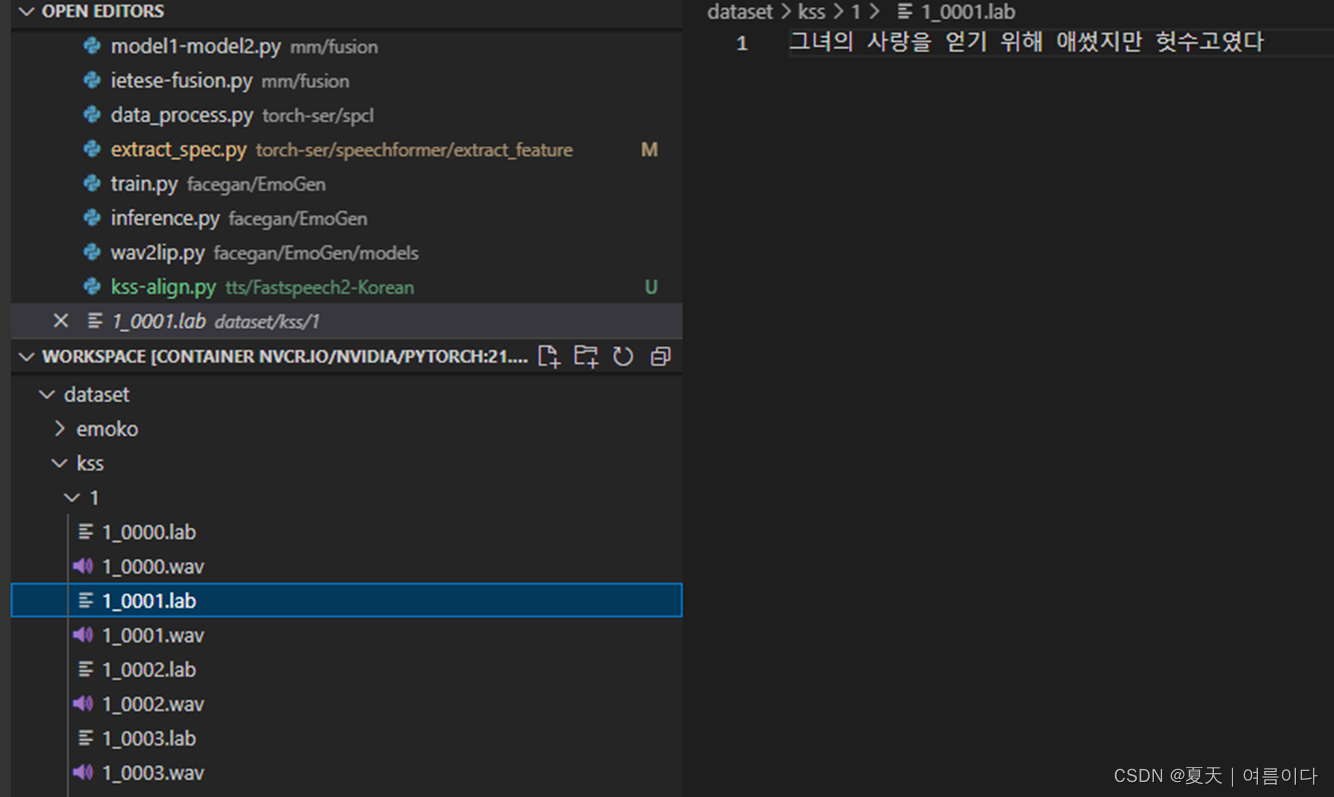
字典(lexicon) 文件生成,也就是korean_dict.txt
* 注意,这里生成的字典文件,每次生成可能都是不同的数量!!
# 训练一个自己的g2p字典
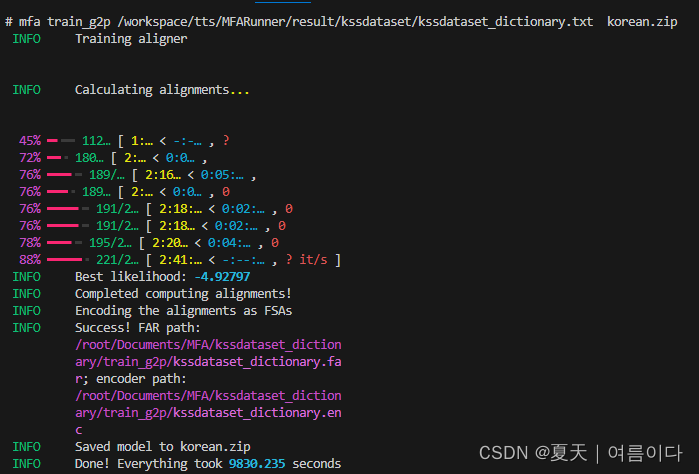
mfa train_g2p korean_dict.txt korean.zip
## 根据自己的字典生成一个g2p模型
## V1:mfa train_g2p /workspace/tts/MFARunner/result/kss_elena/kss_elena_dictionary.txt korean_a.zip
#根据自己的语音
mfa g2p /workspace/tts/MFARunnerV1/preprocessed/kss_elena korean.zip /workspace/tts/MFARunner/result/kss_elena/kss_elena_dictionary.txt
## V1: mfa g2p /workspace/tts/MFARunnerV1/preprocessed/kss_elena(这里是包含了lab和wav的路径) korean_a.zip(上一条命令中生成的压缩包) /workspace/tts/MFARunner/result/kss_elena/kss_elena_dictionary.txt(输出路径)
#训练自己的声学模型
mfa train kss korean.txt out
## V1: mfa train /workspace/tts/MFARunnerV1/preprocessed/kss_elena(这里是包含了lab和wav的路径)/workspace/tts/MFARunner/result/kss_elena/kss_elena_dictionary.txt (刚生成的新的字典文件)
out (输出文件夹)
'''mfa train /workspace/tts/MFARunnerV1/preprocessed/kss_elena /workspace/tts/MFARunner/result/kss_elena/kss_elena_dictionary.txt
out '''第一行:运行后生成一个压缩包

V1:

第二行

V1:

mfa train_g2p 是 korean_dict 路径, 运行后生成的 zip 文件路径
mfa g2p 是来自 train_g2p 的 zip 文件路径、 有数据的文件夹路径以及运行后生成的 txt 文件路径
mfa train接收有数据的文件夹路径、来自g2p的txt文件路径、运行后保存TextGrid文件的路径
全部运行后,将在out文件夹中保存TextGrid文件
命令解释(所有命令)
输入到每个指令的参数可以根据用户进行更改。
- mfa train_g2p 是 korean_dict 路径, 运行后生成的 zip 文件路径
- mfag2p 来自 train_g2p 的 zip 文件路径、 带有数据的文件夹路径、 运行后生成的 txt 文件路径
- mfa train接收有数据的文件夹路径、g2p中出现的txt文件路径、运行后保存TextGrid文件的路径
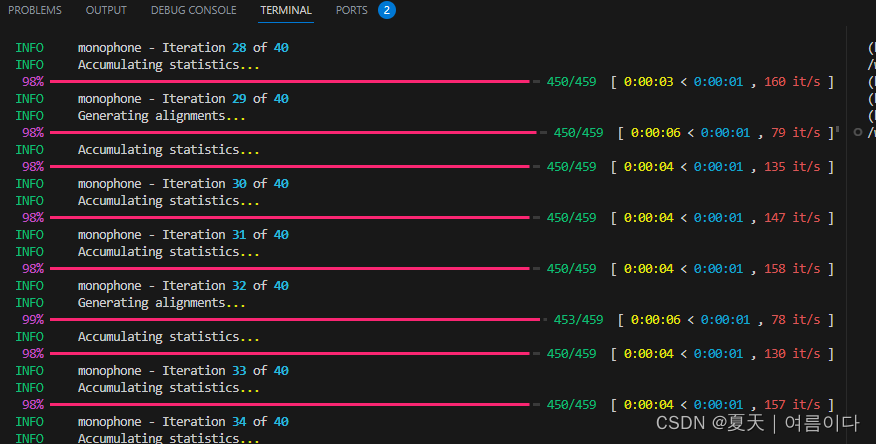
运行后界面
这里就生成一个基于自己数据集词典的模型啦,自己的文件夹下也会有一个korean.zip文件。
2.3.示例韩文数据集声学模型
对于自己的数据集,依旧是先将自己的数据集变为以下格式
对应文本格式
然后进入MFA虚拟环境,借用MFARunner
在dataset、下新增custom.py
#custom.py
from utils import do_multiprocessing, get_filelist, copy_file, read_meta, write_meta, create_dir, run_mfa
from utils import get_korean_dictionary, remove_special_symbols
import os, itertools, sys
from g2pk import G2p
g2p = G2p()
class custom_Dataset():
def __init__(self, dataset_path, preprocessed_file_dir, result_dir, language='korean', num_jobs=8, phone_set=None):
self.result_dir = result_dir
self.dataset_path = dataset_path
self.dataset_name = dataset_path.split("/")[-1]
self.preprocessed_file_dir = preprocessed_file_dir
self.phone_set = phone_set
self.num_jobs = num_jobs
create_dir(self.result_dir)
create_dir(self.preprocessed_file_dir)
self.preprocessed_file_dir = create_dir(os.path.join(preprocessed_file_dir, self.dataset_name))
self.result_dir = create_dir(os.path.join(result_dir, self.dataset_name))
def job(self, info):
wav_filepath, transcript, save_dir = info
filename = wav_filepath.split("/")[-1]
#temp = line.strip('\n')
transcript_filename = transcript.split(" ")[0] + ".wav"
text = transcript.split(" ")[13:]
print("filename:",filename, "transcript_filename:",transcript_filename,"text:", text)
if filename not in transcript_filename:
print("[ERROR] transcript filename and wav-filename doesn't match!")
print("\t\t transcript_filename: {} vs. wav-filename: {}".format(transcript_filename, filename))
sys.exit(0)
return
wav_savepath = os.path.join(save_dir, filename)
transcript_savepath = os.path.join(save_dir, filename.replace(".wav", ".lab"))
copy_file(wav_filepath, wav_savepath)
write_meta(text, transcript_savepath)
def run(self):
wav_filepaths = get_filelist(os.path.join(self.dataset_path, "**"), file_format="wav")
wav_filepaths = [(wav_filepath.split(" ")[-1], wav_filepath) for wav_filepath in wav_filepaths]
wav_filepaths.sort(key=lambda x: x[0])
_, wav_filepaths = list(zip(*wav_filepaths))
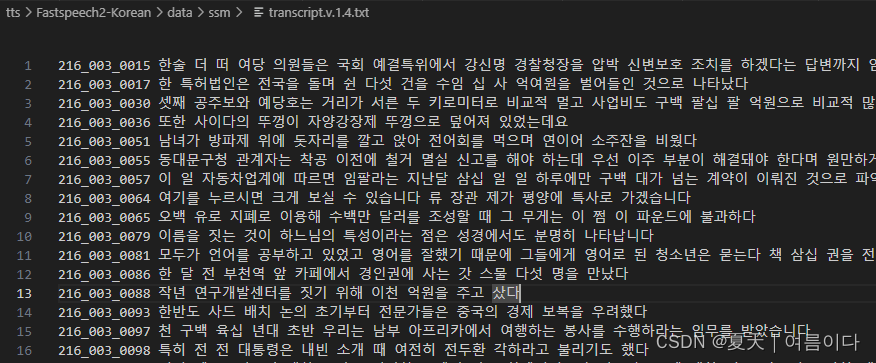
meta_path = os.path.join(self.dataset_path, "transcript.v.1.4.txt")
with open(meta_path, mode='r', encoding='utf-8') as f:
lines = f.readlines()
lines.sort()
with open(meta_path, mode='w', encoding='utf-8') as f:
f.writelines(lines)
transcripts = read_meta(meta_path)
if len(wav_filepaths) != len(transcripts):
print("[ERROR] num of wavs and num of transcripts doesn't match! ({} vs. {})".format(len(wav_filepaths), len(transcripts)))
return
save_dirs = [self.preprocessed_file_dir for _ in range(len(transcripts))]
file_infos = list(zip(wav_filepaths, transcripts, save_dirs))
do_multiprocessing(job=self.job, tasklist=file_infos, num_jobs=self.num_jobs)
transcripts = [transcript.split(" ")[2] for transcript in transcripts]
transcripts = remove_special_symbols(transcripts)
dictionary = get_korean_dictionary(transcripts, g2p)
dictionary_path = os.path.join(self.result_dir, "{}_dictionary.txt".format(self.dataset_name))
textgrid_path = os.path.join(self.result_dir, "TextGrid")
write_meta(dictionary, dictionary_path)
run_mfa(self.preprocessed_file_dir+"/", dictionary_path, textgrid_path, num_jobs=self.num_jobs, phone_set=self.phone_set)
然后修改main.py中的引用,修改config.py中的路径!!!
结果
对齐
mfa align
corpus_directory # 对齐数据
dictionary_path # 词典
acoustic_model_path # 声学模型
output_directory # 输出对齐结果
--temporary_directory #指定临时目录,存储中间结果
--disable_mp # 关闭多进程,默认是False
mfa align /path:/dataset path:/dictionary path:/acoustic_modle path:/output输出后为TextGrid文件,也就是模型所需要的对齐文件~
执行mfa后,可能会出现名为unaligned.txt的文件。
mfa align kss_elena kss_elena korean out ×
运行完成后,生成output文件夹,文件夹下都是.Textgrid文件
第一行是固定的:File type = "ooTextFile"
第二行也是固定的:Object class = "TextGrid"
空一行
xmin = xxxx.xxxx  # 表示开始时间
xmax = xxxx.xxxx  # 表示结束时间
tiers? <exists>  # 这一行固定
size = 2     # 表示这个文件有几个item, item也叫tiers, 可以翻译为'层', 这个值是几,就表示有几个item
item []:
    item [1]:
        class = "IntervalTier"
        name = "phone"
        xmin = 1358.8925
        xmax = 1422.5525
        intervals: size = 104
        intervals [1]:
            xmin = 1358.8925
            xmax = 1361.8925
            text = "sil"
        intervals [2]:
            xmin = 1361.8925
            xmax = 1362.0125
            text = "R"
        intervals [3]:
            ...
        intervals [104]:
            xmin = 1422.2325
            xmax = 1422.5525
            text = "sil"
    item [2]:
        class = "IntervalTier"
        name = "word"
        xmin = 1358.8925
        xmax = 1422.5525
        intervals: size = 3
        intervals [1]:
            xmin = 1358.8925
            xmax = 1361.8925
            text = "sp"
textgrid文件中的size的值是几就表示有几个item, 每个item下面包含class, name, xmin, xmax, intervals的键值对,
item中的size是几就表示这个item中有几个intervals, 每个intervals有xmin, xmax, text三个键值参数.
所有item中的xmax-xmin的值是一样的
总结
对于自己的语音数据集,首先要将自己的语音数据集和语音对应的文本文件,从中提取文本文件.lab文件,标签文件可能是txt文件/csv文件,利用python脚本将语音文件的文本提取到.lab文件,名字相同,
mfa train /mfa_data/my_dictionary.txt /mfa_data/new_acoustic_model.zip  # 仅导出声音模型
mfa train /mfa_data/my_dictionary.txt /mfa_data/my_corpus_aligned  # 仅导出对齐文件
mfa train /mfa_data/my_dictionary.txt /mfa_data/new_acoustic_model.zip /mfa_data/my_corpus_aligned  # 导出声音模型和对齐文件
PS
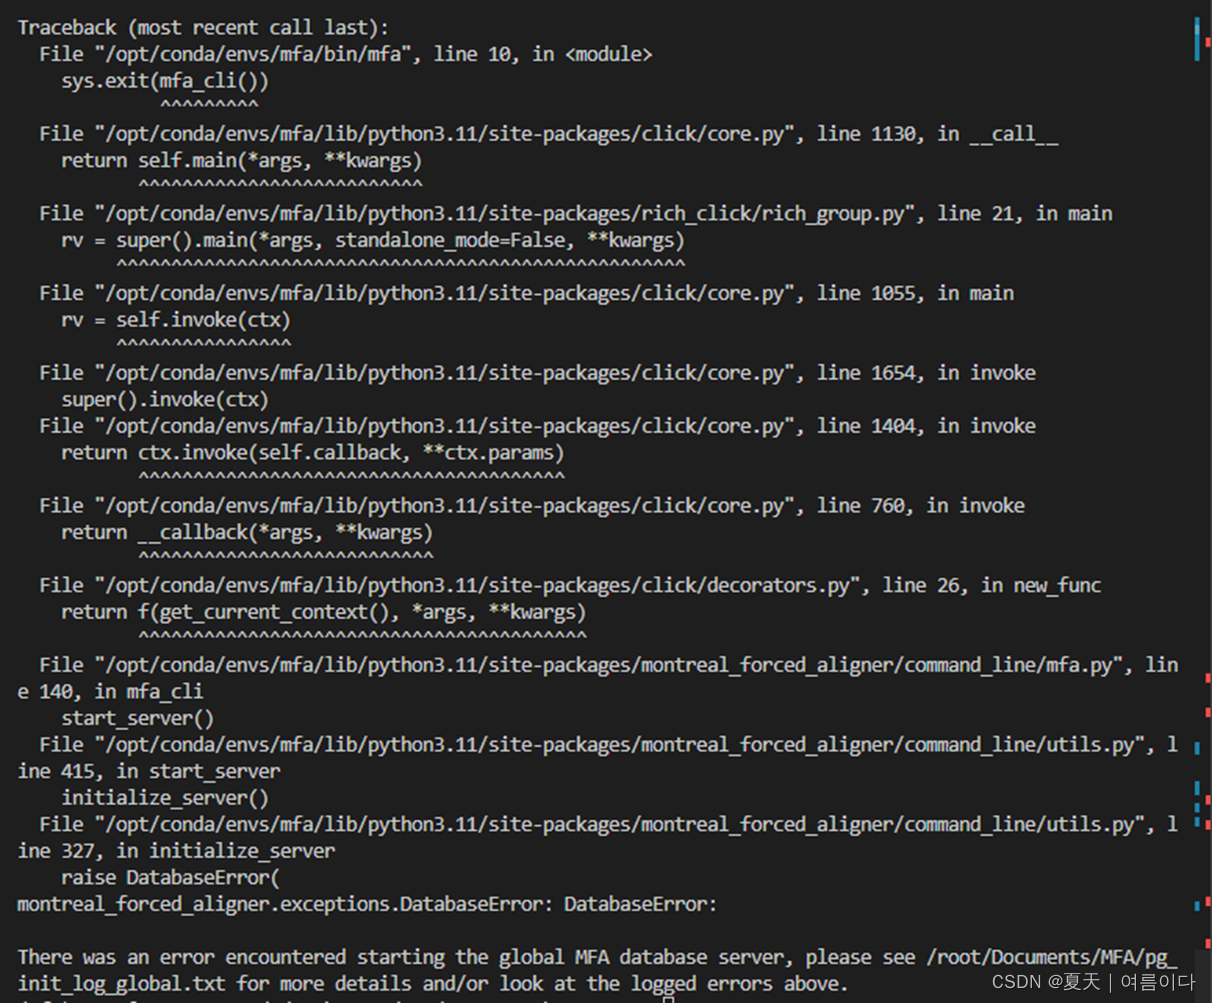
[PS1]the global mfa database server does not exist, initializing it first .
全局mfa数据库服务器不存在,请先对其进行初始化。
montreal_forced_aligner.exceptions.DatabaseError: DatabaseError:
There was an error encountered starting the global MFA database server, please see /root/Documents/MFA/pg_init_log_global.txt for more details and/or look at the logged errors above.
参考网址【未解决】
mfa configure --enable_auto_server
mfa server init
[PS2]yaml.constructor.ConstructorError: could not determine a constructor for the tag 'tag:yaml.org,2002:python/object:argparse.Namespace'
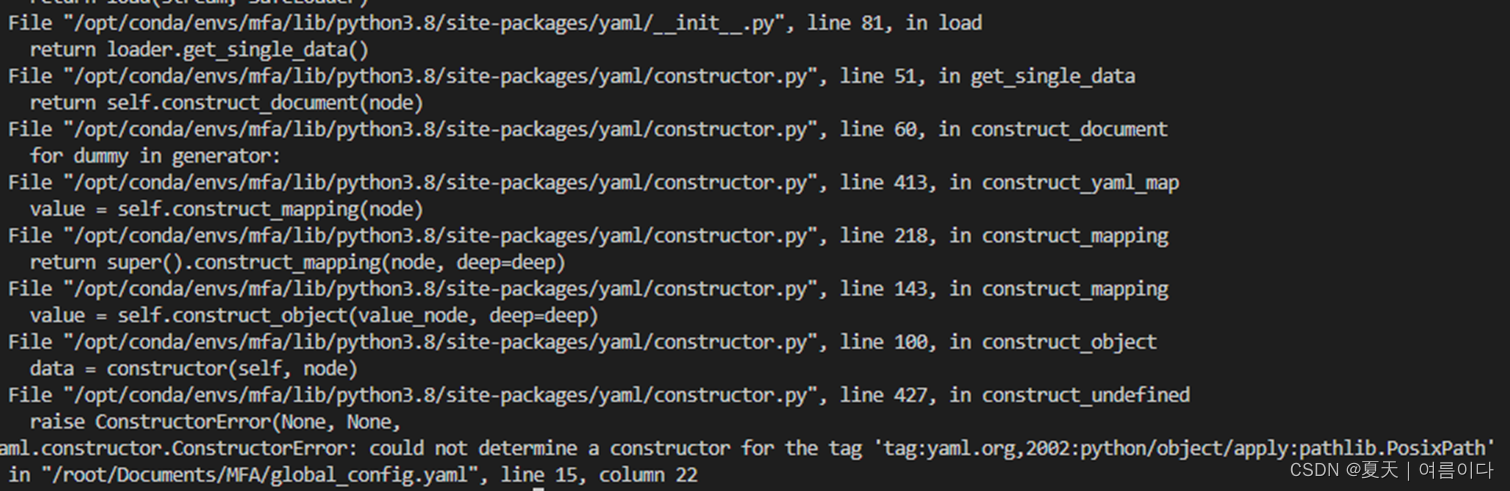
尝试
pip install pyyaml==4.2b2重装yaml版本依旧出现错误
修改文件
vim /opt/conda/envs/mfa/lib/python3.8/site-packages/montreal_forced_aligner/config.py将
config = yaml.safe_load(file_data)
改为
config = yaml.unsafe_load(file_data)之后正常运行。
【PS3】Exception ignored in atexit callback: <bound method ExitHooks.history_save_handler of <montreal_forced_aligner.command_line.mfa.ExitHooks object at 0x7f15a31bf650>>
【PS4】Error in atexit._run_exitfuncs:...
File "/opt/miniconda3/envs/aligner/lib/python3.9/site-packages/montreal_forced_aligner/abc.py", line 559, in __del__
TypeError: 'NoneType' object is not callable
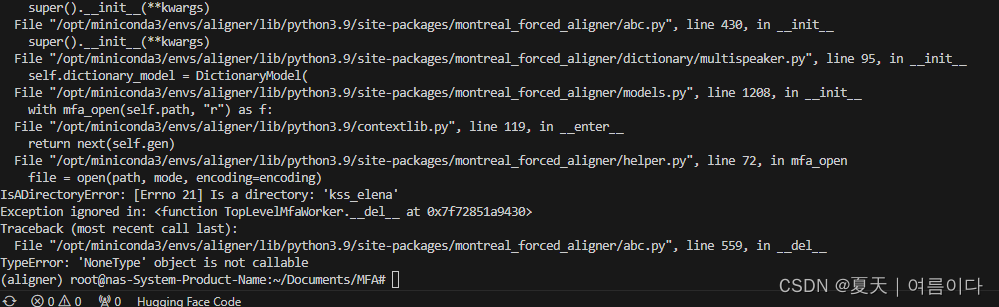
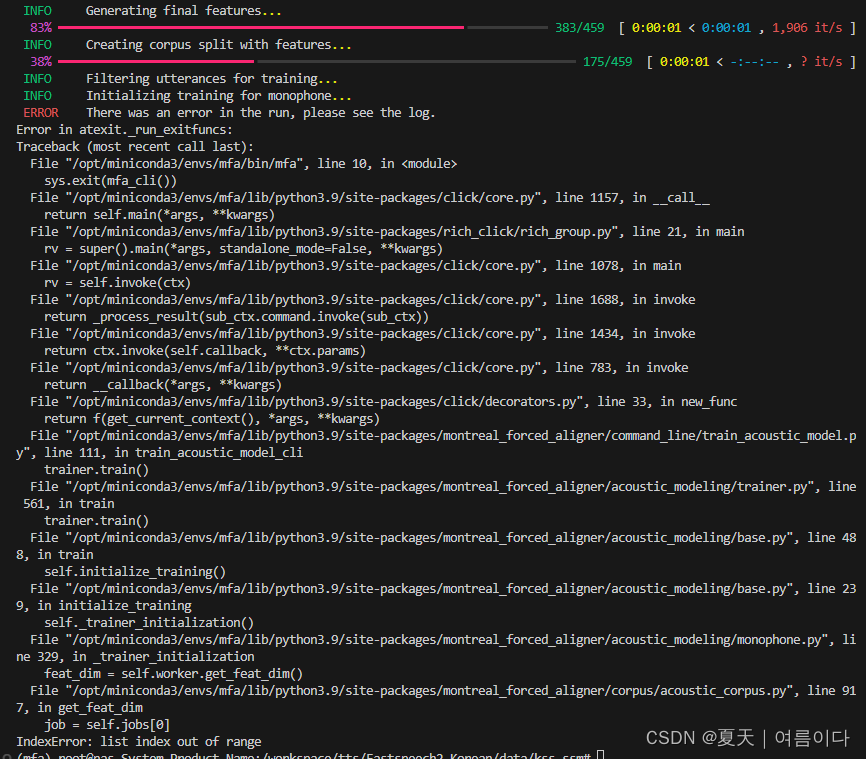
【PS5】IndexError: list index out of range
疑问与解答(Q&A)
1.在MFA命令中,mfa train和mfa train_g2p的区别?
mfa train:训练一个新的声学模型
mfa train_g2p :训练一个汉字变音素模型
参考材料
【1】PYRASIS.COM: 내 목소리를 TTS로 만들기(FastSpeech2)
【2】Installation — Montreal Forced Aligner 2.0.0 documentation
【3】https://osakuadeopeyemi.medium.com/generate-forced-alignment-with-montreal-forced-aligner-mfa-383f91a6f2a1【4】3 Montreal Forced Aligner | Corpus Phonetics Tutorial
附录
# 20230719
conda create -n aligner -c conda-forge montreal-forced-aligner python=3.9

conda activate aligner

conda install -c conda-forge montreal-forced-aligner


pip install g2pk


# MFARunner 文件夹下修改config.py的路径位置
mfa train_g2p /workspace/tts/MFARunner/result/kssdataset/kssdataset_dictionary.txt  korean.zip


 1341
1341

 被折叠的 条评论
为什么被折叠?
被折叠的 条评论
为什么被折叠?
 到【灌水乐园】发言


