


1. 建立工程
2. 建立.vscode
c_pp_properties.json
{
    "configurations": [
        {
            "name": "Linux",
            "includePath": [
                "${workspaceFolder}/**",
                "/home/szm/linux/IMX6ULL/szm_linux/linux-imx-rel_imx_4.1.15_2.1.0_ga/include",
                "/home/szm/linux/IMX6ULL/szm_linux/linux-imx-rel_imx_4.1.15_2.1.0_ga/arch/arm/include",
                "/home/szm/linux/IMX6ULL/szm_linux/linux-imx-rel_imx_4.1.15_2.1.0_ga/arch/arm/include/generated/"
            ],
            "defines": [],
            "compilerPath": "/usr/bin/gcc",
            "cStandard": "c11",
            "cppStandard": "c++17",
            "intelliSenseMode": "gcc-x64"
        }
    ],
    "version": 4
settings.json
{
    "search.exclude": {
        "**/node_modules": true,
        "**/bower_components": true,
        "**/*.o":true,
        "**/*.su":true,
        "**/*.cmd":true,
        "Documentation":true,
    },
    "files.exclude": {
        "**/.git": true,
        "**/.svn": true,
        "**/.hg": true,
        "**/CVS": true,
        "**/.DS_Store": true,
        "**/*.o":true,
        "**/*.su":true,
        "**/*.cmd":true,
        "Documentation":true,
    }
}
3.Makefile
# KERNELDIR表示内核源码路径
KERNELDIR := /home/szm/linux/IMX6ULL/szm_linux/linux-imx-rel_imx_4.1.15_2.1.0_ga
# 表示当前路径,即pwd
CURRENT_PATH := $(shell pwd)

# 将chadevbase.c编译成模块
obj-m := chadevbase.o

build : kernel_modules


# 具体的编译命令,后面的 modules 表示编译模块,-C 表示将当前的工作目录切
# 换到指定目录中,也就是 KERNERLDIR 目录。M 表示模块源码目录,“make modules”命令
# 中加入 M=dir 以后程序会自动到指定的 dir 目录中读取模块的源码并将其编译为.ko 文件。
kernel_modules:
	$(MAKE) -C $(KERNELDIR) M=$(CURRENT_PATH) modules

clean:
	$(MAKE) -C $(KERNELDIR) M=$(CURRENT_PATH) clean
4.代码
4.1 驱动模块加载与卸载
模块编译完成之后扩展名为ko,有两种命令可以加载模块:insmod和modprobe。insmod是最简单的模块加载命令,此命令用于加载指定的.ko 模块。
insmod 命令不能解决模块的依赖关系,比如 drv.ko 依赖 first.ko 这个模
块,就必须先使用insmod 命令加载 first.ko 这个模块,然后再加载 drv.ko这个模块。但是 modprobe 就不会存在这个问题,modprobe 会分析模块的依赖关系,然后会将所有的依赖模块都加载到内核中,因此modprobe 命令相比insmod 要智能一些。modprobe 命令主要智能在提供了模块的依赖性分析、错误检查、错误报告等功能,推荐使用 modprobe 命令来加载驱动。modprobe 命令默认会去/lib/modules/kernel-version目录中查找模块,比如本书使用的 Linux kernel 的版本号为 4.1.15,因此 modprobe 命令默认会到/lib/modules/4.1.15 这个目录中查找相应的驱动模块,一般自己制作的根文件系统中是不会有这个目录的,所以需要自己手动创建。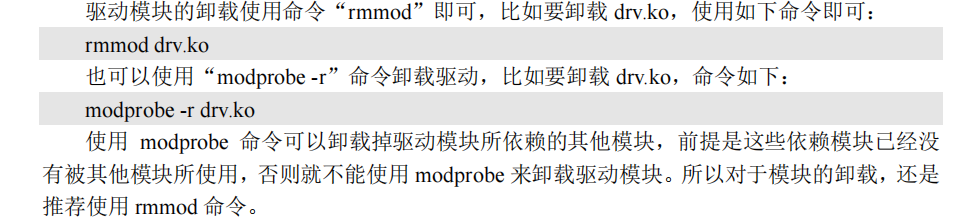
我们把编译好的ko文件放到nfs中
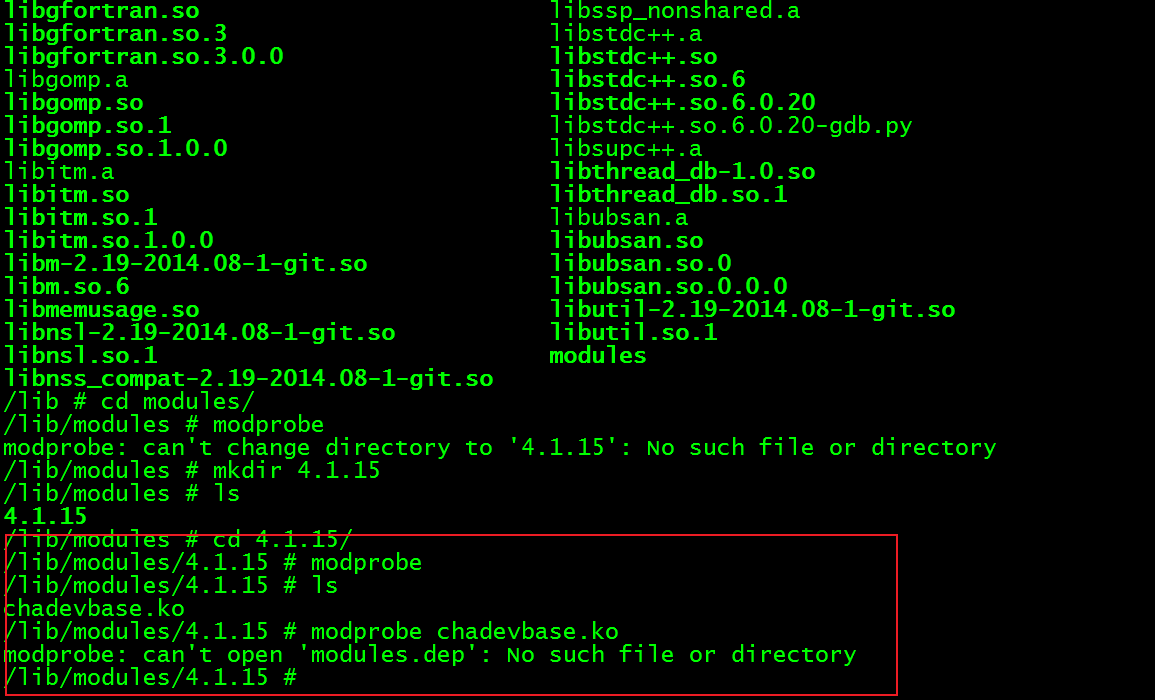
在加载模块驱动之前要先加demod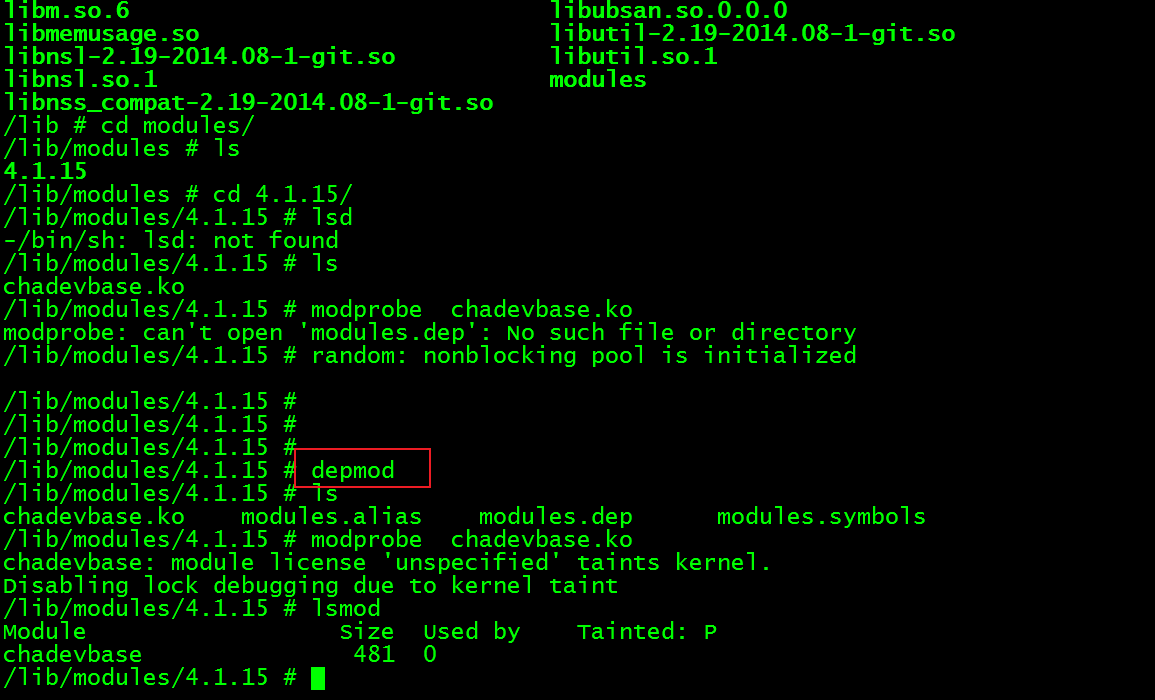
然后使用加载命令,加载成功后可以用lsmod查看驱动
使用rmmod卸载驱动
4.2 字符设备的注册与注销
- 我们需要向系统注册一个字符设备,使用函数register_chrdev
- 卸载驱动的时候,需要注销掉,前面注册的字符设备unregister_chrdev
4.3 设备号
- linux内核使用dev_t
typedef __ kernel_dev_t dev_t
typedef __ u32 __ kernel_dev_t
typedef unsigned int __ u32 - Linux内核将设备号分成两部分,主设备号和次设备号。主设备号占用前12位,次设备号占用后20位
- 设备号的操作函数
从dev_t获取主设备号和次设备号,MAJOR(dev_t), MINOR(dev_t)。也可以使用主设备号和次设备号,通过mkdev(major,minor), 所以一定保证驱动的主设备号和次设备号一定是唯一的,不能冲突
查看当前主设备号的使用情况:
cat /proc/devices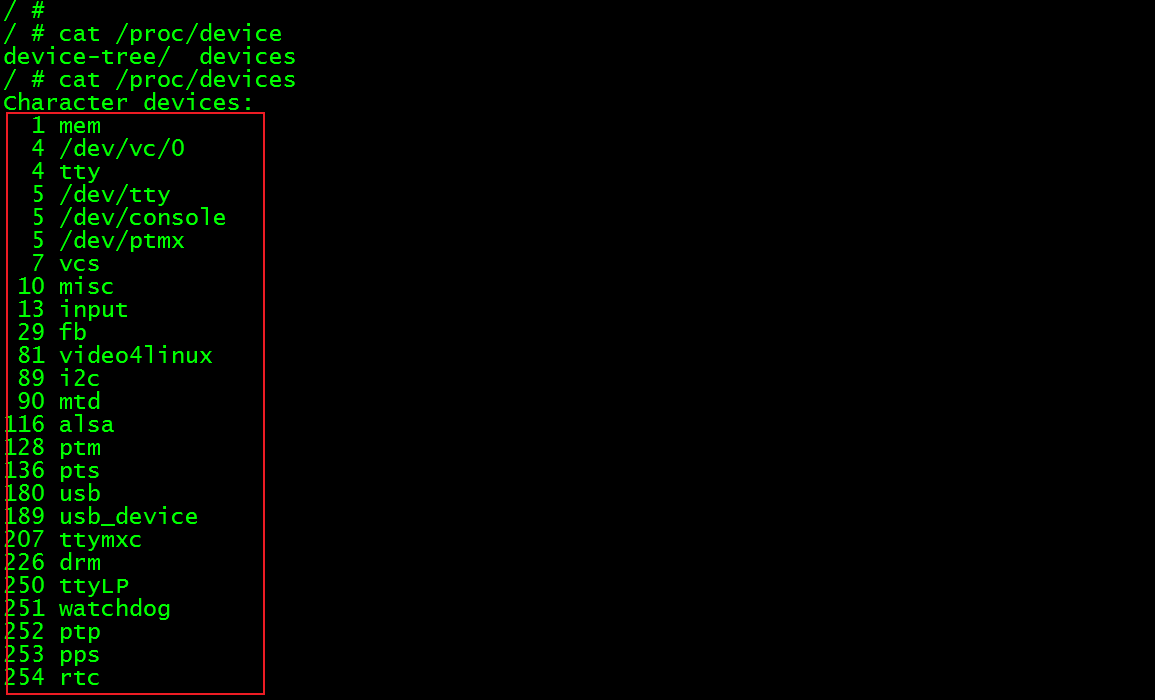
我们看到200没有用
4.4 file_opterations开发,驱动框架
#include <linux/module.h>
#include <linux/kernel.h>
#include <linux/init.h>
#include <linux/fs.h>


#define CHRDEVBASE_MAJOR               200              /* 主设备号 */
#define CHRDEVBASE_NAME                "chrdevbase"     /* 名字 */

static int chrdevbase_open(struct inode *inode, struct file *filp)
{
    printk("chrdevbase_open\r\n");
    return 0;
}

/* 对应的驱动关闭注意和原来的区别 */
static int chrdevbase_release(struct inode *inode, struct file *filp)
{
    printk("chrdevbase_release\r\n");
    return 0;
}

static ssize_t chrdevbase_read(struct file *filp, __user char *buf,
                               size_t count, loff_t *ppos)
{
    printk("chrdevbase_read\r\n");
    return 0;
}


static ssize_t chrdevbase_write(struct file *filp, __user const char *buf,
                               size_t count, loff_t *ppos)
{
    printk("chrdevbase_write\r\n");
    return 0;
}

static struct file_operations chrdevbase_fops={
    .owner = THIS_MODULE,
    .open = chrdevbase_open,
    .release = chrdevbase_release,
    .read = chrdevbase_read,
    .write = chrdevbase_write,
};

static int __init chrdevbase_init(void)
{
    int ret = 0;
    printk("module init\r\n"); //linux内核的打印函数

    /* 注册字符设备 */
    /* file_opterations就是要实现的 */
    ret = register_chrdev(CHRDEVBASE_MAJOR, CHRDEVBASE_NAME,
                          &chrdevbase_fops);
    if(ret < 0)
    {
        printk("chrdevbase init failed\r\n");
    }
    return 0;
}
static void __exit chrdevbase_exit(void)
{
    printk("module exit\r\n");

    /* 注销字符设备 */
    unregister_chrdev(CHRDEVBASE_MAJOR, CHRDEVBASE_NAME);
    return ;
}

/* 模块入口与出口 */
module_init(chrdevbase_init); /* 入口 */ /* 当装载的时候自动执行这个函数,卸载执行下面的函数 */
module_exit(chrdevbase_exit); /* 出口 */ /* 括号里填写驱动入口函数 */

MODULE_LICENSE("GPL");
MODULE_AUTHOR("Shao Zheming");
4.5 应用程序编写
#include <sys/types.h>
#include <sys/stat.h>
#include <fcntl.h>
#include <stdio.h>
#include <unistd.h>

/*
 * argc: 应用程序参数个数
 * argv[]: 参数是什么,具体的参数,说明参数是字符串的形式
 * .chrdevbaseApp <filename> 调用情况
 * */
int main(int argc, char *argv[])
{
    int ret = 0;
    int fd = 0; //文件描述符
    char *filename;
    char readBuf[100], writeBuf[100];

    // 当输入这个命令时,.chrdevbaseApp <filename>
    // 第一个参数,也就是argv[0]就是.chrdevbaseApp
    // 第二个参数,也就是argv[1]就是<filename>
    filename = argv[1];
    // O_RDWR可读可写
    fd = open(filename, O_RDWR);
    if(fd < 0){
        printf("Can't open file %s \r\n", filename); //应用测试就要用printf了
        return -1;
    }

    /* 读和写测试 */
    /* read */
    // 50指的是从驱动里面读多少个字节
    // 返回的是你读的字节数, -1是错了,如果小于50,说明驱动只能给你小于50,没错
    ret = read(fd, readBuf, 50);
    if(ret < 0){
        printf("read file %s failed \r\n", filename);
    }else{

    }
    /* write */
    ret = write(fd, writeBuf, 50);
    if(ret < 0){
        printf("write file %s failed \r\n", filename);
    }else{

    }

    /* write */
    ret = close(fd);
    if(ret < 0){
        printf("close file %s failed \r\n", filename);
    }

    return 0;
}
注意是arm架构,所以在Ubuntu上运行肯定报错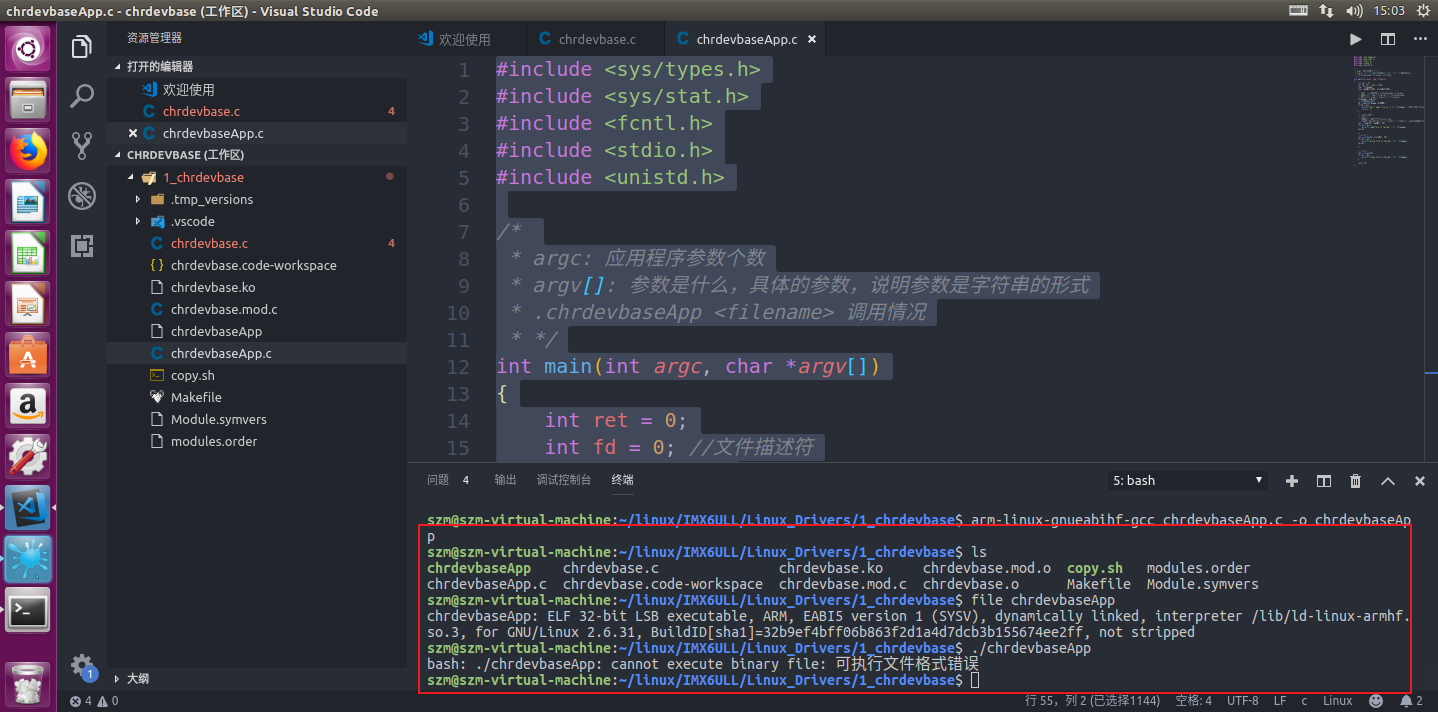
5. 测试
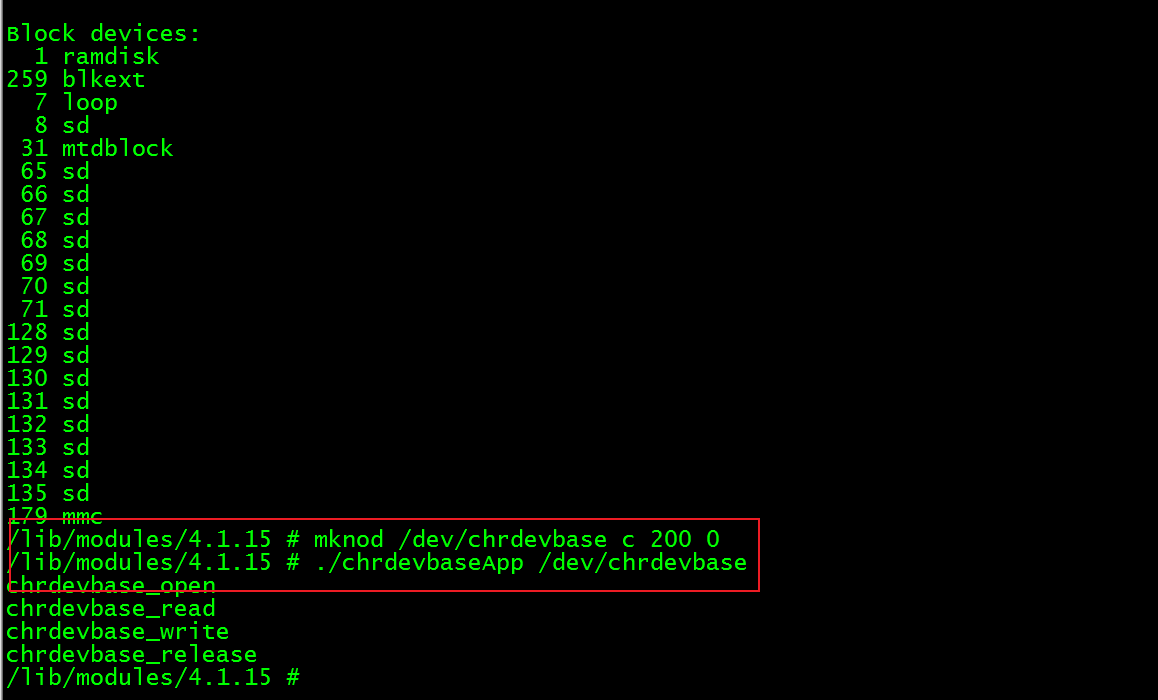
进入dev查看chrdevbase,发现没有这个东西,需要手动创建
c是字符设备的意思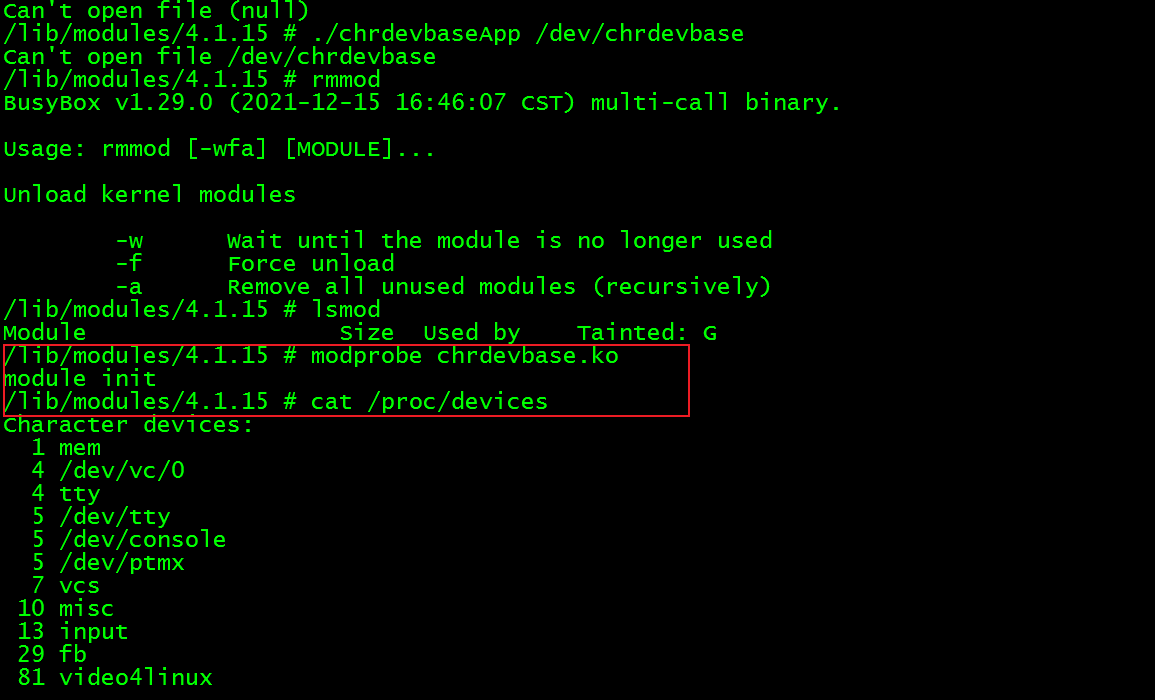
6. 完善这个驱动
要求可以读写程序
chrdevbase.c
#include <linux/module.h>
#include <linux/kernel.h>
#include <linux/init.h>
#include <linux/fs.h>
#include <linux/uaccess.h>
#include <linux/io.h>


#define CHRDEVBASE_MAJOR               200              /* 主设备号 */
#define CHRDEVBASE_NAME                "chrdevbase"     /* 名字 */

/* 和应用层一致 */
static char readBuf[100];                               /* 读缓冲 */
static char writeBuf[100];                              /* 写缓冲 */
static char kernel_data[] = {"kernel data!\r\n"};

static int chrdevbase_open(struct inode *inode, struct file *filp)
{
    //printk("chrdevbase_open\r\n");
    return 0;
}

/* 对应的驱动关闭注意和原来的区别 */
static int chrdevbase_release(struct inode *inode, struct file *filp)
{
    //printk("chrdevbase_release\r\n");
    return 0;
}

static ssize_t chrdevbase_read(struct file *filp, __user char *buf,
                               size_t count, loff_t *ppos)
{
    int ret = 0;
    //printk("chrdevbase_read\r\n");
    /* 应用程序不能直接访问内核数据,必须借用其他的函数 */
    memcpy(readBuf, kernel_data, sizeof(kernel_data));
    //count是由用户决定的
    ret = copy_to_user(buf, readBuf, count);
    if(ret == 0){

    }else{

    }

    return 0;
}


static ssize_t chrdevbase_write(struct file *filp, __user const char *buf,
                               size_t count, loff_t *ppos)
{
    int ret = 0;
    //printk("chrdevbase_write\r\n");
    /* 应用程序不能直接访问内核数据,必须借用其他的函数 */
    //count和buf是由用户决定的
    ret = copy_from_user(writeBuf, buf, count);
    if(ret == 0){
        printk("kernel recevice data:%s \r\n", writeBuf);
    }else{

    }

    return 0;
}

static struct file_operations chrdevbase_fops={
    .owner = THIS_MODULE,
    .open = chrdevbase_open,
    .release = chrdevbase_release,
    .read = chrdevbase_read,
    .write = chrdevbase_write,
};

static int __init chrdevbase_init(void)
{
    int ret = 0;
    printk("module init\r\n"); //linux内核的打印函数

    /* 注册字符设备 */
    /* file_opterations就是要实现的 */
    ret = register_chrdev(CHRDEVBASE_MAJOR, CHRDEVBASE_NAME,
                          &chrdevbase_fops);
    if(ret < 0)
    {
        printk("chrdevbase init failed\r\n");
    }
    return 0;
}
static void __exit chrdevbase_exit(void)
{
    printk("module exit\r\n");

    /* 注销字符设备 */
    unregister_chrdev(CHRDEVBASE_MAJOR, CHRDEVBASE_NAME);
    return ;
}

/* 模块入口与出口 */
module_init(chrdevbase_init); /* 入口 */ /* 当装载的时候自动执行这个函数,卸载执行下面的函数 */
module_exit(chrdevbase_exit); /* 出口 */ /* 括号里填写驱动入口函数 */

MODULE_LICENSE("GPL");
MODULE_AUTHOR("Shao Zheming");
测试APP文件
chrdevbaseApp.c
#include <sys/types.h>
#include <sys/stat.h>
#include <fcntl.h>
#include <stdio.h>
#include <unistd.h>
#include <stdlib.h>
#include <string.h>

/*
 * argc: 应用程序参数个数
 * argv[]: 参数是什么,具体的参数,说明参数是字符串的形式
 * .chrdevbaseApp <filename> <1:2> 1表示读,2表示写
 * .chrdevbaseApp /dev/chrdevbase 1 从这个驱动里面读数据
 * .chrdevbaseApp /dev/chrdevbase 2 从这个驱动里面写数据
 * */
int main(int argc, char *argv[])
{
    int ret = 0;
    int fd = 0; //文件描述符
    char *filename;
    char readBuf[100], writeBuf[100];
    static char user_data[] = {"I write an user data to kernel!\r\n"};

    // 当输入这个命令时,.chrdevbaseApp <filename>
    // 第一个参数,也就是argv[0]就是.chrdevbaseApp
    // 第二个参数,也就是argv[1]就是<filename>
    if(argc != 3){
        /* 表示参数不是3个 */
        printf("Error usage! \r\n");
        return -1;
    }

    filename = argv[1];
    // O_RDWR可读可写
    fd = open(filename, O_RDWR);
    if(fd < 0){
        printf("Can't open file %s \r\n", filename); //应用测试就要用printf了
        return -1;
    }
    if(atoi(argv[2]) == 1){/* 表示读 */
        /* 读和写测试 */
        /* read */
        // 50指的是从驱动里面读多少个字节
        // 返回的是你读的字节数, -1是错了,如果小于50,说明驱动只能给你小于50,没错
        ret = read(fd, readBuf, 50);
        if(ret < 0){
            printf("read file %s failed \r\n", filename);
        }else{
            printf("APP read data:%s \r\n", readBuf);
        }
    }
    if(atoi(argv[2]) == 2){ /* 表示写 */
        /* write */
        memcpy(writeBuf, user_data, sizeof(user_data));
        ret = write(fd, writeBuf, 50);
        if(ret < 0){
            printf("write file %s failed \r\n", filename);
        }else{

        }
    }


    /* write */
    ret = close(fd);
    if(ret < 0){
        printf("close file %s failed \r\n", filename);
    }

    return 0;
}


 1378
1378


 被折叠的 条评论
为什么被折叠?
被折叠的 条评论
为什么被折叠?
 到【灌水乐园】发言


