


服务器项目部署
配置和部署
1. 服务器端口和安全组
-
端口
IP地址   --> 电脑
端口     --> A程序
端口     --> B程序
端口     --> C程序

22,   SSH
3306, MySQL
6379, Redis
80,   网站的默认端口http端口
443.   https
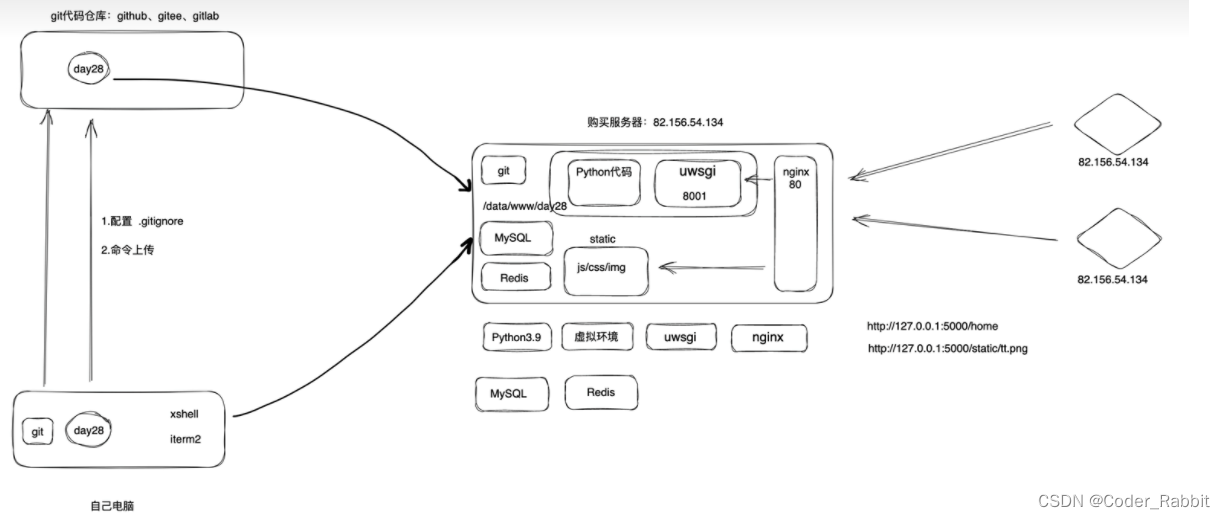
2. 购买云服务器
3. 远程登录
XShell登录
4. 代码同步(git)
git init
git remote add origin https://github.com/xxx.git
git add .
# git status
git commit -m "项目初始化"
git branch -M main
git push -u origin main   # git push -u origin master
5. 安装Python3.9.5
- 安装gcc yum install gcc -y
- 安装Python依赖
yum install zlib zlib-devel -y
yum install bzip2 bzip2-devel -y
yum install ncurses ncurses-devel -y
yum install readline readline-devel -y
yum install openssl openssl-devel -y
yum install xz lzma xz-devel -y
yum install sqlite sqlite-devel -y
yum install gdbm gdbm-devel -y
yum install tk tk-devel -y
yum install mysql-devel -y
yum install python-devel -y
yum install libffi-devel -y
-
下载源码 Python3.9.5
yum install wget -y
wget https://www.python.org/ftp/python/3.9.5/Python-3.9.5.tgz -
编译安装
-
解压
tar -xvf Python-3.9.5.tgz进入目录并编译安装
cd Python-3.9.5
./configure
make all
make install
测试
>>>python3 --version

/usr/local/bin/python3
/usr/local/bin/pip3
/usr/local/bin/pip3.9
配置豆瓣源(腾讯云服务器,默认腾讯源)
pip3.9 config set global.index-url https://pypi.douban.com/simple/
-
6. 安装虚拟环境
-
安装virtualenv
pip3.9 install virtualenv -
创建虚拟环境 (day28)
代码:
/data/www/day28
环境:
/envs/nbmkdir /envs virtualenv /envs/nb --python=python3.9 -
安装项目依赖的pip包
source /envs/nb/bin/activate  # 激活虚拟环境

pip install flask
pip install pymysql
pip install dbutils
cd /data/项目目录/ pip install -r requirements.txt
7. uwsgi
-
安装 激活虚拟环境并安装uwsgi
source /envs/nb/bin/activate # 激活虚拟环境 pip install uwsgi -
基于uwsgi运行项目 (修改代码要重启uwsgi)
-
命令参数
uwsgi --http :80 --wsgi-file app.py --callable app -
文件参数(推荐)
-
创建nb_uwsgi.ini
[uwsgi] socket = 127.0.0.1:8001 chdir = /data/www/day28/ wsgi-file = app.py callable = app processes = 1 virtualenv = /envs/nb/ -
执行命令
source /envs/nb/bin/activate uwsgi --ini nb_uwsgi.ini # uwsgi --ini nb_uwsgi.ini & 后台运行 -
停止
ps -ef|grep nb_uwsgi     # root 12648 12295 0 22:32 pts/3 00:00:00 uwsgi --ini nb_uwsgi.ini
kill -9 12648  # 杀死进程
-
-
8. nginx
安装:利用nginx做反向代理和处理静态文件。
yum install nginx -y
配置:修改nginx.conf配置文件:/etc/nginx/nginx.conf
删除默认的nginx.conf
rm nginx.conf
新建 nginx.conf + 内容拷贝 + 保存
cd /etc/nginx/
vim nginx.conf    创建并打开文件
i                 编辑模式
ESC               进入命令行模式
:wq               保存并退出
user root;
worker_processes auto;
error_log /var/log/nginx/error.log;
pid /run/nginx.pid;

# load dynamic modules. See /usr/share/doc/nginx/README.dynamic.
include /usr/share/nginx/modules/*.conf;

events {
    worker_connections  1024;
}

http {
    log_format  main  '$remote_addr - $remote_user [$time_local] "$request" '
                      '$status $body_bytes_sent "$http_referer" '
                      '"$http_user_agent" "$http_x_forwarded_for"';

    access_log  /var/log/nginx/access.log  main;

    sendfile        		on;
    tcp_nopush      		on;
    tcp_nodelay     		on;
    keepalive_timeout 		65;
    types_hash_max_size     4096;


    include                 /etc/nginx/mime.types;
    default_type            application/octet-stream;

    upstream flask {
    	server 127.0.0.1:8001;
    }

    server {
        listen       80;
        listen       [::]:80;

        # Load configuration files for the default aerver block.
        # include /etc/nginx/default.d/*.conf;

        location /static {
        	alias /root/data/www/day28/static;
        }

        location / {
        	uwsgi_pass  flask;
        	include     uwsgi_params;
        }
    }
}
启动Nginx
-
启动
systemctl start nginx systemctl stop nginx systemctl restart nginx -
开机启动
systemctl enable nginx
9. shell脚本
重启脚本 reboot.sh
#!/usr/bin/env bash

echo -e "\033[34m--------------------wsgi process--------------------\033[0m"

ps -ef|grep nb_uwsgi.ini | grep -v grep

sleep 0.5

echo -e '\n--------------------going to close--------------------'

ps -ef| grep nb_uwsgi.ini | grep -v grep | awk '{print $2}' | xargs kill -9

sleep 0.5

echo -e '\n----------check if the kill action is correct----------'

/envs/nb/bin/uwsgi --ini nb_uwsgi.ini & >/dev/null

echo -e '\n\033[42;1m--------------------started...--------------------\033[0m'
sleep 1

ps -ef | grep nb_uwsgi.ini | grep -v grep
chmod 755 reboot.sh   # 赋予可执行权限
./reboot.sh           # 启动
停止脚本 stop.sh
#!/usr/bin/env bash

echo -e "\033[34m--------------------wsgi process--------------------\033[0m"

ps -ef | grep nb_uwsgi.ini | grep -v grep

sleep 0.5

echo -e '\n--------------------going to close--------------------'

ps -ef | grep nb_uwsgi.ini | grep -v grep | awk '{print $2}' | xargs kill -9

sleep 0.5
chmod 755 stop.sh   # 赋予可执行权限
./stop.sh           # 启动
10. MySQL
-
安装服务端 (这里其实客户端会自动安装上)
yum install mariadb-server -y mariadb-server.x86_64 1:5.5.68-1.el7 -
安装客户端
yum install mariadb -y软件包 1:mariadb-5.5.68-1.e17.x86_64 已安装并且是最新版本 -
服务配置
-
启动
systemctl start mariadb systemctl stop mariadb -
设置开机启动
systemctl enable mariadb
-
-
账号初始化
-
登录
mysql -u root -p -
root设置密码
UPDATE user SET password=password('qwe123..') WHERE user='root'; flush privileges; -
创建用户
insert into mysql.user(user,host,password) values('s5','%',password('qwe123..'));
flush privileges;

# 或更新密码
UPDATE user SET password=password('qwe123..') WHERE user='xxx';
flush privileges;
-
-
创建数据库
CREATE DATABASE day28db DEFAULT CHARSET utf8 COLLATE utf8_general_ci; -
授权
- 创建数据库 day28db
	CREATE DATABASE day28db DEFAULT CHARSET utf8 COLLATE utf8_general_ci;
- 创建账户 s5
	insert into mysql.user(user,host,password) values('s5','%',password('qwe123..'));
	flush privileges;
- 授权
	grant all privileges on day28db.* to s5@'%';
	flush privileges;
- 测试
	- 远程测试0K
	- 本地测试   (注意这里的本地指的是你的服务器)
		无密码可以登录?
		有密码无法登录?
grant all privileges on 数据库.* to settle@'%'; flush privileges;grant all privileges on day28db.* to s5@'%'; flush privileges;
11. Redis (端口6379)
安装:
yum install redis -y
配置 /etc/redis.conf
- 密码
- bind 127.0.0.1   设置为 0.0.0.0
- requirepass qwe123..

vim /etc/redis.conf
启动
systemctl start redis
systemctl stop redis

systemctl enable redis   # 设置开机自启
代码
pip install redis


 565
565


 被折叠的 条评论
为什么被折叠?
被折叠的 条评论
为什么被折叠?
 到【灌水乐园】发言


