


参考:https://zhuanlan.zhihu.com/p/39240159
推荐:一个可视化卷积和反卷积的项目:https://github.com/vdumoulin/conv_arithmetic
1 反卷积计算
pytorch中反卷积的函数为:
class torch.nn.ConvTranspose2d(in_channels, out_channels, kernel_size, stride=1, padding=0,output_padding=0,groups=1,bias=True, dilation=1)
# 一般为以下
nn.ConvTranspose2d(in_channels, out_channels, kernel_size, stride, padding)
参数的含义如下:
- in_channels(int) – 输入信号的通道数
- out_channels(int) – 卷积产生的通道数
- kernel_size(int or tuple) - 卷积核的大小
- stride(int or tuple,optional) - 卷积步长,即要将输入扩大的倍数。
- padding(int or tuple, optional) - 输入的每一条边补充0的层数,高宽都增加2*padding
- output_padding(int or tuple, optional) - 输出边补充0的层数,高宽都增加padding
- groups(int, optional) – 从输入通道到输出通道的阻塞连接数
- bias(bool, optional) - 如果bias=True,添加偏置
- dilation(int or tuple, optional) – 卷积核元素之间的间距
而对于输入输出的计算,首先参数out_channels指定输出的通道数,即一定是output_size*output_size*out_channels,故主要计算输出的output_size,公式如下:
一般来说用以下公式:
例子:
# Generator Code
# 生成器 反卷积
class Generator(nn.Module):
def __init__(self, ngpu):
super(Generator, self).__init__()
self.ngpu = ngpu # Number of GPUs available. Use 0 for CPU mode. 可用的 GPUs 数量。
self.main = nn.Sequential(
# input is Z, going into a convolution 100维
nn.ConvTranspose2d( nz, ngf * 8, 4, 1, 0, bias=False), #(1-1)*1+4-2*0=4
nn.BatchNorm2d(ngf * 8),
nn.ReLU(True),
# state size. (ngf*8) x 4 x 4 4*4*512
'''
class torch.nn.ConvTranspose2d(in_channels, out_channels, kernel_size, stride=1, padding=0,
output_padding=0, groups=1, bias=True, dilation=1)
'''
nn.ConvTranspose2d(ngf * 8, ngf * 4, 4, 2, 1, bias=False), # (4-1)*2-2*1+4=8
nn.BatchNorm2d(ngf * 4),
nn.ReLU(True),
# state size. (ngf*4) x 8 x 8 8*8*256
nn.ConvTranspose2d( ngf * 4, ngf * 2, 4, 2, 1, bias=False), # (8-1)*2-2*1+4=16
nn.BatchNorm2d(ngf * 2),
nn.ReLU(True),
# state size. (ngf*2) x 16 x 16 16*16*128
nn.ConvTranspose2d( ngf * 2, ngf, 4, 2, 1, bias=False), # (16-1)*2-2*1+4=32
nn.BatchNorm2d(ngf),
nn.ReLU(True),
# state size. (ngf) x 32 x 32 32*32*64
nn.ConvTranspose2d( ngf, nc, 4, 2, 1, bias=False), # (32-1)*2-2*1+4=64
nn.Tanh()
# state size. (nc) x 64 x 64 64*64*3
)
def forward(self, input):
return self.main(input) 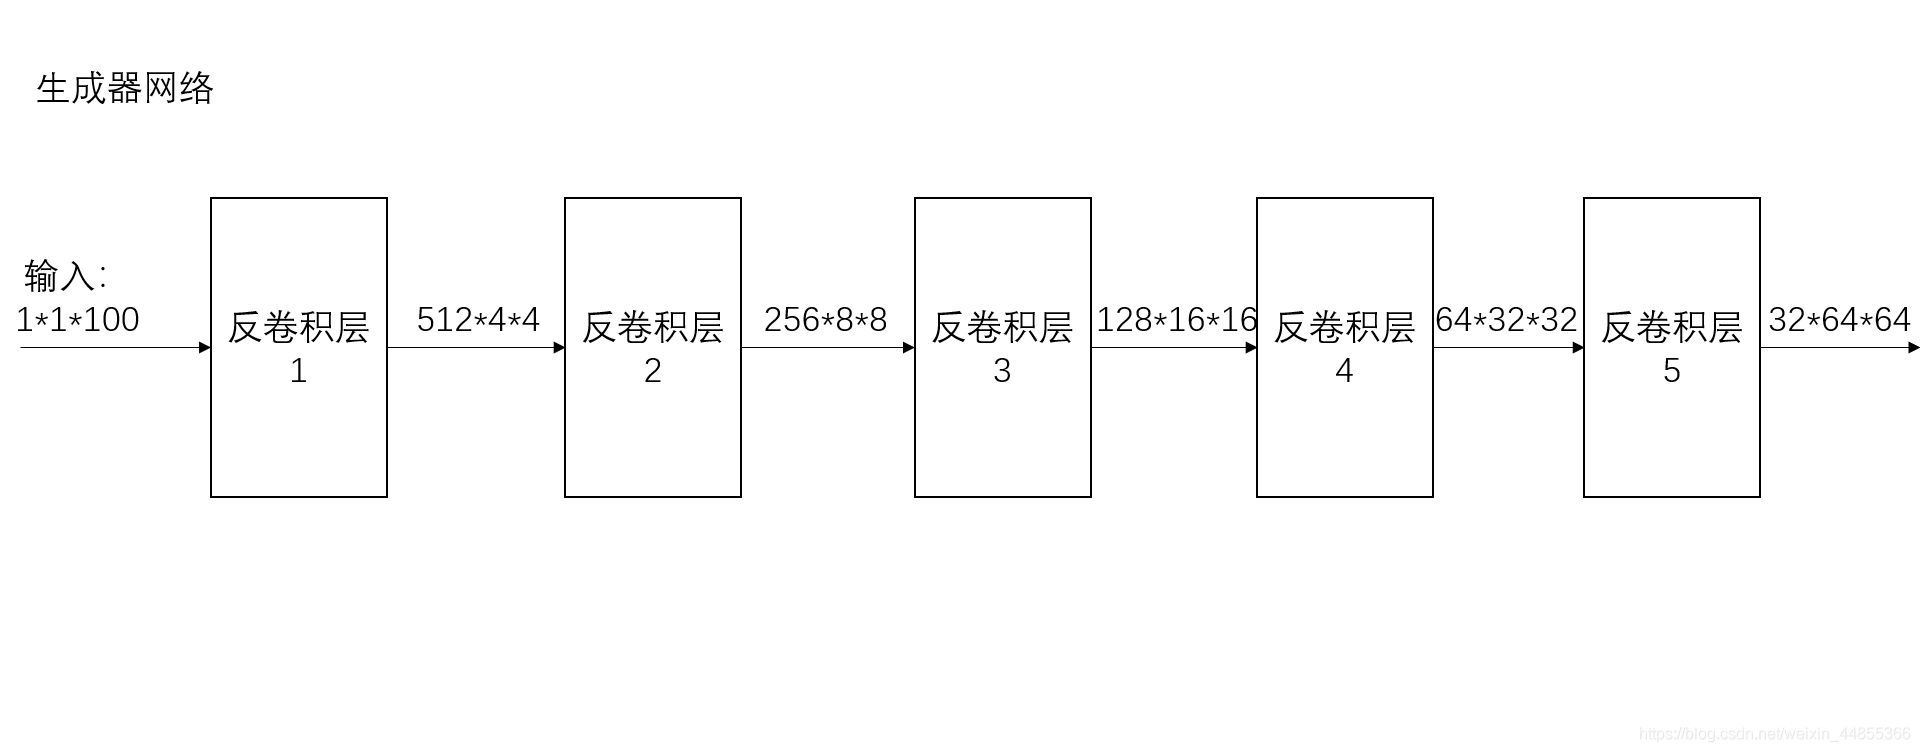 2 卷积计算
Conv2d(in_channels, out_channels, kernel_size, stride=1,padding=0, dilation=1, groups=1,bias=True, padding_mode=‘zeros’)五个常用参数的含义如下:
- in_channels:输入的通道数目;
- out_channels:输出的通道数目;
- kernel_size:卷积核的大小;
- stride:卷积每次滑动的步长;
- padding:填充,设置在所有边界增加值为 0 的边距的大小。
卷积神将网络的计算公式:N=(W-F+2P)/S+1,其中N:输出大小,W:输入大小,F:卷积核大小,P:填充值的大小,S:步长大小

例子:
# batch norm 和leaky relu函数促进了健康的梯度流
class Discriminator(nn.Module):
    def __init__(self, ngpu):
        super(Discriminator, self).__init__()
        self.ngpu = ngpu
        self.main = nn.Sequential(
            # input is (nc) x 64 x 64     128,3*64*64
            nn.Conv2d(nc, ndf, 4, 2, 1, bias=False), # 64-4+2/2+1=32
            nn.LeakyReLU(0.2, inplace=True),
            # state size. (ndf) x 32 x 32  64*32*32

            nn.Conv2d(ndf, ndf * 2, 4, 2, 1, bias=False), # 32-4+2/2+1=16
            nn.BatchNorm2d(ndf * 2),
            nn.LeakyReLU(0.2, inplace=True),
            # state size. (ndf*2) x 16 x 16  128*16*16

            nn.Conv2d(ndf * 2, ndf * 4, 4, 2, 1, bias=False), # 16-4+2/2+1=8
            nn.BatchNorm2d(ndf * 4), # 256
            nn.LeakyReLU(0.2, inplace=True),
            # state size. (ndf*4) x 8 x 8   256*8*8

            nn.Conv2d(ndf * 4, ndf * 8, 4, 2, 1, bias=False), # 8-4+2/2+1=4
            nn.BatchNorm2d(ndf * 8),
            nn.LeakyReLU(0.2, inplace=True),
            # state size. (ndf*8) x 4 x 4  512*4*4

            nn.Conv2d(ndf * 8, 1, 4, 1, 0, bias=False), # 4-4/2+1=1
            nn.Sigmoid() # 128,1*1024
        )

    def forward(self, input):
return self.main(input) 
一些点:
- Conv1d:用于文本数据,只对宽度进行卷积,对高度不进行卷积,而Conv2d:用于图像数据,对宽度和高度都进行卷积
- Conv2d(输入通道数, 输出通道数, kernel_size(长和宽)),当卷积核为方形时,只写一个就可以,但是当卷积核不是方形时,长和宽都要写,如下nn.Conv2d(H,W,....)


 5387
5387


 被折叠的 条评论
为什么被折叠?
被折叠的 条评论
为什么被折叠?
 到【灌水乐园】发言


