


spring+springMVC+MyBatis集成
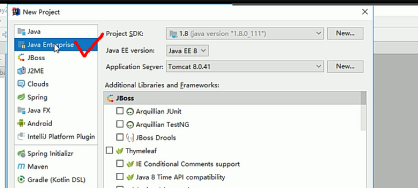
一、创建Java项目
二、修改tomcat设置

1.启动服务器测试能否运行tomcat
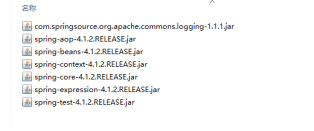
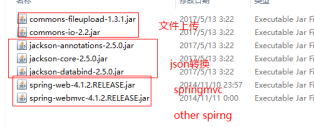
2.在WEB-INF中创建lib文件夹,放入jar包

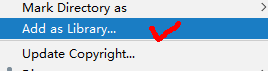
3.右键设置为library
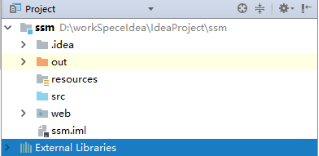
 4.创建文件夹resources,上色,设置为资源文件夹
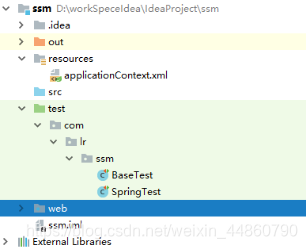
5.创建applicationContext.xml资源文件
Spring官方文档中找到配置文件
 6.拷贝到applicationContext中进行修改,创建测试bean,Data类的注入
<?xml version="1.0" encoding="UTF-8"?>
<beans xmlns="http://www.springframework.org/schema/beans"
       xmlns:xsi="http://www.w3.org/2001/XMLSchema-instance"
       xsi:schemaLocation="http://www.springframework.org/schema/beans
 http://www.springframework.org/schema/beans/spring-beans.xsd">
    <bean id="myDate" class="java.util.Date"/>
</beans>
7.测试spring环境是否成功,新建测试包,上色
 8.要改为spring的测试环境,先导junit的测试包,再导入spring的测试
RunWith:运行spring的测试
ContextConfiguration:读取核心配置文件中配置的bean
@RunWith(SpringJUnit4ClassRunner.class)
@ContextConfiguration("classpath:applicationContext.xml")
public class SpringTest {
    @Autowired
    private Date date;
    @Test
    public void test() throws Exception {
        //测试。。。
        System.out.println(date);
    }
}
9.注入成功说明spring运行环境可以使用
 抽取测试类,BaseTest,以后的测试类直接继承
 Spring的环境就搭建完成
三、继续搭建spring-MVC
1.导入jar包
2.配置web.xml
Spring和springmvc都有自己的容器context,形成子从上下文
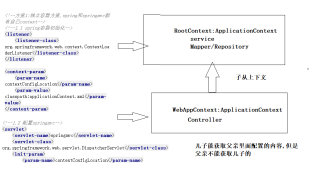
3.配置监听器,监听context
<listener>
    <listener-class>org.springframework.web.context.ContextLoaderListener</listener-class>
</listener>
读取:applicationContext.xml spring容器初始化
<context-param>
    <param-name>transformWsdlLocation</param-name>
    <param-value>classpath:applicationContext.xml</param-value>
	</context-param>
4.读取:applicationContext-mvc.xml 文件
<!--配置springmvc-->
<servlet>
    <servlet-name>springmvc</servlet-name>
    <servlet-class>org.springframework.web.servlet.DispatcherServlet</servlet-class>
    <init-param>
        <param-name>contextConfigLocation</param-name>
        <param-value>classpath:applicationContext-mvc.xml</param-value>
    </init-param>
    <!--设置项目一起动就加载-->
    <load-on-startup>1</load-on-startup>
</servlet>
<servlet-mapping>
    <servlet-name>springmvc</servlet-name>
    <!--/*会拦截所有包括jsp-->
    <!--/会拦截所有但是不包含jsp-->
    <url-pattern>/</url-pattern>
</servlet-mapping>
5.设置字符编码过滤器
<!--
    post请求乱码解决
   get请求实在tomcat猫中配置
-->
<filter>
    <filter-name>EncodingFilter</filter-name>
    <filter-class>org.springframework.web.filter.CharacterEncodingFilter</filter-class>
    <init-param>
        <param-name>encoding</param-name>
        <param-value>utf-8</param-value>
    </init-param>
</filter>
<filter-mapping>
    <filter-name>EncodingFilter</filter-name>
    <url-pattern>/*</url-pattern>
</filter-mapping>
6.完整web.xml配置
<?xml version="1.0" encoding="UTF-8"?>
<web-app xmlns="http://java.sun.com/xml/ns/javaee"
           xmlns:xsi="http://www.w3.org/2001/XMLSchema-instance"
           xsi:schemaLocation="http://java.sun.com/xml/ns/javaee
        http://java.sun.com/xml/ns/javaee/web-app_3_1.xsd"
           version="3.1">

    <!--方案1:独立容器方案,spring和springmvc都有自己context-->
    <!--1.1 spring容器初始化-->
    <listener>
        <listener-class>org.springframework.web.context.ContextLoaderListener</listener-class>
    </listener>

    <context-param>
        <param-name>contextConfigLocation</param-name>
        <param-value>classpath:applicationContext.xml</param-value>
    </context-param>

    <!--1.2 配置springmvc-->
    <servlet>
        <servlet-name>springmvc</servlet-name>
        <servlet-class>org.springframework.web.servlet.DispatcherServlet</servlet-class>
        <init-param>
            <param-name>contextConfigLocation</param-name>
            <param-value>classpath:applicationContext-mvc.xml</param-value>
        </init-param>
        <load-on-startup>1</load-on-startup>
    </servlet>
    <servlet-mapping>
        <servlet-name>springmvc</servlet-name>
        <!--/*会拦截所有包括jsp-->
        <!--/会拦截所有但是不包含jsp-->
        <url-pattern>/</url-pattern>
    </servlet-mapping>

    <!--
        post请求乱码解决
       get请求实在tomcat猫中配置
    -->
    <filter>
        <filter-name>EncodingFilter</filter-name>
        <filter-class>org.springframework.web.filter.CharacterEncodingFilter</filter-class>
        <init-param>
            <param-name>encoding</param-name>
            <param-value>utf-8</param-value>
        </init-param>
    </filter>
    <filter-mapping>
        <filter-name>EncodingFilter</filter-name>
        <url-pattern>/*</url-pattern>
    </filter-mapping>
</web-app>
在tomcat8以前的版本需要设置get请求
在tomcat的xml文件中

以上都是web.xml的配置细节
下面配置applicationContext-mvc.xml
7.配置applicationContext-mvc.xml
<?xml version="1.0" encoding="UTF-8"?>
<beans
xmlns="http://www.springframework.org/schema/beans" xmlns:xsi="http://www.w3.org/2001/XMLSchema-instance"
       xmlns:context="http://www.springframework.org/schema/context"
       xmlns:mvc="http://www.springframework.org/schema/mvc"
       xsi:schemaLocation="http://www.springframework.org/schema/beans
       http://www.springframework.org/schema/beans/spring-beans.xsd
       http://www.springframework.org/schema/context
       http://www.springframework.org/schema/context/spring-context.xsd
       http://www.springframework.org/schema/mvc
       http://www.springframework.org/schema/mvc/spring-mvc.xsd">
    <!--扫描controller-->
    <context:component-scan base-package="com.lr.ssm.controller" />
    <!--静态资源处理-->
    <mvc:default-servlet-handler />
    <!--识别@requestMapper等注解支持-->
    <mvc:annotation-driven />
    <!--配置视图解析器-->
    <bean class="org.springframework.web.servlet.view.InternalResourceViewResolver">
        <property name="prefix" value="/WEB-INF/views/" />
        <property name="suffix" value=".jsp" />
    </bean>
</beans>
Spring和spring-mvc集成就完成了
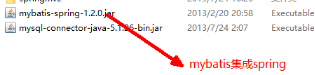
四、集成mybatis
mybatis
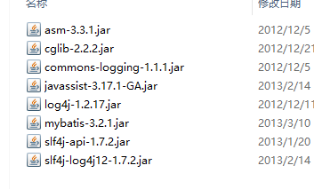
spring+mybatis+事务
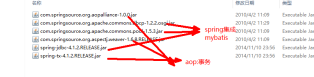
other
1.配置applicationContext.xml
<?xml version="1.0" encoding="UTF-8"?>
<beans xmlns="http://www.springframework.org/schema/beans" xmlns:xsi="http://www.w3.org/2001/XMLSchema-instance"
       xmlns:context="http://www.springframework.org/schema/context"
       xmlns:tx="http://www.springframework.org/schema/tx"
       xsi:schemaLocation="http://www.springframework.org/schema/beans
       http://www.springframework.org/schema/beans/spring-beans.xsd
       http://www.springframework.org/schema/context
       http://www.springframework.org/schema/context/spring-context.xsd
       http://www.springframework.org/schema/tx
       http://www.springframework.org/schema/tx/spring-tx.xsd">
</beans>
<!--配置步骤-->
<!--创建数据库配置文件jdbc.properties===读取配置Datasource
配置SqlSessionFactory===扫描Repository===事务管理器-开启注解事务
-->
2.配置连接池
<!--读取数据库配置文件-->
<context:property-placeholder location="classpath:jdbc.properties"/>

<!--配置连接池-->
<bean id="dataSource" class="org.apache.commons.dbcp.BasicDataSource">
    <property name="driverClassName" value="${jdbc.driverClassName}"/>
    <property name="url" value="${jdbc.url}"/>
    <property name="username" value="${jdbc.username}"/>
    <property name="password" value="${jdbc.password}"/>
    <!--maxActive: 最大连接数量 -->
    <property name="maxActive" value="150" />
    <!--minIdle: 最小空闲连接 -->
    <property name="minIdle" value="5" />
    <!--maxIdle: 最大空闲连接 -->
    <property name="maxIdle" value="20" />
    <!--initialSize: 初始化连接 -->
    <property name="initialSize" value="30" />
    <!-- 用来配置数据库断开后自动连接的 -->
    <!-- 连接被泄露时是否打印 -->
    <property name="logAbandoned" value="true" />
    <!--removeAbandoned: 是否自动回收超时连接 -->
    <property name="removeAbandoned" value="true" />
    <!--removeAbandonedTimeout: 超时时间(以秒数为单位) -->
    <property name="removeAbandonedTimeout" value="10" />
    <!--maxWait: 超时等待时间以毫秒为单位 1000等于60秒 -->
    <property name="maxWait" value="1000" />
    <!-- 在空闲连接回收器线程运行期间休眠的时间值,以毫秒为单位. -->
    <property name="timeBetweenEvictionRunsMillis" value="10000" />
    <!-- 在每次空闲连接回收器线程(如果有)运行时检查的连接数量 -->
    <property name="numTestsPerEvictionRun" value="10" />
    <!-- 1000 * 60 * 30 连接在池中保持空闲而不被空闲连接回收器线程 -->
    <property name="minEvictableIdleTimeMillis" value="10000" />
    <property name="validationQuery" value="SELECT NOW() FROM DUAL" />
</bean>
3.要集成mybatis必须配置配置sqlSessionFactory
就相当于取代了MyBatis-Config.xml文件的作用,读取资源文件,创建sqlSessionFactory
原本要引入到MyBatis-Config.xml中的mapper.xml就注入到sqlSessionFactory中
Mapper应该是一个集合
使用Mapper接口时处理数据库数据,直接注入接口,mybatis自动实现,然后调用方法,sqlSessionFactory已经自动实现了
<!--配置sqlSessionFactory-->
<bean id="sqlSessionFactory" class="org.mybatis.spring.SqlSessionFactoryBean">
    <!--引用数据库的数据源-->
    <property name="dataSource" ref="dataSource"/>
    <!--别名包-->
    <property name="typeAliasesPackage" value="com.lr.ssm.domain,com.lr.ssm.query"/>
    <!--读取映射xml文件-->
    <!--<property name="mapperLocations" value="classpath:cn/itsource/ssm/mapper/*Mapper.xml"/>-->
</bean>
<!--扫描Mapper,会扫描这个包里面所有Mapper接口,通过MapperFactoryBean创建所有的Mapper
直接使用接口调用方法,自动实现
-->
<bean class="org.mybatis.spring.mapper.MapperScannerConfigurer">
    <property name="basePackage" value="com.lr.ssm.mapper"></property>
</bean>
4.开启事务
<!--1)配置事务管理:用jdbc事务管理器-->
<bean id="transactionManager" class="org.springframework.jdbc.datasource.DataSourceTransactionManager">
    <property name="dataSource" ref="dataSource"/>
</bean>
<!--2)开启注解事务  使用时需要在service层加上注解-->
<tx:annotation-driven/>
5.完整applicationContext.xml
<?xml version="1.0" encoding="UTF-8"?>
<beans xmlns="http://www.springframework.org/schema/beans" xmlns:xsi="http://www.w3.org/2001/XMLSchema-instance"
       xmlns:context="http://www.springframework.org/schema/context"
       xmlns:tx="http://www.springframework.org/schema/tx"
       xsi:schemaLocation="http://www.springframework.org/schema/beans
       http://www.springframework.org/schema/beans/spring-beans.xsd
       http://www.springframework.org/schema/context
       http://www.springframework.org/schema/context/spring-context.xsd
       http://www.springframework.org/schema/tx
       http://www.springframework.org/schema/tx/spring-tx.xsd">
    <!--扫描service-->
    <context:component-scan base-package="com.lr.ssm.service"/>
    <!--配置步骤-->
    <!--创建数据库配置文件jdbc.properties===读取配置Datasource
    配置SqlSessionFactory===扫描Repository===事务管理器-开启注解事务
    -->
    <!--读取数据库配置文件-->
    <context:property-placeholder location="classpath:jdbc.properties"/>

    <!--配置连接池-->
    <bean id="dataSource" class="org.apache.commons.dbcp.BasicDataSource">
        <property name="driverClassName" value="${jdbc.driverClassName}"/>
        <property name="url" value="${jdbc.url}"/>
        <property name="username" value="${jdbc.username}"/>
        <property name="password" value="${jdbc.password}"/>
        <!--maxActive: 最大连接数量 -->
        <property name="maxActive" value="150" />
        <!--minIdle: 最小空闲连接 -->
        <property name="minIdle" value="5" />
        <!--maxIdle: 最大空闲连接 -->
        <property name="maxIdle" value="20" />
        <!--initialSize: 初始化连接 -->
        <property name="initialSize" value="30" />
        <!-- 用来配置数据库断开后自动连接的 -->
        <!-- 连接被泄露时是否打印 -->
        <property name="logAbandoned" value="true" />
        <!--removeAbandoned: 是否自动回收超时连接 -->
        <property name="removeAbandoned" value="true" />
        <!--removeAbandonedTimeout: 超时时间(以秒数为单位) -->
        <property name="removeAbandonedTimeout" value="10" />
        <!--maxWait: 超时等待时间以毫秒为单位 1000等于60秒 -->
        <property name="maxWait" value="1000" />
        <!-- 在空闲连接回收器线程运行期间休眠的时间值,以毫秒为单位. -->
        <property name="timeBetweenEvictionRunsMillis" value="10000" />
        <!-- 在每次空闲连接回收器线程(如果有)运行时检查的连接数量 -->
        <property name="numTestsPerEvictionRun" value="10" />
        <!-- 1000 * 60 * 30 连接在池中保持空闲而不被空闲连接回收器线程 -->
        <property name="minEvictableIdleTimeMillis" value="10000" />
        <property name="validationQuery" value="SELECT NOW() FROM DUAL" />
    </bean>

    <!--配置sqlSessionFactory-->
    <bean id="sqlSessionFactory" class="org.mybatis.spring.SqlSessionFactoryBean">
        <!--引用数据库的数据源-->
        <property name="dataSource" ref="dataSource"/>
        <!--别名包-->
        <property name="typeAliasesPackage" value="com.lr.ssm.domain,com.lr.ssm.query"/>
        <!--读取映射xml文件-->
        <property name="mapperLocations" value="classpath:com/lr/ssm/mapper/*Mapper.xml"/>
    </bean>
    <!--扫描Mapper,会扫描这个包里面所有Mapper接口,通过MapperFactoryBean创建所有的Mapper
    直接使用接口调用方法,自动实现
    -->
    <bean class="org.mybatis.spring.mapper.MapperScannerConfigurer">
        <property name="basePackage" value="com.lr.ssm.mapper"></property>
    </bean>

    <!--1)配置事务管理:用jdbc事务管理器-->
    <bean id="transactionManager" class="org.springframework.jdbc.datasource.DataSourceTransactionManager">
        <property name="dataSource" ref="dataSource"/>
    </bean>
    <!--2)开启注解事务  使用时需要在service层加上注解-->
    <tx:annotation-driven/>
</beans>
6.创建mapper.xml映射文件
<?xml version="1.0" encoding="UTF-8" ?>
<!DOCTYPE mapper PUBLIC "-//mybatis.org//DTD Mapper 3.0//EN"
        "http://mybatis.org/dtd/mybatis-3-mapper.dtd">
<mapper namespace="com.lr.ssm.mapper.DeptMapper">
   <!-- 映射sql-->
    <select id="loadAll" resultType="com.lr.ssm.domain.Dept">
        SELECT  * from t_dept
    </select>

    <insert id="save" parameterType="com.lr.ssm.domain.Dept">
        INSERT into t_dept(name) values(#{name})
    </insert>
</mapper>
映射数据库的sql,运行时applicationContext.xml中的sqlsessionFactory会找到映射文件
然后找到映射文件里面命名空间中命名的mapper接口,然后自动实现接口
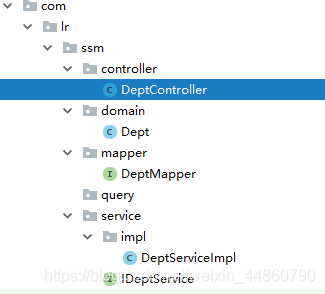
7.创建相应的结构
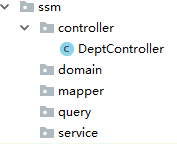
8.按照规范
XxMapper接口需要与XxMapper.xml放在同一个mapper包下面
现在将XxMapper.xml放在资源文件夹中com/lr/ssm/mapper中,文件在编译时会编译到一起
保证结构正确

编译过后
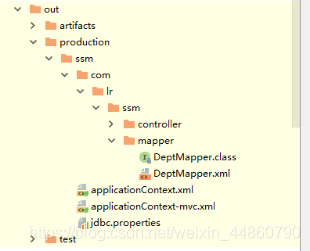
完成结构
9.使用部门表测试
创建实体类
public class Dept {
    private Long id;
    private String name;
}
10.创建mapper接口
public interface DeptMapper {
    //查询所有
    List<Dept> loadAll();
    //添加一个
    void save(Dept dept);
}
11.创建service层接口
public interface IDeptService {
    //查询所有
    List<Dept> loadAll();
    //添加一个
    void save(Dept dept);
}
12.创建service实现,并且调用接口方法
@Service
public class DeptServiceImpl implements IDeptService{
    //直接注入自动实现
    @Autowired
    DeptMapper deptMapper;
    //卧槽。。注意单词错误。。
    @Override
    public List<Dept> loadAll() {
        List<Dept> depts = deptMapper.loadAll();
        return depts;
    }
    //注意开启事务
    @Override
    public void save(Dept dept) {
        deptMapper.save(dept);
    }
}
13.Controller层测试
@RequestMapping("/loadAll")
@ResponseBody
public List<Dept> loadAll(){
    System.out.println("=-----------===============");
    List<Dept> list = iDeptService.loadAll();
    //System.out.println("=-----------===============");
    return list;
}
14.Service层开启注解事务
失败回滚
@Service
@Transactional(readOnly = true,propagation = Propagation.SUPPORTS)
public class DeptServiceImpl implements IDeptService{
    //直接注入自动实现
    @Autowired
    DeptMapper deptMapper;

    //卧槽。。注意单词错误。。
    @Override
    public List<Dept> loadAll() {
        List<Dept> depts = deptMapper.loadAll();
        return depts;
    }
    //注意开启事务

    @Override
    @Transactional
    public void save(Dept dept) {
        deptMapper.save(dept);
    }
}
15.浏览器测试能拿到数据库数据
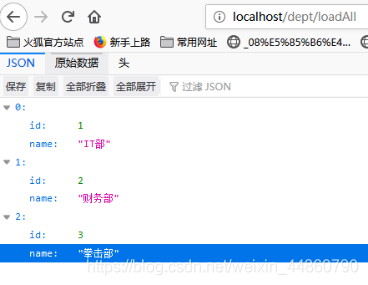
集成完成


 1022
1022


 被折叠的 条评论
为什么被折叠?
被折叠的 条评论
为什么被折叠?
 到【灌水乐园】发言


