


使用Cobbler批量安装RockyLinux操作系统
一、Cobbler简介
Cobbler官网:https://cobbler.github.io/
Cobbler是一个Linux服务器安装的服务,可以通过网络启动(PXE)的方式来快速安装、重装物理服务器和虚拟机,同时还可以管理DHCP,DNS等,具备web管理界面。
Cobbler常用命令:
cobbler check 检查当前设置是否有问题
cobbler list 列出所有的cobbler元素
cobbler report 列出元素的详细信息
cobbler sync 同步配置到数据目录,更改配置最好都要执行一下
cobbler reposync 同步yum仓库
cobbler distro 查看导入的发行版系统信息
cobbler system 查看添加的系统信息
cobbler profile 查看配置信息
二、部署前准备
本文以rocky9.1部署Cobbler 3.3.4版本为例进行实验。
Cobbler服务器IP地址:192.168.100.128
安装软件
# yum源必须有epel源
# dnf install -y epel-release
#关闭防火墙和selinux
# systemctl stop firewalld && systemctl disable firewalld
# sed -i 's/^SELINUX=.*/SELINUX=disabled/g' /etc/selinux/config
# reboot
三、部署Cobbler
1、安装软件
# dnf -y install cobbler dhcp-server
# 查看cobbler相关文件
# rpm -ql cobbler
2、配置cobbler
(1)修改Cobbler主配置文件
# 生成密文密码
# openssl passwd -1
# vi /etc/cobbler/settings.yaml
#设置root密码
default_password_crypted: "$1$9SWj8SXL$o2SbpStKQHNjUkqDhm5hV0"
# cobbler接管dhcp
manage_dhcp: true
manage_dhcp_v4: true
#cobbler服务器地址
server: 192.168.100.128
#tftp地址
next_server_v4: 192.168.100.128
#cobbler接管tftp
manage_tftpd: true
#当bios首选启动项是pxe时,此项设置为true,可避免重启反复安装系统,否则为false
pxe_just_once: true
(2)修改dhcp模版文件
# vi /etc/cobbler/dhcp.template
……
subnet 192.168.100.0 netmask 255.255.255.0 {
option routers 192.168.100.5;
option domain-name-servers 8.8.8.8;
option subnet-mask 255.255.255.0;
range dynamic-bootp 192.168.100.100 192.168.100.254;
default-lease-time 21600;
max-lease-time 43200;
next-server $next_server_v4;
……
(3)启动cobbler,同步配置
# systemctl enable --now cobblerd
# cobbler sync
# systemctl enable --now tftp httpd dhcpd
(5)cobbler配置检查
# cobbler check
The following are potential configuration items that you may want to fix:
1: For PXE to be functional, the 'next_server_v6' field in /etc/cobbler/settings.yaml must be set to something other than ::1, and should match the IP of the boot server on the PXE network.
2: some network boot-loaders are missing from /var/lib/cobbler/loaders. If you only want to handle x86/x86_64 netbooting, you may ensure that you have installed a *recent* version of the syslinux package installed and can ignore this message entirely. Files in this directory, should you want to support all architectures, should include pxelinux.0, andmenu.c32.
3: reposync is not installed, install yum-utils or dnf-plugins-core
4: yumdownloader is not installed, install yum-utils or dnf-plugins-core
5: debmirror package is not installed, it will be required to manage debian deployments and repositories
6: ksvalidator was not found, install pykickstart
7: fencing tools were not found, and are required to use the (optional) power management features. install cman or fence-agents to use them
Restart cobblerd and then run 'cobbler sync' to apply changes.
# 根据check结果提示安装相关包,其它错误可忽略
# dnf -y install syslinux dnf-plugins-core pykickstart
#生成引导加载程序 cobbler mkloaders ,此命令适用cobblerV3.3.1及之后的版本
# cobbler mkloaders
# 查看
# ls /var/lib/cobbler/loaders/
grub libcom32.c32 linux.c32 menu.c32
ldlinux.c32 libutil.c32 memdisk pxelinux.0
3、导入系统镜像资源
# 挂载光盘镜像
# mkdir /mnt/{rocky9,centos7.5}
# mount /dev/sr1 /mnt/rocky9/
# mount /dev/sr0 /mnt/centos7.5/
# 导入系统镜像资源,并查看
# cobbler import --name=rocky-9-x86_64 --path=/mnt/rocky9 --arch=x86_64
# cobbler import --name=centos-7.5-x86_64 --path=/mnt/centos7.5 --arch=x86_64
# cobbler distro list
centos-7.5-x86_64
rocky-9-x86_64
# cobbler profile list
centos-7.5-x86_64
rocky-9-x86_64
注:导入的镜像资源存放在 /var/www/cobbler/distro_mirror/目录中。
#重启cobbler,同步配置
# systemctl restart cobblerd
# cobbler sync
#查看生成的启动菜单
# cat /var/lib/tftpboot/pxelinux.cfg/default
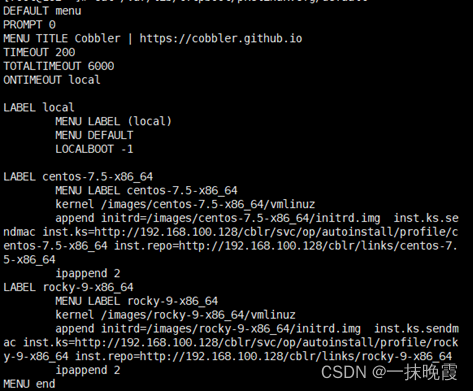
从中可以看到应答文件路径、yum源路径等信息。
4、自定义kickstart应答文件
# 查看应答文件模板
# ls /var/lib/cobbler/templates/
default.ks pxerescue.ks sample.ks
esxi4-ks.cfg sample_autoyast.xml sample_legacy.ks
esxi5-ks.cfg sample_esxi4.ks sample_old.seed
install_profiles sample_esxi5.ks sample.seed
legacy.ks sample_esxi6.ks win.ks
order.txt sample_esxi7.ks
powerkvm.ks
# 自定义应答文件时,应注意不同系统的应答文件会有些许不同,可参考已安装好系统的主机上的应答文件来自定义。
# cat /root/anaconda-ks.cfg
以下是本次实验自定义的Rocky9.1的应答文件,仅供参考。
# vi /var/lib/cobbler/templates/rocky9.ks
# version=Rocky9
ignoredisk --only-use=sda
# Partition clearing information
clearpart --all --initlabel
# Use graphical install
text
# Use CDROM installation media
# url --url=http://192.168.100.128/cblr/links/rocky9-x86_64/
url --url=$tree
reboot
# Keyboard layouts
keyboard --vckeymap=cn --xlayouts='cn'
# System language
lang en_US.UTF-8
selinux --disabled
firewall --disabled
# Network information
network --bootproto=dhcp --device=ens33 --ipv6=auto --activate
# Root password
rootpw --iscrypted $1$s14oAn0D$evyEyWiCjQGRaDrI8UeP90
# Run the Setup Agent on first boot
firstboot --enable
# Do not configure the X Window System
skipx
# System services
services --disabled="chronyd"
# System timezone
timezone Asia/Shanghai --isUtc --nontp
# Disk partitioning information
zerombr
part /boot --fstype="ext4" --ondisk=sda --size=1024
part /swap --fstype="swap" --ondisk=sda --size=2048
part / --fstype="xfs" --ondisk=sda --grow --size=1
%packages
@^minimal-environment
%end
%addon com_redhat_kdump --enable --reserve-mb='auto'
%end
%post
#!/bin/sh
#设置允许root用户ssh登录
echo "PermitRootLogin yes" >>/etc/ssh/sshd_config
sysemctl restart sshd
%end
%anaconda
pwpolicy root --minlen=6 --minquality=1 --notstrict --nochanges --notempty
pwpolicy user --minlen=6 --minquality=1 --notstrict --nochanges --emptyok
pwpolicy luks --minlen=6 --minquality=1 --notstrict --nochanges --notempty
%end
#更新启动菜单
# cobbler profile remove --name rocky-9-x86_64
# cobbler profile add --name rocky-9-x86_64 --distro=rocky-9-x86_64 --autoinstall=rocky9.ks
重启cobbler,同步配置
# systemctl restart cobblerd
# cobbler sync
# cobbler profile list
centos-7.5-x86_64
rocky-9-x86_64
四、测试
新建或使用原有虚拟机,设置与Cobbler服务器同在一个网络,设置好BIOS中的启动顺序为先网络,后硬盘启动,进行无人执守安装测试。
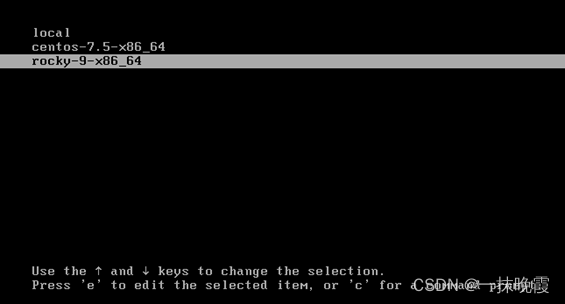
选择第三个菜单项,安装rocky9,选择第一个则从硬盘启动。
参考文献:
https://blog.csdn.net/qq_40875048/article/details/132384248?ops_request_misc=%257B%2522request%255Fid%2522%253A%2522171184299616800185863673%2522%252C%2522scm%2522%253A%252220140713.130102334..%2522%257D&request_id=171184299616800185863673&biz_id=0&utm_medium=distribute.pc_search_result.none-task-blog-2~all~sobaiduend~default-1-132384248-null-null.142^v100^pc_search_result_base6&utm_term=cobbler3.3.3%E7%89%88%E6%9C%AC%E5%AE%89%E8%A3%85&spm=1018.2226.3001.4187


 298
298


 被折叠的 条评论
为什么被折叠?
被折叠的 条评论
为什么被折叠?
 到【灌水乐园】发言


