


Pytorch RNN API使用以及手动编写
文章目录
1. RNN原理
RNN网络架构如下所示:

x,s,o都代表一个向量,分别表示输入层、隐藏层和输出层的值,U和V分别表示输入层到隐藏层的权重矩阵和隐藏层到输出层的权重矩阵,权重矩阵W代表隐藏层上一次的值作为这次的输入的权重。
2. Pytorch RNN API解释
(1)参数

主要参数:

-
input_size:输入特征的维度, 一般rnn中输入的是词向量,那么 input_size 就等于一个词向量的维度,即feature_len;
-
hidden_size:隐藏层神经元个数,或者也叫输出的维度(因为rnn输出为各个时间步上的隐藏状态);
-
num_layers:网络的层数;

此处,num_layers=3;
- nonlinearity:激活函数;
- bias:是否使用偏置,默认为True;
- batch_first:输入数据的形式,默认是 False,形状为:(seq_len, batch_size, input_dim),也就是将序列长度放在第一位,batch_size放在第二位;
- dropout:是否应用dropout, 默认不使用,如若使用将其设置成一个0-1的数字即可;
- birdirectional:是否使用双向的 rnn,默认是 False;

上图即为一个双向网络结构。
(2)输入
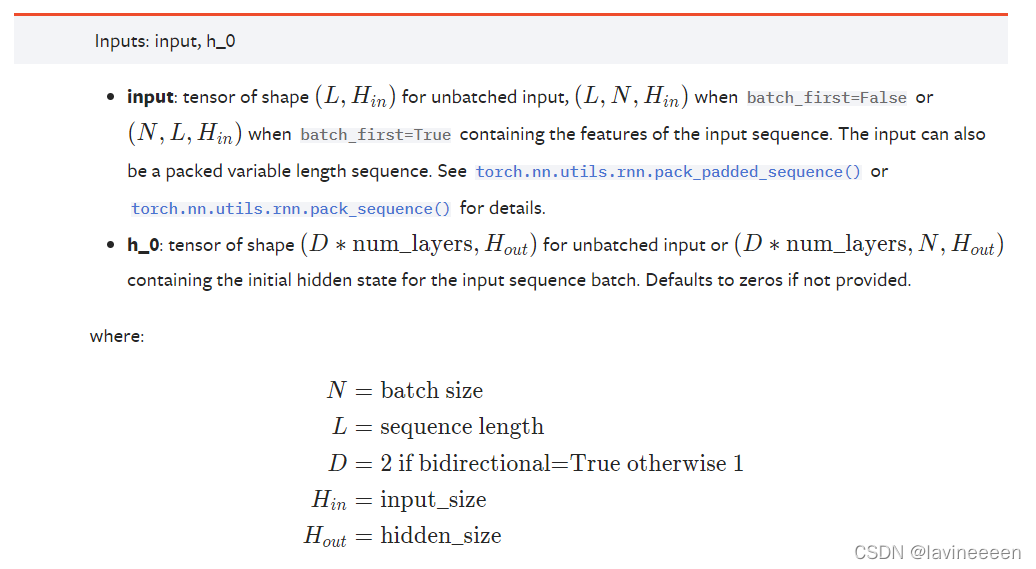
input:当batch_first为默认False时,input的shape为 [ s e q _ l e n , b a t c h _ s i z e , i n p u t _ s i z e ] [seq\_len,batch\_size,input\_size] [seq_len,batch_size,input_size],当batch_first设置为True时,代表input第一维已设置为batch,此时input的shape为 [ b a t c h _ s i z e , s e q _ l e n , i n p u t _ s i z e ] [batch\_size,seq\_len,input\_size] [batch_size,seq_len,input_size];h_0:初始设置的隐藏状态,如下图红色圈内所示

h_0的shape为 [ D × n u m _ l a y e r s , b a t c h _ s i z e , h i d d e n _ s i z e ] [D×num\_layers,batch\_size,hidden\_size] [D×num_layers,batch_size,hidden_size],双向RNN时D为2,单向RNN时D为1。
(3)输出

output:保存最后一层,每个time step的输出,当batch_first为默认False时,output的shape为 [ s e q _ l e n , b a t c h _ s i z e , D × h i d d e n _ s i z e ] [seq\_len,batch\_size,D×hidden\_size] [seq_len,batch_size,D×hidden_size];当batch_first为True时,output的shape为 [ b a t c h _ s i z e , s e q _ l e n , D × h i d d e n _ s i z e ] [batch\_size,seq\_len,D×hidden\_size] [batch_size,seq_len,D×hidden_size];

bidirectional=True时,output保存的是最后一层前向和后向隐藏状态向量的拼接。
h_n:保存每层最后一个隐藏状态h_n,其shape为 [ D × n u m _ l a y e r s , b a t c h _ s i z e , h i d d e n _ s i z e ] [D×num\_layers,batch\_size,hidden\_size] [D×num_layers,batch_size,hidden_size]。
3. Pytorch RNN API使用
import torch
import torch.nn as nn

rnn1 = nn.RNN(input_size=100,hidden_size=20,num_layers=1)  # feature_len(embedding_size)=100, hidden_len=20, 层数=1
x = torch.randn(10,3,100)  # 单词数量seq=10,句子数量batch_size=3,每个特征100维度feature_len=100
out,h = rnn1(x,torch.zeros(1,3,20)) # 传入h0,shape=[num_layers,batch_size,hidden_size]
print(out.shape,h.shape) # out[10,3,20], h[1,3,20]

rnn2 = nn.RNN(input_size=100,hidden_size=20,num_layers=2)  # feature_len=100, hidden_len=20, 层数=2
x = torch.randn(10,3,100)  # 单词数量seq=10,句子数量batch_size=3,每个特征100维度feature_len=100
out,h = rnn2(x,torch.zeros(2,3,20)) # 传入h0,shape=[num_layers(2),batch_size,hidden_size]
print(out.shape,h.shape) # out[10,3,20], h[2,3,20]

rnn3 = nn.RNN(input_size=100,hidden_size=20,num_layers=1,bidirectional=True)  # feature_len=100, hidden_len=20, 层数=1
x = torch.randn(10,3,100)  # 单词数量seq=10,句子数量batch_size=3,每个特征100维度feature_len=100
out,h = rnn3(x,torch.zeros(2,3,20)) # 传入h0,shape=[num_layers*num_direction,batch_size,hidden_size]
print(out.shape,h.shape) # out[10,3,20*2], h[1*2,3,20]

rnn4 = nn.RNN(input_size=100,hidden_size=20,num_layers=2,bidirectional=True)  # feature_len=100, hidden_len=20, 层数=2
x = torch.randn(10,3,100)  # 单词数量seq=10,句子数量batch_size=3,每个特征100维度feature_len=100
out,h = rnn4(x,torch.zeros(4,3,20)) # 传入h0,shape=[num_layers*num_direction,batch_size,hidden_size]
print(out.shape,h.shape) # out[10,3,20*2], h[2*2,3,20]
4. 手动实现RNN
(1)单向RNN
import torch
import torch.nn as nn
import numpy as np

batch_size,seq_len = 2,3 # 批量大小,输入序列长度
input_size,hidden_size = 2,3 # 输入特征大小(词向量维度),隐含层大小
input = torch.randn(batch_size,seq_len,input_size) # 随机初始化一个输入特征序列
h_prev = torch.zeros(batch_size,hidden_size)

# step1 调用Pytorch-RNN API
rnn = nn.RNN(input_size,hidden_size,batch_first=True)
rnn_output,state_final = rnn(input,h_prev.unsqueeze(0)) # 这里第一维应该是num_layers*num_direction,此处为1

# step2 手写一个rnn_forward函数,实现RNN
# 计算公式h_t = tanh(W_(ih)·x_t + b_(ih) + W_(hh)·h_(t-1) + b_(hh))
def rnn_forward(input,weight_ih,weight_hh,bias_ih,bias_hh,h_prev):
    '''weight_ih代表U矩阵,weight_hh代表W矩阵(RNN原理部分)'''
    batch_size,seq_len,input_size = input.shape
    h_dim = weight_ih.shape[0]
    h_out =  torch.zeros(batch_size,seq_len,h_dim) # 初始化一个输出(状态)矩阵
    for t in range(seq_len):
        x = input[:,t,:]  # 获取当前时刻输入特征 [batch_size,input_size]
        '''函数中weight_ih的shape为[h_dim,input_size],weight_hh的shape为[h_dim,h_dim]'''
        # w_ih_batch = weight_ih.unsqueeze(0).tile(batch_size,1,1)     # weight_ih[h_dim,input_size]->[1,h_dim,input_size]->[batch_size,h_dim,input_size]
        w_ih_batch = weight_ih.unsqueeze(0).detach().numpy()     # weight_ih[h_dim,input_size]->[1,h_dim,input_size]
        w_ih_batch = torch.from_numpy(np.tile(w_ih_batch,(batch_size,1,1))).float()   # [1,h_dim,input_size]->[batch_size,h_dim,input_size]
        '''我的是1.7.0版本,tile函数不可使用;所以先转换为numpy再转换为tensor'''
        # w_hh_batch = weight_hh.unsqueeze(0).tile(batch_size,1,1)     # weight_hh[h_dim,h_dim]->[1,h_dim,h_dim]->[batch_size,h_dim,h_dim]
        w_hh_batch = weight_hh.unsqueeze(0).detach().numpy()     # weight_hh[h_dim,h_dim]->[1,h_dim,h_dim]
        w_hh_batch = torch.from_numpy(np.tile(w_hh_batch, (batch_size, 1, 1))).float()   # [1,h_dim,h_dim]->[batch_size,h_dim,h_dim]

        x = x.unsqueeze(2) # [batch_size,input_size] -> [batch_size,input_size,1]
        w_times_x = torch.bmm(w_ih_batch,x).squeeze(-1)    # [batch_size,h_dim,1]->[batch_size,h_dim]
        h_prev = h_prev.unsqueeze(2) # [batch_size,h_dim]->[batch_size,h_dim,1]
        w_times_h = torch.bmm(w_hh_batch,h_prev).squeeze(-1)  # [batch_size,h_dim,1]->[batch_size,h_dim]
        h_prev = torch.tanh(w_times_x+bias_ih+w_times_h+bias_hh)  #[batch_size,h_dim]
        h_out[:,t,:] = h_prev
    return h_out,h_prev.unsqueeze(0)

# step3 验证rnn_forward的正确性
# for k,v in rnn.named_parameters():
#     print(k,v)
custom_rnn_output,custom_state_final = rnn_forward(input,rnn.weight_ih_l0,rnn.weight_hh_l0,rnn.bias_ih_l0,rnn.bias_hh_l0,h_prev)
print(rnn_output,state_final)
print(custom_rnn_output,custom_state_final)
(2)双向RNN
# step4 手写一个bidirectional_rnn_forward函数,实现双向RNN
def bidirectional_rnn_forward(input,weight_ih,weight_hh,bias_ih,bias_hh,h_prev,weight_ih_reverse,weight_hh_reverse,bias_ih_reverse,bias_hh_reverse,h_prev_reverse):
    batch_size,seq_len,input_size = input.shape
    h_dim = weight_ih.shape[0]
    h_out = torch.zeros(batch_size,seq_len,h_dim*2) #初始化一个输出(状态)矩阵,最后一维是2倍h_dim
    forward_output = rnn_forward(input,weight_ih,weight_hh,bias_ih,bias_hh,h_prev)[0]  # forward layer
    '''需将input第二维反转,其他维度不变'''
    backward_output = rnn_forward(torch.flip(input,[1]),weight_ih_reverse,weight_hh_reverse,bias_ih_reverse,bias_hh_reverse,h_prev_reverse)[0] # backward layer
    h_out[:,:,:h_dim] = forward_output
    h_out[:,:,h_dim:] = backward_output
    return h_out,h_out[:,-1,:].reshape((batch_size,2,h_dim)).transpose(0,1) # [batch_size,seq_len,2*h_dim]->[batch_size,2,h_dim]->[2,batch_size,h_dim]

# step5 验证bidirectional_rnn_forward的正确性
bi_rnn = nn.RNN(input_size,hidden_size,batch_first=True,bidirectional=True)
h_prev = torch.zeros(2,batch_size,hidden_size)
bi_rnn_output,bi_state_final = bi_rnn(input,h_prev)
# for k,v in bi_rnn.named_parameters():
#     print(k,v)
custom_bi_rnn_output,custom_bi_state_final = bidirectional_rnn_forward(input,bi_rnn.weight_ih_l0,bi_rnn.weight_hh_l0,bi_rnn.bias_ih_l0,bi_rnn.bias_hh_l0,h_prev[0],
               bi_rnn.weight_ih_l0_reverse,bi_rnn.weight_hh_l0_reverse,bi_rnn.bias_ih_l0_reverse,bi_rnn.bias_hh_l0_reverse,h_prev[1])
print(bi_rnn_output,bi_state_final)
print(custom_bi_rnn_output,custom_bi_state_final)
参考
1.一文搞懂RNN(循环神经网络)基础篇 添加链接描述
2.PyTorch29——RNN的原理、API讲解及其逐行代码实现 添加链接描述


 261
261


 被折叠的 条评论
为什么被折叠?
被折叠的 条评论
为什么被折叠?
 到【灌水乐园】发言


