


但我生来胸膛里便有把火、可不能让人浇灭


一、基础语法
1. 字面量
直接写出来的人可以理解的数据,在java中叫做字面量
| 字面量类型 | 描述 | 举例 |
|---|---|---|
| 字符串字面量 | 用双引号括起来的内容 | “HelloWorld” |
| 整数字面量 | 不带小数的数字 | 666,-88 |
| 小数字面量 | 带小数的数字 | 13.14,-5.21 |
| 字符字面量 | 用双引号括起来的内容 | “HelloWorld” |
| 整数字面量 | 用单引号括起来的内容 | ‘A’,‘0’,‘我’ |
| 布尔字面量 | 布尔值,表示真假 | 只有两个值:true,false |
2、数据类型
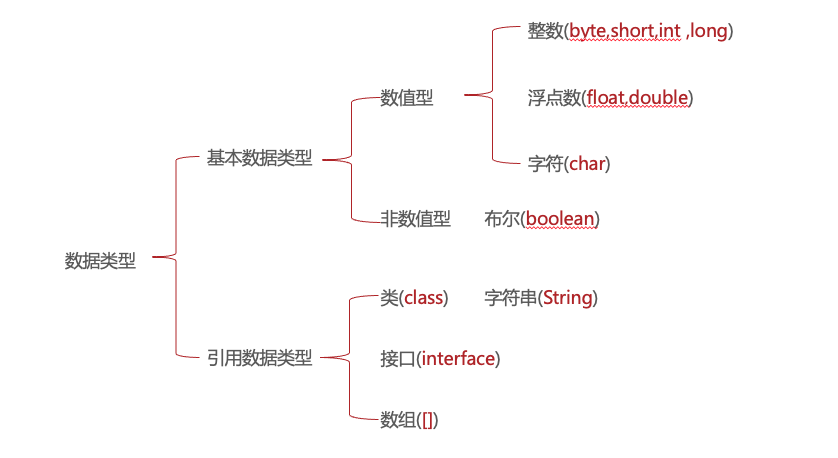
| 数据类型 | 关键字 | 占用内存 | 取值范围 |
|---|---|---|---|
| 整数 | byte | 1 | -128 ~ 127 |
| 整数 | short | 2 | -32768 ~ 32767 |
| 整数 | int(默认) | 4 | -2的31次方到2的31次方-1 |
| 整数 | long | 8 | -2的63次方到2的63次方-1 |
| 浮点数 | float | 4 | 负数:-3.402823E+38到-1.401298E-45 正数:1.401298E-45到3.402823E+38 |
| 浮点数 | double(默认) | 8 | 负数:-1.797693E+308到-4.9000000E-324 正数:4.9000000E-324到1.797693E+308 |
| 字符 | char | 2 | 0~65535 |
| 布尔 | boolean | 1 | true,false |
说明: E+38表示:乘以10的38次方。同理E-45表示:乘以10的负45次方
3、变量
定义: 变量就是内存中的存储空间,空间中存储的数据是可以发生改变
示例:
public class LiteralDemo02 {
    public static void main(String[] args) {
        // 变量的定义格式: 数据类型 变量名 = 变量值;
        int price = 998;
        System.out.println(price);
        // 修改变量值
        price = 888;
        System.out.println(price);
    }
}
注意事项:
- 变量名不能重复
- 变量未赋值,不能直接使用
- 定义
long类型变量,变量值后面加L - 定义
float变量类型,变量值后面加F
4、关键词
定义: 就是被Java语言赋予了特定含义的单词
关键词特点:
- 关键字的字母全部小写
- 常用的代码编辑器,针对关键字有特殊的颜色标记,非常直观
常见关键词:
| - | - | - | - | - |
|---|---|---|---|---|
| abstract | assert | boolean | break | byte |
| case | catch | char | class | const |
| continue | default | do | double | else |
| enum | extends | final | finally | float |
| for | goto | if | implements | import |
| instanceof | int | interface | long | native |
| new | package | private | protected | public |
| return | strictfp | short | static | super |
| switch | synchronized | this | throw | throws |
| transient | try | void | volatile | while |
5、标识符
定义: 就是给类,方法,变量等起名字的符号
组成规则: 由数字、字母、下划线 _ 和美元符 $ 组成
注意事项: 不能以数字开头、不能是关键字、区分大小写
命名约定:
1. 小驼峰命名法: 方法 、变量
- 约定1: 标识符一个单词的时候,首字母小写
- 范例1: name
- 约定2: 标识符是多个单词的时候,第一个单词首字母小写,其他单词首字母大写
- 范例2: firstName
2. 大驼峰命名法: 类
- 约定1: 标识符一个单词的时候,首字母大写
- 范例1: Hello
- 约定2: 标识符是多个单词的时候,每个单词首字母大写
- 范例2: HelloWorld
二、运算符
1. 概述
- 运算符: 对字面量或者变量进行操作的符号
- 表达式:
- 用运算符把字面量或者变量连接起来符合java语法的式子就可以称为表达式
- 不同运算符连接的表达式体现的是不同类型的表达式
- 示例:
	int a = 10;
	int b = 20;
	int c = a + b;
	// + :是运算符,是算术运算符
	// a + b:是表达式,由于+是算术运算符,所以这个表达式叫算术表达式
2. 算数运算符
| 符号 | 作用 | 描述 |
|---|---|---|
+ | 加 | 参看小学一年级 + 减 |
- | 减 | 参看小学一年级 - 乘 |
* | 乘 | 参看小学二年级,与 x 相同 |
/ | 除 | 参看小学二年级,与 ÷ 相同 |
% | 取余 | 获取的是两个数据做除法的余数 |
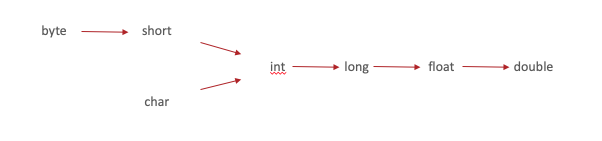
注意: 整数操作只能得到整数,要想得到小数,必须有浮点数参与运算
⑴. 数字相加
- 隐式转换: 把一个表示数据范围小的数值或者变量赋值给另一个表示数据范围大的变量
public class OperatorDemo01 {
     public static void main(String[] args) {
         int a = 10;
         double b = 13.14;
         System.out.println(a + b);
         int c = a + b;
         // 会报错,int 类型 加上 double 类型,得到的是 double 类型
         System.out.println(c);
     }
}
-
强制转换:
- 把一个表示数据范围大的数值或者变量赋值给另一个表示数据范围小的变量
- 格式:数据类型 变量名 = (目标数据类型)(数值或者变量)
 public class OperatorDemo01 {
     public static void main(String[] args) {
         int a = 10;
         double b = 13.14;
         System.out.println(a + b);
         // 强制类型转换: 将 a + b 得到的 double 类型转换为 int 类型
         int c = (int)(a + b);
         System.out.println(c);
     }
}
⑵. 字符相加
字符相加: 拿字符在计算机底层对应的数值来进行计算的
public class OperatorDemo02 {
     public static void main(String[] args) {
          //定义两个变量
          int i = 10;
          char ch = 'A';//'A'的值是65
          ch = 'a';//'a'的值是97
          ch = '0';//'0'的值是48
          System.out.println(i + ch);
     }
}
常用字符与ASCII代码对照表:
A -> 65 A-Z是连续的、a -> 97 a-z是连续的、0 -> 48 0-9是连续的
| 键盘 | ASCII码 | 键盘 | ASCII码 | 键盘 | ASCII码 | 键盘 | ASCII码 |
|---|---|---|---|---|---|---|---|
| ESC | 27 | SPACE | 32 | ! | 33 | " | 34 |
| .# | 35 | $ | 36 | % | 37 | & | 38 |
| ’ | 39 | ( | 40 | ) | 41 | * | 42 |
| .+ | 43 | ’ | 44 | - | 45 | . | 46 |
| / | 47 | 0 | 49 | 2 | 50 | 3 | 51 |
| 4 | 52 | 5 | 53 | 6 | 54 | 7 | 55 |
| 8 | 56 | 9 | 57 | : | 58 | ; | 59 |
| < | 60 | = | 61 | > | 62 | ? | 63 |
| @ | 64 | A | 65 | B | 66 | C | 67 |
| D | 68 | E | 69 | F | 70 | G | 71 |
| H | 72 | I | 73 | J | 74 | K | 75 |
| L | 76 | M | 77 | N | 78 | O | 79 |
| P | 80 | Q | 81 | R | 82 | S | 83 |
| T | 84 | U | 85 | V | 86 | W | 87 |
| X | 88 | Y | 89 | Z | 90 | [ | 91 |
| \ | 92 | ] | 93 | ^ | 94 | _ | 95 |
| ` | 96 | a | 97 | b | 98 | c | 99 |
| d | 100 | e | 101 | f | 102 | g | 103 |
| h | 104 | i | 105 | j | 106 | k | 107 |
| l | 108 | m | 109 | n | 110 | o | 111 |
| p | 112 | q | 113 | r | 114 | s | 115 |
| t | 116 | u | 117 | v | 118 | w | 119 |
| x | 120 | y | 121 | z | 122 | { | 123 |
| 124 | } | 125 | ~ | 126 | - | - |
⑶. 字符串相加
- 当
+操作中出现字符串时,这个+是字符串连接符,而不是算术运算 - 当连续进行
+操作时,从左到右逐个执行
public class OperatorDemo03 {
     public static void main(String[] args) {
         System.out.println("it" + "heima");
         // => "itheima"
         System.out.println("itheima" + 666);
         // => "itheima666"
         System.out.println("itheima" + 6 + 66);
         // => "itheima666"
         System.out.println(1 + 99 + "年itheima");
         // => "100itheima"
     }
}
3. 赋值运算符
| 符号 | 作用 | 描述 |
|---|---|---|
| = | 赋值 | a=10,将10赋值给变量a |
| += | 加后赋值 | a+=b,将a+b的结果赋值给a |
| -= | 减后赋值 | a-=b,将a-b的结果赋值给a |
| *= | 乘后赋值 | a*=b,将a*b的结果赋值给a |
| /= | 除后赋值 | a/=b,将a/b的结果赋值给a |
| %= | 取余后赋值 | a%=b,将a%b的结果赋值给a |
注意: 扩展的赋值运算符隐含了强制类型转换
4. 关系运算符
| 符号 | 作用 | 描述 |
|---|---|---|
| == | 等于 | a==b,判断a和b的值是否相等,成立为true,不成立为false |
| != | 不等于 | a!=b,判断a和b的值是否不相等,成立为true,不成立为false |
| .> | 大于 | a>b,判断a是否大于b,成立为true,不成立为false |
| .>= | 大于等于 | a>=b,判断a是否大于等于b,成立为true,不成立为false |
| < | 小于 | a<b,判断a是否小于b,成立为true,不成立为false |
| <= | 小于等于 | a<=b,判断a是否小于等于b,成立为true,不成立为false |
注意: 关系运算符的结果都是boolean类型,要么是true,要么是false
示例:
public class OperatorDemo01 {
     public static void main(String[] args) {
          //定义三个int类型的变量
          int i = 10;
          int j = 20;
          int k = 10;

          //等于: ==
          System.out.println(i == j);//false
          System.out.println(i == k);//true
          System.out.println("--------");

          //不等于: !=
          System.out.println(i != j);//true
          System.out.println(i != k);//false
          System.out.println("--------");

          //大于: >
          System.out.println(i > j);//false
          System.out.println(i > k);//false
          System.out.println("--------");

          //大于等于: >=
          System.out.println(i >= j);//false
          System.out.println(i >= k);//true
          System.out.println("--------");

          //千万不要把 == 写成了 =(赋值)
          System.out.println(i = j); //20
     }
}
5. 逻辑运算符
| 符号 | 作用 | 描述 |
|---|---|---|
| && | 与,并且的意思 | a && b,a和b都是true,结果为true,否则为false |
| 双竖线 | 或,或者的意思 | a 双竖线 b,a和b都是false,结果为false,否则为true |
| ! | 非,相反的意思 | !a,结果和a的结果正好相反,偶数次操作和原始结果一致 |
需求: 给出你的年龄,通过程序判断你是否属于青年人?
public class IfTest04 {
     public static void main(String[] args) {
          //1:定义一个int类型的变量来表示你的年龄
          int age = 22;
          age = 100;
          //2:用if语句格式2进行判断看你是否属于青年人
          if(age>=18 && age<=65) {
               //3:根据是否是青年人给出不同的提示信息
               System.out.println("你是青年人");
          } else {
               System.out.println("你不是青年人");
          }
     }
}
6. 三元运算符
- 格式: 关系表达式 ?表达式1 :表达式2;
- 范例: a > b ? a : b;
- 运算规则:
- 首先计算关系表达式的值 如果值为true,表达式1 的值就是运算结果
- 如果值为false,表达式2 的值就是运算结果
三元运算符和if语句格式2的区别:
-
如果if语句控制的内容: 是用变量纪录数据值,可以通过三元运算符改进
// if 循环判断 int max; if (a > b) { max = a; } else { max = b; } // 等价为 三元运算符: int max = a > b ? a : b; -
如果if语句控制的内容是: 是通过输出语句直接输出数据值,无法通过三元运算符改进
if (a > b) {
     System.out.println("最大值是:" + a);
} else {
     System.out.println("最大值是:" + b);
}
三、流程控制
1. 顺序结构
顺序结构是程序中最简单最基本的流程控制,没有特定的语法结构,按照代码的先后顺序,依次执行
Debug:
Debug,又被称为断点调试,断点其实是一个标记,告诉我们从哪里开始查看
- 如何加断点:选择要设置断点的代码行,在行号的区域后面单击鼠标左键即可
- 如何运行加了断点的程序:在代码区域右键Debug执行
- 看哪里:看Debugger窗口,看Console窗口
- 点哪里:点(Step Over F8) 开始,点(Stop)结束
- 如何删除断点:选择要删除的断点,单击鼠标左键即可
2. 选择结构
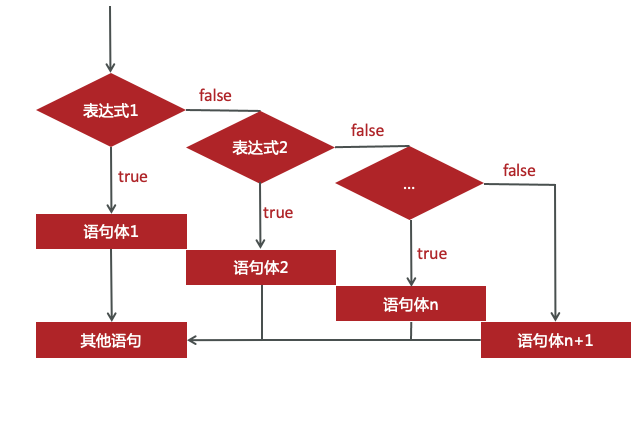
⑴. if语句
根据判定的结果(真或假)决定执行某个分支的代码
语法:
if(结果为boolean类型的表达式1) {
     语句体1;
} else if(结果为boolean类型的表达式2) {
     语句体2;
}
…
else {
     语句体n+1;
}
执行过程:
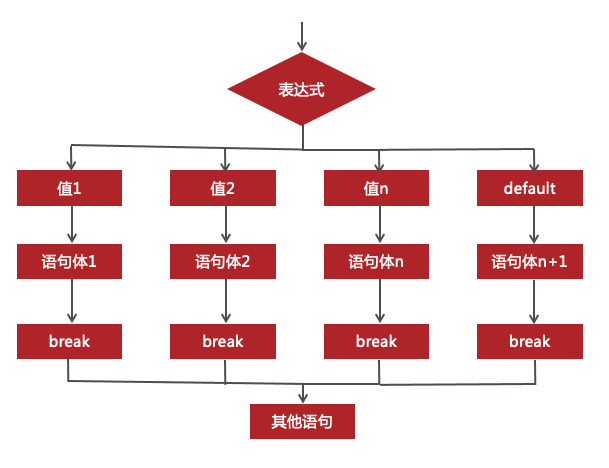
⑵. switch语句
语法:
switch(表达式) {
     case 值1:
          语句体1;
          break;
     case 值2:
          语句体2;
          break;
     …
     default:
          语句体n+1;
          break;
}
格式说明:
- 表达式:
- 可以是byte类型,short类型,int类型,char类型
- JDK5之后可以是枚举类型,JDK7之后可以是String类型
- case: 后面跟的是要和表达式进行比较的值
- break: 表示中断,结束的意思。用来结束switch语句
- default: 所有值都不匹配的时候,执行该处内容。和if语句的else相似
- 注意: 在switch语句中,如果case控制的语句体后面不写break,将出现穿透现象,在不判断下一个case值的情况下,向下运行,直到遇到break,或者整个switch语句结束
执行过程:
3. 循环结构
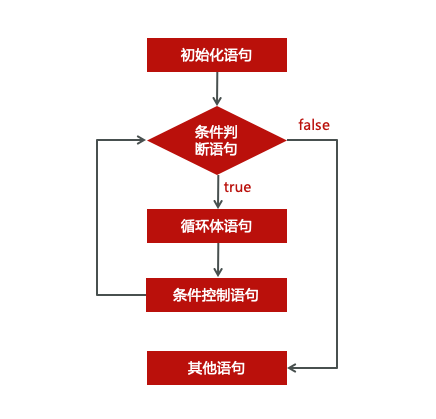
⑴. for 循环
语句格式:
for(初始化语句;条件判断语句;条件控制语句) {
     循环体语句;
}
格式说明:
- 初始化语句: 这里可以是一条或者多条语句,这些语句用来完成初始化操作(int i=1)
- 条件判断语句: 这里使用一个结果值为boolean类型的表达式,这个表达式能决定是否执行循环体语句(i<=1000)
- 循环体语句: 这里可以是任意语句,这些语句可能被多次执行(展示手机信息)
- 条件控制语句: 这里通常是使用一条语句来改变变量的值,从而达到控制循环是否继续向下执行的效果(i+=1)
执行过程:

需求: 寻找 100 ~ 999 之间的水仙花数(个位数的立方 加上 十位数的立方 加上百位数的立方 等于 该数字)个数
public class 水仙花数 {
    public static void main(String[] args) {
        for(int i = 100; i < 1000; i++) {
            int single = i%10;
            int ten = i/10%10;
            int hundreds = i/100;
            if(single*single*single + ten*ten*ten + hundreds*hundreds*hundreds == i) {
                System.out.println(i);
            }
        }
    }
}
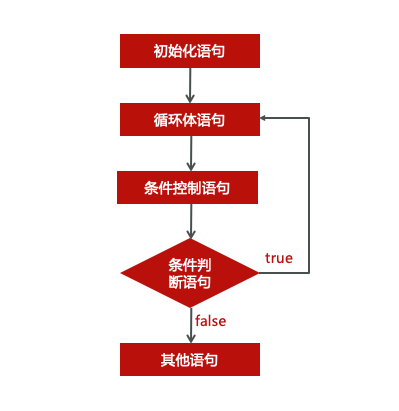
⑵. while 循环
语句格式:
初始化语句;
while (条件判断语句) {
     循环体语句;
     条件控制语句;
}
执行过程:
需求: 峰珠穆朗玛峰高 8848.86 米,现在有一张厚度为 0.001 米的纸。问折叠多少次,就可以超过珠穆朗玛峰的高度?
public class 珠峰 {
    public static void main(String[] args) {

        // 定义纸张厚度、珠峰高度、折叠次数
        double paper = 0.001;
        double zf = 8848.86;
        int count = 0;

        // 判断是否超过珠峰高度
        while (paper < zf) {
            // 计算折叠后的纸张厚度
            paper *= 2;

            // 计算折叠次数
            count++;
        }
        // 输出折叠的次数
        System.out.println("纸张折叠了" + count + "次");
        // => 纸张折叠了 24 次
    }
}
⑶. do … whild 循环
语句格式:
初始化语句;
do {
    循环体语句;
    条件控制语句;
} while (条件判断语句);
执行过程:
⑷. 三种循环的区别
三种循环语句的区别:
- for循环和while循环先判断条件是否成立,然后决定是否执行循环体(先判断后执行)
- do…while循环先执行一次循环体,然后判断条件是否成立,是否继续执行循环体(先执行后判断)
for和while的区别:
- 条件控制语句所控制的自增变量,在for循环结束后,就不可以继续使用了
- 条件控制语句所控制的自增变量,在while循环结束后,还可以继续使用
死循环格式:
- for ( ; ; ) { }
- while ( true ) { }
- do { } while ( true );
⑸. 跳转控制语句
- continue: 用在循环中,基于条件控制,跳过某次循环体内容的执行,继续下一次的执行
- break: 用在循环中,基于条件控制,终止循环体内容的执行,也就是说结束当前的整个循环
⑹. 实例
小芳妈妈每天给他 2.5 元,小芳每到第 5 天,或者 5 的倍数就会花掉 6 元,多少天可以存钱超过 100 元?
public class 小芳存钱 {
    public static void main(String[] args) {

        // 定义总存钱数、存钱天数
        double sumMoney = 2.5;
        int day = 1;

        // 判断是否超过 100 元
        while (sumMoney < 100) {
            sumMoney += 2.5;

            // 如果是第 5 天或者 5 的倍数,花掉 6 元
            if(day%5 == 0) sumMoney -= 6;
            day++;
        }

        // 超过了 100 元,输出天数
        System.out.println("存钱第" + day + "时,超过了 100 元");
    }
}
四、方法
1. 方法的定义和调用
方法(method): 就是完成特定功能的代码块
定义:
public static void 方法名 () {
     //方法体
}
调用:
// 方法必须先定义后调用,否则程序将报错
方法名();
2. 带参数方法的定义和调用
⑴. 定义
// 基础格式
public static void 方法名 ( 参数 ) { … … }

// 单个参数
public static void 方法名 ( 数据类型 变量名 )  { … … }
public static void isEvenNumber(  int   number) { … … }

// 多个参数
public static void 方法名  ( 数据类型 变量名1 ,数据类型 变量名2 ,…… ) { … … }
public static void getMax(  int  number1 , int  number2 ) { … … }
带参方法定义时,参数中的数据类型与变量名都不能缺少,缺少任意一个程序将报错
⑵. 调用
// 基础格式
方法名( 参数 );

// 单个参数
方法名(变量名/字面量值);
isEvenNumber(5);

// 多个参数
方法名(变量名1/字面量值1 ,变量名2/字面量值2);
getMax(10 , 20);
带参方法调用时,参数的数量与类型必须与方法定义中的设置相匹配,否则程序将报错
⑶. 形参和实参
- 形参: 方法定义中的参数
- 实参: 方法调用中的参数
⑷. 实例
需求: 打印两个数中的较大数,数据来自于方法参数
public class method02 {
    public static void main(String[] args) {
        getMax(10, 20);
        getMax(10, 8);
    }
    public static void getMax(int a, int b) {
        if(a == b) {
            System.out.println(a + "和" + b + "相等");
        } else if (a > b) {
            System.out.println(a + "大于" + b);
        } else {
            System.out.println(b + "大于" + a);
        }
    }
}
3. 带返回值方法的定义和调用
⑴. 定义
// 格式
public static 数据类型 方法名 ( 参数 ) {
      return 数据;
}

// 范例
public static boolean isEvenNumber( int number ) {
      return true;
}
方法定义时return后面的返回值与方法定义上的数据类型要匹配,否则程序将报错
⑵. 调用
方法名 ( 参数 ) ; isEvenNumber ( 5 ) ; 数据类型 变量名 = 方法名 ( 参数 ) ; boolean flag = isEvenNumber ( 5 );
// 格式
方法名 ( 参数 );
isEvenNumber ( 5 );

// 范例
数据类型 变量名 = 方法名 ( 参数 ) ;
boolean  flag =  isEvenNumber ( 5 );
方法的返回值通常会使用变量接收,否则该返回值将无意义
⑶. 示例
需求: 判断一个参数是否是偶数
public class method03 {
    public static void main(String[] args) {
        boolean isFlag = isEventNumber(10);
        if(isFlag) {
            System.out.println("是偶数");
        }else {
            System.out.println("是奇数");
        }
    }
    public static boolean isEventNumber(int number) {
        if(number%2 == 0) {
            return true;
        } else {
            return false;
        }
    }
}
4. 方法的注意事项
- 方法不能嵌套定义
- void表示无返回值,可以省略return,也可以单独的书写return,后面不加数据
5. 方法的通用格式
格式:
public static 返回值类型 方法名(参数) {
     方法体;
     return 数据;
}
- public static: 修饰符,目前先记住这个格式
- 返回值类型:
- 方法操作完毕之后返回的数据的数据类型
- 如果方法操作完毕,没有数据返回,这里写void,而且方法体中一般不写return
- 方法名: 调用方法时候使用的标识
- 参数: 由数据类型和变量名组成,多个参数之间用逗号隔开
- 方法体: 完成功能的代码块
- return: 如果方法操作完毕,有数据返回,用于把数据返回给调用者
注意事项:
- 定义方法时,要明确参数类型、返回值类型
- 调用方法时,void类型的方法,直接调用即可;非 void 方法,建议用变量接收调用
示例: 设计一个方法用于获取三个整数较大值,调用方法,把结果在控制台输出。
public class MethodTest03 {
     public static void main(String[] args) {
          int max = getMax(10, 20, 30);
          System.out.println("10,20,30中的较大值是:" + max);
     }
     /*
     参数:int a,int b,int c
     返回值类型:int
     */
     public static int getMax(int a, int b, int c) {
          //获取三个整数较大值
          // if (a >= b) {
               // if (a >= c) {
                    // return a;
               // } else {
                    // return c;
               // }
          // } else {
               // if (b >= c) {
                    // return b;
               // } else {
                    // return c;
               // }
          // }

          // 简化:三目运算符
          int tempMax = a > b ? a : b;
          int max = tempMax > c ? tempMax : c;
          return max;
     }
}
6. 方法重载
- 方法重载指的是: 同一个类中定义的多个方法之间的关系
- 满足下列条件的多个方法相互构成重载:
- 多个方法在同一个类中
- 多个方法具有相同的方法名
- 多个方法的参数不相同,类型不同或者数量不同
特点:
- 类型不同或者数量不同重载仅对应方法的定义,与方法的调用无关
- 重载仅针对同一个类中方法的名称与参数进行识别,与返回值无关
需求: 使用方法重载的思想,设计比较两个整数是否相等的方法,兼容全整数类型(byte, short, int, long)
public class MethodTest {
     public static void main(String[] args) {
          System.out.println(compare(10,20));
          System.out.println(compare((byte) 10,(byte) 20));
          System.out.println(compare((short) 10,(short) 20));
          System.out.println(compare(10L,20L));
     }

     //int
     public static boolean compare(int a,int b) {
          System.out.println("int"); return a == b;
     }

     //byte
     public static boolean compare(byte a,byte b) {
          System.out.println("byte"); return a == b;
     }

     //short
     public static boolean compare(short a,short b) {
          System.out.println("short"); return a == b;
     }

     //long
     public static boolean compare(long a,long b) {
          System.out.println("long");return a == b;
     }
}
五、数组
1. 数组
数组(array): 是一种用于存储多个相同数据类型的存储模型(可以理解为容器)
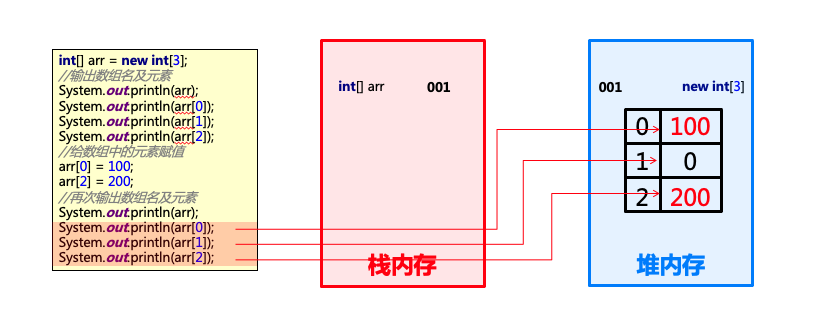
⑴. 数组定义格式
// 格式1(推荐):数据类型[] 变量名;
int[] arr;
// 定义了一个int类型的数组,数组名是arr

// 格式2:数据类型 变量名[];
int arr[];
//定义了一个int类型的变量,变量名是arr数组
⑵. 数组初始化 - 静态初始化
数组初始化概述:
- Java中的数组必须先初始化,然后才能使用
- 所谓初始化: 就是为数组中的数组元素分配内存空间,并为每个数组元素赋值
- 注意: 数组中的每一个数据,我们称之为数组中的元素
静态初始化: 初始化时指定每个数组元素的初始值,由系统决定数组长度
// 格式:数据类型[] 变量名 = new 数据类型[]{数据1,数据2,数据3,…};
// 范例:
int[] arr = new int[]{1,2,3};

// 简化格式:数据类型[] 变量名 = {数据1,数据2,数据3,…};
// 范例:
int[] arr = {1,2,3};
⑶. 数组元素访问
数组变量访问方式(得到的是地址): 数组名
数组内部保存的数据的访问方式(得到的是数组内的元素): 数组名[索引]
- 索引是数组中数据的编号方式
- 作用: 索引用于访问数组中的数据使用,数组名[索引]等同于变量名,是一种特殊的变量名
- 特征: 索引从0开始,是连续的,是逐一增加的,每次加1
⑷. 数组常见操作
①. 遍历
数组遍历: 获取数组中的每一个元素,我们可以把获取到的元素输出在控制台
获取数组长度(元素个数) 格式:数组名.length
格式:
int[] arr = {...};
for (int i = 0; i < arr.length; i++) {
     arr[i]; //对元素arr[i]进行操作
}
②. 获取最大值
需求: 判断一组数字:12, 45, 98, 73, 60,哪个值最大(冒泡排序)
public class arr01 {
    public static void main(String[] args) {
        int arr[] = {12,45,98,73,60};

        // 定义一个变量 储存最大值,默认第一个元素为初始值
        int max = arr[0];

        // 逐个元素对比
        for (int i = 0; i < arr.length; i++) {

            // 如果元素比变量的值大,就用该元素替代 变量的值
            if(max < arr[i]) max = arr[i];
        }

        // 输出最大值
        System.out.println("最大值是:" + max);
    }
}
③. 元素打乱
元素打乱: 把数组中的元素随机交换位置,每次运行都可能产生不一样的结果
获取数组中元素的随机索引:
Random r = new Random();
int index = r.nextInt(arr.length);
示例:
public class arr02 {
    public static void main(String[] args) {
        int[] arr = {1, 2, 3, 4};

        // 打乱索引
        Random r = new Random();
        int index = r.nextInt(arr.length);

        // 将遍历的元素 与 任意的元素 替换
        for (int i = 0; i < arr.length; i++) {
            int temp = arr[i];
            arr[i] = arr[index];
            arr[index] = temp;
        }

        // 输出数组
        for (int j = 0; j < arr.length; j++) {
            // println 换行,print 不换行
            if(j == arr.length) {
                System.out.print(arr[j]);
            } else {
                System.out.print(arr[j] + ",");
            }
        }
    }
}
⑸. 数组初始化 - 动态初始化
动态初始化: 初始化时只指定数组长度,由系统为数组分配初始值
// 格式: 数据类型[] 变量名 = new 数据类型[数组长度];
int[] arr = new int[3];
使用场景:
- 静态初始化: 开始就存入元素值,适合一开始就能确定元素值的业务场景
- 动态初始化: 指定数组长度,后期赋值,适合开始知道数据的数量,但是不确定具体元素值的业务场景
- 注意: 两种初始化的方式是独立的,不可以混用
示例: 5个元素的int数组,数据来自于键盘录入,最后把元素输出
public class arr03 {
    public static void main(String[] args) {
        //定义一个数组,并进行动态初始化
        int[] arr = new int[5];

        //创建键盘录入对象
        Scanner sc = new Scanner(System.in);

        for (int i = 0; i < arr.length; i++) {
            System.out.println("请输入第" + (i + 1) + "个元素:");
            arr[i] = sc.nextInt();
        }

        // 调用方法 打印数组
        printArray(arr);
    }

    public static void printArray(int[] arr) {
        System.out.print("[");
        for (int i = 0; i < arr.length; i++) {
            if(i==arr.length-1) {
                System.out.print(arr[i]);
            }else {
                System.out.print(arr[i] + ", ");
            }
        }
        System.out.println("]");
    }
}
⑹. 数组内存图
- 栈: 栈内储存的是数组的地址,执行时根据地址进行调用
- 堆: 储存原始数据类型
2. 二维数组
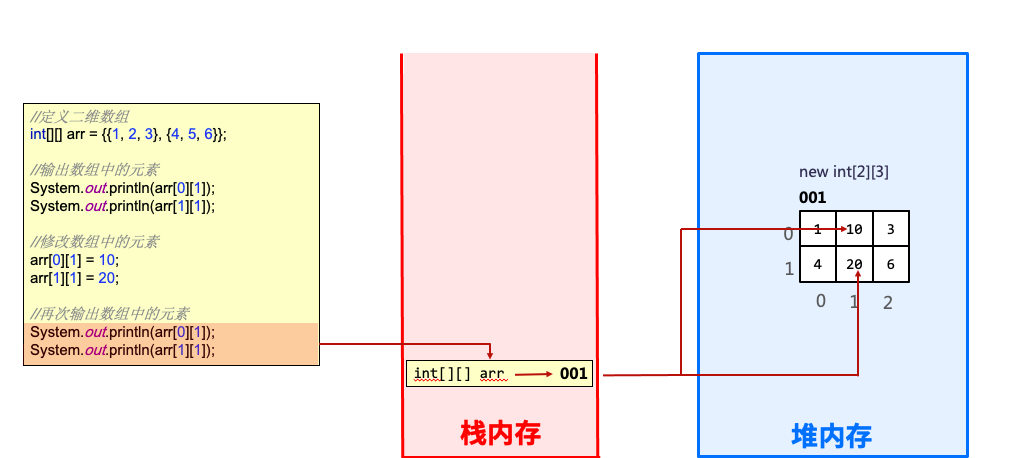
⑴. 二维数组的定义
二维数组: 元素为一维数组的数组
定义格式:
// 格式1(推荐):数据类型[][] 变量名;
int[][] arr;
// 格式2:数据类型 变量名[][];
int arr[][];
// 格式3:数据类型[] 变量名[];
int[] arr[];
⑵. 二维数组的初始化
①. 静态初始化
定义格式:
// 数据类型[][] 变量名 = new 数据类型[][]{{元素…},{元素…},{元素…},…};
int[][] arr = new int[][]{{1,2,3},{4,5,6},{7,8,9}};

// 注意:一维数组中元素的个数可以是不同的
int[][] arr = new int[][]{{1,2,3},{4,5},{6,7,8,9}};

// 简化:数据类型[][] 变量名 = {{元素…},{元素…},{元素…},…};
int[][] arr = {{1,2,3},{4,5,6},{7,8,9}};
②. 动态初始化
// 数据类型[][] 变量名 = new 数据类型[m][n];
int[][] arr = new int[2][3];
⑶. 二维数组的元素访问
- 获取二维数组:数组名
- 获取每一个一维数组:数组名[索引]
- 获取每一个二维数组元素:数组名[索引][索引]
⑷. 二维数组的内存图
⑸. 二维数组的常见操作
①. 遍历
需求: 已知一个二维数组 arr = {{1,2,3},{4,5,6},{7,8,9}}; 请把元素在控制台输出
public class arr04 {
    public static void main(String[] args) {
        int[][] arr = {{1, 2, 3}, {4, 5, 6}, {7, 8, 9}};

        for (int i = 0; i < arr.length; i++) {
            for (int j = 0; j < arr[i].length; j++) {
                System.out.println(arr[i][j]);
            }
        }
    }
}
②.元素打乱
需求: 已知二维数组 arr = {{1,2,3},{4,5,6},{7,8,9}}; 用程序实现把数组中的元素打乱,并在控制台输出打乱后的数组元素
public class arr05 {
    public static void main(String[] args) {
        int[][] arr = {{1, 2, 3}, {4, 5, 6}, {7, 8, 9}};

        Random r = new Random();

        for (int i = 0; i < arr.length; i++) {
            for (int j = 0; j < arr[i].length; j++) {

                int x = r.nextInt(arr.length);
                int y = r.nextInt(arr[i].length);

                int temp = arr[i][j];
                arr[i][j] = arr[x][y];
                arr[x][y] = temp;
            }
        }

        for (int i = 0; i < arr.length; i++) {
            for (int j = 0; j < arr[i].length; j++) {
                System.out.println(arr[i][j]);
            }
        }
    }
}
六、常用 API
API (Application Programming Interface) :应用程序编程接口
1. API参考文档
Java 11 中文 API 参考文档: https://www.apiref.com/java11-zh/index.html
使用流程:
- ① 打开帮助文档
- ② 找到索引选项,输入要学习的类,然后回车
- ③ 看类所在包:
java.lang包下的类在使用的时候不需要导包 - ④ 看类的描述:类是干什么的
- ⑤ 看类的构造方法:创建对象使用
- ⑥ 看类的成员方法:完成功能使用
2. 包和导包
⑴. 包
- 其实就是文件夹
- 作用: 对类进行分类管理 包的定义格式
// 格式:package 包名
// 注意:包名一般是公司域名反写,并且多级包用.分开
package com.itheima;
⑵. 导包
使用不同包下的类时,使用的时候要写类的全路径,写起来太麻烦了。为了简化带包的操作,Java就提供了导包的功能。
// 格式:import 包名;
import com.itheima.Student;
3. Scanner
一个简单的文本扫描程序,可以使用正则表达式解析基本类型和字符串。
构造器:
# 构造一个新的 Scanner ,它生成从指定输入流扫描的值。
Scanner(InputStream source)
# “标准”输入流。
System in
成员方法:
# 将输入的下一个标记扫描为 int
nextInt()
需求: 键盘录入两个整数,求两个数据和,并在控制台输出求和结果
public class scanner01 {
    public static void main(String[] args) {
        Scanner sc = new Scanner(System.in);
        System.out.println("请输入第一个数字");
        int num1 = sc.nextInt();
        System.out.println("请输入第二个数字");
        int num2 = sc.nextInt();
        int sum = num1 + num2;
        System.out.println("两个数字的和是:" + sum);
    }
}
4. Random
该类的实例用于生成伪随机数流。
构造方法:
Random()
# 创建一个新的随机数生成器
成员方法:
int nextInt(int bound)
# 返回从该随机数生成器的序列中提取的伪随机,均匀分布的值在0(包括)和指定值(不包括)之间的 int
需求: 系统自动产生一个1-100之间的整数,使用程序实现猜这个数字是多少? 猜的时候根据不同情况给出相应的提示
public class random01 {
    public static void main(String[] args) {
        Random r = new Random();
        int numRandom = r.nextInt(100) + 1;
        System.out.println("系统已经产生一个1-100之间的整数");
        System.out.println(numRandom);
        while (true) {
            Scanner sc = new Scanner(System.in);
            System.out.println("猜猜数字是多少");
            int numIn = sc.nextInt();
            if(numRandom > numIn) {
                System.out.println("猜的数字小了");
            } else if(numRandom < numIn) {
                System.out.println("猜的数字大了");
            } else {
                System.out.println("恭喜你,猜对了");
                break;
            }
        }
    }
}
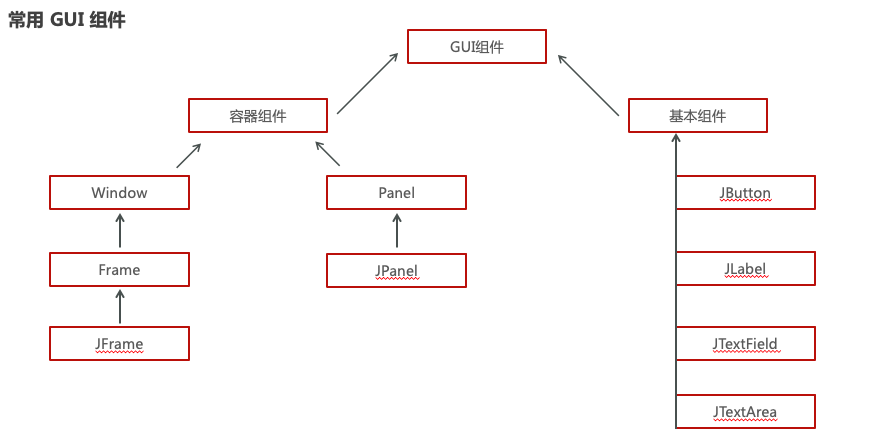
5. GUI
Graphical User Interface(图形用户接口);用图形的方式,来显示计算机操作的界面
⑴. 包
java.awt 包: Abstract Window ToolKit (抽象窗口工具包),需要调用本地系统方法实现功能,属重量级控件
javax.swing 包:
- 在awt的基础上,建立的一套图形界面系统,提供了更多的组件,而且完全由Java实现。增强了移植性,属轻量级控件
- 组件: 是具有图形表示的对象,该图形表示可以显示在屏幕上并且可以与用户交互
⑵. 常用 GUI 组件
⑶. JFrame
一个顶层窗口
构造方法:
JFrame()
// 构造一个最初不可见的新框架。
成员方法:
// 显示或隐藏此窗体具体取决于参数b的值
void setVisible(boolean b)
// 调整此组件的大小,使其宽度为width,高度为height,单位是像素
void setSize(int width, int height)
// 设置当用户在此帧上启动“关闭”时默认发生的操作
void setDefaultCloseOperation(int operation)
// 设置 LayoutManager
void setLayout(LayoutManager manager)
//设置窗体标题
void setTitle(String title)
// 设置位置,值为null,则窗体位于屏幕中央
void setLocationRelativeTo(Component c)
// 设置窗体关闭时默认操作 整数3表示:窗口关闭时退出应用程序
void setDefaultCloseOperation(int operation)
// 设置此窗口是否应始终位于其他窗口之上
void setAlwaysOnTop(boolean alwaysOnTop)
⑷. JButton
“推”按钮的实现
构造方法:
JButton(String text)
// 创建一个带文本的按钮
成员方法:
// 设置大小
void setSize(int width, int height)
// 设置位置(x坐标,y坐标)
void setLocation(int x, int y)
// 设置位置和大小
void setBounds(int x, int y, int width, int height)
和窗体相关操作:
// 取消窗体默认布局
窗体对象.setLayout(null);

// 把按钮添加到窗体
窗体对象.add(按钮对象);
⑸. JLabel
短文本字符串或图像的显示区域,或两者。
构造方法:
- 使用指定的文本创建 JLabel实例:
JLabel(String text) - 使用指定的图像创建 JLabel实例:
JLabel(Icon image) - ImageIcon(String filename): 从指定的文件创建
ImageIcon- 文件路径: 绝对路径和相对路径
- 绝对路径: 完整的路径名,不需要任何其他信息就可以定位它所表示的文件
- 例如: D:\IdeaProjects\javase_code\itheima-api-gui\images\mn.png
- 相对路径: 必须使用取自其他路径名的信息进行解释
- 例如: itheima-api-gui\images\mn.png
成员方法:
// 设置位置和大小
void setBounds(int x, int y, int width, int height)
⑹. 示例
①. 登录
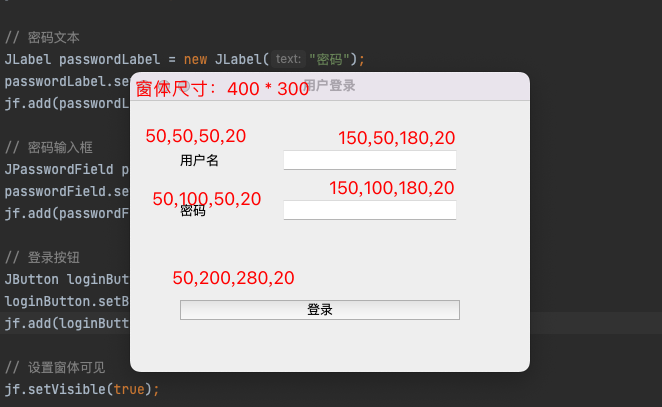
public class jf_login {
    public static void main(String[] args) {
        // 创建窗体对象
        JFrame jf = new JFrame();

        // 组件尺寸
        jf.setSize(400, 300);
        // 窗体标题
        jf.setTitle("用户登录");
        // 窗体位于屏幕中央
        jf.setLocationRelativeTo(null);
        // 窗体位置其他窗口之上
        jf.setAlwaysOnTop(true);
        // 设置窗体关闭时默认操作(整数3表示:窗口关闭时退出应用程序)
        jf.setDefaultCloseOperation(3);
        // 去掉默认布局
        jf.setLayout(null);

        // 用户名文本
        JLabel usernameLabel = new JLabel("用户名");
        usernameLabel.setBounds(50, 50, 50, 20);
        jf.add(usernameLabel);

        // 用户名输入框
        JTextField usernameField = new JTextField();
        usernameField.setBounds(150, 50, 180, 20);
        jf.add(usernameField);

        // 密码文本
        JLabel passwordLabel = new JLabel("密码");
        passwordLabel.setBounds(50, 100, 50, 20);
        jf.add(passwordLabel);

        // 密码输入框
        JPasswordField passwordField = new JPasswordField();
        passwordField.setBounds(150, 100, 180, 20);
        jf.add(passwordField);

        // 登录按钮
        JButton loginButton = new JButton("登录");
        loginButton.setBounds(50, 200, 280, 20);
        jf.add(loginButton);1

        // 设置窗体可见
        jf.setVisible(true);
    }
}
②. 考勤查询
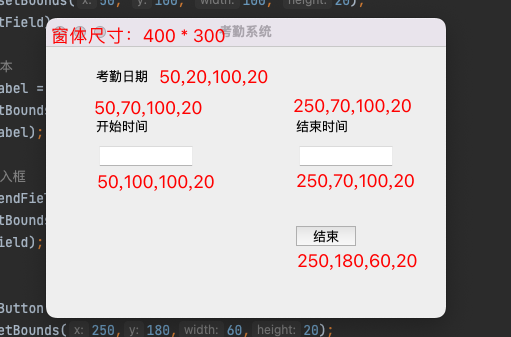
public class jfCheck {
    public static void main(String[] args) {
        JFrame jf = new JFrame();

        jf.setTitle("考勤系统");
        jf.setSize(400, 300);
        jf.setLocationRelativeTo(null);
        jf.setAlwaysOnTop(true);
        jf.setDefaultCloseOperation(3);
        jf.setLayout(null);

        // 考勤日期 标题
        JLabel dateLabel = new JLabel("考勤日期");
        dateLabel.setBounds(50, 20, 100, 20);
        jf.add(dateLabel);

        // 开始时间文本
        JLabel startLabel = new JLabel("开始时间");
        startLabel.setBounds(50, 70, 100, 20);
        jf.add(startLabel);

        // 开始时间输入框
        JTextField startField = new JTextField();
        startField.setBounds(50, 100, 100, 20);
        jf.add(startField);

        // 结束时间文本
        JLabel endLabel = new JLabel("结束时间");
        endLabel.setBounds(250, 70, 100, 20);
        jf.add(endLabel);

        // 结束时间输入框
        JTextField endField = new JTextField();
        endField.setBounds(250, 100, 100, 20);
        jf.add(endField);

        // 结束按钮
        JButton endButton = new JButton("结束");
        endButton.setBounds(250,180,60,20);
        jf.add(endButton);

        jf.setVisible(true);
    }
}
⑺. 事件监听机制
- 事件源: 事件发生的地方。可以是按钮,窗体,图片等
- 事件绑定: 把事件绑定到事件源上,当发生了某个事件,则触发对应的处理逻辑
事件源对象. addXXXListener(事件);
public class jfAction {
    public static void main(String[] args) {
        JFrame jf = new JFrame();

        jf.setTitle("事件监听");
        jf.setSize(400, 300);
        jf.setAlwaysOnTop(true);
        jf.setDefaultCloseOperation(3);
        jf.setLocationRelativeTo(null);
        jf.setLayout(null);

        JButton clickBtn = new JButton("你点我啊");
        clickBtn.setBounds(100, 100, 200, 50);
        jf.add(clickBtn);

        // 绑定事件
        clickBtn.addActionListener(new AbstractAction() {
            @Override
            public void actionPerformed(ActionEvent e) {
                // 控制台打印
                System.out.println("你过来啊");
            }
        });

        jf.setVisible(true);
    }
}
6. String
String类表示字符串。 Java程序中的所有字符串文字(例如"abc" )都实现为此类的实例
⑴. 方法
构造方法:
// 初始化新创建的 String对象,使其表示空字符序列
String()
// 初始化新创建的String对象,使其表示与参数相同的字符序列
String(String original)
成员方法:
// 返回此字符串的长度
int length()
// 将此字符串与指定的对象进行比较
boolean equals(Object anObject)
// 将此 String与另一个 String比较,忽略了大小写
boolean equalsIgnoreCase(String anotherString)
// 返回一个字符串,其值为此字符串,删除了所有前导和尾随空格
String trim()
⑵. 示例
public class string01 {
    public static void main(String[] args) {
        String s1 = new String("helloWorld");
        // 数组长度
        System.out.println(s1.length()); // 10

        String s2 = "helloWorld";
        String s3 = "HelloWorld";

        // 数组比较(区分大小写)
        System.out.println(s1.equals(s2)); // true
        System.out.println(s1.equals(s3)); // false

        // 数组比较(不区分大小写)
        System.out.println(s1.equalsIgnoreCase(s2)); // true
        System.out.println(s1.equalsIgnoreCase(s3)); // true

        // 去掉数组首尾空格
        String s4 = " hello world";
        System.out.println(s4.trim());
        // => "hello world"
    }
}
⑶. 实例
- 用户名限制在 3 ~ 12 位
- 账号:admin、密码:123456
- 登录成功、失败都会进行提示
public class string02 {
    public static void main(String[] args) {
        JFrame jf = new JFrame();

        jf.setSize(400, 300);
        jf.setTitle("用户登录");
        jf.setLocationRelativeTo(null);
        jf.setAlwaysOnTop(true);
        jf.setDefaultCloseOperation(3);
        jf.setLayout(null);

        // 用户名文本
        JLabel usernameLabel = new JLabel("用户名");
        usernameLabel.setBounds(50, 50, 50, 20);
        jf.add(usernameLabel);

        // 用户名输入框
        JTextField usernameField = new JTextField();
        usernameField.setBounds(150, 50, 180, 20);
        jf.add(usernameField);

        // 密码文本
        JLabel passwordLabel = new JLabel("密码");
        passwordLabel.setBounds(50, 100, 50, 20);
        jf.add(passwordLabel);

        // 密码输入框
        JPasswordField passwordField = new JPasswordField();
        passwordField.setBounds(150, 100, 180, 20);
        jf.add(passwordField);

        // 登录按钮
        JButton loginButton = new JButton("登录");
        loginButton.setBounds(50, 200, 280, 20);
        jf.add(loginButton);

        jf.setVisible(true);


        // 绑定事件
        loginButton.addActionListener(new AbstractAction() {
            @Override
            public void actionPerformed(ActionEvent e) {
                // 获取用户名、密码
                String username = usernameField.getText();
                String passworld = passwordField.getText();

                // 用户名在 6 ~ 12 位之间
                if(3 > username.length() || username.length() > 13) {
                    JOptionPane.showMessageDialog(jf, "用户名的长度在 3 ~ 12 位之间");
                    return;
                }

                // 判断用户名、密码
                if(username.equals("admin") && passworld.equals("123456")) {
                    JOptionPane.showMessageDialog(jf, "登录成功");
                    usernameField.setText("");
                    passwordField.setText("");
                } else {
                    JOptionPane.showMessageDialog(jf, "用户名或密码错误");
                }
            }
        });
    }
}
7. 基本类型包装类
将基本数据类型封装成对象的好处就是可以通过对象调用方法操作数据
⑴. Integer
Integer类在对象中包装基本类型int的值
构造方法:
// 根据 int 值创建 Integer 对象(过时)
Integer(int value)
// 根据 String 值创建 Integer 对象(过时)
Integer(String s)
成员方法:
// 返回表示指定的 int 值的 Integer 实例
static Integer valueOf(int i)
// 返回一个保存指定值的 Integer 对象 String
static Integer valueOf(String s)
⑵. int和String的相互转换
// int 转换为 String
static String valueOf(int i)
// 返回 int 参数的字符串表示形式。该方法是 String 类中的方法
// String 转换为 int
static int parseInt(String s)
// 将字符串解析为 int 类型。该方法是 Integer 类中的方法
⑶. 自动装箱和拆箱
- 装箱: 把基本数据类型转换为对应的包装类类型
- 拆箱: 把包装类类型转换为对应的基本数据类型
示例:
Integer i = 100;  // 自动装箱
i += 200;         // i = i + 200;  i + 200 自动拆箱;i = i + 200; 是自动装箱
8. Date和SimpleDateFormat
⑴. Date
Date类表示特定的时刻,精度为毫秒
构造方法:
// 分配 Date对象并对其进行初始化,使其表示分配时间,测量 Date到毫秒
Date()
// 分配 Date对象并初始化它以表示自标准基准时间以来的指定毫秒数,即1970年1月1日00:00:00
Date(long date)
示例:
public class date01 {
    public static void main(String[] args) {
        //Date():分配 Date对象并对其进行初始化,使其表示分配时间,测量 Date到毫秒
        Date d1 = new Date();
        System.out.println(d1); // => Wed Jun 29 17:15:51 CST 2022

        //Date(long date):分配 Date对象并初始化它以表示自标准基准时间以来的指定毫秒数,即1970年1月1日 00:00:00
        Date d2 = new Date(1000 * 60 * 60);
        System.out.println(d2); // => Thu Jan 01 09:00:00 CST 1970(北京时间)
    }
}
⑵. SimpleDateFormat
一个用于以区域设置敏感的方式格式化和解析日期的具体类
构造方法:
// 构造一个SimpleDateFormat,使用默认模式和日期格式
SimpleDateFormat()
// 构造一个SimpleDateFormat使用给定的模式和默认的日期格式
SimpleDateFormat(String pattern)
格式化(从 Date 到 String ):
// 将日期格式化成日期/时间字符串
String format(Date date)
解析(从 String 到 Date ):
// 从给定字符串的开始解析文本以生成日期
Date parse(String source)
示例:
public class date {
    public static void main(String[] args) throws ParseException {
        Date d = new Date();
        // SimpleDateFormat sdf = new SimpleDateFormat();
        SimpleDateFormat sdf = new SimpleDateFormat("yyyy年MM月dd日 HH:mm:ss");
        String s = sdf.format(d);
        System.out.println(s); // => 2022年06月29日 17:17:50

        // 解析
        String d2 = "2022-10-21 9:34:34";
        SimpleDateFormat sdf2 = new SimpleDateFormat("yyyy-MM-dd HH:mm:ss");
        String s2 = String.valueOf(sdf2.parse(d2));
        System.out.println(s2); // => Fri Oct 21 09:34:34 CST 2022
    }
}
七、面向对象基础
1. 类和对象
⑴. 类
- 类: 是对现实生活中一类具有共同属性和行为的事物的抽象
- 对象: 是能够看得到摸的着的真实存在的实体
- 类是对象的抽象,对象是类的实体
对象的属性和行为:
- 属性: 对象具有的各种特征,每个对象的每个属性都拥有特定的值
- 行为: 对象能够执行的操作
类的定义:
public class 类名 {
      // 成员变量
      变量1的数据类型 变量1;
      变量2的数据类型 变量2;
      …
      }
      // 成员方法
      方法1;
      方法2;
      …
}
⑵. 对象
对象的创建:
// 类名 对象名 = new 类名();
Phone p = new Phone();
对象的使用:
// 使用成员变量
// 对象名.变量名
p.brand

// 使用成员方法
// 对象名.方法名(参数)
p.call()
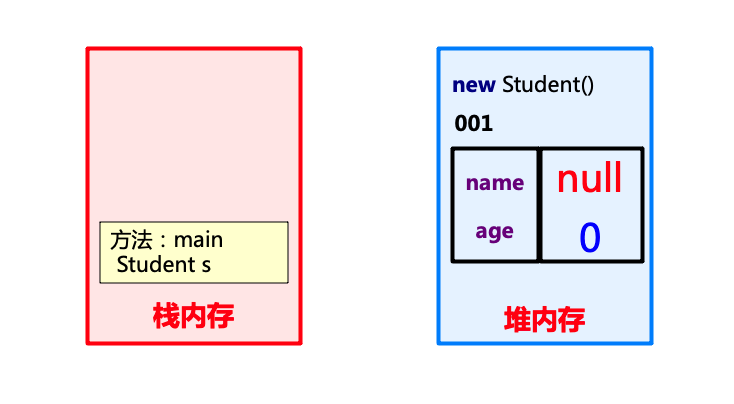
2. 对象内存图
Java 内存分配: Java 程序在运行时,需要在内存中分配空间。为了提高运算效率,就对空间进行了不同区域的划分,因为每一片区域都有特定的处理数据方式和内存管理方式。
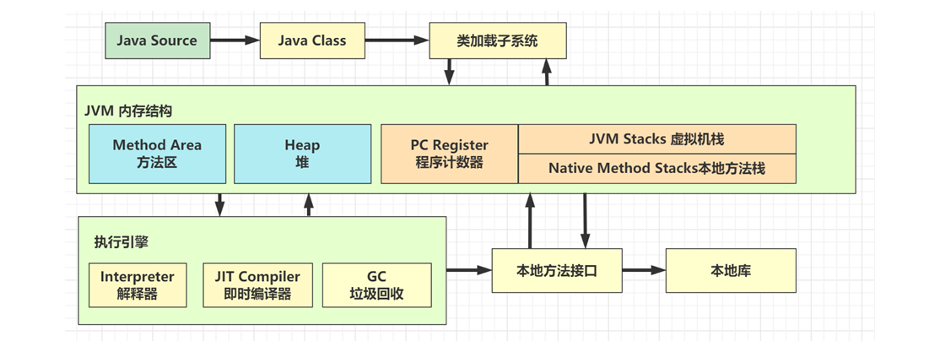
堆栈图:
-
栈: 所有局部变量都会在栈内存中创建
- 局部变量: 定义在方法中的变量或者方法声明上的变量
- 方法执行都会加载到栈中进行
- 局部变量特点: 随着方法的调用而存在,随着方法的调用完毕而消失
- 代码: Student s = new Student();
-
堆: 所有对象及其对应的实例变量和数组都会在堆内存中储存
- 简单理解为: new出来的东西,都存储在堆内存
- 每一个new出来的东西都有一个地址值,使用完毕,会在垃圾回收器空闲时被回收
- 实例变量(成员变量)有初始化值:
- 基本数据类型: 整数:0,浮点数:0.0,布尔:false,字符:空字符
- 引用数据类型: null
成员变量和局部变量的区别:
| 区别 | 成员变量 | 局部变量 |
|---|---|---|
| 类中位置不同 | 类中方法外 | 方法内或者方法声明上 |
| 内存中位置不同 | 堆内存 | 栈内存 |
| 生命周期不同 | 随着对象的存在而存在,随着对象的消失而消失 | 随着方法的调用而存在,随着方法的调用完毕而消失 |
| 初始化值不同 | 有默认的初始化值 | 没有默认的初始化值,必须先定义,赋值,才能使用 |
3. private 关键字
- 是一个权限修饰符,作用是保护成员不被别的类使用,被 private 修饰的成员只在本类中才能访问
- 针对
private修饰的成员变量,如果需要被其他类使用,提供两个相应的操作:- 提供
get变量名()方法,用于获取成员变量的值,方法用public修饰 - 提供
set变量名(参数)方法,用于设置成员变量的值,方法用public修饰
- 提供
案例:
// Student 类

public class Student {
    String name;
    private int age;

    public int getAge() {
        return age;
    }

    public void setAge(int a) {
        age = a;
    }

    public void show() {
        System.out.println(name + "的年龄是:" + age);
    }
}
// StudentDemo 类

public class studentDemo {
    public static void main(String[] args) {
        Student s = new Student();
        System.out.println(s.getAge()); // => 0 , int 变量默认为零

        System.out.println(s.name); // => null , String 变量默认为 null

        s.show(); // => null的年龄是:0

        s.name = "zoe";
        s.setAge(18);
        s.show(); // => zoe的年龄是:18
    }
}
4. this
- this限定的变量用于指代成员变量
- 方法的形参如果与成员变量同名,不带this修饰的变量指的是形参,而不是成员变量
- 方法的形参没有与成员变量同名,不带this修饰的变量指的是成员变量
- 作用: 用于解决局部变量隐藏成员变量
- this指向: 方法被哪个对象调用,this就代表哪个对象
5. 封装
- 封装概述:
- 是面向对象三大特征之一(封装,继承,多态)
- 是面向对象编程语言对客观世界的模拟,客观世界里成员变量都是隐藏在对象内部的,外界是无法直接操作的
- 封装原则:
- 将类的某些信息隐藏在类内部,不允许外部程序直接访问,而是通过该类提供的方法来实现对隐藏信息的操作和访问
- 成员变量private,提供对应的getXxx()/setXxx()方法
- 封装好处:
- 通过方法来控制成员变量的操作,提高了代码的安全性
- 把代码用方法进行封装,提高了代码的复用性
6. 构造方法
⑴. 定义
作用: 创建对象
功能: 主要是完成对象数据的初始化
public class 类名{
    修饰符 类名( 参数 ) {
    }
}
⑵. 注意事项
- 构造方法的创建:
- 如果没有定义构造方法,系统将给出一个默认的无参数构造方法
- 如果定义了构造方法,系统将不再提供默认的构造方法
- 构造方法的重载:
- 如果自定义了带参构造方法,还要使用无参数构造方法,就必须再写一个无参数构造方法
- 推荐的使用方式:
- 永远提供无参数构造方法
- 永远提供无参数构造方法
⑶. JavaBean
就是一个Java中的类,其对象可以用于在程序中封装数据
标准 JavaBean 须满足如下要求:
- 成员变量使用 private 修饰
- 提供每一个成员变量对应的 setXxx() / getXxx()
- 提供一个无参构造方法
⑷. 示例
需求: 编写手机 JavaBean,并在测试类中使用;需体现手机品牌(brand)和价格(price)
// Phone

public class Phone {
    private String brand;
    private int price;

    public Phone() {
    }

    public Phone(String brand, int price) {
        this.brand = brand;
        this.price = price;
    }

    public String getBrand() {
        return brand;
    }

    public void setBrand(String brand) {
        this.brand = brand;
    }

    public int getPrice() {
        return price;
    }

    public void setPrice(int price) {
        this.price = price;
    }
}
// PhoneDemo

public class PhoneDemo {
    public static void main(String[] args) {
        //无参构造方法+set方法
        Phone p1 = new Phone();
        p1.setBrand("小米");
        p1.setPrice(2999);
        System.out.println(p1.getBrand() + "," + p1.getPrice());

        //带参构造方法
        Phone p2 = new Phone("小米", 2999);
        System.out.println(p2.getBrand() + "," + p2.getPrice());
    }
}
7. 继承
- 继承是面向对象三大特征之一(封装,继承和多态)
- 可以使得子类具有父类的属性和方法,还可以在子类中重新定义,追加属性和方法
- 提高了代码复用性
定义:
// public class 子类名 extends 父类名 { }
public class Zi extends Fu { }
// Fu:是父类,也被称为基类、超类
// Zi:是子类,也被称为派生类
示例:
// userLogin

// 继承 JFrame 的窗体类
public class userLogin extends JFrame {
    public userLogin() {

        // 窗体初始化
        initFrame();

        // 窗体绘制
        pointView();

        // 设置窗体可见
        this.setVisible(true);
    }

    private void pointView() {
        // 用户名文本
        JLabel usernameLabel = new JLabel("用户名");
        usernameLabel.setBounds(50, 50, 50, 20);
        this.add(usernameLabel);

        // 用户名输入框
        JTextField usernameField = new JTextField();
        usernameField.setBounds(150, 50, 180, 20);
        this.add(usernameField);

        // 密码文本
        JLabel passwordLabel = new JLabel("密码");
        passwordLabel.setBounds(50, 100, 50, 20);
        this.add(passwordLabel);

        // 密码输入框
        JPasswordField passwordField = new JPasswordField();
        passwordField.setBounds(150, 100, 180, 20);
        this.add(passwordField);

        // 登录按钮
        JButton loginButton = new JButton("登录");
        loginButton.setBounds(50, 200, 280, 20);
        this.add(loginButton);
    }

    private void initFrame() {
        this.setSize(400, 300);
        this.setTitle("用户登录");
        this.setLocationRelativeTo(null);
        this.setAlwaysOnTop(true);
        this.setDefaultCloseOperation(3);
        this.setLayout(null);
    }
}
// app

public class app {
    public static void main(String[] args) {
        userLogin UserLogin = new userLogin();
    }
}
八、动漫美女拼图项目
仓库地址: https://gitee.com/yuan0_0/game_picture
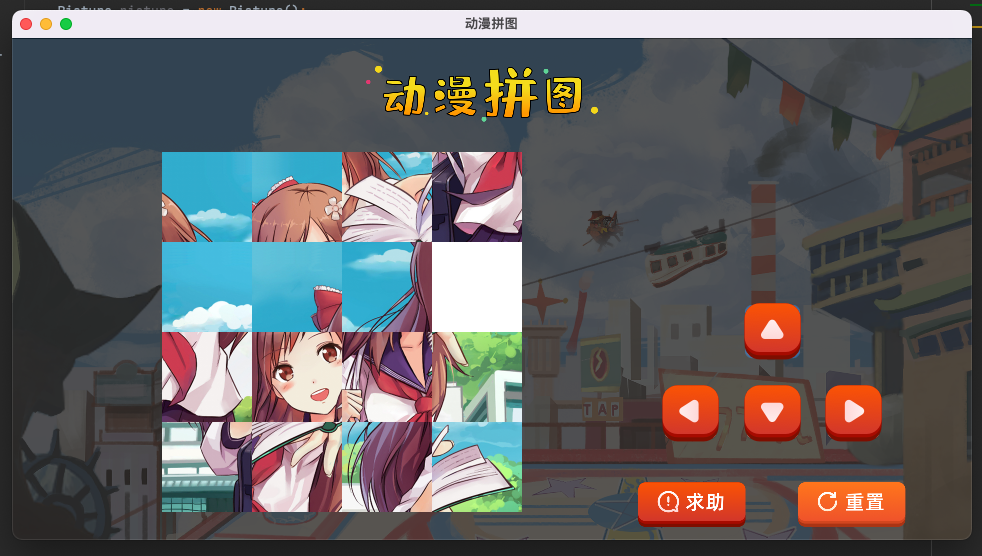
效果预览:

1. 基础项目搭建
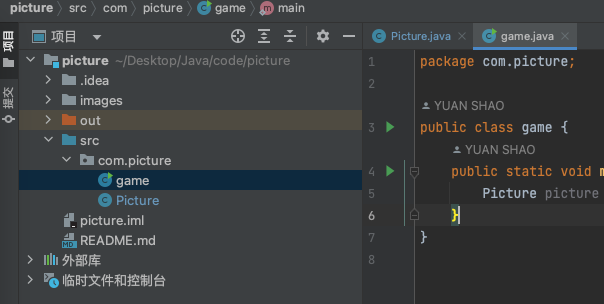
创建 游戏界面 Java 类:
package com.picture;

import javax.swing.*;

public class Picture extends JFrame {
    public Picture() {
        // 创建窗体
        initJFrame();

        // 绘制窗体
        pointView();

        // 显示窗体
        this.setVisible(true);
    }

    private void pointView() {
    }

    private void initJFrame() {
        this.setTitle("动漫拼图");
        this.setSize(960, 530);
        this.setLocationRelativeTo(null);
        this.setDefaultCloseOperation(3);
        this.setLayout(null);
        this.setAlwaysOnTop(true);
    }
}
创建 调用游戏 Java 类:
package com.picture;

public class game {
    public static void main(String[] args) {
        Picture picture = new Picture();
    }
}
2. 绘制游戏界面

编辑 Picture.java 文件:
package com.picture;

import javax.swing.*;

public class Picture extends JFrame {
    // 定义二维数组,储存图片编号
    int[][] imageData = {
            {1, 2, 3, 4},
            {5, 6, 7, 8},
            {9, 10, 11, 12},
            {13, 14, 15, 0},
    };
    public Picture() {
        // 创建窗体
        initJFrame();

        // 绘制窗体
        paintView();

        // 显示窗体
        this.setVisible(true);
    }

    private void paintView() {
        // 窗体标题
        JLabel titleLabel = new JLabel(new ImageIcon("images/title.png"));
        titleLabel.setBounds(354, 27, 232, 57);
        this.add(titleLabel);

        // 画版图
        JPanel imagePanel = new JPanel();
        imagePanel.setBounds(150, 114, 360, 360);
        imagePanel.setLayout(null);

        // 4 * 4t 拼图
        for (int i = 0; i < imageData.length; i++) {
            for (int j = 0; j < imageData[i].length; j++) {
                JLabel imageLabel = new JLabel(new ImageIcon("images/" + imageData[i][j] + ".png"));
                imageLabel.setBounds(j * 90, i * 90, 90, 90);
                imagePanel.add(imageLabel);
            }
        }
        this.add(imagePanel);

        // 参考图
        JLabel consultImg = new JLabel();
        consultImg.setBounds(574, 114, 122, 121);
        this.add(consultImg);

        // 按钮(上下左右)
        JButton topButton = new JButton(new ImageIcon("images/shang.png"));
        topButton.setBounds(732, 265, 57, 57);
        this.add(topButton);

        JButton footerButton = new JButton(new ImageIcon("images/xia.png"));
        footerButton.setBounds(732, 347, 57, 57);
        this.add(footerButton);

        JButton leftButton = new JButton(new ImageIcon("images/zuo.png"));
        leftButton.setBounds(650, 347, 57, 57);
        this.add(leftButton);

        JButton rightButton = new JButton(new ImageIcon("images/you.png"));
        rightButton.setBounds(813, 347, 57, 57);
        this.add(rightButton);

        // 按钮(帮助、重置)
        JButton helpButton = new JButton(new ImageIcon("images/qiuzhu.png"));
        helpButton.setBounds(626, 444, 108, 45);
        this.add(helpButton);

        JButton resetButton = new JButton(new ImageIcon("images/chongzhi.png"));
        resetButton.setBounds(786, 444, 108, 45);
        this.add(resetButton);

        // 窗体背景
        JLabel backGroundLabel = new JLabel(new ImageIcon("images/background.png"));
        backGroundLabel.setBounds(0, 0, 960, 530);
        this.add(backGroundLabel);
    }

    private void initJFrame() {
        this.setTitle("动漫拼图");
        this.setSize(960, 530);
        this.setLocationRelativeTo(null);
        this.setDefaultCloseOperation(3);
        this.setLayout(null);
        this.setAlwaysOnTop(true);
    }
}
3. 图片打乱
编辑 Picture.java 文件:
package com.picture;

import javax.swing.*;
import java.util.Random;

public class Picture extends JFrame {
    // 定义二维数组,储存图片编号
    int[][] imageData = {
            {1, 2, 3, 4},
            {5, 6, 7, 8},
            {9, 10, 11, 12},
            {13, 14, 15, 0},
    };
    public Picture() {
        // 创建窗体
        initJFrame();

        // 打乱拼图
        upset();

        // 绘制窗体
        paintView();

        // 显示窗体
        this.setVisible(true);
    }

    private void upset() {
        Random r = new Random();
        for (int i = 0; i < imageData.length; i++) {
            for (int j = 0; j < imageData[i].length; j++) {
                int x = r.nextInt(imageData.length);
                int y = r.nextInt(imageData[i].length);
                int temp = imageData[x][y];
                imageData[x][y] = imageData[i][j];
                imageData[i][j] = temp;
            }
        }
    }

    private void paintView() {
    ...
    }

    private void initJFrame() {
    ...
    }
}
效果预览:
4. 给按钮注册事件
编辑 Picture.java 文件:
package com.picture;

import javax.swing.*;
import java.awt.event.ActionEvent;
import java.util.Random;

public class Picture extends JFrame {
    // 定义二维数组,储存图片编号
    int[][] imageData = {
        ...
    };

    // 定义按钮
    JButton topButton;
    JButton footerButton;
    JButton leftButton;
    JButton rightButton;
    JButton helpButton;
    JButton resetButton;

    public Picture() {
        // 创建窗体
        initJFrame();

        // 打乱拼图
        upset();

        // 绘制窗体
        paintView();

        // 给按钮添加事件
        addButtonEvent();

        // 显示窗体
        this.setVisible(true);
    }

    public void upset() {
        ...
    }

    // 添加按钮方法
    public void addButtonEvent() {
        topButton.addActionListener(new AbstractAction() {
            @Override
            public void actionPerformed(ActionEvent e) {
                System.out.println("top");
            }
        });
        footerButton.addActionListener(new AbstractAction() {
            @Override
            public void actionPerformed(ActionEvent e) {
                System.out.println("footer");
            }
        });
        leftButton.addActionListener(new AbstractAction() {
            @Override
            public void actionPerformed(ActionEvent e) {
                System.out.println("left");
            }
        });
        rightButton.addActionListener(new AbstractAction() {
            @Override
            public void actionPerformed(ActionEvent e) {
                System.out.println("right");
            }
        });
        helpButton.addActionListener(new AbstractAction() {
            @Override
            public void actionPerformed(ActionEvent e) {
                System.out.println("help");
            }
        });
        resetButton.addActionListener(new AbstractAction() {
            @Override
            public void actionPerformed(ActionEvent e) {
                System.out.println("reset");
            }
        });
    }

    private void paintView() {
        // 窗体标题
        ...

        // 画版图
        ...

        // 4 * 4t 拼图
        ...

        // 参考图
        ...

        // 按钮(上下左右)
        topButton = new JButton(new ImageIcon("images/shang.png"));
        topButton.setBounds(732, 265, 57, 57);
        this.add(topButton);

        footerButton = new JButton(new ImageIcon("images/xia.png"));
        footerButton.setBounds(732, 347, 57, 57);
        this.add(footerButton);

        leftButton = new JButton(new ImageIcon("images/zuo.png"));
        leftButton.setBounds(650, 347, 57, 57);
        this.add(leftButton);

        rightButton = new JButton(new ImageIcon("images/you.png"));
        rightButton.setBounds(813, 347, 57, 57);
        this.add(rightButton);

        // 按钮(帮助、重置)
        helpButton = new JButton(new ImageIcon("images/qiuzhu.png"));
        helpButton.setBounds(626, 444, 108, 45);
        this.add(helpButton);

        resetButton = new JButton(new ImageIcon("images/chongzhi.png"));
        resetButton.setBounds(786, 444, 108, 45);
        this.add(resetButton);

        // 窗体背景
        JLabel backGroundLabel = new JLabel(new ImageIcon("images/background.png"));
        backGroundLabel.setBounds(0, 0, 960, 530);
        this.add(backGroundLabel);
    }

    private void initJFrame() {
    ...
    }
}
5. 移动业务实现
- 获取空白格的索引
- 交换元素
- 重绘画板
编辑 Picture.java 文件:
package com.picture;

import javax.swing.*;
import java.awt.event.ActionEvent;
import java.util.Random;

public class Picture extends JFrame {
    // 定义空白格的索引
    int x0;
    int y0;

    // 定义二维数组,储存图片编号
    int[][] imageData = {
        ...
    };

    // 定义按钮
    ...

    // 定义面板
    JPanel imagePanel;

    public Picture() {
        ...
    }

    public void upset() {
        Random r = new Random();
        for (int i = 0; i < imageData.length; i++) {
            for (int j = 0; j < imageData[i].length; j++) {
                int x = r.nextInt(imageData.length);
                int y = r.nextInt(imageData[i].length);
                int temp = imageData[x][y];
                imageData[x][y] = imageData[i][j];
                imageData[i][j] = temp;
            }
        }

        // 获取空白格的索引
        wc: for (int i = 0; i < imageData.length; i++) {
            for (int j = 0; j < imageData[i].length; j++) {
                if(imageData[i][j] == 0) {
                    x0 = i;
                    y0 = j;
                    break wc;
                }
            }
        }
    }

    // 添加按钮方法
    public void addButtonEvent() {
        topButton.addActionListener(new AbstractAction() {
            @Override
            public void actionPerformed(ActionEvent e) {
                // 边界处理
                if(x0 == 0) return;

                // 元素交换
                imageData[x0][y0] = imageData[x0 - 1][y0];
                imageData[x0 - 1][y0] = 0;
                x0 -= 1;

                //重新绘制图形
                rePaintView();
            }
        });
        footerButton.addActionListener(new AbstractAction() {
            @Override
            public void actionPerformed(ActionEvent e) {
                // 边界处理
                if(x0 == 3) return;

                // 元素交换
                imageData[x0][y0] = imageData[x0 + 1][y0];
                imageData[x0 + 1][y0] = 0;
                x0 += 1;

                //重新绘制图形
                rePaintView();
            }
        });
        leftButton.addActionListener(new AbstractAction() {
            @Override
            public void actionPerformed(ActionEvent e) {
                // 边界处理
                if(y0 == 0) return;

                // 元素交换
                imageData[x0][y0] = imageData[x0][y0 - 1];
                imageData[x0][y0 - 1] = 0;
                y0 -= 1;

                //重新绘制图形
                rePaintView();
            }
        });
        rightButton.addActionListener(new AbstractAction() {
            @Override
            public void actionPerformed(ActionEvent e) {
                // 边界处理
                if(y0 == 3) return;

                // 元素交换
                imageData[x0][y0] = imageData[x0][y0 + 1];
                imageData[x0][y0 + 1] = 0;
                y0 += 1;

                //重新绘制图形
                rePaintView();
            }
        });
        helpButton.addActionListener(new AbstractAction() {
            @Override
            public void actionPerformed(ActionEvent e) {
                System.out.println("help");
            }
        });
        resetButton.addActionListener(new AbstractAction() {
            @Override
            public void actionPerformed(ActionEvent e) {
                System.out.println("reset");
            }
        });
    }

    public void rePaintView() {
        imagePanel.removeAll();

        imagePanel = new JPanel();
        imagePanel.setBounds(150, 114, 360, 360);
        imagePanel.setLayout(null);
        for (int i = 0; i < imageData.length; i++) {
            for (int j = 0; j < imageData[i].length; j++) {
                JLabel imageLabel = new JLabel(new ImageIcon("images/" + imageData[i][j] + ".png"));
                imageLabel.setBounds(j * 90, i * 90, 90, 90);
                imagePanel.add(imageLabel);
            }
        }
        this.add(imagePanel);

        // 重新绘制
        imagePanel.repaint();
    }

    private void paintView() {
        // 窗体标题
        ...

        // 画版图
        imagePanel = new JPanel();
        imagePanel.setBounds(150, 114, 360, 360);
        imagePanel.setLayout(null);

        // 4 * 4t 拼图
        ...

        // 参考图
        ...

        // 按钮(上下左右)
        ...

        // 按钮(帮助、重置)
        ...

        // 窗体背景
        ...
    }

    private void initJFrame() {
    ...
    }
}
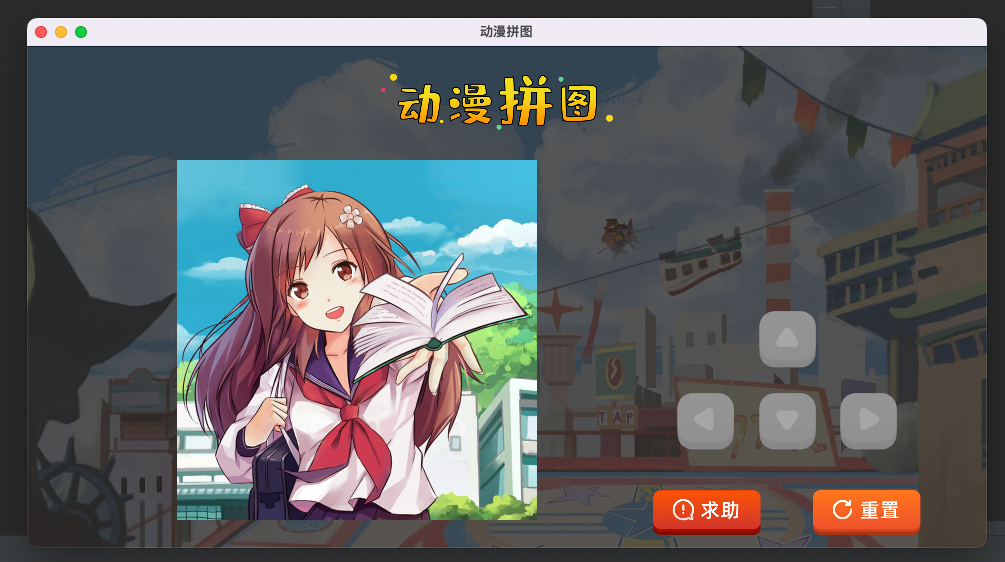
6. 求助业务实现
编辑 Picture.java 文件:
package com.picture;

import javax.swing.*;
import java.awt.event.ActionEvent;
import java.util.Random;

public class Picture extends JFrame {
    // 定义空白格的索引
    int x0;
    int y0;

    // 定义二维数组,储存图片编号
    int[][] imageData = {
            ...
    };

    // 定义按钮
    ...

    // 定义面板
    JPanel imagePanel;

    public Picture() {
        // 创建窗体
        initJFrame();

        // 打乱拼图
        upset();

        // 绘制窗体
        paintView();

        // 给按钮添加事件
        addButtonEvent();

        // 显示窗体
        this.setVisible(true);
    }

    public void upset() {
         ...
    }

    // 添加按钮方法
    public void addButtonEvent() {
        topButton.addActionListener(new AbstractAction() {
            ...
        });
        footerButton.addActionListener(new AbstractAction() {
            ...
        });
        leftButton.addActionListener(new AbstractAction() {
            ...
        });
        rightButton.addActionListener(new AbstractAction() {
            ...
        });
        helpButton.addActionListener(new AbstractAction() {
            @Override
            public void actionPerformed(ActionEvent e) {
                success();
                rePaintView();
            }
        });
        resetButton.addActionListener(new AbstractAction() {
            @Override
            public void actionPerformed(ActionEvent e) {
                System.out.println("reset");
            }
        });
    }

    public void rePaintView() {
        ...
    }
    public void success() {
        // 完整拼图二维数组
        imageData = new int[][] {
                {1, 2, 3, 4},
                {5, 6, 7, 8},
                {9, 10, 11, 12},
                {13, 14, 15, 16},
        };
        topButton.setEnabled(false);
        footerButton.setEnabled(false);
        leftButton.setEnabled(false);
        rightButton.setEnabled(false);
    }

    private void paintView() {
        ...
    }

    private void initJFrame() {
        ...
    }
}
效果预览:
7. 重置业务实现
编辑 Picture.java 文件:
package com.picture;

import javax.swing.*;
import java.awt.event.ActionEvent;
import java.util.Random;

public class Picture extends JFrame {
    // 定义空白格的索引
    int x0;
    int y0;

    // 定义二维数组,储存图片编号
    int[][] imageData = {
        ...
    };

    // 定义按钮
    ...

    // 定义面板
    JPanel imagePanel;

    public Picture() {
        // 创建窗体
        initJFrame();

        // 打乱拼图
        upset();

        // 绘制窗体
        paintView();

        // 给按钮添加事件
        addButtonEvent();

        // 显示窗体
        this.setVisible(true);
    }

    public void upset() {
        ...
    }

    // 添加按钮方法
    public void addButtonEvent() {
        topButton.addActionListener(new AbstractAction() {
            ...
        });
        footerButton.addActionListener(new AbstractAction() {
            ...
        });
        leftButton.addActionListener(new AbstractAction() {
            ...
        });
        rightButton.addActionListener(new AbstractAction() {
            ...
        });
        helpButton.addActionListener(new AbstractAction() {
            ...
        });
        resetButton.addActionListener(new AbstractAction() {
            @Override
            public void actionPerformed(ActionEvent e) {
                imageData = new int[][] {
                        {1, 2, 3, 4},
                        {5, 6, 7, 8},
                        {9, 10, 11, 12},
                        {13, 14, 15, 0},
                };
                upset();
                rePaintView();
                topButton.setEnabled(true);
                footerButton.setEnabled(true);
                leftButton.setEnabled(true);
                rightButton.setEnabled(true);
            }
        });
    }

    public void rePaintView() {
        ...
    }

    public void success() {
        ...
    }

    private void paintView() {
        ...
    }

    private void initJFrame() {
        ...
    }
}
8. 移动成功判断
编辑 Picture.java 文件:
package com.picture;

import javax.swing.*;
import java.awt.event.ActionEvent;
import java.util.Random;

public class Picture extends JFrame {
    // 定义空白格的索引
    int x0;
    int y0;

    // 成功时的二维数组
    int[][] imageDataWin = {
            {1, 2, 3, 4},
            {5, 6, 7, 8},
            {9, 10, 11, 12},
            {13, 14, 15, 0},
    };

    // 定义二维数组,储存图片编号
    int[][] imageData = {
            {1, 2, 3, 4},
            {5, 6, 7, 8},
            {9, 10, 11, 12},
            {13, 14, 15, 0},
    };

    // 定义按钮
    JButton topButton;
    JButton footerButton;
    JButton leftButton;
    JButton rightButton;
    JButton helpButton;
    JButton resetButton;

    // 定义面板
    JPanel imagePanel;

    public Picture() {
        // 创建窗体
        initJFrame();

        // 打乱拼图
        upset();

        // 绘制窗体
        paintView();

        // 给按钮添加事件
        addButtonEvent();

        // 显示窗体
        this.setVisible(true);
    }

    public void upset() {
        Random r = new Random();
        for (int i = 0; i < imageData.length; i++) {
            for (int j = 0; j < imageData[i].length; j++) {
                int x = r.nextInt(imageData.length);
                int y = r.nextInt(imageData[i].length);
                int temp = imageData[x][y];
                imageData[x][y] = imageData[i][j];
                imageData[i][j] = temp;
            }
        }

        // 获取空白格的索引
        wc: for (int i = 0; i < imageData.length; i++) {
            for (int j = 0; j < imageData[i].length; j++) {
                if(imageData[i][j] == 0) {
                    x0 = i;
                    y0 = j;
                    break wc;
                }
            }
        }
    }

    // 添加按钮方法
    public void addButtonEvent() {
        topButton.addActionListener(new AbstractAction() {
            @Override
            public void actionPerformed(ActionEvent e) {
                // 边界处理
                if(x0 == 0) return;

                // 元素交换
                imageData[x0][y0] = imageData[x0 - 1][y0];
                imageData[x0 - 1][y0] = 0;
                x0 -= 1;

                // 判断移动是否成功
                if(isSuccess()) success();

                //重新绘制图形
                rePaintView();
            }
        });
        footerButton.addActionListener(new AbstractAction() {
            @Override
            public void actionPerformed(ActionEvent e) {
                // 边界处理
                if(x0 == 3) return;

                // 元素交换
                imageData[x0][y0] = imageData[x0 + 1][y0];
                imageData[x0 + 1][y0] = 0;
                x0 += 1;

                // 判断移动是否成功
                if(isSuccess()) success();

                //重新绘制图形
                rePaintView();
            }
        });
        leftButton.addActionListener(new AbstractAction() {
            @Override
            public void actionPerformed(ActionEvent e) {
                // 边界处理
                if(y0 == 0) return;

                // 元素交换
                imageData[x0][y0] = imageData[x0][y0 - 1];
                imageData[x0][y0 - 1] = 0;
                y0 -= 1;

                // 判断移动是否成功
                if(isSuccess()) success();

                //重新绘制图形
                rePaintView();
            }
        });
        rightButton.addActionListener(new AbstractAction() {
            @Override
            public void actionPerformed(ActionEvent e) {
                // 边界处理
                if(y0 == 3) return;

                // 元素交换
                imageData[x0][y0] = imageData[x0][y0 + 1];
                imageData[x0][y0 + 1] = 0;
                y0 += 1;

                // 判断移动是否成功
                if(isSuccess()) success();

                //重新绘制图形
                rePaintView();
            }
        });
        helpButton.addActionListener(new AbstractAction() {
            @Override
            public void actionPerformed(ActionEvent e) {
                success();
                rePaintView();
            }
        });
        resetButton.addActionListener(new AbstractAction() {
            @Override
            public void actionPerformed(ActionEvent e) {
                imageData = new int[][] {
                        {1, 2, 3, 4},
                        {5, 6, 7, 8},
                        {9, 10, 11, 12},
                        {13, 14, 15, 0},
                };
                upset();
                rePaintView();
                topButton.setEnabled(true);
                footerButton.setEnabled(true);
                leftButton.setEnabled(true);
                rightButton.setEnabled(true);
            }
        });
    }

    public void rePaintView() {
        imagePanel.removeAll();

        imagePanel = new JPanel();
        imagePanel.setBounds(150, 114, 360, 360);
        imagePanel.setLayout(null);
        for (int i = 0; i < imageData.length; i++) {
            for (int j = 0; j < imageData[i].length; j++) {
                JLabel imageLabel = new JLabel(new ImageIcon("images/" + imageData[i][j] + ".png"));
                imageLabel.setBounds(j * 90, i * 90, 90, 90);
                imagePanel.add(imageLabel);
            }
        }
        this.add(imagePanel);

        // 重新绘制
        imagePanel.repaint();
    }
    public void success() {
        // 完整拼图二维数组
        imageData = new int[][] {
                {1, 2, 3, 4},
                {5, 6, 7, 8},
                {9, 10, 11, 12},
                {13, 14, 15, 16},
        };
        topButton.setEnabled(false);
        footerButton.setEnabled(false);
        leftButton.setEnabled(false);
        rightButton.setEnabled(false);
    }

    public boolean isSuccess() {
        for (int i = 0; i < imageData.length; i++) {
            for (int j = 0; j < imageData[i].length; j++) {
                if(imageData[i][j] != imageDataWin[i][j]) {
                    return false;
                }
            }
        }
        return true;
    }

    private void paintView() {
        // 窗体标题
        JLabel titleLabel = new JLabel(new ImageIcon("images/title.png"));
        titleLabel.setBounds(354, 27, 232, 57);
        this.add(titleLabel);

        // 画版图
        imagePanel = new JPanel();
        imagePanel.setBounds(150, 114, 360, 360);
        imagePanel.setLayout(null);

        // 4 * 4t 拼图
        for (int i = 0; i < imageData.length; i++) {
            for (int j = 0; j < imageData[i].length; j++) {
                JLabel imageLabel = new JLabel(new ImageIcon("images/" + imageData[i][j] + ".png"));
                imageLabel.setBounds(j * 90, i * 90, 90, 90);
                imagePanel.add(imageLabel);
            }
        }
        this.add(imagePanel);

        // 参考图
        JLabel consultImg = new JLabel();
        consultImg.setBounds(574, 114, 122, 121);
        this.add(consultImg);

        // 按钮(上下左右)
        topButton = new JButton(new ImageIcon("images/shang.png"));
        topButton.setBounds(732, 265, 57, 57);
        this.add(topButton);

        footerButton = new JButton(new ImageIcon("images/xia.png"));
        footerButton.setBounds(732, 347, 57, 57);
        this.add(footerButton);

        leftButton = new JButton(new ImageIcon("images/zuo.png"));
        leftButton.setBounds(650, 347, 57, 57);
        this.add(leftButton);

        rightButton = new JButton(new ImageIcon("images/you.png"));
        rightButton.setBounds(813, 347, 57, 57);
        this.add(rightButton);

        // 按钮(帮助、重置)
        helpButton = new JButton(new ImageIcon("images/qiuzhu.png"));
        helpButton.setBounds(626, 444, 108, 45);
        this.add(helpButton);

        resetButton = new JButton(new ImageIcon("images/chongzhi.png"));
        resetButton.setBounds(786, 444, 108, 45);
        this.add(resetButton);

        // 窗体背景
        JLabel backGroundLabel = new JLabel(new ImageIcon("images/background.png"));
        backGroundLabel.setBounds(0, 0, 960, 530);
        this.add(backGroundLabel);
    }

    private void initJFrame() {
        this.setTitle("动漫拼图");
        this.setSize(960, 530);
        this.setLocationRelativeTo(null);
        this.setDefaultCloseOperation(3);
        this.setLayout(null);
        this.setAlwaysOnTop(true);
    }
}
9. 效果预览
仓库地址: https://gitee.com/yuan0_0/game_picture
预览:


 303
303


 被折叠的 条评论
为什么被折叠?
被折叠的 条评论
为什么被折叠?
 到【灌水乐园】发言


