


 文章介绍了在Cesium中加载3DTileset时如何启用自定义着色器以及设置颜色和纹理。通过实验性特性enableModelExperimental为真,允许使用customShader。在tileset中,可以设置整体颜色或根据条件改变颜色。然后,通过创建customShader,定义顶点和片元着色器,实现基于法向量和位置的纹理贴图。文章还强调了理解customshader中变量的意义,并提醒读者根据实际情况调整代码中的坐标轴值。
Cesium tileset 建筑物贴纹理
cesium加载tileset
	//这一句代码非常重要,不然自定义的渲染不会生效
      Cesium.ExperimentalFeatures.enableModelExperimental = true // 必须将这个设为true才能惊醒自定义shader
      var tilesets = this.viewer.scene.primitives.add(
        new Cesium.Cesium3DTileset({
          url: "Assets/tilesetsWhrite/tileset.json",
          name: '3Dtiles',
          // url: this.urls + '/CQKSHMAP/tileset.json',
          dynamicScreenSpaceErrorDensity: 0.1,
          // maximumScreenSpaceError: 128, // 默认值16 用于提高细节细化级别的最大屏幕空间错误
          maximumNumberOfLoadedTiles: 10000000
        })
      )
tileset 设置颜色
这里可以设置整体颜色,也可以根据条件来设置颜色,虽然等下建筑物会进行贴图,但是你设置颜色还是会有效果的,会改变建筑物的整体颜色
      tilesets.readyPromise.then(tileset =>
        tileset.style = new Cesium.Cesium3DTileStyle({
          color: {
            conditions: [
              // ['${floor} >= 5', "color('rgb(42, 160, 224)',1)"],
              // ['${floor} >= 5', 'rgba(255, 255, 255,1)'],
              ['true', "color('rgb(18, 66, 93)',1)"]
              // ['true',  'color("#C1D8F5",1)']
              // ['true', "color('rgb(42, 160, 224)',1)"]
            ]
          }
        })
        // viewer.flyTo(tileset);
      })
tileset设置customshader
     var customShader = new Cesium.CustomShader({
        // lightingModel: Cesium.LightingModel.UNLIT,
        //  lightingModel: Cesium.LightingModel.PBR,
        //设置变量,由顶点着色器传递给片元着色器
        varyings: {
          v_normalMC: Cesium.VaryingType.VEC3,
          v_st: Cesium.VaryingType.VEC3
        },
        //外部传给顶点着色器或者片元着色器
        uniforms: {
          u_texture: {
            value: new Cesium.TextureUniform({
              url: '/Assets/Images/buildWall.jpg'
            }),
            type: Cesium.UniformType.SAMPLER_2D
          },
           u_texture1: {
            value: new Cesium.TextureUniform({
              url: '/Assets/Images/buildWall1.jpg'
            }),
            type: Cesium.UniformType.SAMPLER_2D
          }
        },
       //贴纹理
       //顶点着色器
       //将法向量从顶点着色器设置变量传给片元着色器
        vertexShaderText: `
            void vertexMain(VertexInput vsInput, inout czm_modelVertexOutput vsOutput) {
                  v_normalMC = vsInput.attributes.normalMC;
                  v_st=vsInput.attributes.positionMC ;
            }`,
           //片元着色器
         fragmentShaderText: `
           void fragmentMain(FragmentInput fsInput, inout czm_modelMaterial material) {
              vec3 positionMC = fsInput.attributes.positionMC;
              //这里是设置要贴图的图片的尺寸,设置小了会重复
              float width = 37.0;
              float height = 40.0;
              vec3 rgb;
              //这是是设置了屋顶的颜色,当和法向量平行时,就是屋顶,这里设置0.95,相当于垂直,建筑物四周开始贴图
              if (dot(vec3(0.0, 1.0, 0.0), v_normalMC) > 0.95) {
                material.diffuse = vec3(1.0, 0.0, 0.0);
              } else {
                float textureX = 0.0;
                float dotYAxis = dot(vec3(0.0, 0.0, 1.0), v_normalMC);
                // cos(45deg) 约等于 0.71,这里是建筑物四周的向量与法向量会大于四十五度夹角
                if (dotYAxis > 0.71 || dotYAxis < -0.71) {
                //x代表的是前后面
                  textureX = mod(positionMC.x, width) / width;
                } else {
                //z代表的是左右面
                  textureX = mod(positionMC.z, width) / width;
                }
                float textureY = mod(positionMC.y, height) / height;
                //我这里是根据建筑物高度贴了两张不同的图片
                if (positionMC.y > 30.0) {
                   rgb = texture2D(u_texture1, vec2(textureX, textureY)).rgb;
                } else {
                   rgb = texture2D(u_texture, vec2(textureX, textureY)).rgb;
                }
                material.diffuse = rgb;
              }
          }`
      })
       tilesets.customShader = customShader
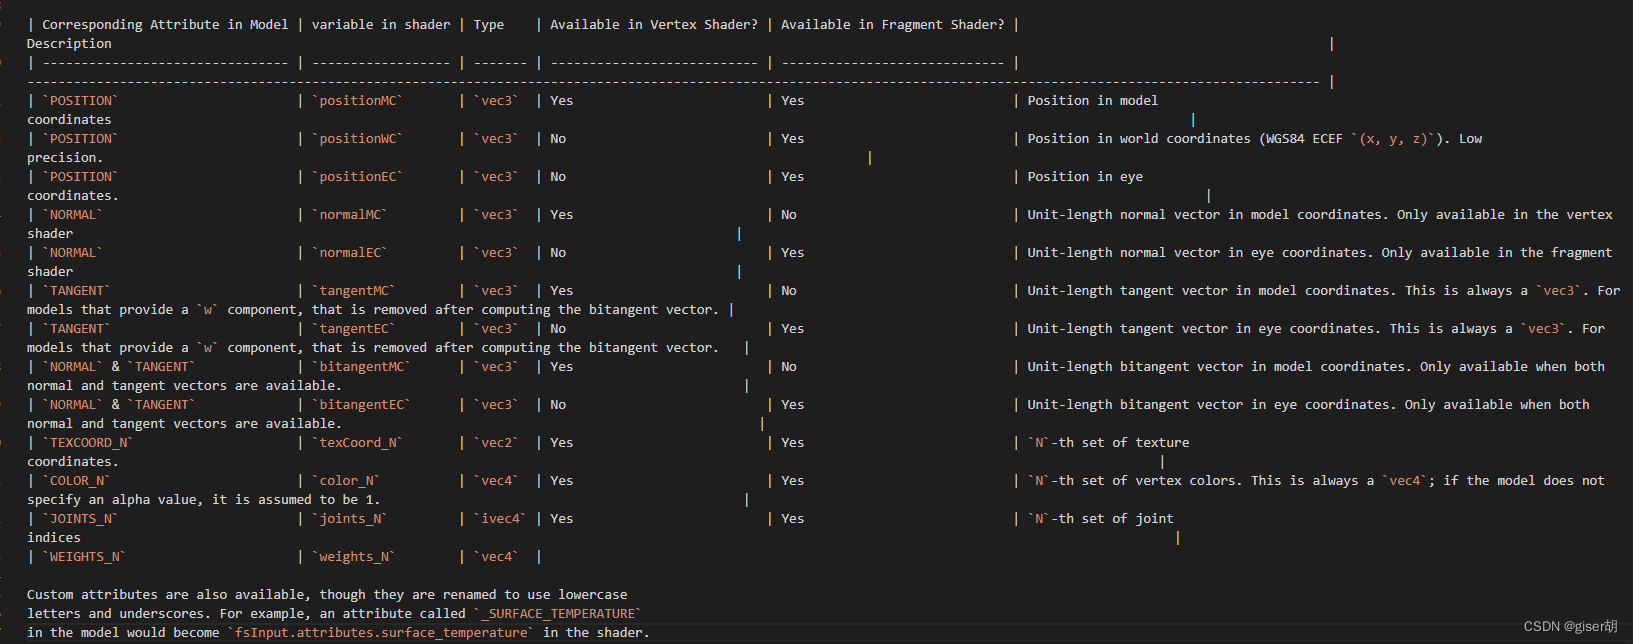
理解customshader里面的一些变量代表的意思
这个表可以在https://github.com/CesiumGS/cesium,链接是下图,可以自己去看看

最终结果

注:有时候自己tileset的高度不一定就是position.z,就像我这次的,垂直方向是y,所以要具体情况具体分析,可以更改代码中的xyz的值来达到此效果,具体为什么作者暂时还没有搞清楚,请谅解


 4496
4496

 被折叠的 条评论
为什么被折叠?
被折叠的 条评论
为什么被折叠?
 到【灌水乐园】发言


