


Linux内核中的中断子系统
中断和信号有什么区别?
中断是基于硬件实现的,不论有没有linux内核中断的流程都一样。而信号是基于软件实现的。信号是中断的一种软件模拟。如果没有linux内核就没有信号。
异常处理流程
中断是基于硬件实现的,不管有没有Linux内核中断的执行都是一样的,中断是异常的一种,遵从4大步3小步的执行流程。
面试题:四大步三小步的执行流程?
1.将cpsr保存spsr中
2.修改cpsr的值
设置为ARM模式
设置为对应的异常模式
如果有必要的话就禁止中断
3.将LR的值保存起来(返回的地址)
4.设置PC(程序状态寄存器)跳转到对应的位置执行
arm裸机中断代码流程:
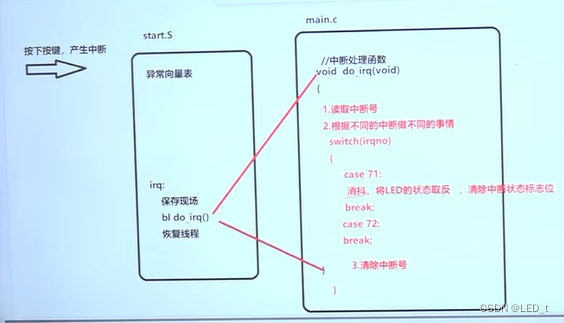
Linux内核中断处理流程
–>外部中断
–>head.S汇编中找异常向量表
–>找到中断后 保存现场 bl handle_irq 恢复现场
–>handle_irq中断处理函数(在内核中写中断处理函数的话 必须叫handle_irq,这样不方便。于是在handle_irq中通过一个函数指针回调中断处理函数)我们写一个中断处理函数之后,把这个函数赋给函数指针,此时handle_irq执行的时候就可以通过函数指针调用到我们写的中断处理函数。
(handle_irq函数没有参数没有返回值)
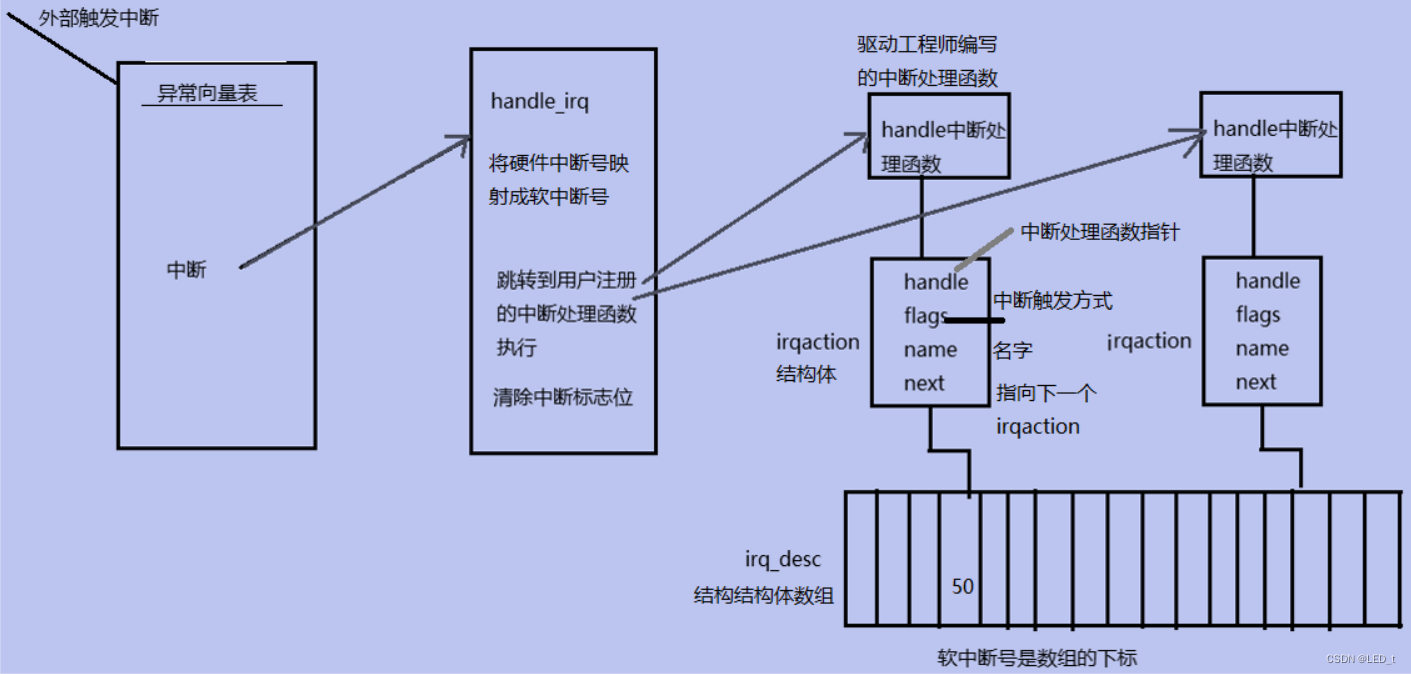
—>为什么将硬件中断号映射成软中断号?
对于linux内核可以移植到不同的平台上,不同的平台中断对应的功能是不同的(比如我们90号中断对应的触摸屏的中断,换一个板子,90号中断有可能对应其他的中断)。面对这些差异,就设计了内核中使用的中断全部都是软中断号(这个软中断和我们之前将的swi不是一个软中断)。映射的过程是内核自动完成的,加减一个偏移值即可。
–>内核中那么多的中断处理函数,我们调用哪一个呢?
内核在启动的时候会为每一个软中断创建一个irq_desc的结构体。
这个结构体又构成了一个结构体数组。
当产生硬件中断之后,内核就会映射成软中断号,软中断号作为数组下标,就能取到irq_desc的结构体。
–>在irq_desc中嵌套了一个irqaction结构体。这个结构体中的handler就是指向中断处理函数的函数指针。flags触发方式。
(在使用内核中的中断子系统的时候,完全不用关心底层的寄存器,中断子系统已经设置好了)
软中断号怎么获取?在设备树上存着的。
Linux内核中断子系统API
#include <linux/interrupt.h>
#include <linux/of_irq.h>
unsigned int irq_of_parse_and_map(struct device_node *np, int index)
功能:解析得到软中断号
参数:
    @np:节点指针
    @index:设备树节点中interrupts键对应值的下标
返回值:成功返回软中断号,失败返回0

int request_irq(unsigned int irq, irq_handler_t handler, unsigned long flags,
     const char *name, void *dev)
功能:注册中断
参数:
    @irq:软中断号(内核中用到的中断号全部都是软中断号)(设备树获取)
    @handler:中断处理函数指针
        //typedef irqreturn_t (*irq_handler_t)(int, void *);
        irqreturn_t key_irq_handle(int irqno,void *dev)
     {
      //中断的处理---中断处理函数中不能加延时耗时的操作
         return IRQ_NONE;    //失败
         return IRQ_HANDLED; //成功
     }
 	@flags:中断触发方式
         IRQF_TRIGGER_RISING  //上升沿
         IRQF_TRIGGER_FALLING //下降沿
         IRQF_TRIGGER_HIGH  //高电平
         IRQF_TRIGGER_LOW  //低电平
         IRQF_SHARED          //共享中断
	 @name:中断的名字
       cat /proc/interrupts 命令查看(设备号的查看方式 cat /proc/device)
 	 @dev:给中断处理函数传递的参数
返回值:成功返回0,失败返回错误码

const void *free_irq(unsigned int irq, void *dev_id)
功能:释放中断
参数:
    @irq:软中断号
    @dev_id:给中断处理函数传递的参数
返回值:返回设备的名字
中断底半部专门为延时耗时操作设计的。
共享中断:在一个中断上有可能接两个可以产生中断的设备。
(有些处理器管脚有限制,在注册管脚的时候有可能需要共享同一个中断号,但是问题是如何区分是哪一个产生的中断?这时候用到了总线,比如说iic总线,一个总线外面可以接很多设备,在每一个设备里面有中断状态寄存器,读一下中断状态寄存器,如果是1 就说明是它产生的中断)
软中断号不只对应着一个irqaction,irqaction中有next指向的下一个irqaction。
Linux内核中断子系统设备树填写
画出硬件连接原理图
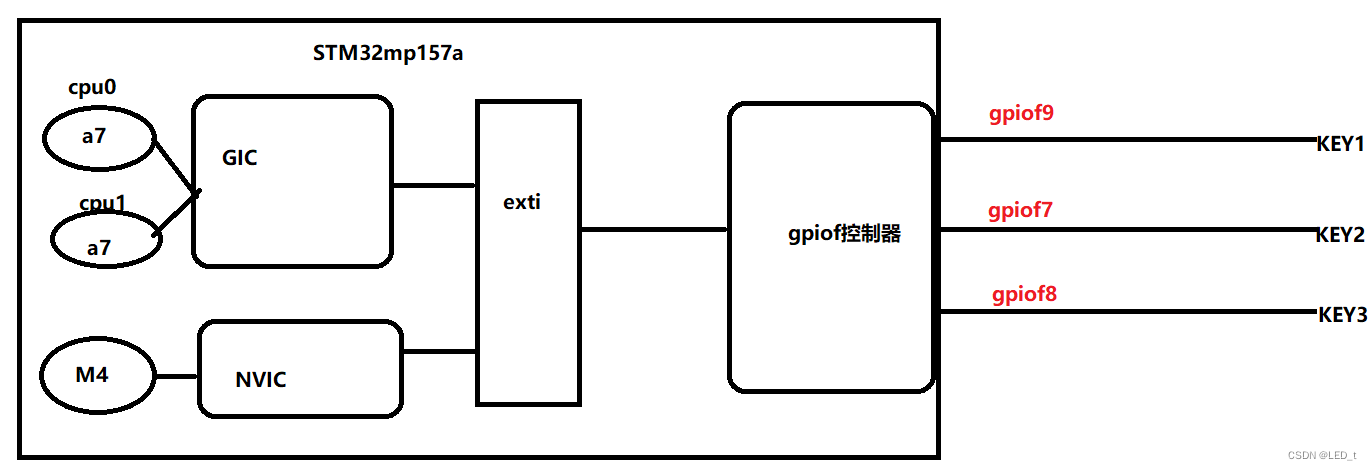
现在系统运行的时候M4的核并没有参与工作。
找出控制器的设备树
1.看控制器有没有使能
2.看对子节点成员的修饰
1.打开文件stm32mp151.dtsi
2.搜索gic
intc: interrupt-controller@a0021000 {
compatible = "arm,cortex-a7-gic";
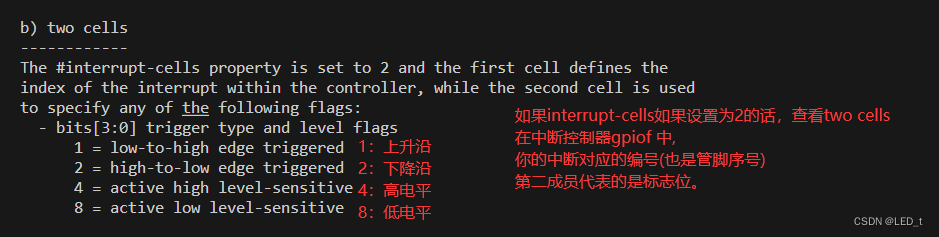
#interrupt-cells = <3>;//修饰子节点使用当前节点成员个数(中断)
interrupt-controller;
reg = <0xa0021000 0x1000>,
<0xa0022000 0x2000>;
};
soc {
compatible = "simple-bus";
#address-cells = <1>;
#size-cells = <1>;
interrupt-parent = <&intc>; //父节点
exti: interrupt-controller@5000d000 {
compatible = "st,stm32mp1-exti", "syscon";
interrupt-controller;
#interrupt-cells = <2>;
reg = <0x5000d000 0x400>;
hwlocks = <&hsem 1 1>;
}
}
pinctrl: pin-controller@50002000 {
#address-cells = <1>;
#size-cells = <1>;
compatible = "st,stm32mp157-pinctrl";
ranges = <0 0x50002000 0xa400>;
--- interrupt-parent = <&exti>; 父节点
st,syscfg = <&exti 0x60 0xff>;
hwlocks = <&hsem 0 1>;
pins-are-numbered;
gpiof: gpio@50007000 {
gpio-controller;
#gpio-cells = <2>;
interrupt-controller;
#interrupt-cells = <2>; //修饰子节点使用当前节点成员个数-中断
reg = <0x50007000 0x400>;
clocks = <&rcc GPIOF>;
st,bank-name = "GPIOF";
status = "disabled";// 控制器已经使能了
};
gpiof 的父节点是exti 写法是 interrupt-parent = <&exti>; 父节点
exti的父节点是gic 写法是 interrupt-parent = <&intc>; //父节点
所以我们要写的中断的父节点应该是gpiof
参考内核帮助文档编写自己的设备树
linux@ubuntu:~/linux-5.10.61/Documentation/devicetree/bindings$ ls
interrupt-controller
linux@ubuntu:~/linux-5.10.61/Documentation/devicetree/bindings$ cd interrupt-controller/
//找通用的参考文档
vi interrupts.txt
myirqs{
 interrupt-parent = <&gpiof>; //父节点
 interrupts = <9 0>,<7 0>,<8 0>; //对应中断管脚及触发方式0代表默认状态
};
重新编译设备树:linux@ubuntu:~/linux-5.10.61$ make dtbs
运行 copy.sh
linux@ubuntu:~/linux-5.10.61$ cat copy.sh
cp arch/arm/boot/uImage ~/tftpboot/
cp arch/arm/boot/dts/stm32mp157a-fsmp1a.dtb  ~/tftpboot/
编译 make arch=arm modname=myirq
make install
重启开发板
安装模块 查看现象

此时现象还有一定的问题:按下一个按键的时候,有出现两次的情况
后面会讲到按键消抖。
中断子系统实例(一个按键)
#include <linux/init.h>
#include <linux/module.h>
#include <linux/of.h>
#include <linux/of_irq.h>
#include <linux/interrupt.h>
// myirqs{
// 	interrupt-parent = <&gpiof>; //父节点
// 	interrupts = <9 0>,<7 0>,<8 0>; //对应中断管脚及触发方式0代表默认状态
// };
struct device_node *node;
unsigned int irqno;
irqreturn_t key_irq_handle(int irq, void *dev)
{
    printk("key1 down...\n");
    return IRQ_HANDLED;
}
static int __init myirqs_init(void)
{
    int ret;
    // 1.获取节点
    node = of_find_node_by_path("/myirqs");
    if (node == NULL)
    {
        printk("of_find_node_by_path error\n");
        return -EINVAL;
    }
    // 2.获取软中断号
    irqno = irq_of_parse_and_map(node, 0);
    if(irqno == 0)
    {
        printk("irq_of_parse_and_map error\n");
        return -EINVAL;
    }
    // 3.注册中断
    ret = request_irq(irqno, key_irq_handle, IRQF_TRIGGER_FALLING, "myirqs", NULL);
    if(ret){
        printk("request_irq error\n");
        return ret;
    }
    return 0;
}
static void __exit myirqs_exit(void)
{
    free_irq(irqno, NULL);
}
module_init(myirqs_init);
module_exit(myirqs_exit);
MODULE_LICENSE("GPL");
中断子系统实例(多个按键)
#include <linux/init.h>
#include <linux/interrupt.h>
#include <linux/module.h>
#include <linux/of.h>
#include <linux/of_irq.h>
// myirqs{
//     compatible = "hqyj,myirqs";
//     interrupt-parent = <&gpiof>;
//     interrupts = <9 0>,<7 0>,<8 0>;
// };
struct device_node* node;
unsigned int irqno[3];
//中断处理函数
irqreturn_t key_irq_handle(int irqno, void* dev)
{
    printk("key_irq_handle: irqno = %d,number = %d\n", irqno, (int)dev);
    return IRQ_HANDLED;
}
static int __init myirqs_init(void)
{
    int ret,i;
    // 1.获取中断的设备树节点--路径 名字 compatible都可以
    node = of_find_node_by_path("/myirqs");
    if (node == NULL) {
        printk("of_find_node_by_path error\n");
        return -EINVAL;
    }
    for(i=0;i<ARRAY_SIZE(irqno);i++){
        // 2.解析得到软中断号
        irqno[i] = irq_of_parse_and_map(node, i);
        if (irqno[i] == 0) {
            printk("of_irq_parse_and_map error\n");
            return -EINVAL;
        }
        // 3.注册中断
        ret = request_irq(irqno[i], key_irq_handle, IRQF_TRIGGER_FALLING,
            "myirqs", (void*)i);
        if (ret) {
            printk("request_irq error\n");
            return -EINVAL;
        }
    }
    return 0;
}
static void __exit myirqs_exit(void)
{
    int i;
    // 4.释放中断
    for(i=0;i<ARRAY_SIZE(irqno);i++){
        free_irq(irqno[i], (void*)i);
    }
}
module_init(myirqs_init);
module_exit(myirqs_exit);
MODULE_LICENSE("GPL");
内核定时器
上边讲到内核中不能使用延时耗时的操作。我们可以使用定时。
用于按键消抖的使用。消除上边的抖动情况。
内核定时器定时原理
1.内核当前时间如何获取?
jiffies:内核时钟节拍数,从系统启动这一刻起这个jiffies(64bit)值就一直在增加。jiffies可以直接使用,本身就是一个变量。
不需要包含头文件。
jiffies 在内核中的链接脚本的文件中有记录。
linux@ubuntu:~/linux-5.10.61$ find -name vmlinux.lds
./arch/arm/kernel/vmlinux.lds
./arch/arm/boot/compressed/vmlinux.lds
./arch/h8300/boot/compressed/vmlinux.lds
linux@ubuntu:~/linux-5.10.61$ vi ./arch/arm/kernel/vmlinux.lds
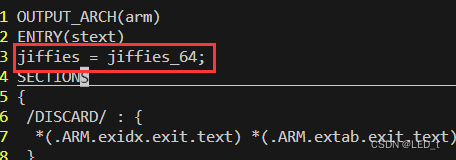
申请了64个bit位用来保存jiffies的值。
2.定时器每增加1走的时间?
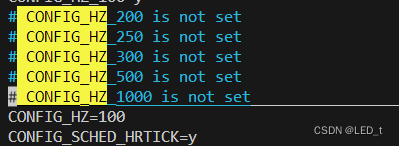
定时器的频率可以通过make menuconfig选配,选配后的选项在.config文件中保存着。
开发板:CONFIG_HZ=100就是频率,定时器每增加1代表走10ms。
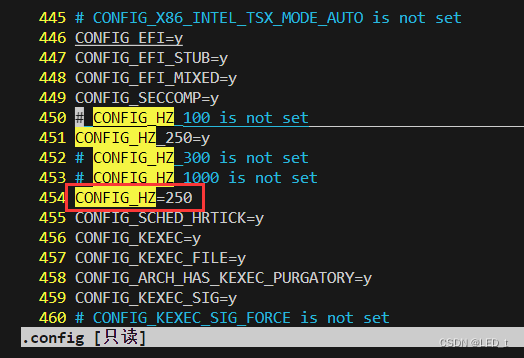
Ubuntu:CONFIG_HZ=250就是频率,定时器每增加1代表走4ms。
开发板:
linux@ubuntu:~/linux-5.10.61$ vi .config
Ubuntu:CONFIG_HZ=250就是频率,定时器每增加1代表走4ms。
ubuntu的.config文件在 /lib/modules 路径下
uname -r 获取内核版本号并进入相当应的内核版本
cd build进入这个目录下
vi .config 打开config文件
linux@ubuntu:~/linux-5.10.61$ cd /lib/modules/
linux@ubuntu:/lib/modules$ ls
4.15.0-213-generic  5.4.0-146-generic  5.4.0-148-generic  5.4.0-42-generic
5.4.0-144-generic   5.4.0-147-generic  5.4.0-150-generic  5.4.0-52-generic
linux@ubuntu:/lib/modules$ uname -r
5.4.0-150-generic
linux@ubuntu:/lib/modules$ cd 5.4.0-150-generic/
linux@ubuntu:/lib/modules/5.4.0-150-generic$ ls
build          modules.alias.bin        modules.dep      modules.softdep
initrd         modules.builtin          modules.dep.bin  modules.symbols
kernel         modules.builtin.bin      modules.devname  modules.symbols.bin
modules.alias  modules.builtin.modinfo  modules.order    vdso
linux@ubuntu:/lib/modules/5.4.0-150-generic$ cd build
linux@ubuntu:/lib/modules/5.4.0-150-generic/build$ ls
arch   crypto         fs       ipc      kernel    mm              samples   sound   usr
block  Documentation  include  Kbuild   lib       Module.symvers  scripts   tools   virt
certs  drivers        init     Kconfig  Makefile  net             security  ubuntu
linux@ubuntu:/lib/modules/5.4.0-150-generic/build$ vi .config
写驱动:分配对象、初始化对象、注册、注销。
内核定时器的API
1.分配对象
    struct timer_list {
        struct hlist_node entry;   //构成内核链表成员
        unsigned long  expires; //定时器时间
        void   (*function)(struct timer_list *); //定时器处理函数
        u32			flags;      //标志位,一般写0
    };

    struct timer_list mytimer;
2.对象的初始化
    mytimer.expires = jiffies + HZ; //定时1s  #define HZ CONFIG_HZ
    timer_setup(&mytimer, 定时器处理函数, 0);
    (在开发板上定时是1s,在ubuntu上定时不一定是1s了,如果想要保证任何内核版本的定时时间都是1s的话,我们可以使用宏HZ  #define HZ CONFIG_HZ 这里写HZ不论是任何的内核,定时时间都是1s)

3.启动定时器
 void add_timer(struct timer_list *timer);
 //启动定时器,定时器启动之后只会执行一次

 mod_timer(struct timer_list *timer, unsigned long expires);
 //再次启动定时器
4.删除定时器
    int del_timer(struct timer_list * timer);
 //移除定时器
内核定时器的实例
#include <linux/init.h>
#include <linux/module.h>
#include <linux/of.h>
#include <linux/of_gpio.h>
#include <linux/timer.h>
// myleds
// {
//     led1 = <&gpioe 10 0>;
//     led2 = <&gpiof 10 0>;
//     led3 = <&gpioe 8 0>;
// };
struct timer_list mytimer;
struct device_node* node;
int gpiono[3];
char* name[] = { "led1", "led2", "led3" };
// 定时器处理函数
void timer_led_handle(struct timer_list* timer)
{
    int i;
    for (i = 0; i < ARRAY_SIZE(name); i++) {
        gpio_set_value(gpiono[i],!gpio_get_value(gpiono[i]));
    }
    mod_timer(&mytimer, jiffies + HZ);
}
static int __init mytimer_init(void)
{
    int ret, i;
    // 1.获取节点
    node = of_find_node_by_name(NULL, "myleds");
    if (node == NULL) {
        printk("of_find_node_by_name error\n");
        return -EINVAL;
    }
    for (i = 0; i < ARRAY_SIZE(name); i++) {
        // 2.解析gpio号
        gpiono[i] = of_get_named_gpio(node, name[i], 0);
        if (gpiono[i] < 0) {
            printk("of_get_named_gpio error\n");
            return -EINVAL;
        }
        // 3.初始化LED
        ret = gpio_request(gpiono[i], name[i]);
        if (ret) {
            printk("gpio_request error\n");
            return ret;
        }
        ret = gpio_direction_output(gpiono[i], 0);
        if (ret) {
            printk("gpio_direction_output error\n");
            return ret;
        }
    }
    // 4.初始化定时器
    mytimer.expires = jiffies + HZ;
    timer_setup(&mytimer, timer_led_handle, 0);
    // 5.启动定时器
    add_timer(&mytimer);
    return 0;
}
static void __exit mytimer_exit(void)
{
    int i;
    del_timer(&mytimer);
    for (i = 0; i < ARRAY_SIZE(name); i++) {
        gpio_free(gpiono[i]);
    }
}
module_init(mytimer_init);
module_exit(mytimer_exit);
MODULE_LICENSE("GPL");
内核定时器的练习
1.使用内核定时器让LED闪烁
2.使用内核定时器完成按键中断消抖工作

#include <linux/init.h>
#include <linux/interrupt.h>
#include <linux/module.h>
#include <linux/of.h>
#include <linux/of_irq.h>
#include <linux/of_gpio.h>
// myirqs{
// 	interrupt-parent = <&gpiof>; //父节点
// 	interrupts = <9 0>,<7 0>,<8 0>; //对应中断管脚及触发方式0代表默认状态
//  keys = <&gpiof 9 0>;
// };
struct device_node* node;
struct timer_list mytimer;
unsigned int irqno;
int gpiono;
void key_irq_timer_handle(struct timer_list* timer)
{
    if(!gpio_get_value(gpiono)){ //说明按键安下了
        printk("key1 down...\n");
    }
}
irqreturn_t key_irq_handle(int irq, void* dev)
{
    mod_timer(&mytimer, jiffies + 1); //再次启动定时器
    return IRQ_HANDLED;
}
static int __init myirqs_init(void)
{
    int ret;
    // 1.获取节点
    node = of_find_node_by_path("/myirqs");
    if (node == NULL) {
        printk("of_find_node_by_path error\n");
        return -EINVAL;
    }
    // 2.获取软中断号和获取gpio号
    irqno = irq_of_parse_and_map(node, 0);
    if (irqno == 0) {
        printk("irq_of_parse_and_map error\n");
        return -EINVAL;
    }
    gpiono = of_get_named_gpio(node, "keys", 0); //gpio在任何模式下都支持读
    if (gpiono < 0) {
        printk("of_get_named_gpio error\n");
        return -EINVAL;
    }
    // 3.初始化定时器
    mytimer.expires = jiffies + 1; // 定时时间10ms
    timer_setup(&mytimer, key_irq_timer_handle, 0);
    add_timer(&mytimer);

    // 4.注册中断
    ret = request_irq(irqno, key_irq_handle, IRQF_TRIGGER_FALLING, "myirqs", NULL);
    if (ret) {
        printk("request_irq error\n");
        return ret;
    }
    return 0;
}
static void __exit myirqs_exit(void)
{
    free_irq(irqno, NULL);
    del_timer(&mytimer);
}
module_init(myirqs_init);
module_exit(myirqs_exit);
MODULE_LICENSE("GPL");
输入子系统驱动
输入子系统驱动简介
—目标:模拟键盘驱动
输入类设备都是通过输入子系统进行数据上报的。比如鼠标,键盘,触摸屏等驱动都是需要通过输入子系统驱动上报数据的,上报的数据是input_event结构体,这个input_event结构体被上报/dev/input/event*节点中了。
输入子系统驱动框架结构
我们只需要写设备驱动层就可以了,事件处理层和核心层都是内核中处理好的。
所有的驱动都是在drivers下的。
/drivers/input下有evdev.c(键盘事件处理层代码) 、mousedev.c(鼠标事件处理层代码)、joydev.c(游戏手柄事件处理层代码)事件处理层代码。
事件处理层xxx.c的功能:接受 设备驱动层 向 事件处理层 上报的数据,并把数据提供给应用层。说明evdev.c中嵌套了file_operations结构体。
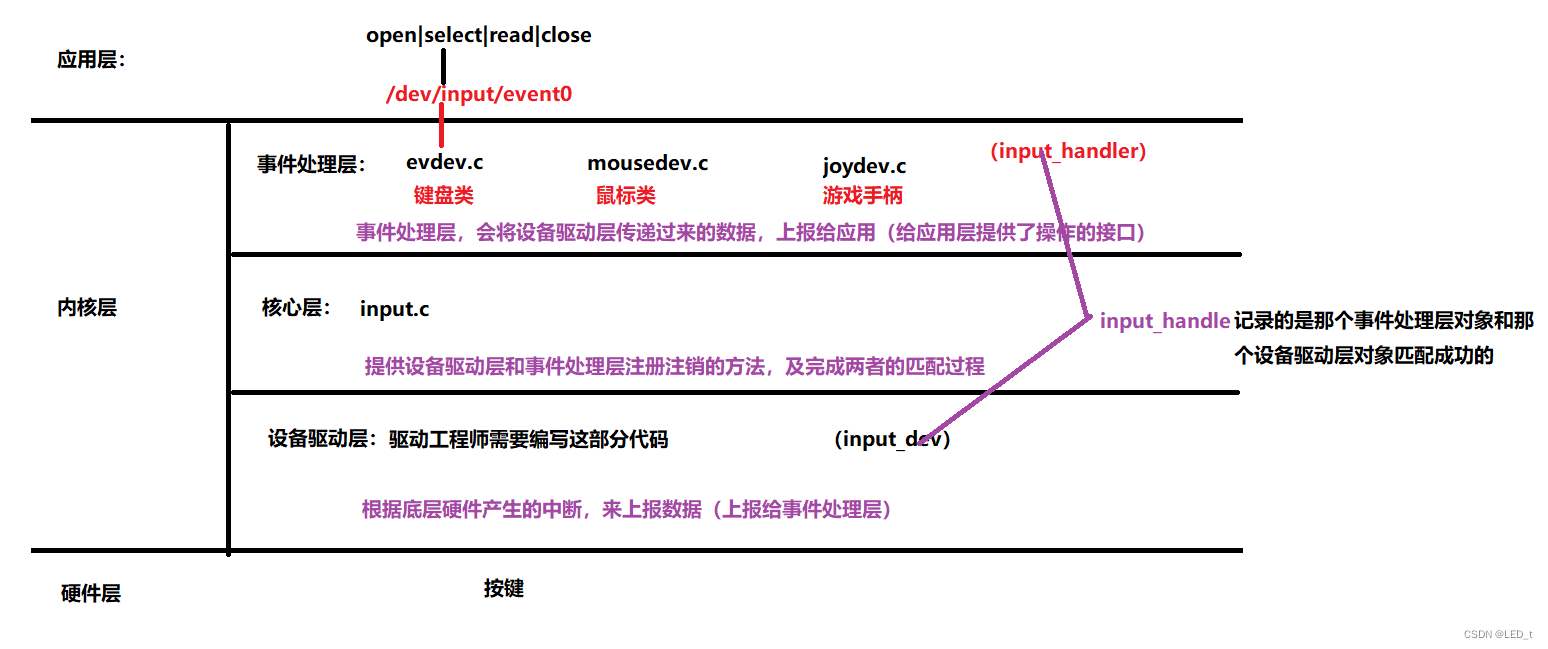
手机上的触摸屏:是iic子系统加输入子系统驱动。
所以我们最终要看一下 input_dev 怎么分配,怎么填充,怎么注册,怎么上报事件即可。
输入子系统驱动API
~/linux-5.10.61/Documentation$ vi input/input-programming.rst
1.分配对象
    struct input_dev *key_dev;
 key_dev = input_allocate_device();
2.对象初始化
    set_bit(EV_KEY, key_ev->evbit); // 指定上报的是键盘类事件
    set_bit(KEY_L, key_ev->keybit); // 指定上报l键
    set_bit(KEY_S, key_ev->keybit); // 指定上报s键
    set_bit(KEY_ENTER, key_ev->keybit); // 指定上报s键
3.注册
    int input_register_device(struct input_dev *dev)
4.注销
    void input_unregister_device(struct input_dev *dev)
5.上报数据
    void input_event(struct input_dev *dev,
   unsigned int type, unsigned int code, int value) //上报数据
 void input_sync(struct input_dev *dev) //同步
键盘驱动的实例
keybroad.c
#include <linux/init.h>
#include <linux/input.h>
#include <linux/interrupt.h>
#include <linux/module.h>
#include <linux/of.h>
#include <linux/of_irq.h>
// myirqs{
// 	interrupt-parent = <&gpiof>; //父节点
// 	interrupts = <9 0>,<7 0>,<8 0>; //对应中断管脚及触发方式0代表默认状态
// };
struct device_node* node;
unsigned int irqno[3];
struct input_dev* key_ev;
irqreturn_t key_irq_handle(int irq, void* dev)
{
    switch ((int)dev) {
    case 0:
        input_event(key_ev, EV_KEY, KEY_L, 1);
        input_sync(key_ev);
        input_event(key_ev, EV_KEY, KEY_L, 0);
        input_sync(key_ev);
        break;
    case 1:
        input_event(key_ev, EV_KEY, KEY_S, 1);
        input_sync(key_ev);
        input_event(key_ev, EV_KEY, KEY_S, 0);
        input_sync(key_ev);
        break;
    case 2:
        input_event(key_ev, EV_KEY, KEY_ENTER, 1);
        input_sync(key_ev);
        input_event(key_ev, EV_KEY, KEY_ENTER, 0);
        input_sync(key_ev);
        break;
    }
    return IRQ_HANDLED;
}
static int __init myirqs_init(void)
{
    int ret, i;
    // 1.获取节点
    node = of_find_node_by_path("/myirqs");
    if (node == NULL) {
        printk("of_find_node_by_path error\n");
        return -EINVAL;
    }
    for (i = 0; i < ARRAY_SIZE(irqno); i++) {
        // 2.获取软中断号
        irqno[i] = irq_of_parse_and_map(node, i);
        if (irqno[i] == 0) {
            printk("irq_of_parse_and_map error\n");
            return -EINVAL;
        }
        // 3.注册中断
        ret = request_irq(irqno[i], key_irq_handle,
            IRQF_TRIGGER_FALLING, "myirqs", (void*)i);
        if (ret) {
            printk("request_irq error\n");
            return ret;
        }
    }
    // 4.注册输入子系统
    key_ev = input_allocate_device();
    if (key_ev == NULL) {
        printk("input_allocate_device error\n");
        return -ENOMEM;
    }
    set_bit(EV_KEY, key_ev->evbit); // 指定上报的是键盘类事件
    set_bit(KEY_L, key_ev->keybit); // 指定上报l键
    set_bit(KEY_S, key_ev->keybit); // 指定上报s键
    set_bit(KEY_ENTER, key_ev->keybit); // 指定上报s键

    ret = input_register_device(key_ev);
    if (ret) {
        printk("input_register_device error\n");
        return ret;
    }
    return 0;
}
static void __exit myirqs_exit(void)
{
    int i;
    input_unregister_device(key_ev);
    for (i = 0; i < ARRAY_SIZE(irqno); i++) {
        free_irq(irqno[i], (void*)i);
    }
}
module_init(myirqs_init);
module_exit(myirqs_exit);
MODULE_LICENSE("GPL");
test.c
可以使用如下程序测试键盘上报的数据,也可以通过exec 0</dev/tty1
#include <head.h>
#include <linux/input.h>
#include <sys/select.h>
int main(int argc, const char* argv[])
{
    int fd1, fd2, ret;
    fd_set rfds;
    struct input_event key_ev;
    char buf[128] = { 0 };
    if ((fd2 = open("/dev/input/event0", O_RDWR)) == -1)
        PRINT_ERR("open keybroad error");
    while (1) {
        FD_ZERO(&rfds);
        FD_SET(fd2, &rfds);

        if ((ret = select(fd2 + 1, &rfds, NULL, NULL, NULL)) == -1)
            PRINT_ERR("select error");

        if (FD_ISSET(fd2, &rfds)) {
            memset(&key_ev, 0, sizeof(key_ev));
            read(fd2, &key_ev, sizeof(key_ev));
            printf("type = %d,code = %d,value=%d\n",
                key_ev.type,key_ev.code,key_ev.value);
        }
    }

    close(fd2);
    return 0;
}


 217
217


 被折叠的 条评论
为什么被折叠?
被折叠的 条评论
为什么被折叠?
 到【灌水乐园】发言


