


- 首先要获取到微信公众号的开发者权限,这一步省略,可以自行百度
- 微信公众号对接自己的服务器
首先第一步需要有自己的服务器和固定的ip,
其中,80/443端口需要有其中一个,
80端口对应http服务,
443端口对应https服务。
然后需要在自己的服务器上编写服务端代码,对应微信公众号的token和秘钥,在微信公众号上填写相应地址,调试通过后对接完成。
对接完成后,用户向龚总好发送的消息会被转发至服务端,你可以根据用户发送的消息做对应的处理
具体操作流程如下:
点击基本服务,然后点击修改配置。
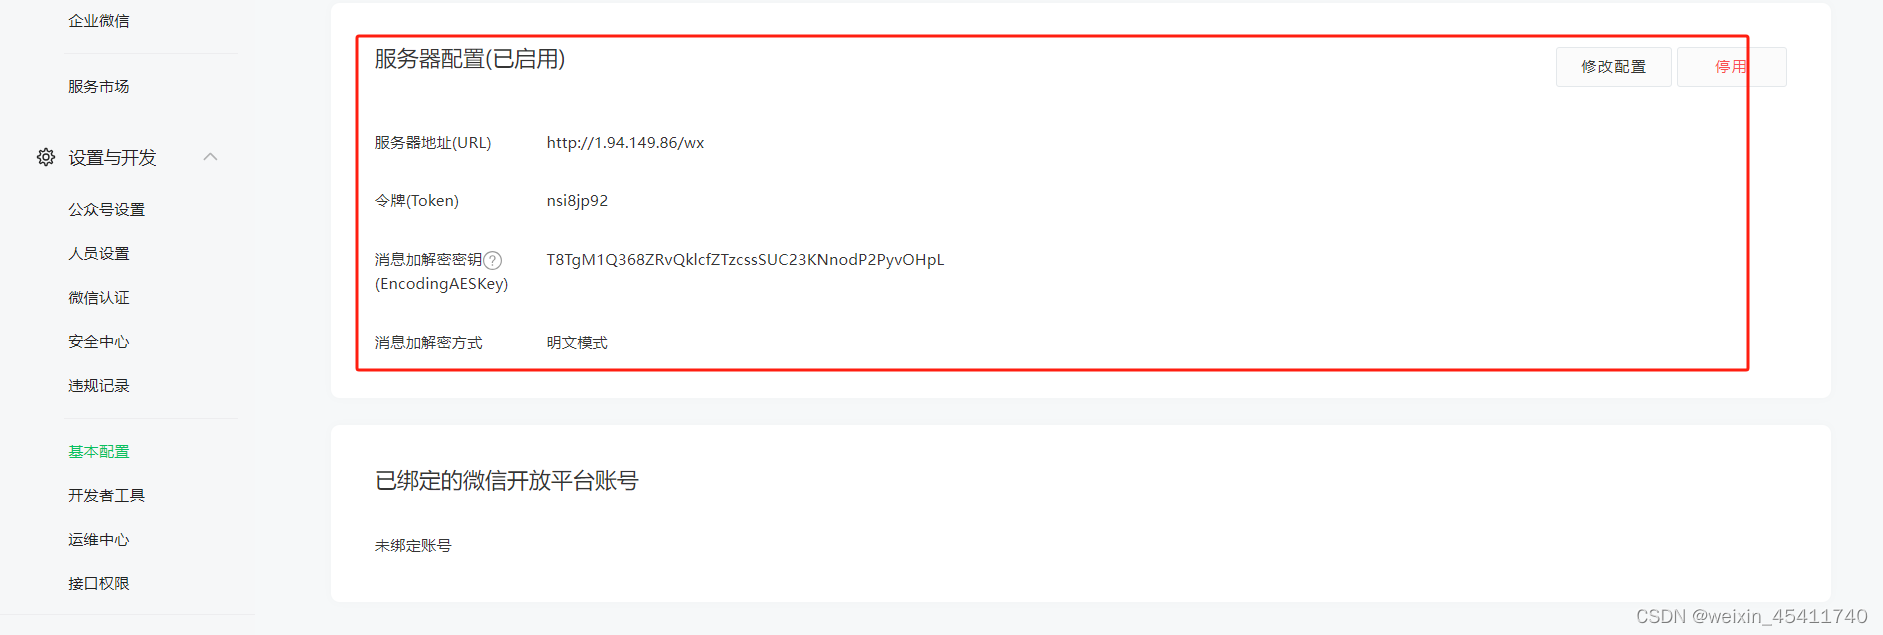
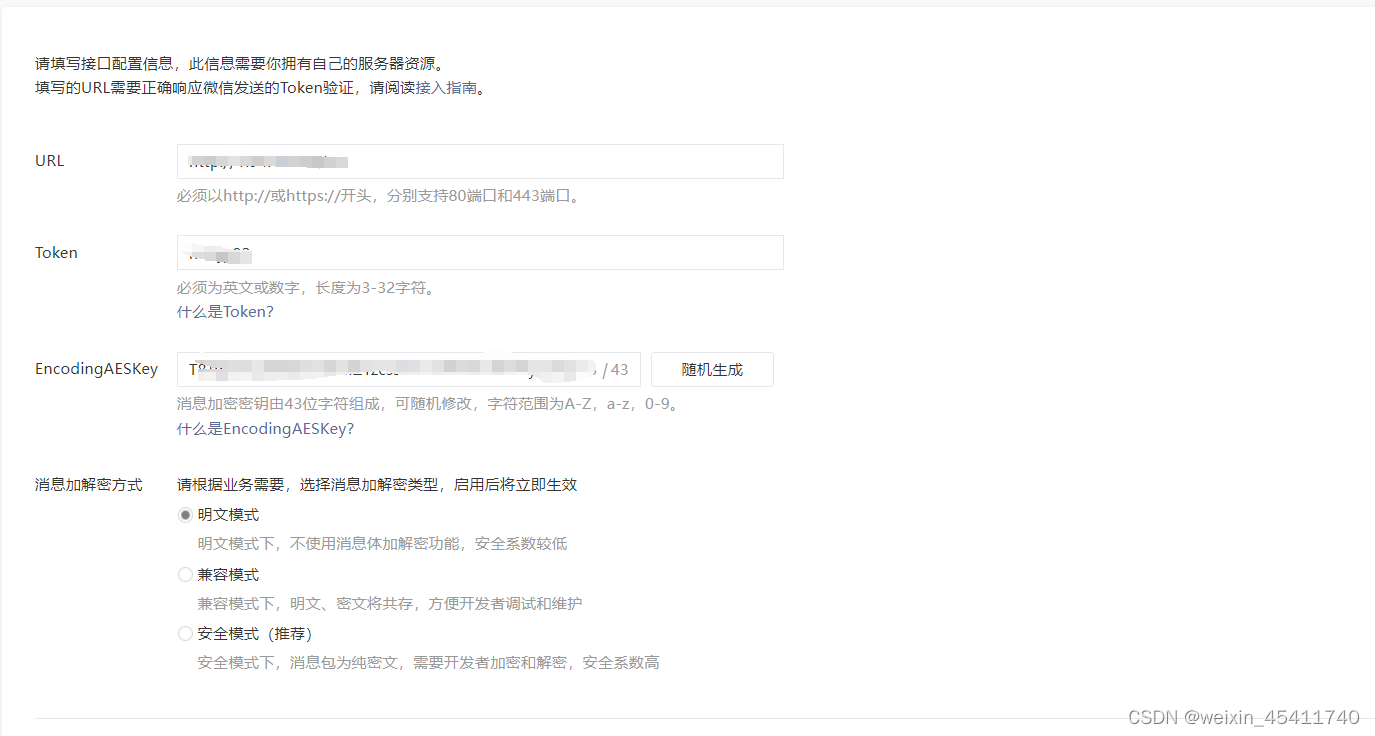
填写自己的服务端地址和接口,填写对应的token和秘钥,服务端必须和客户端保持一致,然后点击提交,成功的话页面会有提示,然后返回上一层页面点击启用即可。
这里付一下服务端的代码,我用的是java,官方有php的代码实例
 @Controller
public class WxGZHGetMsg {
    @RequestMapping("/wx")
    @ResponseBody
    public String wxGZHGetMsg(HttpServletRequest request){
        //获取随机数
        String echostr = request.getParameter("echostr");
        //加密签名
        String signature = request.getParameter("signature");
        //随机数
        String nonce = request.getParameter("nonce");
        //时间戳
        String timestamp = request.getParameter("timestamp");
        //自己在微信开发那里设置的
        String token ="*******************";
        List<String> list = new ArrayList<>();
        list.add(token);

        list.add(timestamp);
        list.add(nonce);
        Collections.sort(list);
        String join = String.join("", list);
        String s = DigestUtils.sha1Hex(join);
        System.out.println(s);
        System.out.println(signature);
        return request.getParameter("echostr");
    }
}
需要注意的是,启用后我们之前在公众号上的菜单将会失效,需要我们用api的方式重新提交一次,所以说,有做过菜单的需要注意,下面是创建菜单的步骤
首先我们需要通过接口获取token
   /*
获取token
 */
    @RequestMapping("/getToken")
    public String getToken() {

        String appId = "xxxxxxxxx"; // 替换为你的AppID
        String appSecret = "xxxxxxxx"; // 替换为你的AppSecret

        String url = "https://api.weixin.qq.com/cgi-bin/token?grant_type=client_credential&appid=" + appId + "&secret=" + appSecret;

        CloseableHttpClient httpClient = HttpClients.createDefault();
        HttpGet httpGet = new HttpGet(url);

        try (CloseableHttpResponse response = httpClient.execute(httpGet)) {
            HttpEntity entity = response.getEntity();
            if (entity != null) {
                String result = EntityUtils.toString(entity, "UTF-8");
                JSONObject jsonObject = new JSONObject(result);

                // 提取access_token
                String accessToken = jsonObject.getString("access_token");
                token = accessToken;

                // 输出access_token
                System.out.println("Access Token: " + accessToken);
                // 在这里你可以解析返回的JSON字符串以获取access_token
            }
        } catch (IOException e) {
            e.printStackTrace();
        } finally {
            try {
                httpClient.close();
            } catch (IOException e) {
                e.printStackTrace();
            }
        }


        return null;

    }
然后获取之前的菜单的结构json,有菜单的在此之前请不要启用服务器配置
/*
获取自定义菜单
 */
@RequestMapping("/getMenu")
public String getMenu() {

    String token = "xxxxxxxxxxxxxxxxxxx"; // 替换为你的AppSecret

    String url = "https://api.weixin.qq.com/cgi-bin/menu/get?access_token=" + token;

    CloseableHttpClient httpClient = HttpClients.createDefault();
    HttpGet httpGet = new HttpGet(url);

    try (CloseableHttpResponse response = httpClient.execute(httpGet)) {
        HttpEntity entity = response.getEntity();
        if (entity != null) {
            String result = EntityUtils.toString(entity, "UTF-8");
            JSONObject jsonObject = new JSONObject(result);

            // 提取access_token


            // 输出access_token
            System.out.println("menu: " + jsonObject);
            // 在这里你可以解析返回的JSON字符串以获取access_token
        }
    } catch (IOException e) {
        e.printStackTrace();
    } finally {
        try {
            httpClient.close();
        } catch (IOException e) {
            e.printStackTrace();
        }
    }

    return null;
}
通过此程序你可以获取自己的菜单结构,如下所示
{

   "is_menu_open": 1,

   "selfmenu_info": {

       "button": [

           {

               "type": "click",

               "name": "今日歌曲",

               "key": "V1001_TODAY_MUSIC"

           },

           {

               "name": "菜单",

               "sub_button": {

                   "list": [

                       {

                           "type": "view",

                           "name": "搜索",

                           "url": "http://www.soso.com/"

                       },

                       {

                           "type": "view",

                           "name": "视频",

                           "url": "http://v.qq.com/"

                       },

                       {

                           "type": "click",

                           "name": "赞一下我们",

                           "key": "V1001_GOOD"

                       }

                   ]

               }

           }

       ]

   }}
然后你只需将此json通过创建接口重新创建即可,我这里都用的java。需要在启用服务器后进行配置
String url = "https://api.weixin.qq.com/cgi-bin/menu/create?access_token=" + token;

    CloseableHttpClient httpClient = HttpClients.createDefault();
    HttpPost httpPost = new HttpPost(url);

    // 设置请求体参数为您提供的 JSON 数据
    String jsonBody = “你的菜单结构”


    StringEntity requestEntity = new StringEntity(jsonBody, ContentType.APPLICATION_JSON);
    httpPost.setEntity(requestEntity);

    // 设置请求头 Content-Type 为 application/json
    httpPost.setHeader("Content-Type", "application/json");

    try (CloseableHttpResponse response = httpClient.execute(httpPost)) {
        HttpEntity entity = response.getEntity();
        if (entity != null) {
            String result = EntityUtils.toString(entity, "UTF-8");
            JSONObject jsonObject = new JSONObject(result);

            // 提取access_token

            // 输出access_token
            System.out.println("menu: " + jsonObject);
            // 在这里您可以解析返回的JSON字符串以获取access_token
        }
    } catch (IOException e) {
        e.printStackTrace();
    } finally {
        try {
            httpClient.close();
        } catch (IOException e) {
            e.printStackTrace();
        }
    }
}
然后就是自动回复,我们要编写代码接收到用户向公众号发送的消息,然后返回我们想要回复的消息即可:此接口必须是你对接微信服务器所填写的接口,否则无法接收:如下
    @RequestMapping("/wx")
    public @ResponseBody
    String wxGZHGetMsg(HttpServletRequest request) {
        System.out.println(request.toString());
        try {
            // 获取请求体内容
            String xmlContent = getRequestBody(request);

            // 使用 Jsoup 解析 XML 内容
            Document document = Jsoup.parse(xmlContent, "", org.jsoup.parser.Parser.xmlParser());

            // 修改 XML 内容
//            modifyXmlimg(document);
            Elements eventElements = document.select("Event");
            if (!eventElements.isEmpty()) {
                String s = modifuxmlMenu(document);

                return s;

            } else {


                return modifyXmlContent(document);
            }


            // 将修改后的 XML 内容转换为字符串

        } catch (Exception e) {
            e.printStackTrace();
            return null;
        }
    }

    private String getRequestBody(HttpServletRequest request) throws IOException {// 获取请求体内容
        StringBuilder requestBody = new StringBuilder();
        try (BufferedReader reader = request.getReader()) {
            String line;
            while ((line = reader.readLine()) != null) {
                requestBody.append(line);
            }
        }
        return requestBody.toString();
    }
由于微信发送的信息室xml格式的,所以我们需要进行一定的处理,我这里使用的是jsonp包所带的方法进行处理的,使用jsonp需要在
Pom文件中引入相关的依赖,如下
<dependency>
            <groupId>org.jsoup</groupId>
            <artifactId>jsoup</artifactId>
            <version>1.14.3</version>
        </dependency>
@RequestMapping("/wx")
public @ResponseBody
String wxGZHGetMsg(HttpServletRequest request) {
System.out.println(request.toString());
try {
// 获取请求体内容
String xmlContent = getRequestBody(request);
// 使用 Jsoup 解析 XML 内容
Document document = Jsoup.parse(xmlContent, "", org.jsoup.parser.Parser.xmlParser());
// 修改 XML 内容
// modifyXmlimg(document);
Elements eventElements = document.select("Event");
if (!eventElements.isEmpty()) {
String s = modifuxmlMenu(document);
return s;
} else {
return modifyXmlContent(document);
}
// 将修改后的 XML 内容转换为字符串
} catch (Exception e) {
e.printStackTrace();
return null;
}
}
private String getRequestBody(HttpServletRequest request) throws IOException {// 获取请求体内容
StringBuilder requestBody = new StringBuilder();
try (BufferedReader reader = request.getReader()) {
String line;
while ((line = reader.readLine()) != null) {
requestBody.append(line);
}
}
return requestBody.toString();
}这里附上微信公众号发送消息和接收消息的xml文件格式,也可以去微信文档里自己查看
接收到的信息格式

<xml>
  <ToUserName><![CDATA[toUser]]></ToUserName>
  <FromUserName><![CDATA[fromUser]]></FromUserName>
  <CreateTime>1348831860</CreateTime>
  <MsgType><![CDATA[text]]></MsgType>
  <Content><![CDATA[this is a test]]></Content>
  <MsgId>1234567890123456</MsgId>
  <MsgDataId>xxxx</MsgDataId>
  <Idx>xxxx</Idx>
</xml>
回复需要的格式
回复文本消息

<xml>
  <ToUserName><![CDATA[toUser]]></ToUserName>
  <FromUserName><![CDATA[fromUser]]></FromUserName>
  <CreateTime>12345678</CreateTime>
  <MsgType><![CDATA[text]]></MsgType>
  <Content><![CDATA[你好]]></Content>
</xml>

回复图片消息


<xml>
  <ToUserName><![CDATA[toUser]]></ToUserName>
  <FromUserName><![CDATA[fromUser]]></FromUserName>
  <CreateTime>12345678</CreateTime>
  <MsgType><![CDATA[image]]></MsgType>
  <Image>
    <MediaId><![CDATA[media_id]]></MediaId>
  </Image>
</xml>

还支持语音视频等,但我这里用不到,大家可以自己去查
这里需要注意的是,回复消息的时候需要把ToUserName和FromUserName
的value值进行互换,具体过程大家可以自行根据需求编写。
还有一点需要注意的,回复图片,视频,音频等格式的时候需要先上传到微信服务器(图片不可超过10m),然后通过微信服务器返回的rid进行回复用户,我这里附上前后端代码
<form action="/uploadMaterial" method="post" enctype="multipart/form-data">
    <label for="media">Select file:</label>
    <input type="file" id="media" name="media" required><br><br>

    <label for="type">Select type:</label>
    <select id="type" name="type" required>
        <option value="image">Image</option>
        <option value="voice">Voice</option>
        <option value="video">Video</option>
        <option value="thumb">Thumb</option>
    </select><br><br>

    <div id="videoFields" style="display: none;">
        <label for="title">Video Title:</label>
        <input type="text" id="title" name="title"><br><br>
        <label for="introduction">Video Introduction:</label>
        <textarea id="introduction" name="introduction"></textarea><br><br>
    </div>
    <button type="submit">Upload</button>
</form>
<script>
    document.getElementById('type').addEventListener('change', function() {
        var videoFields = document.getElementById('videoFields');
        if (this.value === 'video') {
            videoFields.style.display = 'block';
        } else {
            videoFields.style.display = 'none';
        }
    });
后端代码,注意,再次之前请先获取token
 @PostMapping("/uploadMaterial")
    public String uploadMaterial(@RequestParam("media") MultipartFile file,
                                 @RequestParam("type") String type,
                                 @RequestParam(value = "title", required = false) String title,
                                 @RequestParam(value = "introduction", required = false) String introduction) throws IOException {

        String ACCESS_TOKEN = token; // Replace with actual token
        String UPLOAD_URL_TEMPLATE = "https://api.weixin.qq.com/cgi-bin/material/add_material?access_token=%s&type=%s";


        if (file.isEmpty() || file.getSize() > 10485760) { // Assuming max file size is 10MB
            return "Invalid file or file size exceeds 10MB.";
        }

        String originalFilename = file.getOriginalFilename();
        if (originalFilename == null || (!originalFilename.endsWith(".jpg") && !originalFilename.endsWith(".png")
                && !originalFilename.endsWith(".mp3") && !originalFilename.endsWith(".mp4"))) {
            return "Invalid file type. Only JPG, PNG, MP3, and MP4 are allowed.";
        }

        File tempFile = File.createTempFile("upload-", originalFilename.substring(originalFilename.lastIndexOf('.')));
        Files.copy(file.getInputStream(), tempFile.toPath(), StandardCopyOption.REPLACE_EXISTING);

        String uploadUrl = String.format(UPLOAD_URL_TEMPLATE, ACCESS_TOKEN, type);
        try (CloseableHttpClient httpClient = HttpClients.createDefault()) {
            HttpPost uploadFile = new HttpPost(uploadUrl);
            MultipartEntityBuilder builder = MultipartEntityBuilder.create();
            builder.addBinaryBody("media", tempFile, ContentType.create(file.getContentType()), originalFilename);

            // For video, add title and introduction
            if ("video".equals(type) && title != null && introduction != null) {
                Map<String, String> descriptionMap = new HashMap<>();
                descriptionMap.put("title", title);
                descriptionMap.put("introduction", introduction);
                String descriptionJson = new com.fasterxml.jackson.databind.ObjectMapper().writeValueAsString(descriptionMap);
                builder.addPart("description", new StringBody(descriptionJson, ContentType.APPLICATION_JSON));
            }

            HttpEntity multipart = builder.build();
            uploadFile.setEntity(multipart);

            HttpResponse responseFromWeChat = httpClient.execute(uploadFile);
            int statusCode = responseFromWeChat.getStatusLine().getStatusCode();
            HttpEntity responseEntity = responseFromWeChat.getEntity();
            String responseString = EntityUtils.toString(responseEntity);

            System.out.println("Response from WeChat: " + responseString);
            return responseString;
        } catch (Exception e) {
            e.printStackTrace();
            return "Internal server error: " + e.getMessage();
        } finally {
            tempFile.delete();
        }
    }
此外,为了区分不同用户的提问状态,我这里使用了Redis进行保存用户提问数据的操作,并且设置1小时超时 ,在用户提问的时候,把用户的id存入Redis,由此可以分辨出每一位用户的问题,做出相对应的回答。
Redis可从网上自行下载安装,在java中使用可以通过pom文件引入
<dependency>
    <groupId>org.springframework.boot</groupId>
    <artifactId>spring-boot-starter-data-redis</artifactId>
</dependency>
<dependency>
    <groupId>org.springframework.boot</groupId>
    <artifactId>spring-boot-starter-data-redis-reactive</artifactId>
</dependency>

然后编写配置类

@Configuration
public class RedisConfig {

    @Bean
    public RedisTemplate<String, Object> redisTemplate(RedisConnectionFactory redisConnectionFactory) {
        RedisTemplate<String, Object> template = new RedisTemplate<>();
        template.setConnectionFactory(redisConnectionFactory);
        // 使用StringRedisSerializer来序列化和反序列化redis的key值
        template.setKeySerializer(new StringRedisSerializer());
        template.setHashKeySerializer(new StringRedisSerializer());
        // 使用GenericJackson2JsonRedisSerializer来序列化和反序列化redis的value值
        template.setValueSerializer(new GenericJackson2JsonRedisSerializer());
        template.setHashValueSerializer(new GenericJackson2JsonRedisSerializer());
        template.afterPropertiesSet();
        return template;
    }
}
这里我们通过 bean的方式注入,可以通过@Autowired注入的方式在程序中进行调用,Redis在springboot中的调用方式非常简单,可以使用sava ,find,delete 方式进行存储和删除修改
这里的sava方式我进行了保存时间的设定,timeou是时间参数,
TimeUnit 是时间单位(时/分/秒/毫秒),最小单位为毫秒,超时后会自动删除数据。
public class RedisService {

    @Autowired
    private RedisTemplate<String, Object> redisTemplate;

    public void save(String key, Object value, long timeout, TimeUnit unit) {
        redisTemplate.opsForValue().set(key, value, timeout, unit);
    }

    public Object find(String key) {
        return redisTemplate.opsForValue().get(key);
    }

    public void delete(String key) {
        redisTemplate.delete(key);
    }
}
附一下最后的成果
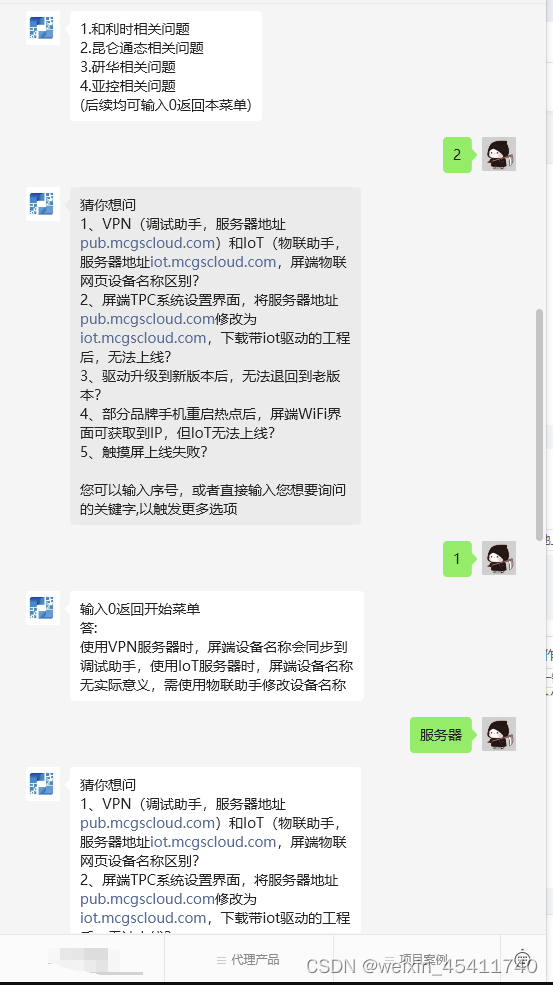
我这里是在菜单里添加了一个选项激活的
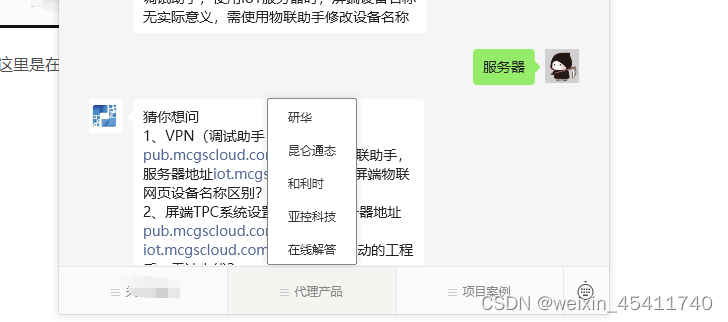
这里想要实现此功能需要自定义菜单配置的时候配置一个click事件,然后编写相关逻辑就可以实现。
后续会继续做人工客服的功能,这个也比较简单,实现后会继续更新
写的比较乱,有需要的可以私信交流


 被折叠的 条评论
为什么被折叠?
被折叠的 条评论
为什么被折叠?
 到【灌水乐园】发言


