


autoware.universe源码略读3.5--perception:compare_map_segmentation/crosswalk_traffic_light_estimator
compare_map_segmentation
官方文档对这个包的介绍是:
compare_map_segmentation 是一个节点,通过使用地图信息(如 pcd、高程地图或来自 map_loader 界面的分割地图点云)从输入点云中过滤地面点。
然后这里的文件构造也是和这个介绍对的上的,具体的话是根据滤波使用到的信息来设置了几个不同的文件
compare_elevation_map_filter_node
首先,我们可以看到这是一个继承自class Filter的继承类,滤波类的主体是在传感器模块中实现的,很多模块都有对应的子类。
在构造函数中,一上来调用的第一个函数是unsubscribe,这个函数是sensing模块点云预处理中的函数,底层逻辑调用的是ROS中的unsubscribe()函数,其实这个底层函数的具体操作也就是reset(),作用就是强制停止对点云的订阅(所以这里的作用我猜就是在有其他点云订阅的时候调用这个函数可以停掉?感觉就是一个初始化阶段的保障措施)
unsubscribe();
// 具体定义
void pointcloud_preprocessor::Filter::unsubscribe()
{
  if (use_indices_) {
    sub_input_filter_.unsubscribe();
    sub_indices_filter_.unsubscribe();
    if (approximate_sync_) {
      sync_input_indices_a_.reset();
    } else {
      sync_input_indices_e_.reset();
    }
  } else {
    sub_input_.reset();
  }
}
接下来还是ROS2对通信服务质量的设置
  rclcpp::QoS durable_qos{1};    // 服务质量,QoS用于控制ROS2中的通信行为,如可靠性、历史记录和持久性
  durable_qos.transient_local(); // 使消息在发布者和订阅者之间的连接断开时不会丢失(持久性)
之后就是对地图话题的订阅了,回调函数是elevationMapCallback,可以看到这里显示根据高度信息,生成了一个类似于海拔图的东西,还有就是调用subscribe()函数来执行话题的订阅
最后关于filter函数,这个就是官方文档介绍的流程了,先根据插值计算elevation_map_在对应点上的高度,然后计算高度差,要是大于阈值就放到输出中(这个逻辑是小于阈值的都认为是地面点了吧)
- 具体滤波函数的调用是在其他节点有对应类实例化的时候进行的
distance_based_compare_map_filter_nodelet
这个函数galatic版本也和最新版本的差距比较大,构造函数和上一个没什么太大的区别,这里是多了一个参数回调函。也就是在节点参数发生变化的时候可以通过参数回调函数设置新的参数。
然后这里的实现其实是基于pcl库实现的,可以看到在回调函数里设置了tree_变量,也就是pcl::search::Search<pcl::PointXYZ>::Ptr类型的,之后在filter函数里直接通过
  pcl::getPointCloudDifference<pcl::PointXYZ>(
    *pcl_input, distance_threshold_ * distance_threshold_, tree_, *pcl_output);
来找到满足阈值条件(大于阈值)的点云并赋值给pcl_output,这个逻辑感觉也没什么问题,但是最新版本的代码是更严谨了一些,感觉要是需要用的话也可以考虑移植过来,接口什么的大多都一样
voxel_based_approximate_compare_map_filter_nodelet
这个的核心思想和上一个是相同的,不过这里是使用了体素网格这种办法(voxel grid),可以看到在点云的回调函数中,根据输入的点云进行了体素网格的划分
  voxel_map_ptr_.reset(new pcl::PointCloud<pcl::PointXYZ>);
  voxel_grid_.setLeafSize(distance_threshold_, distance_threshold_, distance_threshold_);
  voxel_grid_.setInputCloud(map_pcl_ptr);
  voxel_grid_.setSaveLeafLayout(true);
  voxel_grid_.filter(*voxel_map_ptr_);
然后在filter中,就是把不在体素网格中的点作为输出
  for (size_t i = 0; i < pcl_input->points.size(); ++i) {
    const int index = voxel_grid_.getCentroidIndexAt(voxel_grid_.getGridCoordinates(
      pcl_input->points.at(i).x, pcl_input->points.at(i).y, pcl_input->points.at(i).z));
    if (index == -1) {  // empty voxel
      // map_ptr_->points.at(index)
      pcl_output->points.push_back(pcl_input->points.at(i));
    }
  }
voxel_based_compare_map_filter_nodelet
上边一个看名字的话应该是一个近似比较,这个应该是更严谨一些的方法,这里的回调函数和构造函数没有什么特殊的,比较特殊的是定义了一个新函数is_in_voxel,这个其实核心还是得部分还是直接找网格中点的坐标
  int voxel_index =
    voxel.getCentroidIndexAt(voxel.getGridCoordinates(src_point.x, src_point.y, src_point.z));
然后这里不太一样的是,这里是认为即使找到了对应的索引,但如果距离超过一定阈值了,这里也是会返回false,也就是认为这个点不在网格里
  if (voxel_index != -1) {  // not empty voxel
    const double dist_x = map->points.at(voxel_index).x - target_point.x;
    const double dist_y = map->points.at(voxel_index).y - target_point.y;
    const double dist_z = map->points.at(voxel_index).z - target_point.z;
    const double sqr_distance = dist_x * dist_x + dist_y * dist_y + dist_z * dist_z;
    if (sqr_distance < distance_threshold * distance_threshold) {
      return true;
    }
  }
  return false;
对应到filter函数里,其实就是针对每一个点,再三个方向来回加阈值然后判断。。如果任何一种情况下判断出了点在网格坐标内,那么就跳过这个点,反之就认为这个点满足不在体素中的条件,加到输出中去
    // example
    if (is_in_voxel(
          pcl::PointXYZ(
            point.x + distance_threshold_, point.y + distance_threshold_,
            point.z + distance_threshold_),
          point, distance_threshold_, voxel_map_ptr_, voxel_grid_)) {
      continue;
    }
voxel_distance_based_compare_map_filter_nodelet
根据官方文档
This filter is a combination of the distance_based_compare_map_filter and voxel_based_approximate_compare_map_filter.
所以看起来这个就是把前面的两个滤波结合了一下,不过这个在filter函数里可以看到,判断在体素里有没有之后,是又调用了一下K临近查找的函数nearestKSearch,然后根据找到的距离判断下满不满足距离条件
  for (size_t i = 0; i < pcl_input->points.size(); ++i) {
    const int index = voxel_grid_.getCentroidIndexAt(voxel_grid_.getGridCoordinates(
      pcl_input->points.at(i).x, pcl_input->points.at(i).y, pcl_input->points.at(i).z));
    if (index == -1) {                 // empty voxel
      std::vector<int> nn_indices(1);  // nn means nearest neighbor
      std::vector<float> nn_distances(1);
      tree_->nearestKSearch(pcl_input->points.at(i), 1, nn_indices, nn_distances);
      if (distance_threshold_ * distance_threshold_ < nn_distances.at(0)) {
        pcl_output->points.push_back(pcl_input->points.at(i));
      }
    }
  }
总结
所以这个模块看起来是为点云预处理工作准备的,输入的点云和地图先进行一下滤波处理,然后把“地图点”都给去掉,相当于做了一个点云分割的操作。之后我觉得再做感知就合理了,整体逻辑还是挺简单的
crosswalk_traffic_light_estimator
根据官方的介绍,这个是根据HD地图以及检测到的机动车道信号灯来推理行人信号灯的一个模块。这个里面涉及到的消息类型比较多,尤其会涉及到地图或者信号灯的一些消息类型,也有对应的订阅的成员变量。下面来具体分析下这个类都实现了什么以及是怎么实现的
  rclcpp::Subscription<HADMapBin>::SharedPtr sub_map_;
  rclcpp::Subscription<LaneletRoute>::SharedPtr sub_route_;
  rclcpp::Subscription<TrafficSignalArray>::SharedPtr sub_traffic_light_array_;
  rclcpp::Publisher<TrafficSignalArray>::SharedPtr pub_traffic_light_array_;
hasMergeLane
这个是非成员变量函数,根据函数名字来看,是判断地图中的路后续时候会融合成一个的,这个函数在定义的时候分了两种形式。我感觉,第二种只是单纯的把输入两条变成了可以输入一堆,而且第二种也是调用了第一种的
bool hasMergeLane(
  const lanelet::ConstLanelet & lanelet_1, const lanelet::ConstLanelet & lanelet_2,
  const lanelet::routing::RoutingGraphPtr & routing_graph_ptr)
bool hasMergeLane(
  const lanelet::ConstLanelets & lanelets,
  const lanelet::routing::RoutingGraphPtr & routing_graph_ptr)
我感觉,第二种只是单纯的把输入两条变成了可以输入一堆,而且第二种也是调用了第一种的
if (!hasMergeLane(lanelet_1, lanelet_2, routing_graph_ptr)) {
        continue;
      }
然后这个判断也很简单,就是调用following函数找到后续所有的车道ID,然后如果有相同的ID,就认为后边可以合并了。当然在第二种具体调用第一种之前,还确保了一下车道都是不转向的。
onMap
因为构造函数没有什么特殊的地方,所以这里就直接来看一下几个回调函数吧,先是对地图的回调函数,这里应该是直接用了lanelet的库,先是从二进制文件中加载地图
  lanelet_map_ptr_ = std::make_shared<lanelet::LaneletMap>();
  lanelet::utils::conversion::fromBinMsg(
    *msg, lanelet_map_ptr_, &traffic_rules_ptr_, &routing_graph_ptr_);
然后分别创建针对车辆和行人的规则
  const auto traffic_rules = lanelet::traffic_rules::TrafficRulesFactory::create(
    lanelet::Locations::Germany, lanelet::Participants::Vehicle);
  const auto pedestrian_rules = lanelet::traffic_rules::TrafficRulesFactory::create(
    lanelet::Locations::Germany, lanelet::Participants::Pedestrian);
然后根据规则创建路径图
    lanelet::routing::RoutingGraph::build(*lanelet_map_ptr_, *traffic_rules);
  lanelet::routing::RoutingGraphConstPtr pedestrian_graph =
    lanelet::routing::RoutingGraph::build(*lanelet_map_ptr_, *pedestrian_rules);
  lanelet::routing::RoutingGraphContainer overall_graphs({vehicle_graph, pedestrian_graph});
然后把所有的路径放在了一个新的指针变量之中
  lanelet::routing::RoutingGraphContainer overall_graphs({vehicle_graph, pedestrian_graph});
  overall_graphs_ptr_ =
    std::make_shared<const lanelet::routing::RoutingGraphContainer>(overall_graphs);
onRoute
这个主要是根据输入路线中的车道线,提取出来那些有与车道线有冲突的行人通道
  for (const auto & route_lanelet : route_lanelets) {
    constexpr int PEDESTRIAN_GRAPH_ID = 1;
    const auto conflict_lls =
      overall_graphs_ptr_->conflictingInGraph(route_lanelet, PEDESTRIAN_GRAPH_ID);
    for (const auto & lanelet : conflict_lls) {
      conflicting_crosswalks_.push_back(lanelet);
    }
  }
onTrafficLightArray
这里实现的是整个算法的核心逻辑了,这里面用到的子函数就更多一些
用到的第一个子函数是getGreenLanelets,这个函数getGreenLanelets的作用是从给定的车道列表中找到那些当前或最近被检测为绿色交通信号灯的车道。函数使用当前检测到的信号灯颜色和先前检测到的信号灯颜色来决定哪些车道是绿色的。首先是分别获取了当前和上一次的信号灯的颜色
    const auto current_detected_signal =
      getHighestConfidenceTrafficSignal(traffic_lights_for_vehicle, traffic_light_id_map);

    if (!current_detected_signal) {
      continue;
    }

    const auto is_green = current_detected_signal.get() == TrafficLight::GREEN;

    const auto last_detected_signal =
      getHighestConfidenceTrafficSignal(traffic_lights_for_vehicle, last_detect_color_);

    if (!last_detected_signal) {
      continue;
    }

    const auto was_green = current_detected_signal.get() == TrafficLight::UNKNOWN &&
                           last_detected_signal.get() == TrafficLight::GREEN &&
                           use_last_detect_color_;
里面具体的信号灯颜色,是通过getHighestConfidenceTrafficSignal函数,里面就是找到置信度最高的状态作为信号灯状态
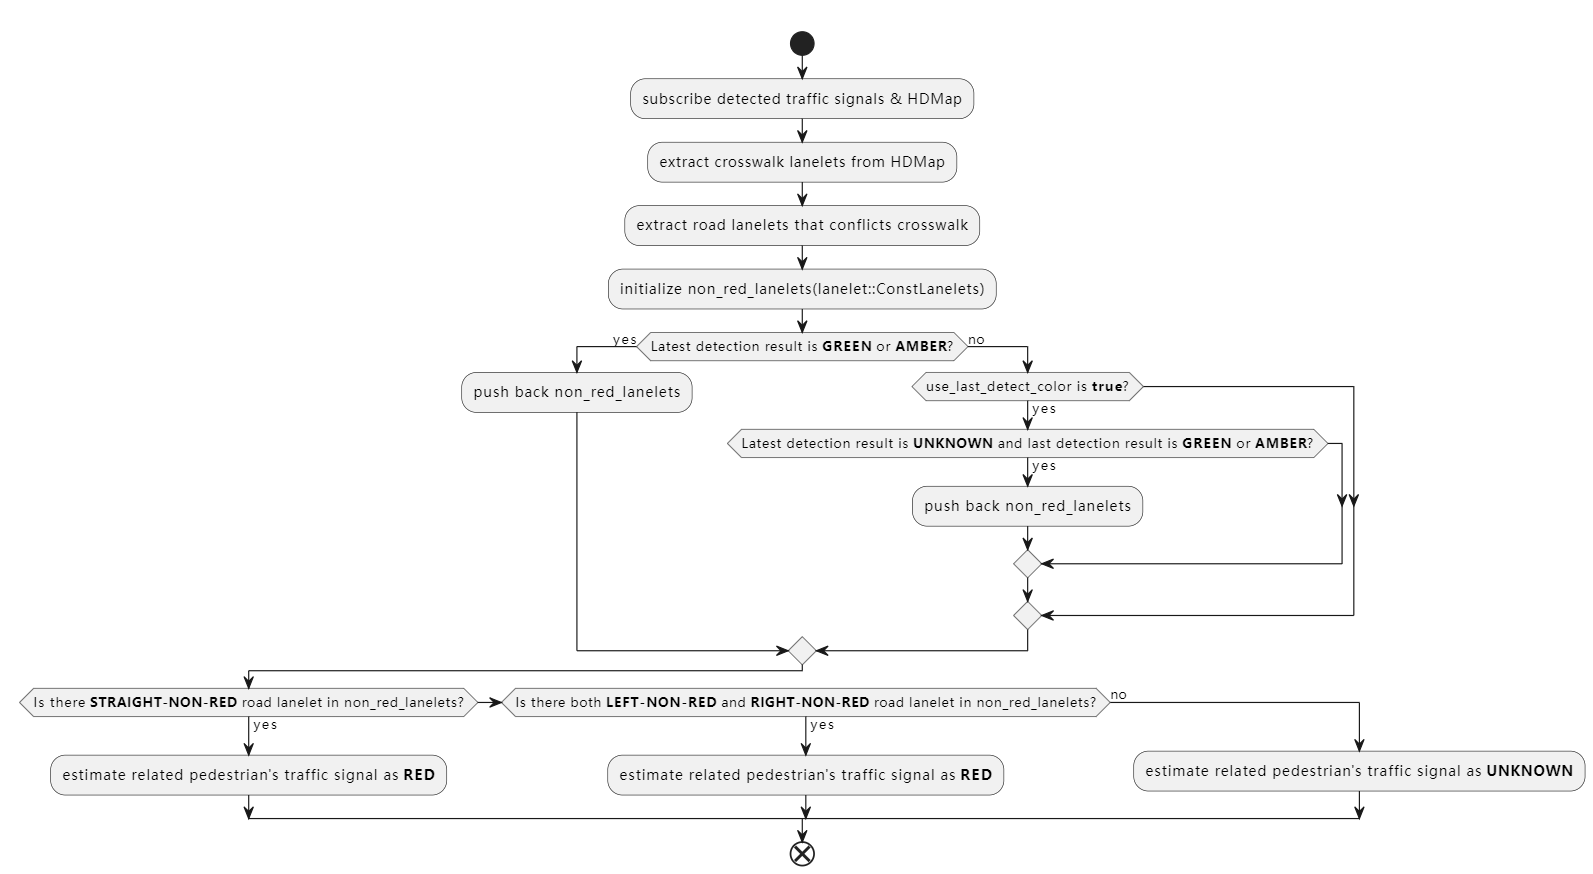
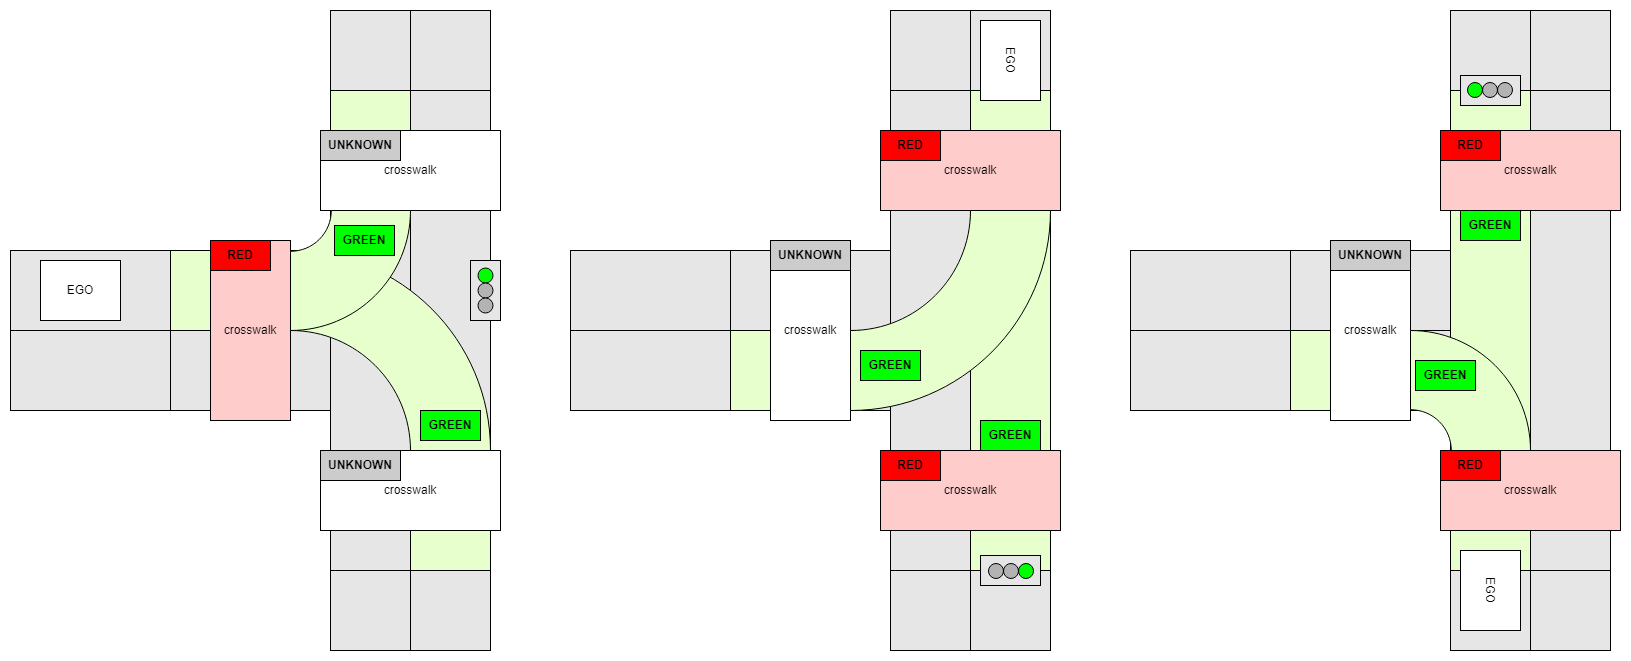
之后是estimateCrosswalkTrafficSignal,这个就是根据车道的等来判断行人的灯了,这里有一个函数是regulatoryElementsAs,用于获取车道(lanelet)关联的特定类型的规章元素(regulatory elements)。规章元素是在车道网络中定义交通规则和标志的元素,例如交通信号灯、停车标志、限速标志等。
这里具体的设置灯状态的逻辑可以参考官方文档的图:

然后就是updateLastDetectedSignal了,用来更新最近检测到的交通信号灯的状态,简单说就是更新last_detect_color_变量,把新增的灯插进去,然后如果其中的元素已经不再在traffic_light_id_map里了,就把它移除
总结
这里的逻辑就是根据车道的红绿灯状态来推断人行道的红绿灯状态,其实核心思想就是找到人行通道和车道的矛盾处,也就是交叉的地方,然后再根据检测到的车道的红绿灯状态,再来设置人行道的红绿灯状态,核心的思路在官方文档表达的非常清晰了,代码实现可能用到lanelet的地方比较多,所以读起来比较吃力


 839
839

 被折叠的 条评论
为什么被折叠?
被折叠的 条评论
为什么被折叠?
 到【灌水乐园】发言


