


系列文章目录
目标检测——map概念、IoU汇总IoU、GIoU、DIoU、CIoU、SIoU、EIoU、Wiou、Focal、alpha
目标检测——YOLOv3、YOLOv4、YOLOv5、YOLOv7正负样本匹配、YOLO3损失函数理解
目标检测——SE、ECA、CA、SA、CBAM、ShuffleAttention、SimAM、CrissCrossAttention、SK、NAM、GAM、SOCA注意力模块、程序
前言
学习小计。
一、正负样本匹配
ground-truth:简称 gt,标注生成的框,真实框。。
anchor:先验框,尺寸预先设置好的框,可以通过 k-means 等方法生成适合数据集的尺寸。
predict,也称为预测框,网络的 detect 层的输出信息。
anchor 和 gt 相互作用,通过筛选手段,确定哪个 anchor 负责预测哪个 gt,不同检测方法中筛选手段不同,一个 gt 可以有多个 anchor 对应。
predict 和 anchor 一一对应。每个 predict 都是对应一个 anchor 的(其实现在大部分检测方法比如 yolo,predict 输出的并不是实际坐标,需要通过 anchor 解码)。当确定某个 anchor 有负责预测 gt 之后,这个 anchor 对应的 predicts 就是正样本,其余就是负样本。predicts 的输出结果和 gt 相互作用,计算 loss。
正负样本:负责预测目标”(即正样本)和背景(即负样本)
在目标检测中不能将所有的预测框都进入损失函数进行计算,因为框太多,参数量太大,需要先将正负样本选择出来,再进行损失函数的计算。
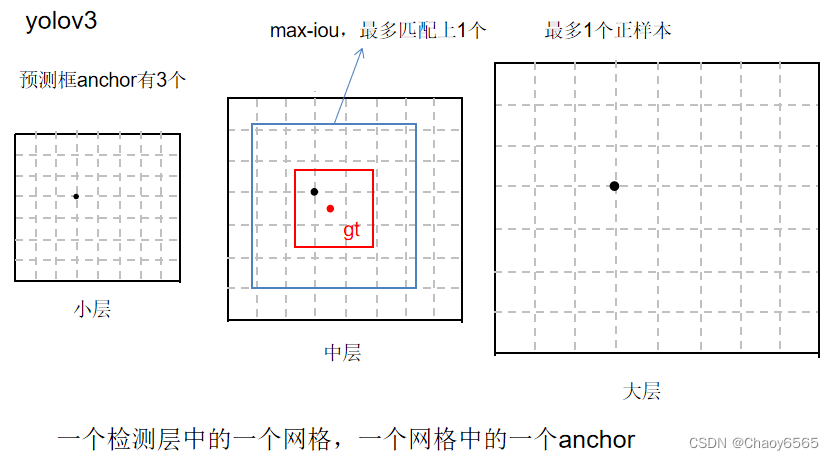
1、YOLOv3正负样本匹配
YOLOv3正负样本匹配采用max-iou matching策略,选取真实框与先验框iou最大的anchor为正样本,再加上预测框与真实框iou大于一定阈值的样本,基本上也就是一个真实框只对应一个anchor正样本,剩下的anchor中,与ground truth的IOU都小于阈值的anchor为负样本。除了正负样本,其余为忽略样本。
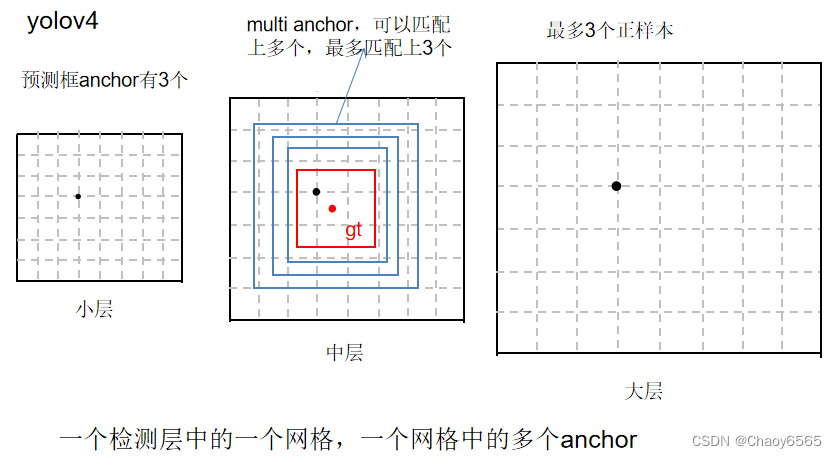
2、YOLOv4正负样本匹配
yolov4为了增加正样本,采用multi anchor策略,只要大于IoU阈值的anchor ,都为正样本。
3、YOLOv5正负样本匹配
yolov5在v3、v4的基础上继续增加正样本数量。方法如下:
1、跨分支预测:跨分支预测就是一个GT框可以由多个预测分支来预测,重复anchor匹配和grid匹配的步骤,可以得到某个GT 匹配到的所有正样本。
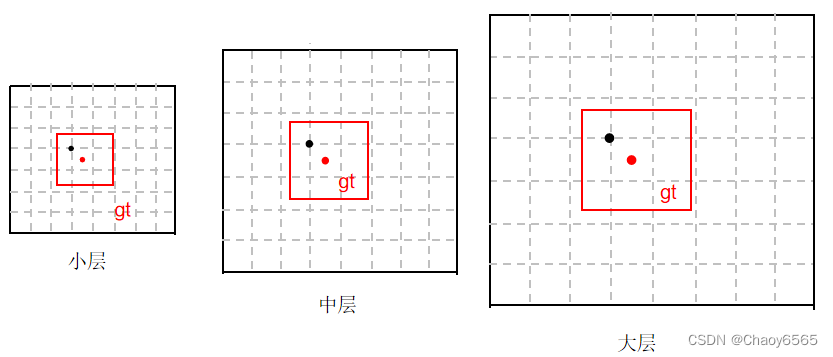
2、 跨cell(网格)预测:gt框落在了某个预测分支的某个网格内,则该网格有左、上、右、下4个邻域网格,根据GT框的中心位置,将最近的2个邻域网格也作为预测网格,也即一个GT框可以由3个网格来预测。
gt可以由大中小中的几个分支负责,各个分支可以由多个网格负责,这些网格上的anchor通过训练即可调整参数,形成输出的anchor,这个anchor再与gt进行匹配。最多三个网格。加上3分支,总共9个。
3、跨anchor预测:不同于IOU匹配,yolov5采用基于宽高比例的匹配策略,GT的宽高与anchors的宽高对应相除得到ratio1,anchors的宽高与GT的宽高对应相除得到ratio2,取ratio1和ratio2的最大值作为最后的宽高比,该宽高比和设定阈值(默认为4)比较,小于设定阈值的anchor则为匹配到的anchor。
即一个gt可以由多个分支中的多个网格中的多个anchor同时负责。
具体步骤:
a、匹配先验框
1、对每一个GT框,分别计算它与9种anchor的宽与宽的比值、高与高的比值;在宽比值、高比值这2个比值中,取最极端(最大)的一个比值,作为GT框和anchor的比值;
这里可以理解成计算GT Box和Anchor Templates分别在宽度以及高度方向的最大差异(当相等的时候比例为1,差异最小);接着统计宽度方向与高度方向的最大差异之间的最大值(二值取最大),即宽度和高度方向差异最大的值:
2、得到GT框和anchor的比值后,若这个比值小于设定的比值阈值(如果真实框与某个先验框的宽高比例大于设定阈值,则说明该真实框和该先验框匹配度不够,将该先验框认为是负样本。),那么这个anchor就负责预测GT框,这个anchor的预测框就被称为正样本,所有其它的预测框都是负样本。
b、匹配特征点
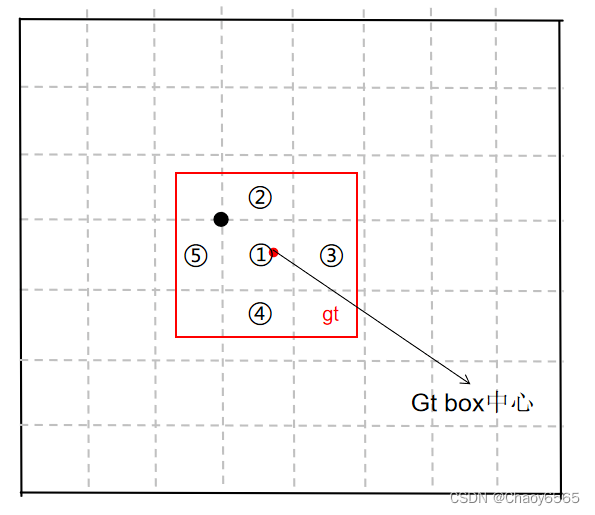
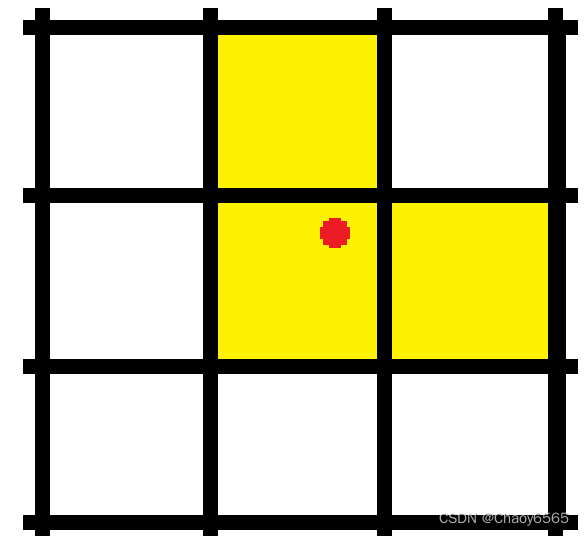
在之前的yolo网络中,每个真实框由其中心点所在的网格内的左上角特征点来负责预测。
yolov5 对于被选中的特征层,首先计算真实框落在哪个网格内,此时该网格左上角特征点便是一个负责预测的特征点。同时利用四舍五入规则,找出最近的两个网格,将这三个网格都认为是负责预测该真实框的。红色点表示该真实框的中心,除了当前所处的网格外,其2个最近的邻域网格也被选中。从这里就可以发现预测框的XY轴偏移部分的取值范围不再是0-1,而是0.5-1.5。找到对应特征点后,对应特征点在a中被选中的先验框负责该真实框的预测。
4、YOLOv7正负样本匹配
YOLOv7正负样本匹配前一部分与yolov5的一样后面加了simOTA来精确筛选。
Cost代价矩阵:
**目的:**自适应的找到当前特征点应该去拟合的真实框。
组成:
1、每个真实框和当前特征点预测框的重合程度;
2、每个真实框和当前特征点预测框的种类预测准确度;
每个真实框和当前特征点预测框的重合程度越高和每个真实框和当前特征点预测框的种类预测准确度越高,Cost代价就会越小。
SimOTA步骤:
1、计算每个真实框和当前特征点预测框的重合程度。
2、计算将重合度最高的二十个预测框与真实框的IOU加起来求得每个真实框的k,也就代表每个真实框有k个特征点与之对应。
3、计算每个真实框和当前特征点预测框的种类预测准确度。
4、计算Cost代价矩阵(代表每个真实框和每个特征点之间的代价关系)。
5、将Cost最低的k个点作为该真实框的正样本。
二、关于YOLO3 损失函数理解
自己看了2天,也许大概差不多是理解了这个损失函数。
原文http://t.csdn.cn/caxAz
代码里加了很多注释,有跟我一样小白的可以看看。
main 调用
yolo_loss = YOLOLoss(anchors, num_classes, input_shape, Cuda, anchors_mask)# 实例化

outputs         = model_train(images)  # 代入模型
loss_value_all  = 0
#   计算损失
for l in range(len(outputs)):
	loss_item = yolo_loss(l, outputs[l], targets)   # 计算损失值
	loss_value_all  += loss_item
loss_value = loss_value_all
计算loss实际上是网络的预测结果和网络的真实结果的对比。
和网络的预测结果一样,网络的损失也由三个部分组成,分别是Reg部分、Obj部分、Cls部分。
Reg部分是特征点的回归参数判断、Obj部分是特征点是否包含物体判断、Cls部分是特征点包含的物体的种类。
简而言之,1、一个是x、y、w、h部分带来的误差,也就是bbox带来的loss
2、一个是置信度带来的误差,也就是obj带来的loss
3、最后一个是类别带来的误差,也就是class带来的loss
import math
from functools import partial
import numpy as np
import torch
import torch.nn as nn
# 注释里输出的数据类型batch_size为1
# 计算loss实际上是网络的预测结果和网络的真实结果的对比。
# 和网络的预测结果一样,网络的损失也由三个部分组成,分别是Reg部分、Obj部分、Cls部分。
# Reg部分是特征点的回归参数判断、Obj部分是特征点是否包含物体判断、Cls部分是特征点包含的物体的种类。
class YOLOLoss(nn.Module):
def __init__(self, anchors, num_classes, input_shape, cuda, anchors_mask = [[6,7,8], [3,4,5], [0,1,2]]):
super(YOLOLoss, self).__init__()
#-----------------------------------------------------------#
# 13x13的特征层对应的anchor是[116,90],[156,198],[373,326]
# 26x26的特征层对应的anchor是[30,61],[62,45],[59,119]
# 52x52的特征层对应的anchor是[10,13],[16,30],[33,23]
#-----------------------------------------------------------#
self.anchors = anchors # anchors:先验框大小
self.num_classes = num_classes # num_classes:检验物体种类
self.bbox_attrs = 5 + num_classes # input_shape:输入图片大小
self.input_shape = input_shape # anchors_mask: 选先验框索引
self.anchors_mask = anchors_mask # 先验框序号
# 下面这些是一些损失乘的参数
self.giou = True
self.balance = [0.4, 1.0, 4]
self.box_ratio = 0.05
self.obj_ratio = 5 * (input_shape[0] * input_shape[1]) / (416 ** 2)
self.cls_ratio = 1 * (num_classes / 80)
self.ignore_threshold = 0.5
self.cuda = cuda
def clip_by_tensor(self, t, t_min, t_max):
t = t.float()
result = (t >= t_min).float() * t + (t < t_min).float() * t_min
result = (result <= t_max).float() * result + (result > t_max).float() * t_max
return result
def MSELoss(self, pred, target):
return torch.pow(pred - target, 2)
def BCELoss(self, pred, target):
epsilon = 1e-7
pred = self.clip_by_tensor(pred, epsilon, 1.0 - epsilon)
output = - target * torch.log(pred) - (1.0 - target) * torch.log(1.0 - pred)
return output
# [giou原理可以参考http://t.csdn.cn/MDPpD](http://t.csdn.cn/MDPpD)
def box_giou(self, b1, b2):
"""
输入为:
----------
b1: tensor, shape=(batch, feat_w, feat_h, anchor_num, 4), xywh
b2: tensor, shape=(batch, feat_w, feat_h, anchor_num, 4), xywh
返回为:
-------
giou: tensor, shape=(batch, feat_w, feat_h, anchor_num, 1)
"""
#----------------------------------------------------#
# 求出预测框左上角右下角
#----------------------------------------------------#
b1_xy = b1[..., :2]
b1_wh = b1[..., 2:4]
b1_wh_half = b1_wh/2.
b1_mins = b1_xy - b1_wh_half
b1_maxes = b1_xy + b1_wh_half
#----------------------------------------------------#
# 求出真实框左上角右下角
#----------------------------------------------------#
b2_xy = b2[..., :2]
b2_wh = b2[..., 2:4]
b2_wh_half = b2_wh/2.
b2_mins = b2_xy - b2_wh_half
b2_maxes = b2_xy + b2_wh_half
#----------------------------------------------------#
# 求真实框和预测框所有的iou
#----------------------------------------------------#
intersect_mins = torch.max(b1_mins, b2_mins)
intersect_maxes = torch.min(b1_maxes, b2_maxes)
intersect_wh = torch.max(intersect_maxes - intersect_mins, torch.zeros_like(intersect_maxes))
intersect_area = intersect_wh[..., 0] * intersect_wh[..., 1]
b1_area = b1_wh[..., 0] * b1_wh[..., 1]
b2_area = b2_wh[..., 0] * b2_wh[..., 1]
union_area = b1_area + b2_area - intersect_area
iou = intersect_area / union_area
#----------------------------------------------------#
# 找到包裹两个框的最小框的左上角和右下角
#----------------------------------------------------#
enclose_mins = torch.min(b1_mins, b2_mins)
enclose_maxes = torch.max(b1_maxes, b2_maxes)
enclose_wh = torch.max(enclose_maxes - enclose_mins, torch.zeros_like(intersect_maxes))
#----------------------------------------------------#
# 计算对角线距离
#----------------------------------------------------#
enclose_area = enclose_wh[..., 0] * enclose_wh[..., 1]
giou = iou - (enclose_area - union_area) / enclose_area
return giou
def forward(self, l, input, targets=None):
#----------------------------------------------------#
# l代表的是,当前输入进来的有效特征层,是第几个有效特征层
# input是输入数据,单个特征层
# input的shape为 bs, 3*(5+num_classes), 13, 13
# bs, 3*(5+num_classes), 26, 26
# bs, 3*(5+num_classes), 52, 52
# targets代表的是真实框,类似于[0.6358, 0.5204, 0.0697, 0.0312, 0.0000]这个样子
#----------------------------------------------------#
#--------------------------------#
# 获得图片数量,特征层的高和宽
# 13和13
#--------------------------------#
bs = input.size(0) # batch_size
in_h = input.size(2) # 特征层的高
in_w = input.size(3) # 特征层的宽
#-----------------------------------------------------------------------#
# 计算步长
# 每一个特征点对应原来的图片上多少个像素点
# 如果特征层为13x13的话,一个特征点就对应原来的图片上的32个像素点
# 如果特征层为26x26的话,一个特征点就对应原来的图片上的16个像素点
# 如果特征层为52x52的话,一个特征点就对应原来的图片上的8个像素点
# stride_h = stride_w = 32、16、8
# stride_h和stride_w都是32。
#-----------------------------------------------------------------------#
stride_h = self.input_shape[0] / in_h # 特征层高的步长
stride_w = self.input_shape[1] / in_w # 特征层宽的步长
#-------------------------------------------------#
# 此时获得的scaled_anchors大小是相对于特征层的先验框大小
# self.anchors 10,13, 16,30, 33,23, 30,61, 62,45, 59,119, 116,90, 156,198, 373,326
# stride_w 32.0 ,scaled_anchors [(0.3125, 0.40625), (0.5, 0.9375), (1.03125, 0.71875), (0.9375, 1.90625), (1.9375, 1.40625), (1.84375, 3.71875), (3.625, 2.8125), (4.875, 6.1875), (11.65625, 10.1875)]
#-------------------------------------------------#
scaled_anchors = [(a_w /stride_w, a_h / stride_h) for a_w, a_h in self.anchors] # 相对于特征层的先验框大小
#-----------------------------------------------#
# 输入的input一共有三个,他们的shape分别是
# bs, 3*(5+num_classes), 13, 13 => batch_size, 3, 13, 13, 5(x_offset、y_offset、h和w、置信度) + num_classes
# batch_size, 3, 26, 26, 5 + num_classes
# batch_size, 3, 52, 52, 5 + num_classes
#-----------------------------------------------#
# 调整预测数据的排列格式
# input torch.Size([1, 30, 26, 26])
# prediction torch.Size([1, 3, 26, 26, 10]) # 最后的10 是因为我的分类种类是5个 所以5+5=10
prediction = input.view(bs, len(self.anchors_mask[l]), self.bbox_attrs, in_h, in_w).permute(0, 1, 3, 4, 2).contiguous()
#-----------------------------------------------#
# 先验框的中心位置的调整参数
#-----------------------------------------------#
x = torch.sigmoid(prediction[..., 0]) # 0-1
y = torch.sigmoid(prediction[..., 1])
#-----------------------------------------------#
# 先验框的宽高调整参数
#-----------------------------------------------#
w = prediction[..., 2]
h = prediction[..., 3]
#-----------------------------------------------#
# 获得置信度,是否有物体
#-----------------------------------------------#
conf = torch.sigmoid(prediction[..., 4])
#-----------------------------------------------#
# 种类置信度
#-----------------------------------------------#
pred_cls = torch.sigmoid(prediction[..., 5:])
#-----------------------------------------------#
# 获得网络应该有的预测结果
# 简而言之就是将基于整个图片的真实框转化为基于相应特征层的大小
# 获得真实框相对应的先验框
# 我这里图片为416*416 特征层分别为52*52 ,26*26 ,13*13 所以相应的真实框也需要转化
# targets:真实框数据 targets类似于[0.6358, 0.5204, 0.0697, 0.0312, 0.0000]这个样子
# scaled_anchors:相对于特征层的先验框大小
# in_h:相应特征层的高
# in_w:相应特征层的宽
# noobj_mask:用于选取哪些先验框不包含物体 无目标为1 有目标为0
# box_loss_scale:用于获得xywh的比例 大目标loss权重小,小目标loss权重大 让网络更加去关注小目标
# y_true: batch_size, 3, 13, 13, 5 + num_classes 真实框
# # y_true的格式[1,3,13,13,10] 并不是每一特征点上都有真实框的,没有真实框的地方为0
#-----------------------------------------------#
y_true, noobj_mask, box_loss_scale = self.get_target(l, targets, scaled_anchors, in_h, in_w)
print(y_true.shape)
#---------------------------------------------------------------#
# 将预测结果进行解码,判断预测结果和真实值的重合程度
# 如果重合程度过大则忽略,因为这些特征点属于预测比较准确的特征点
# 作为负样本不合适
# pred_boxes 转换后的预测框数据
#----------------------------------------------------------------#
noobj_mask, pred_boxes = self.get_ignore(l, x, y, h, w, targets, scaled_anchors, in_h, in_w, noobj_mask)
if self.cuda:
# 转换类型格式
y_true = y_true.type_as(x)
noobj_mask = noobj_mask.type_as(x)
box_loss_scale = box_loss_scale.type_as(x)
#--------------------------------------------------------------------------#
# box_loss_scale是真实框宽高的乘积,宽高均在0-1之间,因此乘积也在0-1之间。
# 2-宽高的乘积代表真实框越大,比重越小,小框的比重更大。
#--------------------------------------------------------------------------#
box_loss_scale = 2 - box_loss_scale
loss = 0
obj_mask = y_true[..., 4] == 1 # 是否有物体
n = torch.sum(obj_mask)
if n != 0:
if self.giou:
#---------------------------------------------------------------#
# 计算预测结果和真实结果的giou
# 正样本,编码后的长宽与xy轴偏移量与预测值的差距
#----------------------------------------------------------------#
giou = self.box_giou(pred_boxes, y_true[..., :4]).type_as(x)
# giou torch.Size([1, 3, 13, 13])
loss_loc = torch.mean((1 - giou)[obj_mask])
else:
#-----------------------------------------------------------#
# 计算中心偏移情况的loss,使用BCELoss效果好一些
#-----------------------------------------------------------#
loss_x = torch.mean(self.BCELoss(x[obj_mask], y_true[..., 0][obj_mask]) * box_loss_scale[obj_mask])
loss_y = torch.mean(self.BCELoss(y[obj_mask], y_true[..., 1][obj_mask]) * box_loss_scale[obj_mask])
#-----------------------------------------------------------#
# 计算宽高调整值的loss
#-----------------------------------------------------------#
loss_w = torch.mean(self.MSELoss(w[obj_mask], y_true[..., 2][obj_mask]) * box_loss_scale[obj_mask])
loss_h = torch.mean(self.MSELoss(h[obj_mask], y_true[..., 3][obj_mask]) * box_loss_scale[obj_mask])
loss_loc = (loss_x + loss_y + loss_h + loss_w) * 0.1
# 实际存在的框,种类预测结果与实际结果的对比。
loss_cls = torch.mean(self.BCELoss(pred_cls[obj_mask], y_true[..., 5:][obj_mask]))
loss += loss_loc * self.box_ratio + loss_cls * self.cls_ratio
# 正样本,预测结果中置信度的值与1对比;负样本,预测结果中置信度的值与0对比
loss_conf = torch.mean(self.BCELoss(conf, obj_mask.type_as(conf))[noobj_mask.bool() | obj_mask])
loss += loss_conf * self.balance[l] * self.obj_ratio
# if n != 0:
# print(loss_loc * self.box_ratio, loss_cls * self.cls_ratio, loss_conf * self.balance[l] * self.obj_ratio)
return loss
def calculate_iou(self, _box_a, _box_b):
#-----------------------------------------------------------#
# 计算真实框的左上角和右下角
#-----------------------------------------------------------#
b1_x1, b1_x2 = _box_a[:, 0] - _box_a[:, 2] / 2, _box_a[:, 0] + _box_a[:, 2] / 2
b1_y1, b1_y2 = _box_a[:, 1] - _box_a[:, 3] / 2, _box_a[:, 1] + _box_a[:, 3] / 2
#-----------------------------------------------------------#
# 计算先验框获得的预测框的左上角和右下角
#-----------------------------------------------------------#
b2_x1, b2_x2 = _box_b[:, 0] - _box_b[:, 2] / 2, _box_b[:, 0] + _box_b[:, 2] / 2
b2_y1, b2_y2 = _box_b[:, 1] - _box_b[:, 3] / 2, _box_b[:, 1] + _box_b[:, 3] / 2
#-----------------------------------------------------------#
# 将真实框和预测框都转化成左上角右下角的形式
#-----------------------------------------------------------#
box_a = torch.zeros_like(_box_a)
box_b = torch.zeros_like(_box_b)
box_a[:, 0], box_a[:, 1], box_a[:, 2], box_a[:, 3] = b1_x1, b1_y1, b1_x2, b1_y2
box_b[:, 0], box_b[:, 1], box_b[:, 2], box_b[:, 3] = b2_x1, b2_y1, b2_x2, b2_y2
#-----------------------------------------------------------#
# A为真实框的数量,B为先验框的数量
#-----------------------------------------------------------#
A = box_a.size(0)
B = box_b.size(0)
#-----------------------------------------------------------#
# 计算交的面积
#-----------------------------------------------------------#
max_xy = torch.min(box_a[:, 2:].unsqueeze(1).expand(A, B, 2), box_b[:, 2:].unsqueeze(0).expand(A, B, 2))
min_xy = torch.max(box_a[:, :2].unsqueeze(1).expand(A, B, 2), box_b[:, :2].unsqueeze(0).expand(A, B, 2))
inter = torch.clamp((max_xy - min_xy), min=0)
inter = inter[:, :, 0] * inter[:, :, 1]
#-----------------------------------------------------------#
# 计算预测框和真实框各自的面积
#-----------------------------------------------------------#
area_a = ((box_a[:, 2]-box_a[:, 0]) * (box_a[:, 3]-box_a[:, 1])).unsqueeze(1).expand_as(inter) # [A,B]
area_b = ((box_b[:, 2]-box_b[:, 0]) * (box_b[:, 3]-box_b[:, 1])).unsqueeze(0).expand_as(inter) # [A,B]
#-----------------------------------------------------------#
# 求IOU
#-----------------------------------------------------------#
union = area_a + area_b - inter
return inter / union # [A,B]
# 获得网络应该有的预测结果
# targets:真实框数据
# anchors:相对于特征层的先验框大小
# in_h:特征层的高
# in_w:特征层的宽
def get_target(self, l, targets, anchors, in_h, in_w):
#-----------------------------------------------------#
# 计算一共有多少张图片
# targets类似于[0.6358, 0.5204, 0.0697, 0.0312, 0.0000]这个样子
#-----------------------------------------------------#
bs = len(targets)
#-----------------------------------------------------#
# 用于选取哪些先验框不包含物体 1
#-----------------------------------------------------#
noobj_mask = torch.ones(bs, len(self.anchors_mask[l]), in_h, in_w, requires_grad = False)
#-----------------------------------------------------#
# 让网络更加去关注小目标
#-----------------------------------------------------#
box_loss_scale = torch.zeros(bs, len(self.anchors_mask[l]), in_h, in_w, requires_grad = False)
#-----------------------------------------------------#
# batch_size, 3, 13, 13, 5 + num_classes
#-----------------------------------------------------#
y_true = torch.zeros(bs, len(self.anchors_mask[l]), in_h, in_w, self.bbox_attrs, requires_grad = False)
for b in range(bs): # 对每张图片进行如下操作
if len(targets[b])==0: # 没有图片直接返回
continue
batch_target = torch.zeros_like(targets[b]) # 提取相对应图片的真实框
#-------------------------------------------------------#
# 计算出正样本在特征层上的中心点
# 对特征层还原真实框的大小
# 因为之前的真实框数据是以真实图片为参考现在要以特征层为参考
# targets:[0.6358, 0.5204, 0.0697, 0.0312, 0.0000] :x,y,h,w,置信度
#-------------------------------------------------------#
batch_target[:, [0,2]] = targets[b][:, [0,2]] * in_w
batch_target[:, [1,3]] = targets[b][:, [1,3]] * in_h
batch_target[:, 4] = targets[b][:, 4]
batch_target = batch_target.cpu()
#-------------------------------------------------------#
# 将真实框转换一个形式
# 这里转换是为了数据可以送到这个函数 self.calculate_iou 计算重合度
# num_true_box, 4
# in_w,in_h 13 13
# batch_target tensor([[ 5.6250, 6.9844, 6.1250, 10.2187, 2.0000],
# [ 5.6250, 6.9844, 6.1250, 10.2187, 4.0000]])
# gt_box tensor([[ 0.0000, 0.0000, 6.1250, 10.2187],
# [ 0.0000, 0.0000, 6.1250, 10.2187]])
#-------------------------------------------------------#
gt_box = torch.FloatTensor(torch.cat((torch.zeros((batch_target.size(0), 2)), batch_target[:, 2:4]), 1))
#-------------------------------------------------------#
# 将先验框转换一个形式
# 9, 4
# anchors [(0.3125, 0.40625), (0.5, 0.9375), (1.03125, 0.71875), (0.9375, 1.90625), (1.9375, 1.40625), (1.84375, 3.71875), (3.625, 2.8125), (4.875, 6.1875), (11.65625, 10.1875)]
# anchor_shapes tensor([[ 0.0000, 0.0000, 0.3125, 0.4062],
# [ 0.0000, 0.0000, 0.5000, 0.9375],
# [ 0.0000, 0.0000, 1.0312, 0.7188],
# [ 0.0000, 0.0000, 0.9375, 1.9062],
# [ 0.0000, 0.0000, 1.9375, 1.4062],
# [ 0.0000, 0.0000, 1.8438, 3.7188],
# [ 0.0000, 0.0000, 3.6250, 2.8125],
# [ 0.0000, 0.0000, 4.8750, 6.1875],
# [ 0.0000, 0.0000, 11.6562, 10.1875]])
#-------------------------------------------------------#
anchor_shapes = torch.FloatTensor(torch.cat((torch.zeros((len(anchors), 2)), torch.FloatTensor(anchors)), 1))
#-------------------------------------------------------#
# 计算交并比
# self.calculate_iou(gt_box, anchor_shapes) = [num_true_box, 9]每一个真实框和9个先验框的重合情况
# best_ns:
# [每个真实框最大的重合度max_iou, 每一个真实框最重合的先验框的序号]
# gt_box tensor([[0.0000, 0.0000, 3.5000, 1.1875],
# [0.0000, 0.0000, 0.3750, 2.9687],
# [0.0000, 0.0000, 4.5625, 6.1562],
# [0.0000, 0.0000, 6.5938, 4.2188],
# [0.0000, 0.0000, 3.9063, 4.3125]])
# anchor_shapes tensor([[ 0.0000, 0.0000, 0.3125, 0.4062],
# [ 0.0000, 0.0000, 0.5000, 0.9375],
# [ 0.0000, 0.0000, 1.0312, 0.7188],
# [ 0.0000, 0.0000, 0.9375, 1.9062],
# [ 0.0000, 0.0000, 1.9375, 1.4062],
# [ 0.0000, 0.0000, 1.8438, 3.7188],
# [ 0.0000, 0.0000, 3.6250, 2.8125],
# [ 0.0000, 0.0000, 4.8750, 6.1875],
# [ 0.0000, 0.0000, 11.6562, 10.1875]])
# best_ns tensor([4, 3, 7, 7, 6])
# gt_box torch.Size([2, 4])
# anchor_shapes torch.Size([9, 4])
# cc tensor([[0.0155, 0.0573, 0.0907, 0.2186, 0.3333, 0.5540, 0.7563, 0.2710, 0.0688],
# [0.0155, 0.0573, 0.0907, 0.2186, 0.3333, 0.5540, 0.7563, 0.2710, 0.0688]])
# best_ns tensor([6, 6])
#-------------------------------------------------------#
# 选出真实框对应3个先验框中的那个先验框
# argmax函数:torch.argmax(input, dim=None, keepdim=False)返回指定维度最大值的序号
# self.calculate_iou(gt_box, anchor_shapes) 这里是求真实框与9个先验框的iou
best_ns = torch.argmax(self.calculate_iou(gt_box, anchor_shapes), dim=-1)
for t, best_n in enumerate(best_ns):
if best_n not in self.anchors_mask[l]:
continue
#----------------------------------------#
# 判断这个先验框是当前特征点的哪一个先验框
# kself.anchors_mask[l] [6, 7, 8]
# best_n tensor(6)
# k 0
# c tensor(1)
# anchors_mask = [[6,7,8], [3,4,5], [0,1,2]]
#----------------------------------------#
k = self.anchors_mask[l].index(best_n)
#----------------------------------------#
# 获得真实框属于哪个网格点
#----------------------------------------#
i = torch.floor(batch_target[t, 0]).long()
j = torch.floor(batch_target[t, 1]).long()
#----------------------------------------#
# 取出真实框的种类
#----------------------------------------#
c = batch_target[t, 4].long()
#----------------------------------------#
# noobj_mask代表无目标的特征点 无目标为1 有目标为0
#----------------------------------------#
noobj_mask[b, k, j, i] = 0
#----------------------------------------#
# tx、ty代表中心调整参数的真实值
#----------------------------------------#
if not self.giou:
#----------------------------------------#
# tx、ty代表中心调整参数的真实值
#----------------------------------------#
y_true[b, k, j, i, 0] = batch_target[t, 0] - i.float()
y_true[b, k, j, i, 1] = batch_target[t, 1] - j.float()
y_true[b, k, j, i, 2] = math.log(batch_target[t, 2] / anchors[best_n][0])
y_true[b, k, j, i, 3] = math.log(batch_target[t, 3] / anchors[best_n][1])
y_true[b, k, j, i, 4] = 1
y_true[b, k, j, i, c + 5] = 1
else:
#----------------------------------------#
# tx、ty代表中心调整参数的真实值
# b:对应那张图片
# k:哪一个先验框(0-2)
# i:真实框位置
# j:真实框位置
#----------------------------------------#
y_true[b, k, j, i, 0] = batch_target[t, 0]
y_true[b, k, j, i, 1] = batch_target[t, 1]
y_true[b, k, j, i, 2] = batch_target[t, 2]
y_true[b, k, j, i, 3] = batch_target[t, 3]
y_true[b, k, j, i, 4] = 1
y_true[b, k, j, i, c + 5] = 1
#----------------------------------------#
# 用于获得xywh的比例
# 大目标loss权重小,小目标loss权重大
#----------------------------------------#
box_loss_scale[b, k, j, i] = batch_target[t, 2] * batch_target[t, 3] / in_w / in_h
return y_true, noobj_mask, box_loss_scale
# 根据网络的预测结果获得预测框,计算预测框和所有真实框的重合程度,如果重合程度大于一定门限,则将该预测框对应的先验框忽略。其余作为负样本。
def get_ignore(self, l, x, y, h, w, targets, scaled_anchors, in_h, in_w, noobj_mask):
#-----------------------------------------------------#
# 计算一共有多少张图片
#-----------------------------------------------------#
bs = len(targets)
#-----------------------------------------------------#
# 生成网格,先验框中心,网格左上角
# torch.linspace 函数的作用是,返回一个一维的tensor(张量)[start开始值 ,end结束值,steps:分割的点数,默认是100]
# 以特征层13*13为例 grid_x为 【0-12】
# grid_x torch.Size([1, 3, 13, 13])
# grid_y torch.Size([1, 3, 13, 13])
#-----------------------------------------------------#
grid_x = torch.linspace(0, in_w - 1, in_w).repeat(in_h, 1).repeat(
int(bs * len(self.anchors_mask[l])), 1, 1).view(x.shape).type_as(x)
grid_y = torch.linspace(0, in_h - 1, in_h).repeat(in_w, 1).t().repeat(
int(bs * len(self.anchors_mask[l])), 1, 1).view(y.shape).type_as(x)
# 生成先验框的宽高
# anchor_h torch.Size([1, 3, 13, 13])
# anchor_w torch.Size([1, 3, 26, 26])
scaled_anchors_l = np.array(scaled_anchors)[self.anchors_mask[l]] # 从9个先验框里选出相应特征层的3个先验框
anchor_w = torch.Tensor(scaled_anchors_l).index_select(1, torch.LongTensor([0])).type_as(x)
anchor_h = torch.Tensor(scaled_anchors_l).index_select(1, torch.LongTensor([1])).type_as(x)
anchor_w = anchor_w.repeat(bs, 1).repeat(1, 1, in_h * in_w).view(w.shape)
anchor_h = anchor_h.repeat(bs, 1).repeat(1, 1, in_h * in_w).view(h.shape)
# 现在anchor_w,anchor_h 格式如上,里面的值是相应先验框的大小
#-------------------------------------------------------#
# 计算调整后的先验框中心与宽高
#-------------------------------------------------------#
pred_boxes_x = torch.unsqueeze(x + grid_x, -1)
pred_boxes_y = torch.unsqueeze(y + grid_y, -1)
pred_boxes_w = torch.unsqueeze(torch.exp(w) * anchor_w, -1)
pred_boxes_h = torch.unsqueeze(torch.exp(h) * anchor_h, -1)
pred_boxes = torch.cat([pred_boxes_x, pred_boxes_y, pred_boxes_w, pred_boxes_h], dim = -1)
# 根据先验框大小调整后的预测框
for b in range(bs):
#-------------------------------------------------------#
# 将预测结果转换一个形式
# pred_boxes_for_ignore num_anchors, 4
# pred_boxes torch.Size([1, 3, 26, 26, 4])
# pred_boxes_for_ignore torch.Size([2028, 4])
#-------------------------------------------------------#
pred_boxes_for_ignore = pred_boxes[b].view(-1, 4)
#-------------------------------------------------------#
# 计算真实框,并把真实框转换成相对于特征层的大小
# gt_box num_true_box, 4
#-------------------------------------------------------#
if len(targets[b]) > 0:
batch_target = torch.zeros_like(targets[b])
#-------------------------------------------------------#
# 计算出正样本在特征层上的中心点
#-------------------------------------------------------#
batch_target[:, [0,2]] = targets[b][:, [0,2]] * in_w
batch_target[:, [1,3]] = targets[b][:, [1,3]] * in_h
batch_target = batch_target[:, :4].type_as(x)
#-------------------------------------------------------#
# 计算交并比
# anch_ious num_true_box, num_anchors
#-------------------------------------------------------#
# pred_boxes_for_ignore torch.Size([507, 4])
# batch_target torch.Size([7, 4])
# anch_ious torch.Size([7, 507])
anch_ious = self.calculate_iou(batch_target, pred_boxes_for_ignore)
#-------------------------------------------------------#
# 每个先验框对应真实框的最大重合度
# anch_ious_max num_anchors
#-------------------------------------------------------#
anch_ious_max, _ = torch.max(anch_ious, dim = 0)
anch_ious_max = anch_ious_max.view(pred_boxes[b].size()[:3])
noobj_mask[b][anch_ious_max > self.ignore_threshold] = 0
return noobj_mask, pred_boxes
以上参考:http://t.csdn.cn/FZlqy、http://t.csdn.cn/CDZ0D、http://t.csdn.cn/V9ow7、http://t.csdn.cn/CjmoY
总结
有什么不对的地方,还请大家指正。


 1153
1153


 被折叠的 条评论
为什么被折叠?
被折叠的 条评论
为什么被折叠?
 到【灌水乐园】发言


