


LNMP数据流向分析

第一步:浏览器发送http request请求到服务器(Nginx),服务器响应并处理web请求,将一些静态资源(CSS,图片,视频等)返回浏览器。
第二步:将php脚本通过接口传输协议(网关协议)PHP-FCGI(fast-cgi)传输给PHP-FPM(进程管理程序),PHP-FPM不做处理,调用PHP解析器进程,PHP解析器解析php脚本信息。PHP解析器进程可以启动多个,进行并发执行。
第三步:PHP脚本通过PHP和数据库的连接,完成对数据库进行增删改查的功能,并从数据库中获取数据。
第四步:将获取到的数据返回到PHP-FPM,PHP-FPM再通过fast-cgi的形式将脚本信息传送给Nginx。
第五步:服务器再通过Http response的形式传送给浏览器。浏览器再进行解析与渲染然后进行呈现。
搭建Nginx动静分离和反向代理实验步骤如下:
实验环境:Centos7.3操作系统,
实验步骤:
搭建LAMP分离部署
(1)首先我们需要准备三台虚拟机,其中一台搭建好Nginx,然后平滑升级,并且配置好系统启动项
首先开始搭建Nginx服务,这里我是用脚本进行搭建。
[root@localhost ~]# vim 1.sh
#!/bin/bash
yum -y remove httpd
yum -y install gcc gcc-c++ proc-devel zlib-devel openssl-devel
useradd -M -s /sbin/nologin nginx
cd /home/yfr/
tar zxf nginx-1.11.5.tar.gz -C /usr/src/
cd /usr/src/nginx-1.11.5/
./configure --prefix=/usr/local/nginx --user=nginx --group=nginx --with-http_stub_status_module
make && make install
ln -s /usr/local/nginx/sbin/nginx /usr/local/sbin/
ls -l /usr/local/sbin/nginx
nginx -t
nginx
netstat -anpt | grep nginx
~
~
~
:x
[root@localhost ~]# chmod +x 1.sh 给脚本加执行权限
[root@localhost ~]# . 1.sh 执行脚本
[root@localhost ~]# vim 2.sh
#!/bin/bash
cd /home/yfr/
tar zxf nginx-1.13.5.tar.gz -C /usr/src/
cd /usr/src/nginx-1.13.5/
./configure --prefix=/usr/local/nginx --user=nginx --group=nginx --with-http_stub_status_module --with-stream
make
cd objs/
mv /usr/local/nginx/sbin/nginx /usr/local/nginx/sbin/nginx_old
cp nginx /usr/local/nginx/sbin/
mv /usr/local/nginx/conf/nginx.conf /usr/local/nginx/conf/nginx.conf_old
cd …
cp conf/nginx.conf /usr/local/nginx/conf/
nginx -v
fuser -k -n tcp 80
nginx
netstat -anpt | grep nginx
[root@localhost ~]# chmod +x 2.sh 给脚本加执行权限
[root@localhost ~]# . 2.sh 执行脚本
(2)启动之后来编写nginx启动脚本,并且添加到系统进程中。
[root@localhost nginx-1.11.5]# vim /etc/init.d/nginx
#!/bin/bash
#####################Welcome to nginx##################
#chkconfig:2345 99 20
#descrition:this is a nginx web server
PROG="/usr/local/nginx/sbin/nginx"
PIDF="/usr/local/nginx/logs/nginx.pid"
case “$1” in
start)
$PROG
echo “startting nginx…”
;;
stop)
kill -s QUIT $(cat $PIDF)
echo “stopping nginx…”
;;
restart)
    $0 stop
    $0 start
;;
reload)
    kill -s HUP $(cat $PIDF)
    echo "reload nginx....."
;;
*
    echo "USAGE:$0 { start | stop | restart | reload }"
    exit 1
esac
exit 0
:x
[root@localhost nginx-1.11.5]# chmod +x /etc/init.d/nginx
然后我们把编写的启动脚本加执行权限
[root@localhost nginx-1.11.5]# chkconfig --add nginx 添加Nginx启动脚本到系统进程中
[root@localhost nginx-1.11.5]# chkconfig nginx on 启动Nginx这个进程
[root@localhost nginx-1.11.5]# chkconfig --list nginx 查看Nginx的启动权限
Note: This output shows SysV services only and does not include native
systemd services. SysV configuration data might be overridden by native
systemd configuration.
  If you want to list systemd services use 'systemctl list-unit-files'.
  To see services enabled on particular target use
  'systemctl list-dependencies [target]'.
nginx 0:off 1:off 2:on 3:on 4:on 5:on 6:off
[root@localhost nginx-1.11.5]# systemctl stop nginx 重启一下服务
[root@localhost nginx-1.11.5]# netstat -anpt | grep nginx
tcp 0 0 0.0.0.0:80 0.0.0.0:* LISTEN 7302/nginx: master
[root@localhost nginx-1.13.5]# systemctl stop firewalld 关闭防火墙
(3)转到第二台虚拟机上,开始搭建PHP服务器
解压PHP依赖包以及安装包,以及C编译器
[root@localhost ~]# yum -y install gcc gcc-c++
[root@localhost yfr]# tar zxf libmcrypt-2.5.8.tar.gz -C /usr/src/
[root@localhost yfr]# tar xf mhash-0.9.9.9.tar.gz -C /usr/src/
[root@localhost yfr]# tar xf mcrypt-2.6.8.tar.gz -C /usr/src/
[root@localhost yfr]# tar xf php-5.3.28.tar.gz -C /usr/src/
开始给每个依赖包编译安装
[root@localhost libmcrypt-2.5.8]# cd /usr/src/libmcrypt-2.5.8/
[root@localhost libmcrypt-2.5.8]# ./configure && make && make install
[root@localhost libmcrypt-2.5.8]# cd …/mhash-0.9.9.9/
[root@localhost mhash-0.9.9.9]# ./configure && make && make install
[root@localhost mhash-0.9.9.9]# cd …/mcrypt-2.6.8/
[root@localhost mcrypt-2.6.8]# ./configure && make && make install
[root@localhost php-5.3.28]# ln -s /usr/local/lib/libm* /usr/lib
编译安装完依赖包之后,开始下载编译安装PHP
[root@localhost mcrypt-2.6.8]# cd …/php-5.3.28/
[root@localhost php-5.3.28]# export LD_LIBRARY_PATH=$LD_LIBRARY_PATH:/usr/lib
[root@localhost php-5.3.28]# yum -y install openssl-devel libxml2-devel gd libjpeg-devel libpng-devel
[root@localhost php-5.3.28]# ./configure --prefix=/usr/local/php --with-config-file-path=/usr/local/php/etc --with-mhash --with-mcrypt --with-mysql=mysqlnd --with-mysqli=mysqlnd --with-pdo-mysql=mysqlnd --with-libxml-dir --enable-mbstring --enable-bcmath --with-gd --with-jpeg-dir --with-png-dir --enable-fpm
上述命令中:
–prefix=/usr/local/php 指定 php 安装目录
–with-config-file-path=/usr/local/php/etc 指定php.ini位置
–with-mysql=/usr/local/mysqlmysql 扩调用MySQL的存储过程、处理MySQL事务,而且还可以使访问数据库工作变得更加稳定
–with-jpeg-dir 打开对jpeg图片的支持
–with-png-dir 打开对png图片的支持
–enable-fpm 打上PHP-fpm 补丁后才有这个参数,CGI方式安装的启动程序
–with-mcrypt mcrypt算法扩展
–with-mhash mhash算法扩展
[root@localhost php-5.3.28]# make && make install
然后我们把配置文件更改一下。
[root@localhost php-5.3.28]# cp php.ini-development /usr/local/php/etc/php.ini
然后把启动项复制到快捷
[root@localhost php-5.3.28]# ln -s /usr/local/php/sbin/php-fpm /usr/sbin
[root@localhost php-5.3.28]# cd /usr/local/php/etc/ 进入PHP配置文件中
把生产环境的生产配置配置文件复制一份
[root@localhost etc]# cp php-fpm.conf.default php-fpm.conf
[root@localhost etc]# vim php-fpm.conf
140 user = nginx
141 group = nginx
142
143 ; The address on which to accept FastCGI requests.
144 ; Valid syntaxes are:
145 ; ‘ip.add.re.ss:port’ - to listen on a TCP socket to a specific address on
146 ; a specific port;
147 ; ‘port’ - to listen on a TCP socket to all addresses on a
148 ; specific port;
149 ; ‘/path/to/unix/socket’ - to listen on a unix socket.
150 ; Note: This value is mandatory.
151 listen = 192.168.199.54:9000
152
[root@localhost etc]# useradd -M -s /sbin/nologin nginx 创建nginx用户以及组
[root@localhost etc]# php-fpm 启动PHP
[root@localhost etc]# netstat -anput | grep php-fpm
tcp 0 0 192.168.199.54:9000 0.0.0.0:* LISTEN 43799/php-fpm: mast
(4)回到Nginx服务器上,安装nfs并且配置
[root@localhost nginx-1.13.5]# yum -y install nfs-utils 安装nfs
[root@localhost nginx-1.13.5]# mkdir /www 创建共享目录
[root@localhost nginx-1.13.5]# chmod -R 777 /www/ 给共享目录加权限
[root@localhost nginx-1.13.5]# vim /etc/exports 编辑nfs配置文件
/www 192.168.199.0/24(rw,sync)
~
~
~
:x
启动nfs
[root@localhost nginx-1.13.5]# systemctl start rpcbind
[root@localhost nginx-1.13.5]# systemctl start nfs
[root@localhost nginx-1.13.5]# showmount -e 127.0.0.1 查看挂载目录
Export list for 127.0.0.1:
/www 192.168.199.0/24
(5)回到PHP服务器,安装nfs并且挂载
[root@localhost etc]# yum -y install nfs-utils
[root@localhost etc]# mkdir /www
[root@localhost etc]# showmount -e 192.168.199.52
Export list for 192.168.199.52:
/www 192.168.199.0/24
[root@localhost etc]# mount -t nfs 192.168.199.52:/www /www
[root@localhost etc]# df -h
Filesystem Size Used Avail Use% Mounted on
/dev/mapper/cl-root 17G 4.0G 13G 24% /
devtmpfs 473M 0 473M 0% /dev
tmpfs 489M 152K 489M 1% /dev/shm
tmpfs 489M 7.1M 482M 2% /run
tmpfs 489M 0 489M 0% /sys/fs/cgroup
/dev/sda1 1014M 173M 842M 18% /boot
tmpfs 98M 36K 98M 1% /run/user/1000
/dev/sr0 4.1G 4.1G 0 100% /media/dvd
192.168.199.52:/www 17G 3.7G 14G 22% /www
(6)回到Nginx服务器上配置分离部署的PHP选项
[root@localhost nginx-1.13.5]# vim /usr/local/nginx/conf/nginx.conf
43 location / {
44 root /www;
45 index index.php index.html index.htm;
46 }
65 location ~ .php$ {
66 root /www;
67 fastcgi_pass 192.168.199.54:9000;
68 fastcgi_index index.php;
69 fastcgi_param SCRIPT_FILENAME /scripts$fastcgi_script_name;
70 include fastcgi.conf;
71 }
72
[root@localhost nginx-1.13.5]# nginx -t 检测配置文件
nginx: the configuration file /usr/local/nginx/conf/nginx.conf syntax is ok
nginx: configuration file /usr/local/nginx/conf/nginx.conf test is successful
[root@localhost yfr]# unzip Discuz_7.2_FULL_SC_UTF8.zip 解压论坛压缩包
[root@localhost yfr]# cd upload/ 进入论坛
[root@localhost upload]# cp -r * /www/ 复制我们的内容到共享目录中
(6)去第三台虚拟机上安装MySQL
这边使用脚本即可实现
[root@localhost ~]# vim 1.sh
#!/bin/bash
cd /media/dvd/Packages/
rpm -ivh ncurses-devel-5.9-13.20130511.el7.x86_64.rpm
yum -y install gcc gcc-c++
cd /home/yfr/
tar zxvf cmake-2.8.6.tar.gz -C /usr/
cd /usr/cmake-2.8.6/
./configure
gmake && gmake install -j 4
groupadd mysql
useradd -M -s /sbin/nologin mysql -g mysql
cd /home/yfr/
tar zxvf mysql-5.5.22.tar.gz -C /usr/src/
cd /usr/src/mysql-5.5.22/
cmake -DCMAKE_INSTALL_PREFIX=/usr/local/mysql -DSYSCONFDIR=/etc/ -DDEFAULT_CHARSET=utf8 -DDEFAULT_COLLATION=utf8_general_ci -DWITH_EXTRA_CHARSET=all
make -j 4 && make install -j 4
chown -R mysql:mysql /usr/local/mysql
rm -fr /etc/my.cnf
cd /usr/src/mysql-5.5.22/
cp support-files/my-medium.cnf /etc/my.cnf
/usr/local/mysql/scripts/mysql_install_db --user=mysql --basedir=/usr/local/mysql --datadir=/usr/local/mysql/data
echo “PATH”=$PATH:/usr/local/mysql/bin/ >> /etc/profile
. /etc/profile
cp -fr support-files/mysql.server /etc/rc.d/init.d/mysqld
chmod +x /etc/rc.d/init.d/mysqld
chkconfig --add mysqld
systemctl restart mysqld
netstat -pant | grep mysqld
[root@localhost ~]# chmod +x 1.sh 给脚本加权限
[root@localhost ~]# . 1.sh 执行脚本
设置我们的root密码为123
[root@localhost mysql-5.5.22]# mysqladmin -uroot password 123
[root@localhost mysql-5.5.22]# mysql -uroot -p123
创建一个用户discuz密码为123
mysql> grant all on discuz.* to ‘discuz’@‘192.168.199.%’ identified by ‘123’;
Query OK, 0 rows affected (0.00 sec)
mysql> flush privileges; 刷新系统
Query OK, 0 rows affected (0.00 sec)
(7)回到Nginx服务器,设置相关参数,验证
[root@localhost upload]# chmod -R 777 /www/ 给我们的共享目录加权限
[root@localhost upload]# systemctl stop firewalld
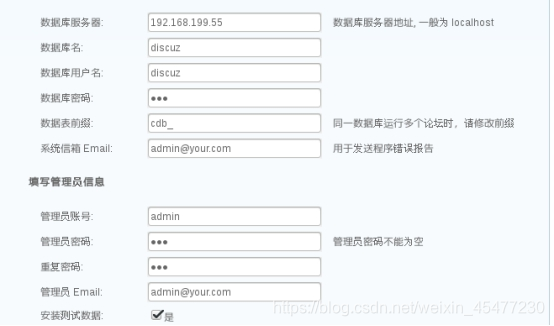
[root@localhost upload]# firefox 192.168.199.52/install/index.php 访问

然后回到PHP服务器
[root@localhost etc]# vim /usr/local/php/etc/php.ini
226 short_open_tag = on
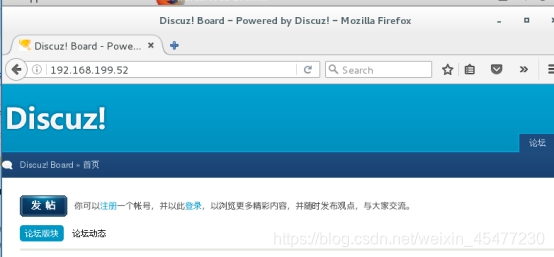
回到Nginx服务器验证

这里的数据库服务器是指MySQL的IP地址


 493
493


 被折叠的 条评论
为什么被折叠?
被折叠的 条评论
为什么被折叠?
 到【灌水乐园】发言


