


Eth-Trunk是一种捆绑技术,它将多个物理接口捆绑成一个逻辑接口,这个逻辑接口就称为Eth-Trunk接口,捆绑在一起的每个物理接口称为成员接口。Eth-Trunk只能由以太网链路构成,其优势在于:
- 负载分担:在某一个
Eth-Trunk接口内可以实现流量负载分担 - 提高可靠性:当某个成员接口连接的物理链路出现故障时,流量会切换到其他可用的链路上,从而提高整个
Trunk链路的可靠性 - 增加带宽:
Trunk接口的总带宽是各成员接口带宽之和
所有Eth-Trunk中物理接口参数必须一致,Eth-Trunk链路两端要求一致的物理参数有:物理接口类型、物理接口数量、物理接口速率、物理接口的双工方式以及物理接口的流控方式。
实验拓扑

实验目的
- 理解
Eth-Trunk的应用场景 - 掌握两种配置
Eth-Trunk链路聚合的方法- 手工负载分担方式:需要手动创建链路聚合组,并配置多个接口加入到所创建的
Eth-Trunk中 - 静态LACP模式:该模式通过
LACP协议协商Eth-Trunk参数后自主选择活动接口
- 手工负载分担方式:需要手动创建链路聚合组,并配置多个接口加入到所创建的
- 掌握配置
Eth-Trunk链路聚合的方法
实验步骤
-
验证各
PC间可以相互Ping通后关闭g0/0/2与g0/0/5,以便后边可以进行实验S1: [S1]interface g0/0/2 [S1-GigabitEthernet0/0/2]shutdown //关闭接口 [S1-GigabitEthernet0/0/2]interface g0/0/5 [S1-GigabitEthernet0/0/5]shutdown S2: [S2]interface g0/0/2 [S2-GigabitEthernet0/0/2]shutdown //关闭接口 [S2-GigabitEthernet0/0/2]interface g0/0/5 [S2-GigabitEthernet0/0/5]shutdown -
模拟链路增加,打开
S1与S2的g0/0/2接口,此时默认开启的MSTP协议一定会阻塞其中某条链路以防形成回路
可以观察到
g0/0/2链路并没有被利用起来,因此无法实质性增加S1与S2之间的带宽。由此也证明单靠增加链路条数是不足以增加带宽的。 -
为了实质性增加
S1与S2之间的带宽,我们决定将g0/0/1与g0/0/2逻辑化成一条物理线路S1: [S1]interface Eth-Trunk 1 //在S1上配置链路聚合,创建Eth-Trunk 1接口 [S1-Eth-Trunk1]mode manual load-balance //指定为手工负载分担模式 [S1-Eth-Trunk1]quit [S1]interface g0/0/1 [S1-GigabitEthernet0/0/1]eth-trunk 1 //将g0/0/1加入Eth-Trunk 1接口 [S1-GigabitEthernet0/0/1]interface g0/0/2 [S1-GigabitEthernet0/0/2]eth-trunk 1S2: [S2]interface Eth-Trunk 1 //在S2上配置链路聚合,创建Eth-Trunk 1接口 [S2-Eth-Trunk1]mode manual load-balance [S2-Eth-Trunk1]quit [S2]interface g0/0/1 [S2-GigabitEthernet0/0/1]eth-trunk 1 [S2-GigabitEthernet0/0/1]int g0/0/2 [S2-GigabitEthernet0/0/2]eth-trunk 1配置完成后,我们查询当下
Eth-Trunk 1的情况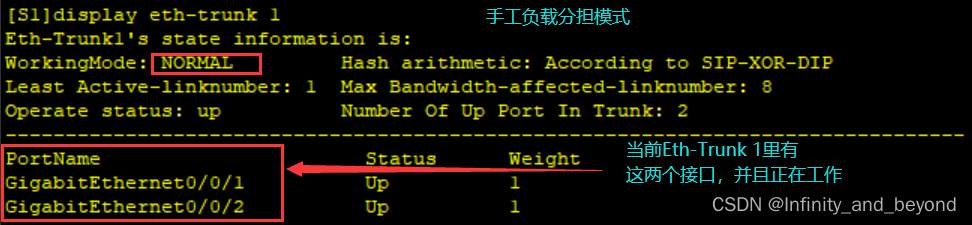
再查询聚合链路后
MSTP生成树的情况
Eth-Trunk组中只要有一条物理链路是正常的,Eth-Trunk接口就不会断开,仍然可以保证数据的转发。可见,其不仅提升了带宽也实现了链路冗余。 -
接着我们再部署一条链路作为备份链路,并采用静态
LACP模式配置Eth-Trunk实现两条链路同时转发,一条链路备份,当其中一条转发链路出现问题时,备份链路可立即进行数据转发 -
打开
S1与S2的g0/0/5模拟增加了一条新链路 -
将先前加入到
Eth-Trunk接口下的物理接口进行删除,否则无法修改模式S1: [S1]interface g0/0/1 [S1-GigabitEthernet0/0/1]undo eth-trunk //将g0/0/1从先前配置的Eth-Trunk中移除 [S1-GigabitEthernet0/0/1]interface g0/0/2 [S1-GigabitEthernet0/0/2]undo eth-trunk S2: [S2]interface g0/0/1 [S2-GigabitEthernet0/0/1]undo eth-trunk [S2-GigabitEthernet0/0/1]interface g0/0/2 [S2-GigabitEthernet0/0/2]undo eth-trunk -
重新创建
Eth-Trunk 1接口,并将其工作模式定位静态LACP模式S1: [S1]interface Eth-Trunk 1 //创建Eth-Trunk 1接口 [S1-Eth-Trunk1]mode lacp-static //工作模式定为静态LACP模式 [S1-Eth-Trunk1]interface g0/0/1 [S1-GigabitEthernet0/0/1]eth-trunk 1 //将g0/0/1加入Eth-Trunk 1接口 [S1-GigabitEthernet0/0/1]interface g0/0/2 [S1-GigabitEthernet0/0/2]eth-trunk 1 [S1-GigabitEthernet0/0/2]interface g0/0/5 [S1-GigabitEthernet0/0/5]eth-trunk 1 S2: [S2]interface Eth-Trunk 1 //创建Eth-Trunk 1接口 [S2-Eth-Trunk1]mode lacp-static //工作模式定为静态LACP模式 [S2-Eth-Trunk1]interface g0/0/1 [S2-GigabitEthernet0/0/1]eth-trunk 1 [S2-GigabitEthernet0/0/1]interface g0/0/2 [S2-GigabitEthernet0/0/2]eth-trunk 1 [S2-GigabitEthernet0/0/2]interface g0/0/5 [S2-GigabitEthernet0/0/5]eth-trunk 1我们观察链路聚合后各端口的情况

-
我们将
S1的优先级由默认的32768改为100,使其成为主动端【值越低优先级越高】,并按照主动端设备的接口来选择活动接口。两端设备选出主动端后,两端都会以主动端的接口优先级来选择活动端口。两端选择了一致的活动接口,活动链路便可以建立起来,设置这些活动链路以负载分担的方式转发数据。S1: [S1]lacp priority 100 //将S1在Eth-Trunk下的优先级设为100 [S1]interface Eth-Trunk 1 [S1-Eth-Trunk1]max active-linknumber 2 //设置Eth-Trunk 1的最大活动链路数为2 [S1-Eth-Trunk1]interface g0/0/1 [S1-GigabitEthernet0/0/1]lacp priority 100 //将g0/0/1接口优先级设为100 [S1-GigabitEthernet0/0/1]interface g0/0/2 [S1-GigabitEthernet0/0/2]lacp priority 100此时我们再次查看
Eth-Trunk 1接口的情况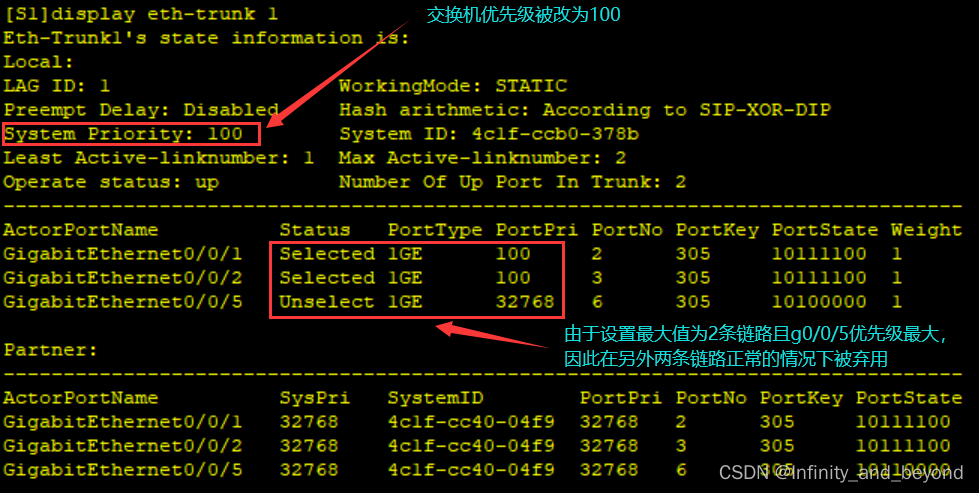
此时我们手动关闭
g0/0/1接口模拟故障,看看g0/0/5是否会接替g0/0/1的位置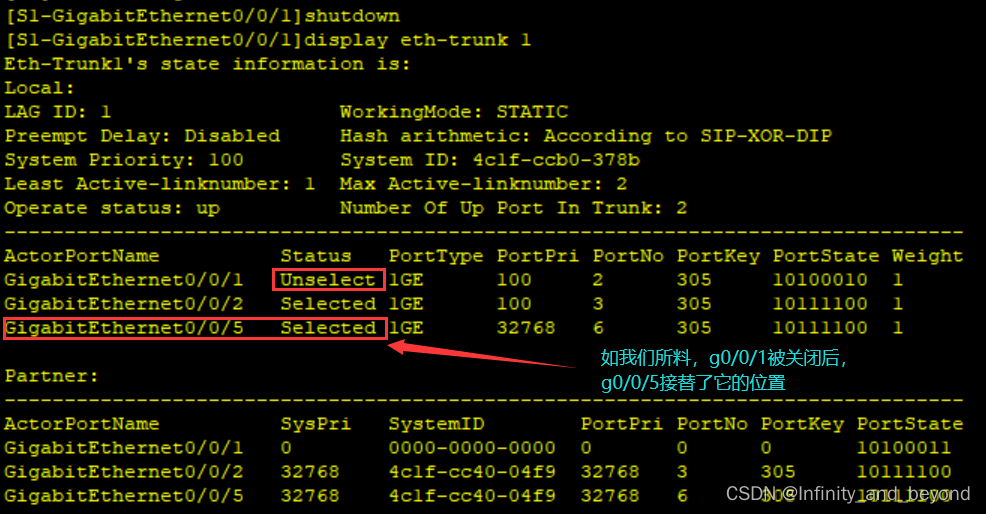
本实验取自华为公司《HCNA网络技术实验指南》,此书对于新手学习计算机网络协议以及熟悉eNSP操作十分友好,强烈推荐!!!


 6679
6679


 被折叠的 条评论
为什么被折叠?
被折叠的 条评论
为什么被折叠?
 到【灌水乐园】发言


