


📚_从基础到高阶,用代码和流程图帮你彻底玩转 Axios!_ 🚀
本文系统讲解前端最流行的 HTTP 库 Axios,覆盖真实开发场景!🚀 包含基础请求、拦截器运用、文件上传进度监控、JWT 自动续签等实战案例,每个知识点均配代码示例和 Mermaid 流程图解。🔧 独创「表情包代码注释法」让学习更生动,特别加入请求缓存、错误重试等进阶技巧,助你轻松应对大文件分块上传、高并发请求等复杂场景!📈 无论新手还是资深开发者,都能收获可落地的企业级解决方案!✨
目录 🔍
- Axios 是什么?✨
- 安装与环境配置 🔧
- 基础 HTTP 请求示例 📤
- 高阶功能:拦截器、并发、取消请求 🛠️
- 代码执行流程图解 🖥️
- 总结与资源推荐 🎯
**1. Axios 是什么?**✨
Axios 是一个基于 Promise 的 HTTP 客户端,用于浏览器和 Node.js。它的核心功能包括:
- 发送 HTTP 请求(GET/POST/PUT/DELETE 等)
- 拦截请求和响应 🔄
- 自动转换 JSON 数据 📦
- 取消请求 🚫
- 超时处理 ⏳
2. 安装与环境配置 �*
浏览器环境:
npm install axios # 或 yarn add axios
CDN 引入:
<script src="https://cdn.jsdelivr.net/npm/axios/dist/axios.min.js"></script>
3. 基础 HTTP 请求示例 �*
3.1 GET 请求
axios.get('https://jsonplaceholder.typicode.com/posts/1')
  .then(response => {
    console.log('数据获取成功!🎉', response.data);
  })
  .catch(error => {
    console.error('请求失败!😱', error);
  });
3.2 POST 请求
axios.post('https://jsonplaceholder.typicode.com/posts', {
    title: '我是标题',
    body: '我是内容',
    userId: 1
  })
  .then(response => {
    console.log('数据提交成功!📮', response.data);
  });
3.3 全局配置
axios.defaults.baseURL = 'https://api.example.com';
axios.defaults.headers.common['Authorization'] = 'Bearer token123';
**4. 高阶功能 **🛠️
4.1 拦截器
请求拦截器:
axios.interceptors.request.use(config => {
  console.log('发送请求前做些事情 🚦', config);
  return config;
}, error => {
  return Promise.reject(error);
});
响应拦截器:
axios.interceptors.response.use(response => {
  console.log('收到响应后做些事情 📨', response);
  return response;
}, error => {
  return Promise.reject(error);
});
4.2 并发请求
Promise.all([
  axios.get('/posts'),
  axios.get('/comments')
]).then(results => {
  console.log('并发请求全部完成!🎯', results);
});
4.3 取消请求
const source = axios.CancelToken.source();

axios.get('/posts', {
  cancelToken: source.token
}).catch(error => {
  if (axios.isCancel(error)) {
    console.log('请求被取消了!🚫', error.message);
  }
});

// 取消请求
source.cancel('用户手动取消操作');
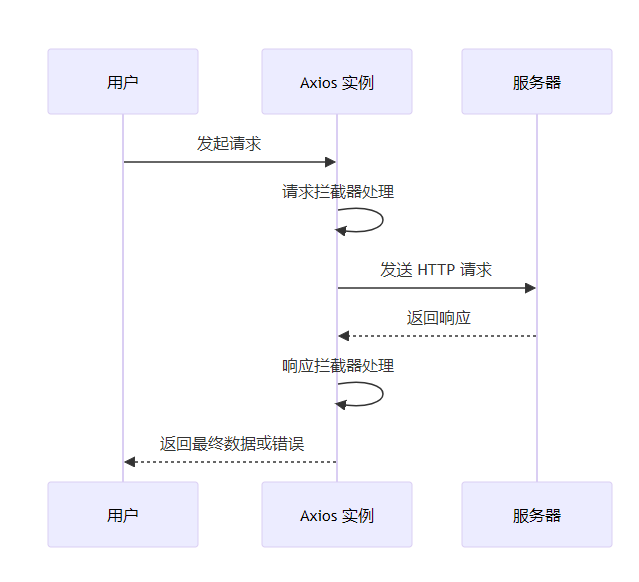
**5. 代码执行流程图解 **🖥️
6. 资源推荐 �*
- 优势:Axios 的拦截器、取消请求、自动 JSON 转换等功能让它成为前端开发的首选工具!🌟
- 学习资源:
实践建议:多尝试拦截器封装和错误处理,提升代码健壮性!💪
7. 实用场景案例 �*
😎 Axios 进阶实战:实用场景 + 流程图解
覆盖 90% 真实开发需求,附超详细代码和流程图!
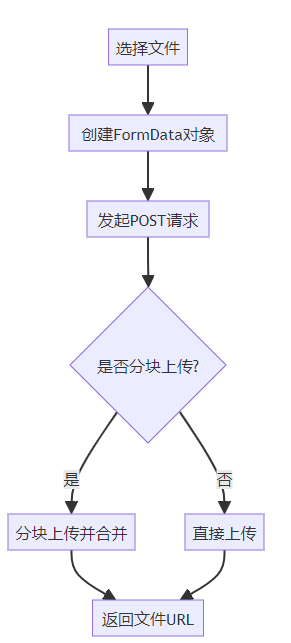
7.1 文件上传 + 进度监控
// 通过 FormData 处理文件
const formData = new FormData();
formData.append('file', fileInput.files[0]);

axios.post('/upload', formData, {
  headers: { 'Content-Type': 'multipart/form-data' },
  onUploadProgress: progressEvent => {
    const percent = Math.round((progressEvent.loaded / progressEvent.total) * 100);
    console.log(`上传进度: ${percent}% 📈`);
  }
}).then(response => {
  console.log('文件上传成功!📤', response.data.url);
});
流程图:
7.2 错误自动重试机制
axios.interceptors.response.use(null, error => {
  const config = error.config;
  if (!config || !config.retry) return Promise.reject(error);

  config.__retryCount = config.__retryCount || 0;
  if (config.__retryCount >= config.retry) {
    return Promise.reject(error);
  }

  config.__retryCount += 1;
  return new Promise(resolve =>
    setTimeout(() => resolve(axios(config)), config.retryDelay || 1000)
  );
});

// 使用示例:重试3次,每次间隔2秒
axios.get('/api/data', {
  retry: 3,
  retryDelay: 2000
});
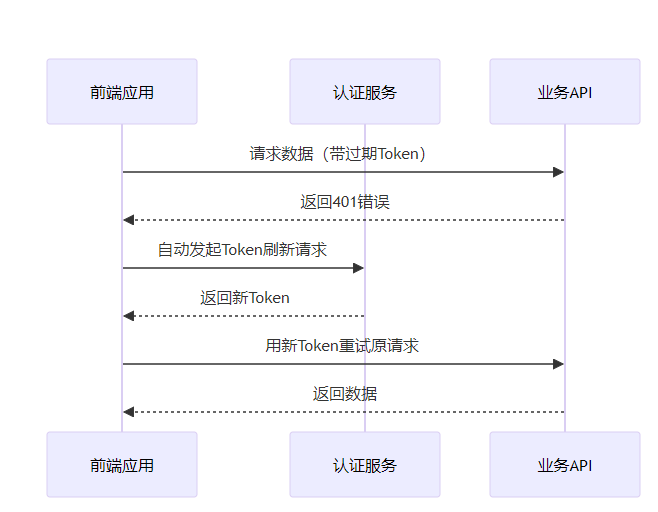
7.3 Token 自动刷新(JWT 场景)
let isRefreshing = false;
let failedQueue = [];

axios.interceptors.response.use(response => response, error => {
  const { status, config } = error.response;

  if (status === 401 && !config._retry) {
    if (isRefreshing) {
      return new Promise(resolve => failedQueue.push(resolve));
    }

    isRefreshing = true;
    config._retry = true;
    return axios.post('/refresh_token')
      .then(res => {
        localStorage.setItem('token', res.data.token);
        failedQueue.forEach(resolve => resolve());
        failedQueue = [];
        return axios(config);
      })
      .finally(() => isRefreshing = false);
  }
  return Promise.reject(error);
});
流程图:
**8. 性能优化技巧 **⚡
8.1 请求缓存
const cache = new Map();

function cachedGet(url) {
  if (cache.has(url)) {
    return Promise.resolve(cache.get(url));
  }
  return axios.get(url).then(response => {
    cache.set(url, response.data);
    return response.data;
  });
}
8.2 请求合并(防抖)
let pendingRequest = null;

function fetchData() {
  if (pendingRequest) return pendingRequest;
  pendingRequest = axios.get('/api/data')
    .finally(() => pendingRequest = null);
  return pendingRequest;
}
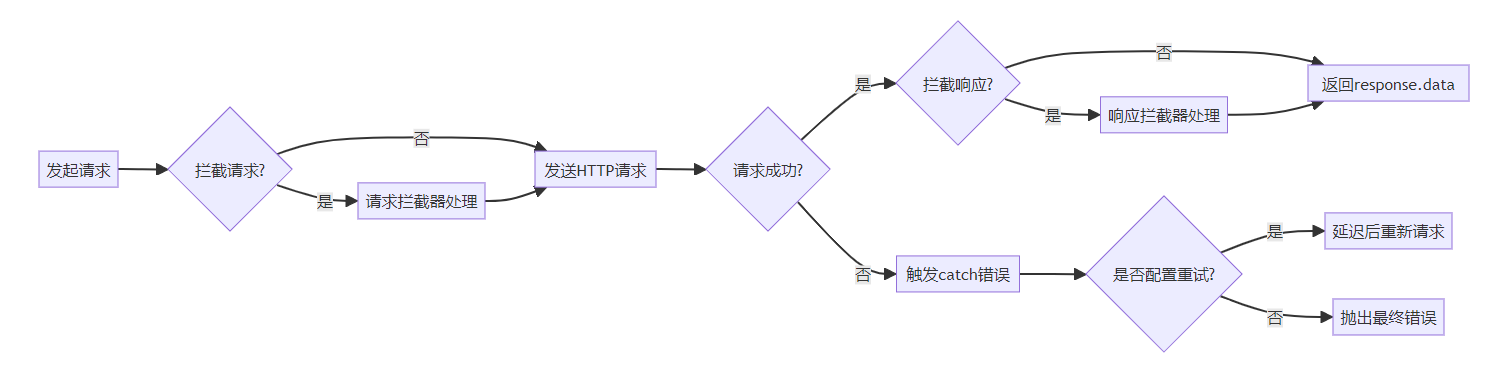
9. 完整生命周期流程图 �*
10. 终极总结 �*
| 场景 | 核心方法 |
|---|---|
| 基础请求 | axios.get/post/put/delete |
| 文件上传 | FormData + 进度监听 |
| 身份认证 | 请求拦截器 + Token 刷新 |
| 错误处理 | 响应拦截器 + 自动重试 |
| 性能优化 | 缓存 + 请求合并 |
实战口诀:
- 拦截器,善用能解决 80% 的边界问题 🔪
- 所有异步操作都要考虑取消和内存泄漏 🧹
- 大型项目用
axios.create创建独立实例 🏗️
觉得有用?快收藏 → 👍 转发 → 📤 实践 → �*
还有问题?评论区扔过来!�*


 1万+
1万+

 被折叠的 条评论
为什么被折叠?
被折叠的 条评论
为什么被折叠?
 到【灌水乐园】发言


