


• 实战:使用nginx实现动静分离的负载均衡集群
• 实战:使用haproxy实现负载均衡集群
LB负载均衡集群分两类: LVS (四层)和 nginx或haproxy (七层)
客户端通过访问分发器的VIP来访问网站
|
现在应用更复杂,比如现在网站页面有: .php .html .png .jpeg .jsp 等, 有动态页面有静态页面。静态页面一般是不变的,想访问更快些,前面学习过SQUID。
|
但是前面的LVS是四层的。基于IP的。现在需要在应用层基于不同的应用进行分发。
|
七层LB , Nginx / Haproxy都可以支持7层LB
现在实现以下功能,拓扑图:
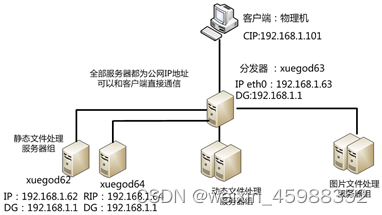
工作中,希望这样:
静态文件处理:可以使用nginx 或apache
动文件处理: apache ,tomcat
图片文件处理: squid
工作中,希望这样:
静态文件处理:可以使用nginx 或apache
动文件处理: apache ,tomcat
图片文件处理: squid
使用nginx实现动静分离的负载均衡集群
- Nginx 负载均衡基础知识
Nginx 的 upstream 负载的5种方式,目前最常用 前3 种方式
1)、轮询(默认)
每个请求按时间顺序逐一分配到不同的后端服务器,如果后端服务器 down 掉,能自动剔除。
2)、weight
指定轮询几率,weight 和访问比率成正比,用于后端服务器性能不均的情况。
3)、ip_hash
每个请求按访问 ip 的 hash 结果分配,这样每个访客固定访问一个后端服务器,可以解决 session 的问题。
4)、fair(第三方)
按后端服务器的响应时间来分配请求,响应时间短的优先分配。
5)、url_hash(第三方) url哈西
按访问url的hash结果来分配请求,使同样的url定向到同一个后端服务器,后端服务器为缓存时比较有效
实例1:使用nginx实现负载均衡和动静分离
源码编译安装nginx
一、安装nginx时必须先安装相应的编译工具和相关依赖
[root@xuegod63 ~]#yum -y install gcc gcc-c++ autoconf automake
[root@xuegod63 ~]#yum -y install zlib zlib-devel openssl openssl-devel pcre pcre-devel
zlib:nginx提供gzip模块,需要zlib库支持
openssl:nginx提供ssl功能
pcre:支持地址重写rewrite功能
安装nginx:
[root@xuegod63 ~]# ll nginx-1.8.0.tar.gz -h #整个nginx文件不到只813K,很小
-rw-r–r-- 1 root root 813K Jul 14 20:17 nginx-1.8.0.tar.gz
[root@xuegod63 ~]# tar -zxvf nginx-1.8.0.tar.gz -C /usr/local/src/
[root@xuegod63 ~]# cd /usr/local/src/nginx-1.8.0/
[root@xuegod63 ~]# ./configure --prefix=/usr/local/nginx --with-http_dav_module --with-http_stub_status_module --with-http_addition_module --with-http_sub_module --with-http_flv_module --with-http_mp4_module
编译和安装: (查看CPU逻辑数cat /proc/cpuinfo | grep processor | wc -l)
[root@xuegod63 ~]#make -j 4
[root@xuegod63 ~]#make install
生成运行nginx的用户:
[root@xuegod63 nginx-1.8.0]# useradd -u 8000 -s /sbin/nologin nginx
[root@xuegod63 nginx-1.8.0]# id !$
id nginx
uid=8000(nginx) gid=8000(nginx) groups=8000(nginx)
nginx主要目录结构:
[root@xuegod63 /]# cd /usr/local/nginx
conf html logs sbin
conf #配置文件
html #网站根目录
logs #日志
sbin #nginx启动脚本
主配置文件:
[root@xuegod63 /]# vim /usr/local/nginx /conf/nginx.conf
启动nginx:
[root@xuegod63 /]# /usr/local/nginx /sbin/nginx
[root@xuegod63 /]# netstat -antup | grep :80
tcp 0 0 0.0.0.0:80 0.0.0.0:* LISTEN 5281/httpd
[root@xuegod63 /]# netstat -antup | grep :80
开机启动:
[root@xuegod63 nginx-1.8.0]# echo '/server/nginx-1.8.0/sbin/nginx & ’ >> /etc/rc.local
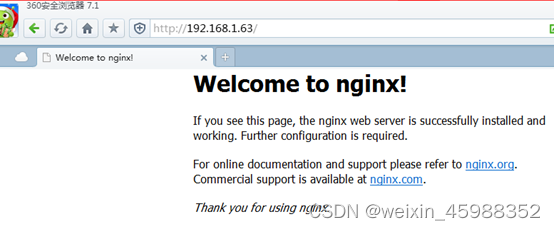
测试:
http://192.168.1.63/
nginx服务日常操作:
测试配置文件语法:
[root@xuegod63 nginx-1.8.0]# /server/nginx-1.8.0/sbin/nginx -t
nginx: the configuration file /server/nginx-1.8.0/conf/nginx.conf syntax is ok
nginx: configuration file /server/nginx-1.8.0/conf/nginx.conf test is successful
重新加载配置文件
[root@xuegod63 nginx-1.8.0]# /server/nginx-1.8.0/sbin/nginx -s reload
关闭nginx
[root@xuegod63 /]# /server/nginx-1.8.0/sbin/nginx -s stop
[root@xuegod63 /]# /server/nginx-1.8.0/sbin/nginx -s start #没有start参数
nginx: invalid option: “-s start”
配置nginx成为分发器,实现动静分离
[root@xuegod63 conf]# cd /server/nginx-1.8.0/conf #配置文件目录
[root@xuegod63 conf]# cp nginx.conf nginx.conf.back #备份一下配置文件
[root@xuegod63 conf]# vim nginx.conf
[root@xuegod63 nginx-1.8.0]# vim /server/nginx-1.8.0/conf/nginx.conf #指定启动nginx用户
改:# user nobody;
为:user nginx nginx;
改:
43 location / {
44 root html;
45 index index.html index.htm; #在location / { 。。。} 中添加以下内容 #定义分发策略
location / {
root html;
index index.html index.htm;
    if ($request_uri ~* \.html$){
               proxy_pass http://htmlservers;
       }
    if ($request_uri ~* \.php$){
               proxy_pass http://phpservers;
       }
               proxy_pass http://picservers;

  }
把以下内容注释掉,否则php文件直接在nginx服务器上解析了,不再解析给后端服务器:
location ~ .php$ {
73 # root html;
74 # fastcgi_pass 127.0.0.1:9000;
75 # fastcgi_index index.php;
76 # fastcgi_param SCRIPT_FILENAME /server/nginx-1.8.0/html$fastcgi_script_name;
77 # include fastcgi_params;
78 # }

#定义负载均衡设备的 Ip
#定义负载均衡设备的 Ip
在配置文件nginx.conf的最后一行}前,添加以下内容:
upstream htmlservers { #定义负载均衡服务器组名称
server 192.168.1.62:80;
server 192.168.1.64:80;
}
upstream phpservers{
server 192.168.1.62:80;
server 192.168.1.64:80;
}
upstream picservers {
server 192.168.1.62:80;
server 192.168.1.64:80;
}
#后期工作中,根据工作中的需要,配置成具体业务的IP地址
保存退出。
重新加载nginx服务器配置文件:
[root@xuegod63 conf]# /server/nginx-1.8.0/sbin/nginx -t
nginx: the configuration file /server/nginx-1.8.0/conf/nginx.conf syntax is ok
nginx: configuration file /server/nginx-1.8.0/conf/nginx.conf test is successful
[root@xuegod63 conf]# /server/nginx-1.8.0/sbin/nginx -s reload
配置后端服务器: xuegod62
配置web服务器:
[root@xuegod62 html]# yum install httpd php -y
生成静态测试文件:
root@xuegod62 html]#echo 192.168.1.62 > /var/www/html/index.html
生成动态测试文件:
[root@xuegod62 html]#vim /var/www/html/test.php #写如以下内容:
192.168.1.62-php
生成图片文件:
上传如下图片,到“xuegod62网站/var/www/html/目录下:
启动apache服务器:
[root@xuegod62 html]# service httpd restart
配置后端服务器: xuegod64
IP: 192.168.1.64
配置web服务器:
[root@xuegod64 html]# yum install httpd php -y
生成静态测试文件:
echo 192.168.1.64 > /var/www/html/index.html
生成动态测试文件:
vim /var/www/html/test.php #写如以下内容:
192.168.1.64-php
生成图片文件:
上传如下图片,到“xuegod64网站/var/www/html/目录下:
[root@xuegod64 html]# service httpd restart
到此nginx实现负载均衡结束。
测试转发静态页面:
http://192.168.1.63/
测试性能:
扩展: 文件打开数过多
[root@xuegod64 htm
 最低0.47元/天 解锁文章


 499
499


 被折叠的 条评论
为什么被折叠?
被折叠的 条评论
为什么被折叠?
 到【灌水乐园】发言


