


爬取研究中心的书目
现在,想要把如下网站中的书目信息爬取出来。
案例一 耶鲁
Publications | Yale Law School
分析网页,如下图所示,需要爬取的页面,标签信息是“<p>”,所以用 items=soup.find_all("p")

代码如下:
import requests
from bs4 import BeautifulSoup as bs
from openpyxl import Workbook


url="https://law.yale.edu/china-center/publications/recent-staff-publications"

webfile=requests.get(url)
webfile.encoding="utf-8"
data=webfile.text

soup=bs(data,"html.parser")
soup.prettify()

items=soup.find_all("p")
for i in items:
    print(i.get_text())
完善代码如下:
import requests
from bs4 import BeautifulSoup as bs
from openpyxl import Workbook
import re

wb=Workbook()
ws=wb.active

wfile=open("bool.txt","w",encoding="utf-8")

url="https://law.yale.edu/china-center/publications/recent-staff-publications"

webfile=requests.get(url)
webfile.encoding="utf-8"
data=webfile.text

soup=bs(data,"html.parser")
soup.prettify()

items=soup.find_all("p")


# 正则表达式匹配模式
pattern1 = r'([^,\n“]+), “([^”]+),”\s*([^,\n]+)'
pattern2 = r'([^,]+(?: and [^,]+)*), “([^”]+),”'

'''
正则表达式匹配模式:

([^,]+(?: and [^,]+)*):匹配作者名。这个模式匹配一个或多个名字,由“and”连接。[^,]+匹配一个或多个非逗号字符,(?: and [^,]+)*是一个非捕获组,匹配零个或多个“and”后跟一个或多个非逗号字符的模式。
“([^”]+),”:匹配文章名。这个模式匹配引号内的任何字符,直到遇到闭合的引号和逗号。

([^,\n“]+):匹配作者名。这个模式匹配一个或多个非逗号、换行符和左引号的字符序列。[^,\n“]是一个字符集,表示匹配除了逗号、换行符和左引号之外的任何字符。+表示匹配一个或多个这样的字符。
“([^”]+),”:匹配文章名。这个模式匹配以左引号开始,以右引号结束的任何字符序列,并且确保文章名后面跟着一个逗号。
([^,\n]+):匹配期刊名。这个模式匹配一个或多个非逗号和换行符的字符序列。

'''


for i in items:
    info=i.get_text()
    # 查找所有匹配项
    matches = re.findall(pattern1, info)
    if len(matches)>0:
        print(matches)

        for m in matches:
            print(m,sep=",",file=wfile)

wfile.close()
将txt文本导入excel即可。原因在于正则表达式中得到的列表中的信息,有的似乎是tuptle类型,导致openpyxl无法输入xlsx表格中。所以采用了txt文本方式。
基于以上出现的情况,再次优化代码,如下:
import requests
from bs4 import BeautifulSoup as bs
from openpyxl import Workbook
import re

wb=Workbook()
ws=wb.active

wfile=open("bool.txt","w",encoding="utf-8")

url="https://law.yale.edu/china-center/publications/recent-staff-publications"

webfile=requests.get(url)
webfile.encoding="utf-8"
data=webfile.text

soup=bs(data,"html.parser")
soup.prettify()

items=soup.find_all("p")


# 正则表达式匹配模式
pattern1 = r'([^\n“]+), “([^”]+),”\s*([^,\n]+)' #作者和文章名和期刊名,用括号将三者区分
pattern2 = r'([^\n“]+), “([^”]+),”\s*([^,\n]+[)])'
#parttern1缺少了最后的右括号,在这里补充上。[)]表示可供选择。


for i in items:
    info=i.get_text()
    # 查找所有匹配项
    matches = re.findall(pattern2, info)
    if len(matches)>0:
        print(matches)

        for m in matches:
            mlist=[]#将元组的元素放到列表中,这样可以把列表的字符串输出到xlsx中
            for k in m:
                mlist.append(k)
                print(k,sep=",",end=";",file=wfile)

            print("\n",file=wfile)
##                print(type(k))
            ws.append(mlist)

##            print(m,sep=",",file=wfile)#注意,m是元组而不是字符串
            #print(type(m))

wfile.close()
wb.save("book2.xlsx")
首先是完善了正则表达式:
'''
正则表达式匹配模式[^,]+匹配一个或多个非逗号字符,
(?: and [^,]+)*是一个非捕获组,匹配零个或多个“and”后跟一个或多个非逗号字符的模式。([^\n“]+):匹配作者名。这个模式匹配一个或多个非换行符和左引号的字符序列。
“([^”]+),”:匹配文章名。这个模式匹配引号内的任何字符,直到遇到闭合的引号和逗号。
[^,\n“]是一个字符集,表示匹配除了逗号、换行符和左引号之外的任何字符。+表示匹配一个或多个这样的字符。
“([^”]+),”:匹配文章名。这个模式匹配以左引号开始,以右引号结束的任何字符序列,并且确保文章名后面跟着一个逗号。
([^,\n]+):匹配期刊名。这个模式匹配一个或多个非逗号和换行符的字符序列。
'''# 正则表达式匹配模式
pattern1 = r'([^\n“]+), “([^”]+),”\s*([^,\n]+)' #作者和文章名和期刊名,用括号将三者区分
pattern2 = r'([^\n“]+), “([^”]+),”\s*([^,\n]+[)])'
#parttern1缺少了最后的右括号,在这里补充上。[)]表示可供选择。
然后循环输出元组中的元素,放到列表中,从而将元组的元素转化为列表中的字符串。
最后,将不必要的信息清除,简洁代码如下:
import requests
from bs4 import BeautifulSoup as bs
from openpyxl import Workbook
import re

wb=Workbook()
ws=wb.active

wfile=open("bool.txt","w",encoding="utf-8")

url="https://law.yale.edu/china-center/publications/recent-staff-publications"

webfile=requests.get(url)
webfile.encoding="utf-8"
data=webfile.text

soup=bs(data,"html.parser")
soup.prettify()

items=soup.find_all("p")

# 正则表达式匹配模式

pattern2 = r'([^\n“]+), “([^”]+),”\s*([^,\n]+[)])'#作者和文章名和期刊名,用括号将三者区分

for i in items:
    info=i.get_text()
    # 查找所有匹配项
    matches = re.findall(pattern2, info)
    if len(matches)>0:
        print(matches)

        for m in matches:
            mlist=[]
            for k in m:
                mlist.append(k)
                print(k,sep=",",end=";",file=wfile)
            ws.append(mlist)

wfile.close()
wb.save("book2.xlsx")
即可完成。
案例二 哈佛
爬取哈佛大学费正清中心出版书籍的信息时候,标签信息是class="article-container entry-content clear",所以用:item1=soup.find_all(attrs={"class":"article-container entry-content clear"})

所以,爬取代码如下:
'''
下面这段代码,爬取哈佛大学费正清中心出版书籍的信息
'''
import requests
from bs4 import BeautifulSoup as bs
from openpyxl import Workbook

wb=Workbook()
ws=wb.active

for page in range(1,9):
    url=f'https://fairbank.fas.harvard.edu/research/publications/page/{page}/'

    webFile=requests.get(url)
    webFile.eocoding="utf-8"
    data=webFile.text

    soup=bs(data,'html.parser')
    soup.prettify()

    ##item1=soup.find_all(attrs={"class":"uagb-post__title"})#提取书本标题信息
    ##for i in item1:
    ##    print(i.get_text())
    ##
    ##
    ##item2=soup.find_all(attrs={"class":"ast-excerpt-container ast-blog-single-element"})#提取书目介绍信息
    ##for k in item2:
    ##    print(k.get_text())

    item3=soup.find_all(attrs={"class":"article-container entry-content clear"})#在网络页面中,找到的整个的文本
    for m in item3:
        info=m.get_text()
        row1=info.split("\n")
        row2=list(filter(lambda x:len(x)>1,row1))#过滤掉空字符串。
        ws.append(row2)#worksheet中添加的是列表,然后把列表中的元素挨个放到了xlsx表格中。

wb.save("bool.xlsx")
即可完成。
案例三 普林斯顿大学
观察该网站,标签信息是class="row search-result-wrapper"

其网站如下:
url="https://catalog.princeton.edu/?f%5Bformat%5D%5B%5D=Book&f%5Blocation%5D%5B%5D=East+Asian+Library&page=1&per_page=100"
于是写代码如下:
import requests
from bs4 import BeautifulSoup as bs
from openpyxl import Workbook
import re

wb=Workbook()
ws=wb.active


for pageNum in  range(1,100):#提取一百页,共10000条书目的信息
    url=f"https://catalog.princeton.edu/?f%5Bformat%5D%5B%5D=Book&f%5Blocation%5D%5B%5D=East+Asian+Library&page={pageNum}&per_page=100"

    webfile=requests.get(url)
    webfile.encoding="utf-8"
    data=webfile.text

    soup=bs(data,"html.parser")
    soup.prettify()


    item=soup.find_all(attrs={"class":"row search-result-wrapper"})
    for m in item:
        info=m.get_text()
        row1=info.split("\n")
        row2=list(filter(lambda x: len(x)>1,row1))
        ws.append(row2)
    print(pageNum,pageNum/100)
wb.save("book3.xlsx")
即可完成。
爬取公众号讲座图片信息
要下载网页中的图片,你可以使用Python的几个库来实现,比如`requests`来获取网页内容,以及`BeautifulSoup`来解析HTML并提取图片链接。以下是一个简单的示例代码,用于下载指定链接中的所有图片:
```python
案例一 微信公众号讲座海報
图片对应的链接如下图所示:
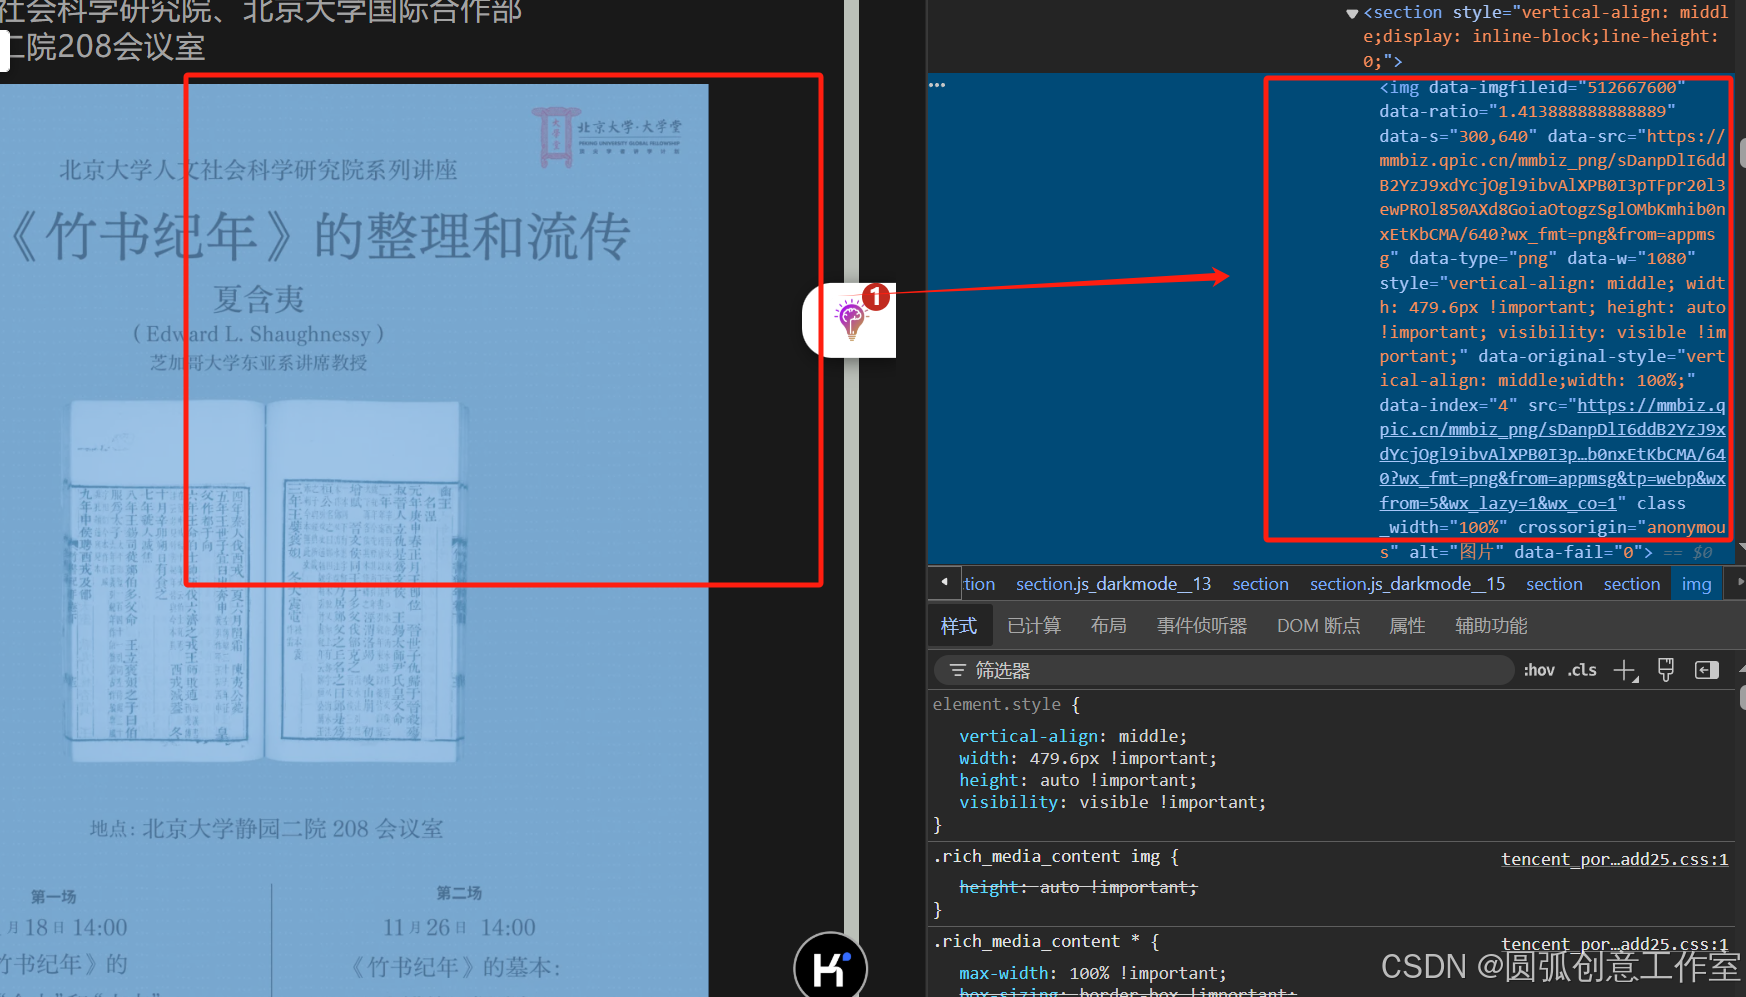
网络链接如下:
<img data-imgfileid="512667600" data-ratio="1.413888888888889" data-s="300,640"
data-src="https://mmbiz.qpic.cn/mmbiz_png/sDanpDlI6ddB2YzJ9xdYcjOgl9ibvAlXPB0I3pTFpr20l3ewPROl850AXd8GoiaOtogzSglOMbKmhib0nxEtKbCMA/640?wx_fmt=png&from=appmsg"
data-type="png"
data-w="1080"
style="vertical-align: middle; width: 479.6px !important; height: auto !important; visibility: visible !important;" data-original-style="vertical-align: middle;width: 100%;"
data-index="4" src="https://mmbiz.qpic.cn/mmbiz_png/sDanpDlI6ddB2YzJ9xdYcjOgl9ibvAlXPB0I3pTFpr20l3ewPROl850AXd8GoiaOtogzSglOMbKmhib0nxEtKbCMA/640?wx_fmt=png&from=appmsg&tp=webp&wxfrom=5&wx_lazy=1&wx_co=1" class="" _width="100%" crossorigin="anonymous" alt="图片" data-fail="0">
代码如下,
import os

import urllib.request
import requests
from bs4 import BeautifulSoup
import re

# 目标URL
url = 'https://mp.weixin.qq.com/s/A4Q1tVK6LnDa4vpJmMSIvQ'

# 发送HTTP请求获取网页内容
response = requests.get(url)
response.encoding = 'utf-8'  # 根据网页编码设置,可能需要调整

# 解析网页内容
soup = BeautifulSoup(response.text, 'html.parser')

# 找到所有图片标签
img_tags = soup.find_all('img')

# 创建一个目录来保存图片
if not os.path.exists('lecture_images'):
    os.makedirs('lecture_images')

# 遍历所有图片标签并下载图片
zhang=1
for img in img_tags:
    # 获取图片的URL,优先使用data-src属性
    imageUrl = img.get('data-src', '') or img.get('src', '')
    print(imageUrl)

    imageName= os.path.join('lecture_images',str(zhang)+"-"+".png")#將图片存在了文件夹中。
    urllib.request.urlretrieve(imageUrl,filename=imageName)
    zhang+=1
即可完成,在文件夹中爬取了相关的讲座图片。不过爬取的图片有些非讲座信息,需要进一步清除。
### 注意事项:
如果图片链接是动态加载的,那么使用requests和BeautifulSoup可能无法直接获取到图片链接,因为这些库只能处理静态内容。动态加载的内容通常是通过JavaScript在客户端执行后生成的。在这种情况下,你可以使用以下几种方法之一来处理:
1. 使用Selenium
Selenium是一个自动化测试工具,可以模拟浏览器行为,包括执行JavaScript。你可以使用Selenium来加载页面,然后提取动态加载的图片链接。
from selenium import webdriver
import time
import requests
from bs4 import BeautifulSoup
import os

# 设置Selenium驱动
driver = webdriver.Chrome()  # 确保你已经安装了ChromeDriver

# 访问网页
driver.get('https://mp.weixin.qq.com/s/A4Q1tVK6LnDa4vpJmMSIvQ')

# 等待页面加载完成
time.sleep(5)  # 根据网络情况调整等待时间

# 获取页面源码
html = driver.page_source

# 解析网页内容
soup = BeautifulSoup(html, 'html.parser')

# 找到所有图片标签
img_tags = soup.find_all('img')

# 创建一个目录来保存图片
if not os.path.exists('lecture_images'):
    os.makedirs('lecture_images')

# 遍历所有图片标签并下载图片
for img in img_tags:
    # 获取图片的URL
    img_url = img.get('src')
    if img_url:
        # 发送请求下载图片
        img_response = requests.get(img_url)
        if img_response.status_code == 200:
            # 构造图片的保存路径
            img_name = os.path.join('lecture_images', img_url.split('/')[-1])
            # 保存图片
            with open(img_name, 'wb') as f:
                f.write(img_response.content)
            print(f"图片已保存:{img_name}")
        else:
            print(f"图片下载失败:{img_url}")

# 关闭浏览器
driver.quit()
2. 使用Pyppeteer
Pyppeteer是一个Python库,它提供了一个高级的接口来控制无头版Chrome。它也是基于Chromium的,可以执行JavaScript。
import asyncio
from pyppeteer import launch
from bs4 import BeautifulSoup
import requests
import os

async def main():
    browser = await launch(headless=True)
    page = await browser.newPage()
    await page.goto('https://mp.weixin.qq.com/s/A4Q1tVK6LnDa4vpJmMSIvQ')
    await page.waitForSelector('img')  # 等待图片加载
    html = await page.content()
    soup = BeautifulSoup(html, 'html.parser')
    img_tags = soup.find_all('img')
    if not os.path.exists('lecture_images'):
        os.makedirs('lecture_images')
    for img in img_tags:
        img_url = img.get('src')
        if img_url:
            img_response = requests.get(img_url)
            if img_response.status_code == 200:
                img_name = os.path.join('lecture_images', img_url.split('/')[-1])
                with open(img_name, 'wb') as f:
                    f.write(img_response.content)
                print(f"图片已保存:{img_name}")
            else:
                print(f"图片下载失败:{img_url}")
    await browser.close()

asyncio.get_event_loop().run_until_complete(main())
即可完成。
案例二 文研院讲座海報
如下所示:
import os
import requests
from bs4 import BeautifulSoup

# 创建一个目录来保存图片
if not os.path.exists('images'):
    os.makedirs('images')
# 网页URL
for page in range(1:25):
    url = f'http://www.ihss.pku.edu.cn/templates/zs_hb/index.aspx?nodeid=200&pagesize={page}&pagenum=9'
    print(url)

    # 发送HTTP请求获取网页内容
    response = requests.get(url)
    html_content = response.text

    # 解析HTML内容
    soup = BeautifulSoup(html_content, 'html.parser')

    # 查找所有图片标签
    img_tags = soup.find_all('img')

    # 遍历图片标签并下载图片
    k=0
    for img in img_tags:
        # 获取图片的URL
        img_url = img.get('src')
        k+=1
        if not img_url:
            continue  # 如果没有图片URL,则跳过

        try:
            print(img_url)

            # 完整的图片URL
            full_img_url = requests.compat.urljoin(url, img_url)

            print(full_img_url)
            # 获取图片的文件名
            filename = f"北大文研院讲座{page}-{k}.jpg"

            # 发送HTTP请求获取图片内容
            with requests.get(full_img_url, stream=True) as r:
                with open(filename, 'wb') as f:
                    for chunk in r.iter_content(chunk_size=8192):
                        f.write(chunk)

            print(f'图片已下载:{filename}')

        except:pass


print('所有图片下载完成。')
即可完成。
爬取视频
案例一 单个m3u8文件
如下代码,尝试爬取熊猫视频。
import requests
from bs4 import BeautifulSoup

# 视频页面的URL
#video_url = 'https://live.ipanda.com/2024/12/29/VIDEhZob4eWsvi1UXj4cHAQJ241229.shtml'
#video_url = "https://live.ipanda.com/2024/12/29/VIDEhZob4eWsvi1UXj4cHAQJ241229.shtml?spm=C98970.PHSCvfkkgowB.MegryT2Yxr1F.10"
video_url = "https://live.ipanda.com/2024/12/29/VIDEhZob4eWsvi1UXj4cHAQJ241229.shtml?spm=C98970.PHSCvfkkgowB.MegryT2Yxr1F.10"
# 发送HTTP请求获取网页内容
response = requests.get(video_url)
response.encoding="utf-8"
web_content = response.text

# 使用BeautifulSoup解析网页内容
soup = BeautifulSoup(web_content, 'html.parser')


# 寻找视频文件的URL,如果在video标签的src属性中,即可如下:

video_tags=soup.find_all(attrs={"class":"video"})
video_tags=soup.find_all(attrs={"video id":"_video_player_html5_api"})

srclinks=[]
for video_tag in video_tags:
    if video_tag.has_attr("src"):
        src_link.append(video_tag["src"])


    # 发送请求下载视频
    video_response = requests.get(video_src, stream=True)
    if video_response.status_code == 200:
        # 将视频保存到本地文件
        with open('video.mp4', 'wb') as video_file:
            for chunk in video_response.iter_content(chunk_size=1024):
                video_file.write(chunk)
        print('视频下载完成')
    else:
        print('视频下载失败')
else:
    print('未找到视频文件')
但是在实际操作中会发现视频没有下载下来。这个时候需要在网页中,下载m3u8文件,最后把这些片段合并成一个MP4。这样就能下载下来视频。手机浏览器夸克就使用了这样的步骤。
m3u8文件格式最初是由苹果公司提出,用于存储基于HTTP Live Streaming(HLS)协议的播放列表。HLS是一种用于实时流传输的协议,旨在提供更流畅的视频体验。m3u8文件作为播放列表,包含了视频流的信息,指导播放器如何获取和解码视频内容。
需要更新代码如下。
观察网络文件信息:
<div class="video-js vjs-fill dimensions-_video_player vjs-controls-enabled vjs-touch-enabled vjs-workinghover vjs-v7 vjs-layout-medium whs vjs-has-started vjs-paused vjs-ended vjs-user-inactive"
id="_video_player" tabindex="-1" lang="zh-cn" translate="no" role="region" aria-label="视频播放器"><video id="_video_player_html5_api" class="vjs-tech" tabindex="-1" autoplay="" src="blob:https://live.ipanda.com/8bf67562-8cef-489d-bd54-deb832c3a0c0">
<source src="https://dh5.cntv.qcloudcdn.com/asp/h5e/hls/main/0303000a/3/default/0c5b97eb7f004bfda4a30b509eabfdc4/main.m3u8?maxbr=2048&contentid=15120519184043" type="application/x-mpegURL">
</video>
<div class="ads-overlay">
<span class="ads-label-text" aria-live="off" role="presentation">
</span><button class="ads-mute vjs-mute-control vjs-control vjs-button vjs-vol-1" type="button" title="静音(m)" aria-disabled="false"><span class="vjs-icon-placeholder" aria-hidden="true"></span><span class="vjs-control-text" aria-live="polite">静音(m)</span></button><button class="ads-fullscreen-btn vjs-fullscreen-control vjs-control vjs-button" type="button" title="全屏(f)" aria-disabled="false"><span class="vjs-icon-placeholder" aria-hidden="true"></span><span class="vjs-control-text" aria-live="polite">全屏(f)</span></button><div class="ad-countdown-time vjs-time-control vjs-control"><span class="vjs-control-text" role="presentation">ADCountdown Time </span><span class="ad-countdown-time-display" aria-live="off" role="presentation">
</span><span class="ad-vip-can-skip"> | 广告</span>
</div>
</div><div class="pause-ad-overlay vjs-hidden">
<div class="pause-ad-content vjs-hidden"><img class="pause-ad-img" role="presentation" src="" onload=""><button class="pause-ad-close vjs-control vjs-button" type="button" aria-disabled="false"><span class="vjs-icon-placeholder" aria-hidden="true"></span><span class="vjs-control-text" aria-live="polite"></span><span class="ad-label">关闭广告</span></button></div></div><div class="banner-ad-overlay vjs-hidden"><div class="banner-ad-content"><img class="banner-ad-img" role="presentation" src=""><button class="banner-ad-close vjs-control vjs-button" type="button" aria-disabled="false"><span class="vjs-icon-placeholder" aria-hidden="true"></span><span class="vjs-control-text" aria-live="polite"></span></button></div></div><div class="vjs-poster" tabindex="-1" aria-disabled="false" style="background-image: url("https://p2.img.cctvpic.com/fmspic/2024/12/29/0c5b97eb7f004bfda4a30b509eabfdc4-180.jpg");"></div><div class="ad-vip-skip-hint vjs-time-control vjs-control ad-vip-skip-hint-hide">
<span class="vjs-control-text" role="presentation"> </span><span class="ad-vip-skip-hint-display" aria-live="off" role="presentation">尊贵的用户,已为您跳过广告</span></div><div class="ad-vip-skip-hint vjs-time-control vjs-control ad-vip-skip-hint-hide"><span class="vjs-control-text" role="presentation"> </span><span class="ad-vip-skip-hint-display" aria-live="off" role="presentation">您上次观看至-:-处,已为您续播</span></div><div class="vjs-barrage-layer"></div><div class="bezel-container vjs-hidden" data-layer="4"><div class="cvp-bezel-text-wrapper"><div class="cvp-bezel-text"></div></div><div class="cvp-bezel"><div class="cvp-bezel-icon"><svg height="100%" version="1.1" viewBox="0 0 36 36" width="100%">
<use class="cvp-svg-shadow" xlink:href="#cvp122"></use>
<path class="cvp-svg-fill" d="" id="cvp122"></path>
</svg></div></div></div><div class="vjs-loading-spinner" dir="ltr"><span class="vjs-control-text">正在加载 视频播放器。</span>
</div>
可以看到,<video id="_video_player_html5_api" class="vjs-tech" tabindex="-1" autoplay="" src="blob:https://live.ipanda.com/8bf67562-8cef-489d-bd54-deb832c3a0c0">
显然, id="_video_player_html5_api",其语法结构和class="ad-vip-can-skip"是一致的。
<span
<div
前面是<division,<span这样大的文本容域,在其后有具体的数据信息,如id=" ……", class="……",src="……",后面的这些备注信息是并列的。
In HTML, the
<span>tag is an inline container used to mark up a part of a text or to apply styles to a part of the text. It is a generic inline container and does not inherently represent anything. Here are some key points about the<span>tag:span
英
/ spæn /
美
/ spæn /
简明柯林斯
n.
时间跨度,一段时间;(桥或拱的)墩距,跨距;宽度,翼展;范围,包括的种类
可以这样理解,<head , <span,<div是网络文本的结构,标题、段落、分区等等。
id=……,src=……,class=……,
更新代码如下:
import requests
from bs4 import BeautifulSoup
import re

# 视频页面的URL
#video_url = 'https://live.ipanda.com/2024/12/29/VIDEhZob4eWsvi1UXj4cHAQJ241229.shtml'
#video_url = "https://live.ipanda.com/2024/12/29/VIDEhZob4eWsvi1UXj4cHAQJ241229.shtml?spm=C98970.PHSCvfkkgowB.MegryT2Yxr1F.10"
video_url = "https://live.ipanda.com/2025/01/10/VIDExFN8sl7SCWDrfoZ1zpAN250110.shtml?spm=C98970.PHSCvfkkgowB.MegryT2Yxr1F.7"
# 发送HTTP请求获取网页内容
response = requests.get(video_url)
response.encoding="utf-8"
web_content = response.text

# 使用BeautifulSoup解析网页内容
soup = BeautifulSoup(web_content, 'html.parser')


# 寻找视频文件的URL,如果在video标签的src属性中,即可如下:

video_tags=soup.find_all(attrs={"class":"video"})#找到video所在位置

html_content=str(video_tags)


pattern = r'src="([^"]+)"'
src_links = re.findall(pattern, html_content)#用正则表达式把src找到
for link in src_links:
    print(link)


##    # 发送请求下载视频
##    video_response = requests.get(video_src, stream=True)
##    if video_response.status_code == 200:
##        # 将视频保存到本地文件
##        with open('video.mp4', 'wb') as video_file:
##            for chunk in video_response.iter_content(chunk_size=1024):
##                video_file.write(chunk)
##        print('视频下载完成')
##    else:
##        print('视频下载失败')
##else:
##    print('未找到视频文件')
实际上,得换一个思路。网络视频文件多是由m3u8文件拼合构成。所以得从m3u8文件中入手。
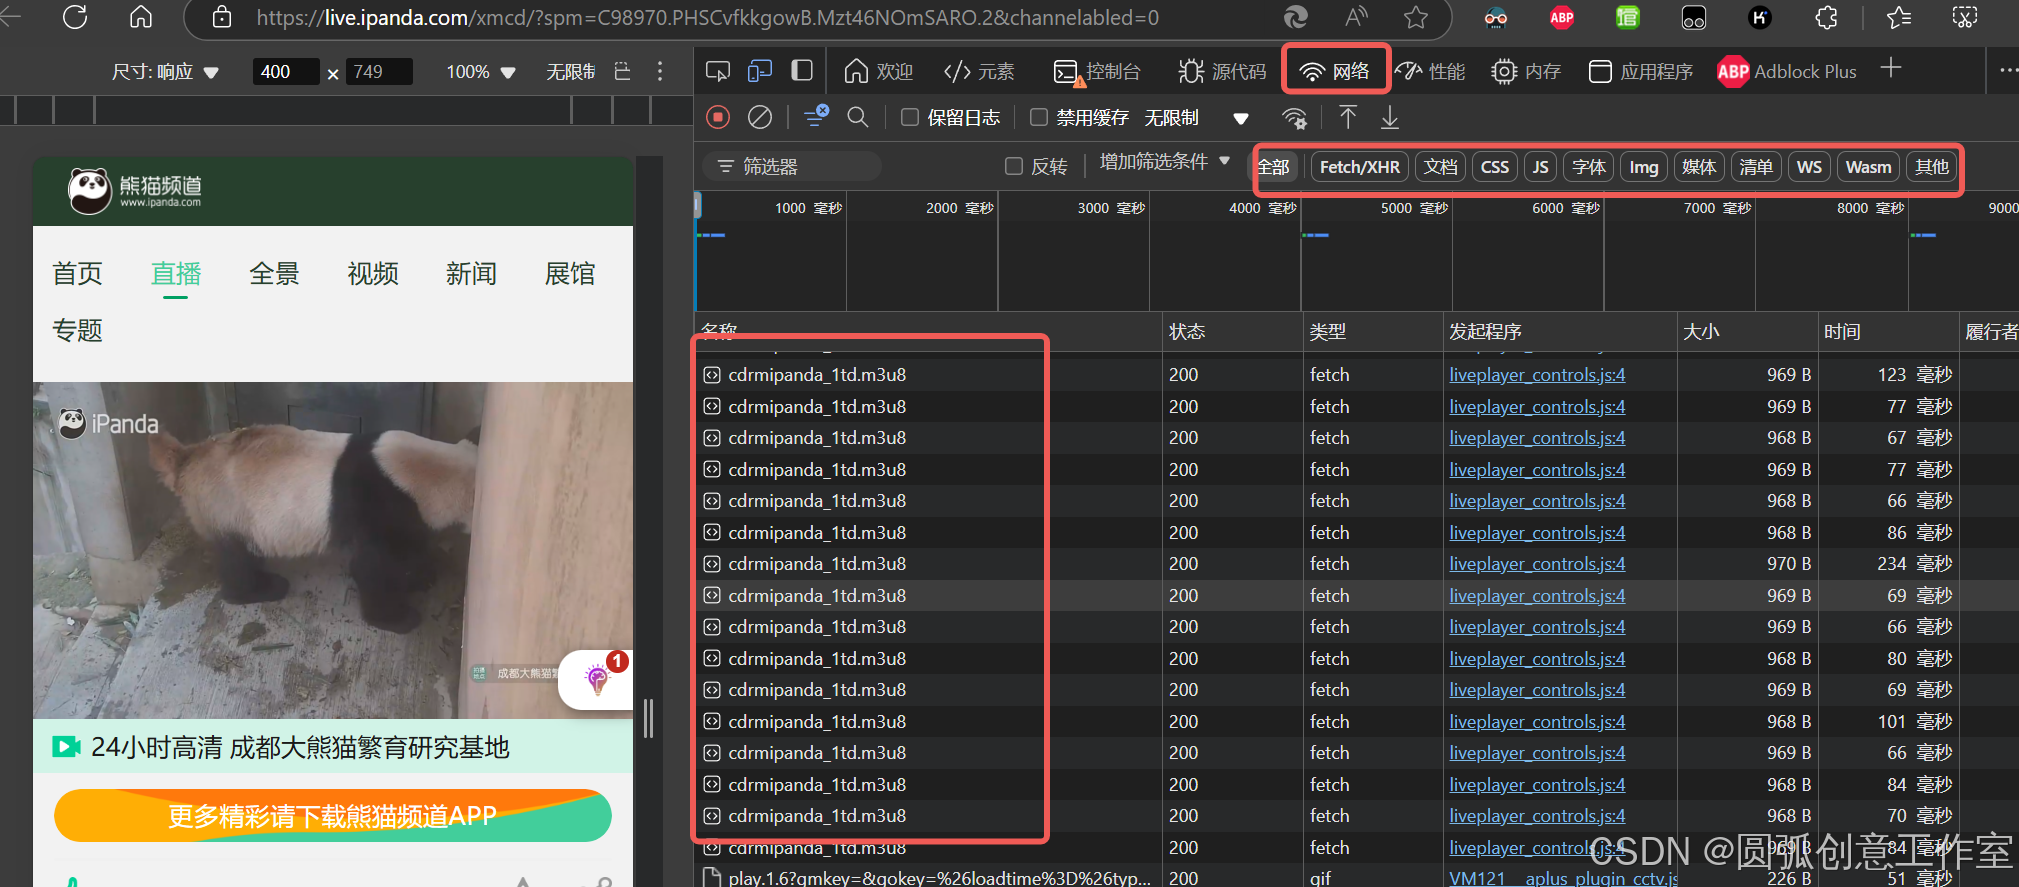
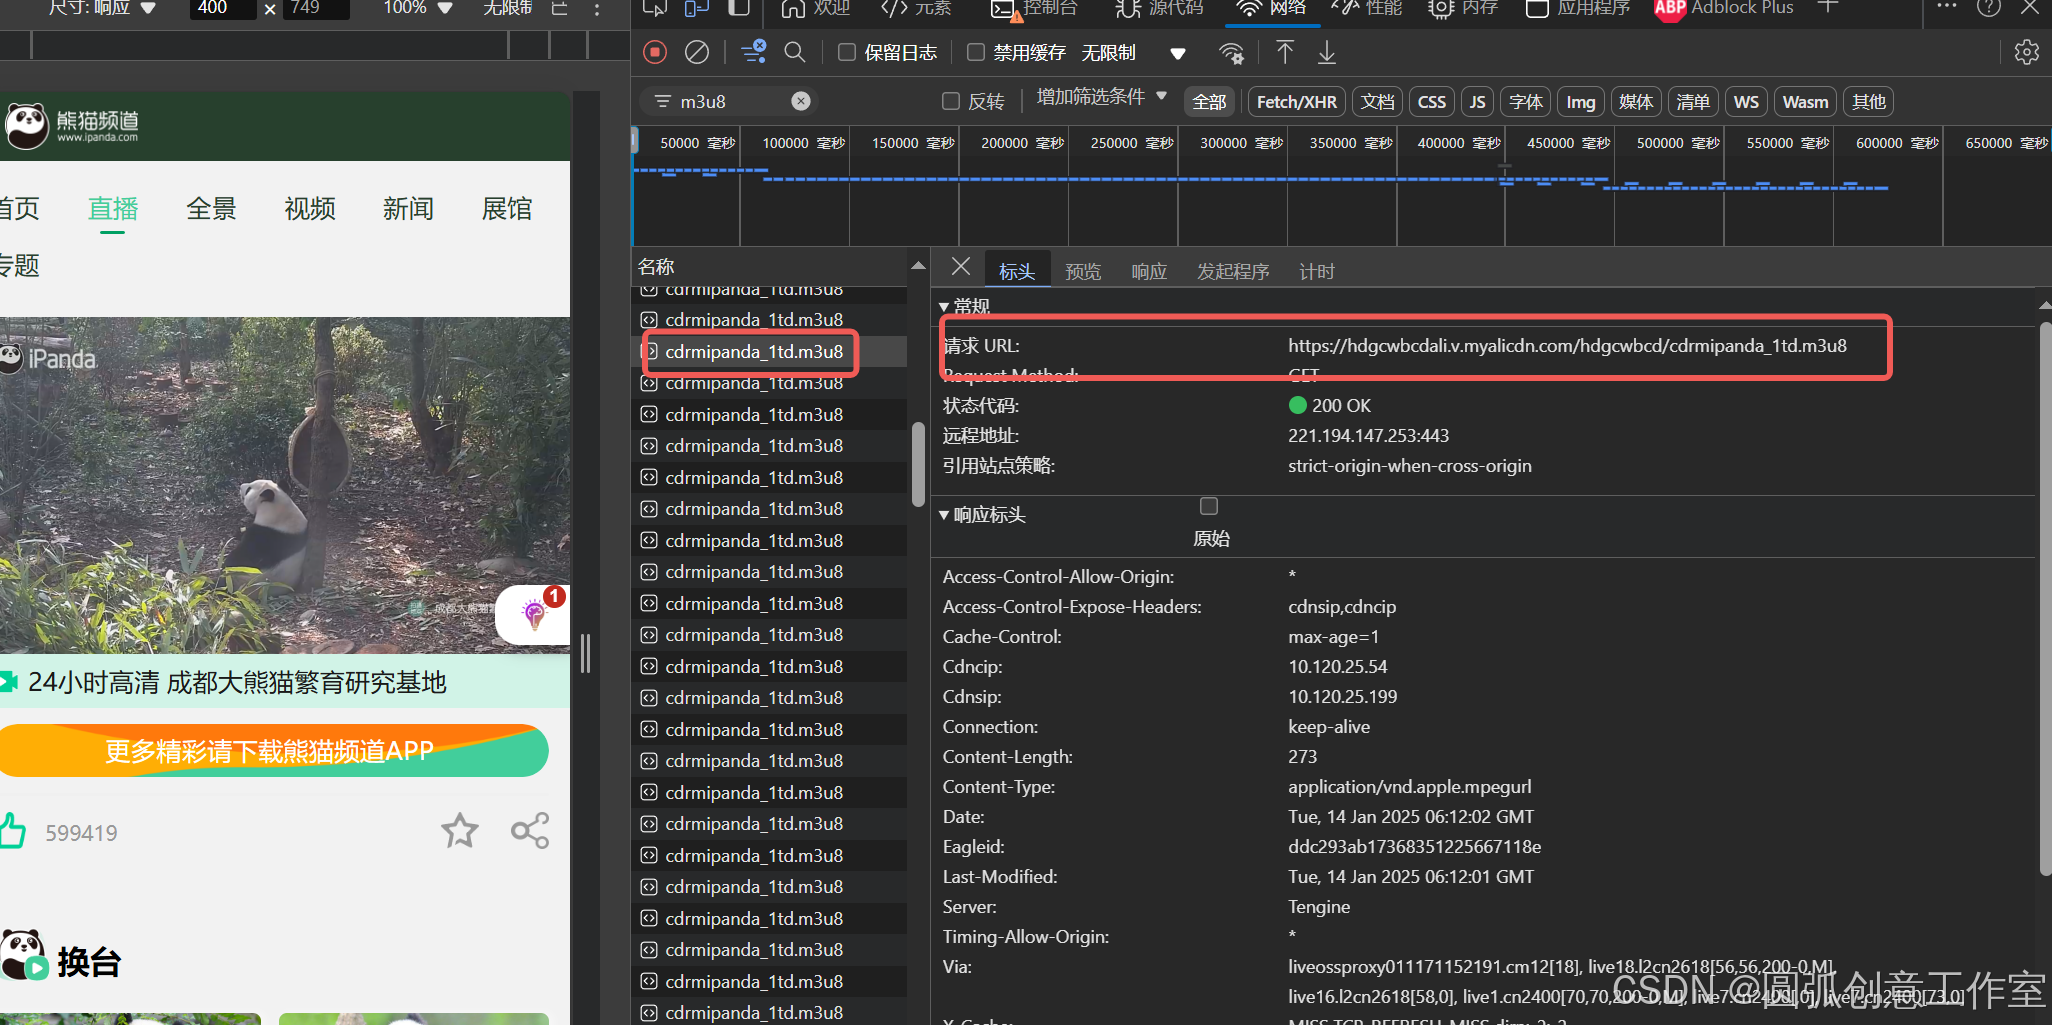
在谷歌浏览器中打开网站,单击鼠标右键选择“Inspect”,这时候在“Network”中选择输入m3y8。
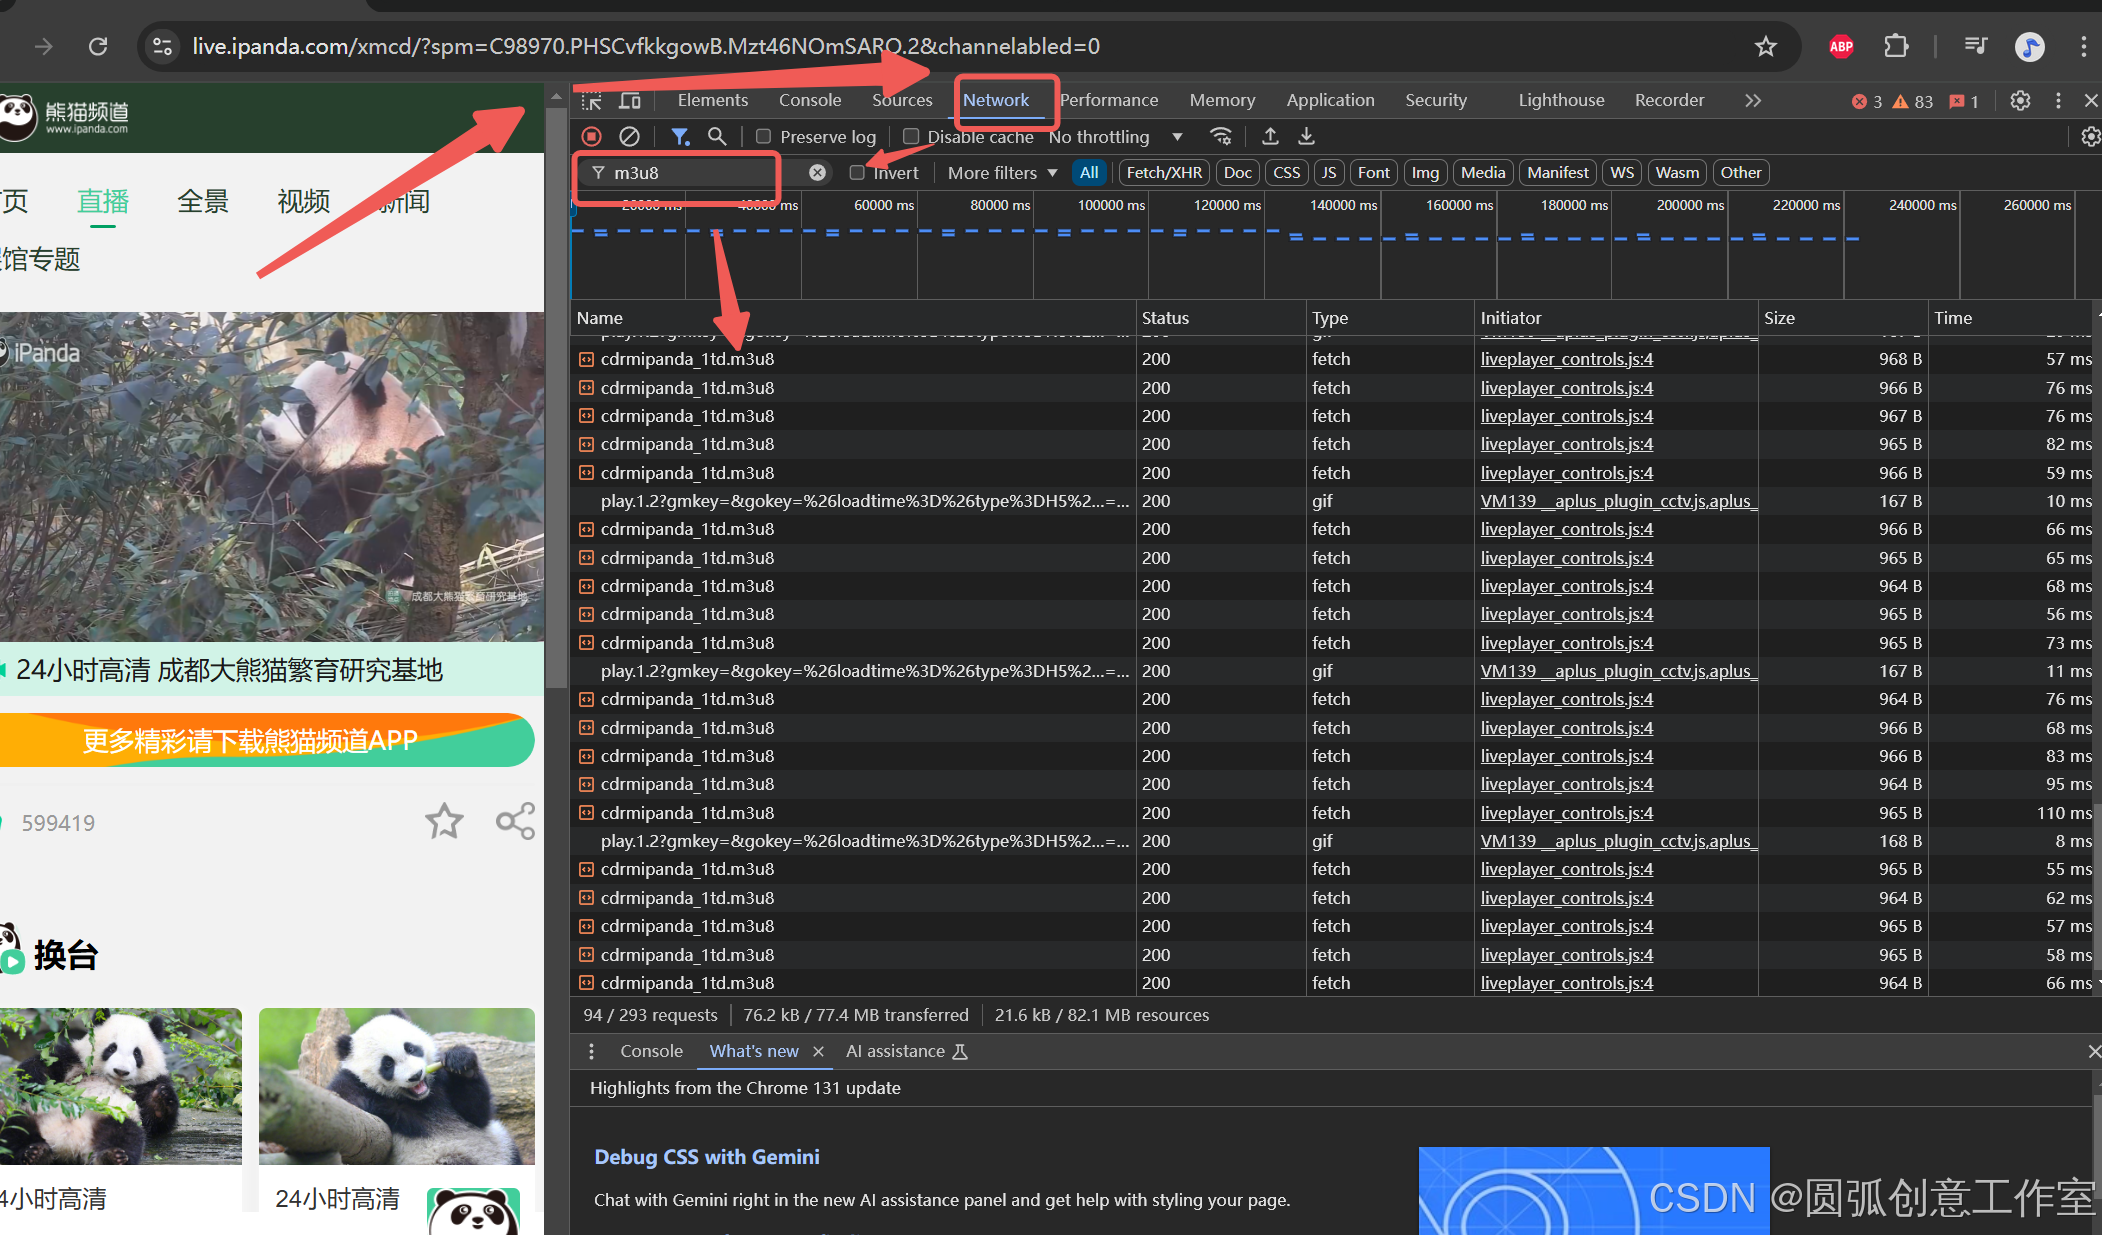
观察网页解析,在不同的时间间隔里,视频是不同的。
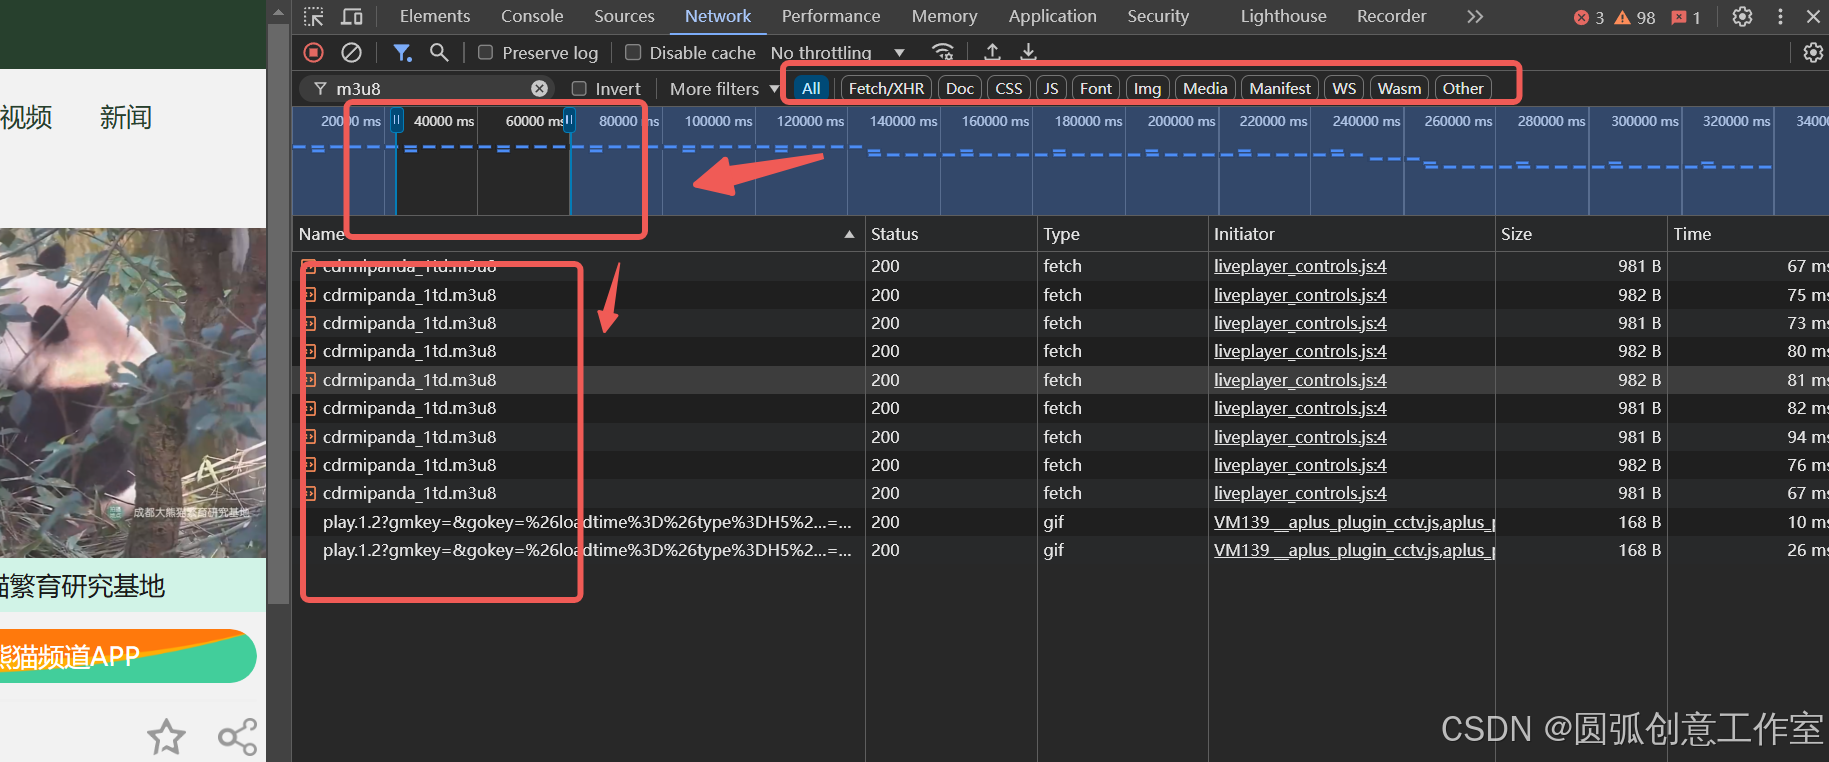
edge浏览器中,也是同样的运行机制。
一个40分钟的视频如果以https://xxxxxx.com/xxx.mp4的格式进行加载的话会很慢而且很浪费流量,哪怕你只想看1分钟,2分钟,都得等着这个40分的视频全部加载完,你才能看,这样效率很低。为了解决这个问题,有人就想到了,如果把这40分钟的视频切割成若干个小片段,每个小片段也就1分钟或者30秒,用户播放的时候一个小片段一个小片段的播放,这样也就不用等整个视频加载完才能看的问题了,只需要等这1个小片段加载完就可以了。这就是视频流
ts文件:分割的每一个小片段,它就是ts文件,是以.ts文件命名的。例如:play1.ts,这个ts文件是可以播放预览的,但也只有几秒钟,或者1分钟。
m3u8文件:一个更长的视频会分割成很多很多的小片段即很多个.ts文件,于是有人把这很多个ts文件按照顺序放到了一个文件夹中,并把这个文件夹命名为m3u8文件。
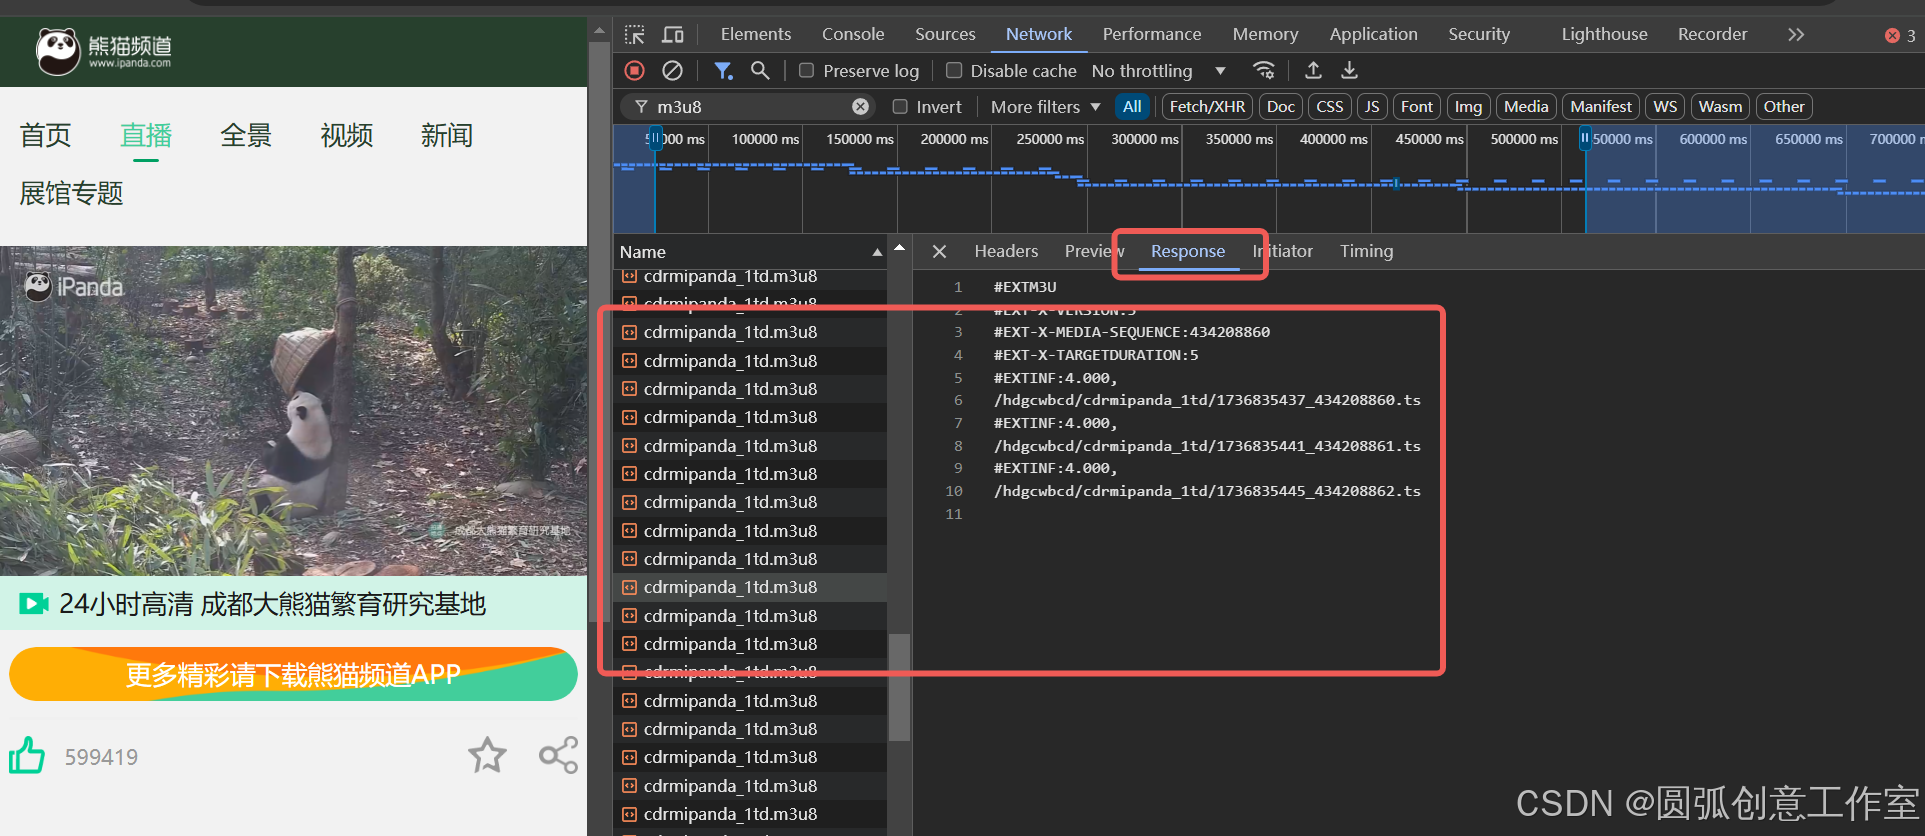
如图所示,在我们需要寻找的视频中,m3u8文件的链接如下所示:
在Python中将m3u8文件转换为mp4文件,通常需要借助FFmpeg这个强大的多媒体处理工具,以下是具体步骤和示例代码:
### 1. 安装FFmpeg
- **Windows**:下载“release full”版本的FFmpeg,解压到任意文件夹,然后将该文件夹路径添加到系统环境变量中。可以通过在命令提示符或PowerShell中输入`ffmpeg`来验证是否安装成功。
- **其他系统**:访问FFmpeg的官方网站查看对应系统的安装细节。### 2. 安装Python依赖库
使用`pip install requests`命令安装`requests`库,用于下载m3u8文件内容。### 3. 下载m3u8文件和解析
使用`requests`库下载m3u8文件,并解析其中的ts文件链接。```python
import requestsdef download_m3u8(m3u8_url):
response = requests.get(m3u8_url)
with open('playlist.m3u8', 'wb') as f:
f.write(response.content)
print("M3U8文件下载完成")def parse_m3u8():
with open('playlist.m3u8', 'r') as f:
lines = f.readlines()
ts_files = [line.strip() for line in lines if line.endswith('.ts\n')]
return ts_files
```### 4. 下载ts文件
根据解析出的ts文件链接,下载所有ts文件。```python
import osdef download_ts_files(ts_files, m3u8_url):
if not os.path.exists('ts_files'):
os.makedirs('ts_files')for ts in ts_files:
ts_url = ts if ts.startswith('http') else f"{m3u8_url.rsplit('/', 1)[0]}/{ts}"
ts_response = requests.get(ts_url)
ts_name = os.path.join('ts_files', ts.split('/')[-1])
with open(ts_name, 'wb') as f:
f.write(ts_response.content)
print(f"{ts_name} 下载完成")
```### 5. 使用FFmpeg合并ts文件并转换为mp4
使用FFmpeg命令行工具将所有ts文件合并并转换为mp4格式。```python
import subprocessdef convert_to_mp4():
ts_files = 'ts_files/*.ts' # 使用FFmpeg合并TS文件
output_file = 'output.mp4'
command = f"ffmpeg -i 'concat:{ts_files}' -c copy {output_file}"
subprocess.run(command, shell=True)
print(f"转换完成,生成文件: {output_file}")
```### 6. 主函数
将以上步骤整合到主函数中,实现从m3u8链接到mp4文件的完整转换流程。```python
if __name__ == "__main__":
m3u8_url = input("请输入M3U8链接: ")
download_m3u8(m3u8_url)
ts_files = parse_m3u8()
download_ts_files(ts_files, m3u8_url)
convert_to_mp4()
```### 注意事项
- 确保FFmpeg已正确安装并添加到系统路径中。
- 输出路径必须存在,否则可能会出现错误。
- 根据实际情况,可能需要根据m3u8文件的具体内容调整FFmpeg命令的参数。通过以上步骤,你可以使用Python自动下载m3u8链接并将其转换为mp4格式。
ffmpeg还可以通过一个文件列表来合并TS文件,这种方法在处理大量文件时更加高效。
如果下载并解压FFmpeg后没有找到bin目录,可能是下载的版本或解压方式出现了问题。以下是一些解决步骤和建议:
1. 确认下载的版本
确保你下载的是正确的版本。FFmpeg的官方下载页面提供了多种版本,包括静态构建版本和共享库版本。通常,静态构建版本会包含bin目录,而共享库版本可能需要额外的配置。
- 推荐下载静态构建版本:静态构建版本包含所有必要的可执行文件,如
ffmpeg.exe、ffplay.exe和ffprobe.exe,这些文件都位于bin目录中。
2. 重新下载并解压
重新下载FFmpeg的静态构建版本,并确保解压到正确的目录。以下是一些具体步骤:
-
访问FFmpeg官网:
- 打开FFmpeg官网的下载页面:Download FFmpeg
- 选择“Windows builds from gyan.dev”部分,下载
release builds中的essentials_build版本。例如,下载ffmpeg-7.0.2-essentials_build.zip。
-
解压文件:
- 将下载的ZIP文件解压到你选择的目录,例如
D:\ffmpeg。 - 解压后,你应该能看到
bin、doc和presets等目录。进入bin目录,确认存在ffmpeg.exe、ffplay.exe和ffprobe.exe这三个可执行文件。
- 将下载的ZIP文件解压到你选择的目录,例如
3. 配置环境变量
将FFmpeg的bin目录添加到系统的环境变量中,以便在任意目录下都能使用FFmpeg命令。
-
找到FFmpeg的
bin目录路径:- 例如,如果你将FFmpeg解压到
D:\ffmpeg,那么bin目录路径为D:\ffmpeg\bin。
- 例如,如果你将FFmpeg解压到
-
编辑系统环境变量:
- 按下
Win + X键,选择“系统”。 - 在窗口的左侧边栏中,点击“高级系统设置”。
- 在弹出的“系统属性”窗口中,点击“环境变量”按钮。
- 在“系统变量”部分,找到名为“Path”的变量,点击“编辑”。
- 在“编辑环境变量”窗口中,点击“新建”,输入FFmpeg的
bin目录路径(例如D:\ffmpeg\bin)。 - 依次点击“确定”按钮,保存更改。
- 按下
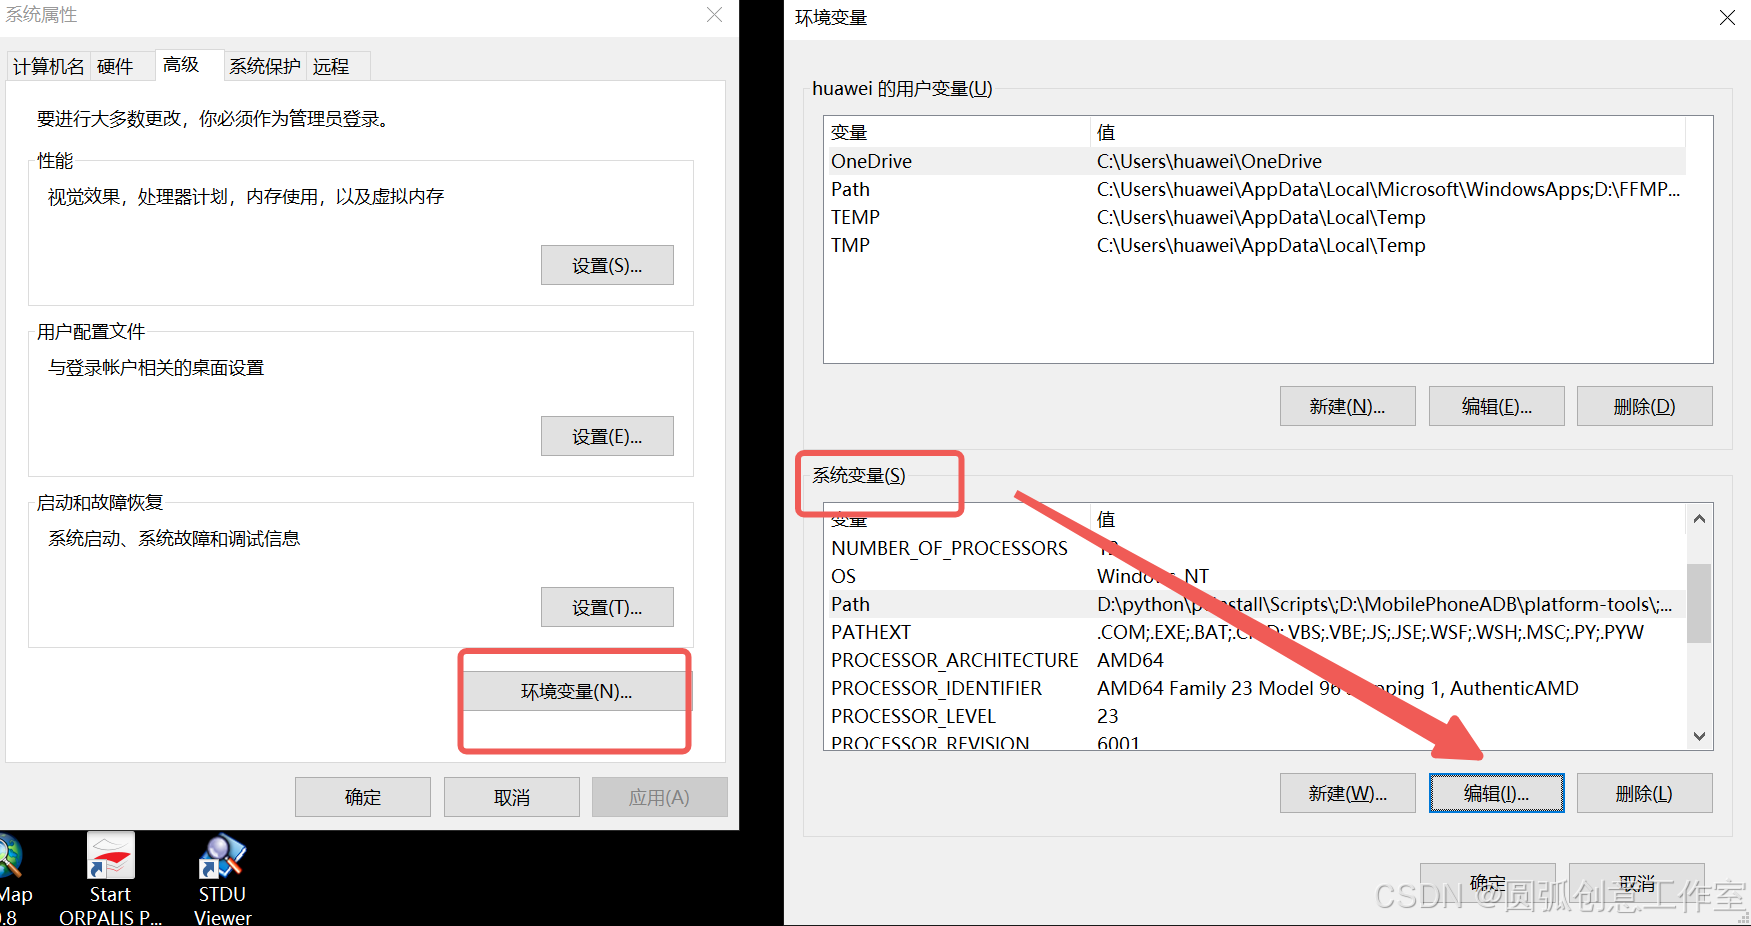
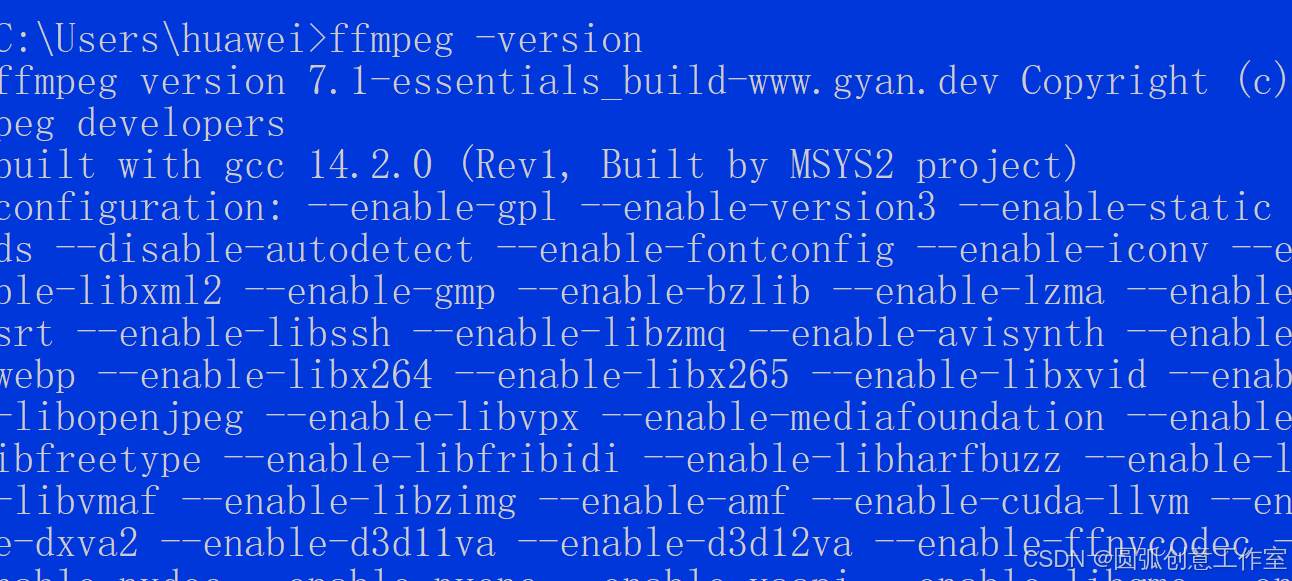
4. 验证安装
重新打开一个命令行窗口,输入以下命令,检查FFmpeg是否安装成功:
然后,在此基础上,完善代码如下:
import requests
from bs4 import BeautifulSoup
import os

# 目标网页URL
url = 'https://dora.xiaoxinbk.com/archives/51/?action=get&p=1'

# 发送HTTP请求获取网页内容
response = requests.get(url)
soup = BeautifulSoup(response.text, 'html.parser')

# 查找视频链接(这里需要根据实际网页结构进行调整)
# 假设视频链接在<video>标签的src属性中
video_tag = soup.find_all(attrs={'class':'dplayer-video dplayer-video-current'})


video_link="https://hdgcwbcdali.v.myalicdn.com/hdgcwbcd/cdrmipanda_1td.m3u8"
# 下载视频
# 获取视频文件名
filename = os.path.basename(video_link)

# 发送HTTP请求下载视频
video_response = requests.get(video_link, stream=True)


#下载m3u8文件和解析
m3u8_url="https://hdgcwbcdali.v.myalicdn.com/hdgcwbcd/cdrmipanda_1td.m3u8"

def download_m3u8(m3u8_url):
    response = requests.get(m3u8_url)
    with open('playlist.m3u8', 'wb') as f:
        f.write(response.content)
    print("M3U8文件下载完成")

def parse_m3u8():
    with open('playlist.m3u8', 'r') as f:
        lines = f.readlines()
    ts_files = [line.strip() for line in lines if line.endswith('.ts\n')]
    return ts_files

#根据解析出的ts文件链接,下载所有ts文件。
def download_ts_files(ts_files, m3u8_url):
    if not os.path.exists('ts_files'):
        os.makedirs('ts_files')

    for ts in ts_files:
        ts_url = ts if ts.startswith('http') else f"{m3u8_url.rsplit('/', 1)[0]}/{ts}"
        ts_response = requests.get(ts_url)
        ts_name = os.path.join('ts_files', ts.split('/')[-1])
        with open(ts_name, 'wb') as f:
            f.write(ts_response.content)
        print(f"{ts_name} 下载完成")


#使用FFmpeg合并ts文件并转换为mp4

import os
import subprocess

def create_file_list(ts_directory, file_list_path):
    # 获取所有TS文件并排序
    ts_files = [f for f in os.listdir(ts_directory) if f.endswith('.ts')]
    ts_files.sort()  # 按文件名排序

    # 创建文件列表文件
    with open(file_list_path, 'w') as f:
        for ts_file in ts_files:
            f.write(f"file '{os.path.join(ts_directory, ts_file)}'\n")

def merge_ts_to_mp4(ts_directory, output_file):
    # 创建文件列表文件
    file_list_path = 'file_list.txt'
    print(file_list_path)

    create_file_list(ts_directory, file_list_path)

    # 使用FFmpeg命令合并TS文件
    command = f"ffmpeg -f concat -safe 0 -i {file_list_path} -c copy {output_file}"
    subprocess.run(command, shell=True)
    print(f"转换完成,生成文件: {output_file}")

    # 删除文件列表文件
    os.remove(file_list_path)

# 示例

download_m3u8(m3u8_url)
ts_files = parse_m3u8()
download_ts_files(ts_files, m3u8_url)

ts_directory = 'ts_files'
output_file = 'output.mp4'
merge_ts_to_mp4(ts_directory, output_file)
运行代码的时候,发现仍然有瑕疵,但是基本上完成了视频下载的主要流程。对代码修正如下:
import requests
from bs4 import BeautifulSoup
import os

import subprocess


# 目标网页URL
url = 'https://dora.xiaoxinbk.com/archives/51/?action=get&p=1'

# 发送HTTP请求获取网页内容
response = requests.get(url)
soup = BeautifulSoup(response.text, 'html.parser')


#下载m3u8文件和解析
m3u8_url="https://hdgcwbcdali.v.myalicdn.com/hdgcwbcd/cdrmipanda_1td.m3u8"
##
###def download_m3u8(m3u8_url):下载文件
response = requests.get(m3u8_url)
with open('playlist.m3u8', 'wb') as f:
    f.write(response.content)
print("M3U8文件下载完成")
##
##def parse_m3u8():

if not os.path.exists('ts_files'):
    os.makedirs('ts_files')


with open('playlist.m3u8', 'r') as f:
    lines = f.readlines()

    ts_files = [line.strip() for line in lines if line.endswith('.ts\n')]


    for ts in ts_files:
        if ts.startswith("http"):
            ts_url=ts
        else:
            ilink=m3u8_url.rsplit('/',2)[0] #rsplit('/',1)的作用是从右开始,以“/”为切分2次。所得列表取第0个元素。
            ts_url= ilink+ts
            print(ts_url)

        ts_response = requests.get(ts_url)

        ts_name = ts.split('/')[-1]
        print(ts_name)
        with open(f"E:\\ts_files\\{ts_name}", 'wb') as f:#将文件输入到指定文件夹中。
            f.write(ts_response.content)

        print(f"{ts_name} 下载完成")


import os
import subprocess

def merge_ts_files(input_folder, output_file):
    # 获取输入文件夹中的所有 TS 文件
    ts_files = sorted([f for f in os.listdir(input_folder) if f.endswith('.ts')])

    # 检查是否有 TS 文件
    if not ts_files:
        print("指定文件夹中没有找到 TS 文件。")
        return

    # 创建一个临时文件列表文件
    file_list_path = os.path.join(input_folder, "file_list.txt")
    with open(file_list_path, "w", encoding="utf-8") as file_list:
        for ts_file in ts_files:
            file_list.write(f"file '{os.path.join(input_folder, ts_file)}'\n")

    # 构建 FFmpeg 命令
    ffmpeg_command = [
        "ffmpeg",
        "-f", "concat",
        "-safe", "0",
        "-i", file_list_path,
        "-c", "copy",
        output_file
    ]

    # 执行 FFmpeg 命令
    try:
        subprocess.run(ffmpeg_command, check=True)
        print(f"TS 文件已成功合并到 {output_file}")
    except subprocess.CalledProcessError as e:
        print(f"合并 TS 文件时出错: {e}")
    finally:
        # 删除临时文件列表文件
        os.remove(file_list_path)

# 使用示例
input_folder = "E:\\ts_files"  # 输入文件夹路径
output_file = "merged_output.ts"  # 输出文件路径
merge_ts_files(input_folder, output_file)
即可完成。
案例二 爬取视频
如上所示,实现了将一个m3u8文件中的ts合并:
import requests
from bs4 import BeautifulSoup
import os

import subprocess


# 目标网页URL
url = 'https://dora.xiaoxinbk.com/archives/51/?action=get&p=1'

# 发送HTTP请求获取网页内容
response = requests.get(url)
soup = BeautifulSoup(response.text, 'html.parser')


#下载m3u8文件和解析
m3u8_url="https://hdgcwbcdali.v.myalicdn.com/hdgcwbcd/cdrmipanda_1td.m3u8"
##
###def download_m3u8(m3u8_url):下载文件
response = requests.get(m3u8_url)
with open('playlist.m3u8', 'wb') as f:
    f.write(response.content)
print("M3U8文件下载完成")
##
##def parse_m3u8():

if not os.path.exists('ts_files'):
    os.makedirs('ts_files')


with open('playlist.m3u8', 'r') as f:
    lines = f.readlines()

    ts_files = [line.strip() for line in lines if line.endswith('.ts\n')]


    for ts in ts_files:
        if ts.startswith("http"):
            ts_url=ts
        else:
            ilink=m3u8_url.rsplit('/',2)[0] #rsplit('/',1)的作用是从右开始,以“/”为切分2次。所得列表取第0个元素。
            ts_url= ilink+ts
            print(ts_url)

        ts_response = requests.get(ts_url)

        ts_name = ts.split('/')[-1]
        print(ts_name)
        with open(f"E:\\ts_files\\{ts_name}", 'wb') as f:#将文件输入到指定文件夹中。
            f.write(ts_response.content)

        print(f"{ts_name} 下载完成")


import os
import subprocess

def merge_ts_files(input_folder, output_file):
    # 获取输入文件夹中的所有 TS 文件
    ts_files = sorted([f for f in os.listdir(input_folder) if f.endswith('.ts')])

    # 检查是否有 TS 文件
    if not ts_files:
        print("指定文件夹中没有找到 TS 文件。")
        return

    # 创建一个临时文件列表文件
    file_list_path = os.path.join(input_folder, "file_list.txt")
    with open(file_list_path, "w", encoding="utf-8") as file_list:
        for ts_file in ts_files:
            file_list.write(f"file '{os.path.join(input_folder, ts_file)}'\n")

    # 构建 FFmpeg 命令
    ffmpeg_command = [
        "ffmpeg",
        "-f", "concat",
        "-safe", "0",
        "-i", file_list_path,
        "-c", "copy",
        output_file
    ]

    # 执行 FFmpeg 命令
    try:
        subprocess.run(ffmpeg_command, check=True)
        print(f"TS 文件已成功合并到 {output_file}")
    except subprocess.CalledProcessError as e:
        print(f"合并 TS 文件时出错: {e}")
    finally:
        # 删除临时文件列表文件
        os.remove(file_list_path)

# 使用示例
input_folder = "E:\\ts_files"  # 输入文件夹路径
output_file = "merged_output.ts"  # 输出文件路径
merge_ts_files(input_folder, output_file)
现在需要将多个m3u8文件合并。
代码如下:
一日一图
代码如下:
"""
使用Python中的turtle模块绘制一个壮观的太阳系图是一个有趣且具有挑战性的任务

"""

import turtle
import math

# 设置屏幕
screen = turtle.Screen()
screen.bgcolor("black")
screen.title("Solar System")

# 创建太阳
sun = turtle.Turtle()
sun.hideturtle()
sun.penup()
sun.goto(0, -200)
sun.pendown()
sun.color("yellow")
sun.begin_fill()
sun.circle(50)
sun.end_fill()

# 行星数据(名称,距离太阳的距离(单位:像素),大小(单位:像素))
planets = [
    ("Mercury", 35, 5),
    ("Venus", 72, 10),
    ("Earth", 98, 10),
    ("Mars", 152, 7),
    ("Jupiter", 279, 30),  # 简化大小,实际应更大
    ("Saturn", 449, 25),   # 简化大小,实际应更大
    # "Uranus" 和 "Neptune" 由于距离太远,在这个比例下可能无法很好地显示
]

# 绘制行星和轨道
orbit_color = "gray"
planet_color = ["gray", "yellow", "blue", "red", "orange", "gold", "lightblue"]  # 对应行星的颜色,实际应根据行星选择

for i, (name, distance, size) in enumerate(planets):
    # 绘制轨道
    orbit_turtle = turtle.Turtle()
    orbit_turtle.hideturtle()
    orbit_turtle.speed(0)
    orbit_turtle.penup()
    orbit_turtle.goto(0, 0)
    orbit_turtle.pendown()
    orbit_turtle.color(orbit_color)
    orbit_turtle.width(2)
    orbit_turtle.circle(distance)
    orbit_turtle.hideturtle()

    # 绘制行星
    planet_turtle = turtle.Turtle()
    planet_turtle.hideturtle()
    planet_turtle.speed(0)
    planet_turtle.penup()
    # 计算行星在轨道上的位置
    angle = 360 * i / len(planets)  # 均匀分布行星
    x = distance * math.cos(math.radians(angle))
    y = distance * math.sin(math.radians(angle)) - 200  # 减去太阳的高度
    planet_turtle.goto(x, y)
    planet_turtle.pendown()
    planet_turtle.color(planet_color[i % len(planet_color)])  # 循环使用颜色
    planet_turtle.begin_fill()
    planet_turtle.circle(size)
    planet_turtle.end_fill()
    planet_turtle.write(name, align="center", font=("Arial", 8, "normal"))
    planet_turtle.hideturtle()

# 隐藏turtle光标
turtle.done()
turtle.tracer(False)
图片如下:

即可完成。


 1536
1536

 被折叠的 条评论
为什么被折叠?
被折叠的 条评论
为什么被折叠?
 到【灌水乐园】发言


