


深度纹理
深度纹理存储高精度的深度值,范围为[0,1],而且通常是非线性的。
深度值计算
在顶点变化中,最终会变换到裁剪空间NDC空间下,裁剪空间是一个[-1,1]的线性空间,在NDC空间下我们可以轻松的获得[-1,1]的深度值d

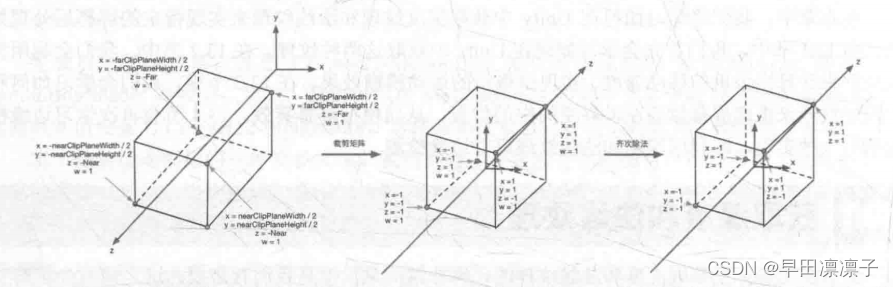
获得到d之后,我们将其映射到[0,1]中

深度值获取
在unity中我们并不需要自己计算深度值,从深度纹理中我们可以获取到深度值。
首先,我们需要通过脚本设置摄像机的depthTextureMode

设置之后,我们就可以在shader中通过_CameraDepthTexture变量来访问深度纹理。
对深度纹理的采样,为了处理平台差异,使用

进行采样。
由于采样得到的深度值并不是线性的,我们需要将其变成线性的。
我们知道从视角空间到裁剪空间的变换矩阵,加入我们将一个点从视角空间变化到裁剪空间,我们可以得到:

将其进行其次除法

获得表达式

对其进行映射到[0,1]

由于摄像机正向对应的z值为负值,所以还要取反

但是在unity中提供了函数来进行转换
LinearEyeDepth会将深度纹理的采样结果转换到视角空间下的线性深度值
Linear01Depth将会把深度纹理采样结果转换到视角空间下的[0,1]的线性深度值
全局雾效
实现效果
噪声全局雾效
实现关键
我们需要根据深度值,获得每个像素的实际世界坐标。从而模拟全局雾效。
- 首先对图像空间下的视锥体射线进行插值,得到摄像机到该像素的方向信息。
- 将该射线和线性视角空间下的深度值相乘,得到该点对于摄像机的偏移
- 偏移加上世界空间下的摄像机位置得到该点的世界坐标
代码如下:

_WorldSpaceCameraPos和linearDepth可以由函数求得。
interpolatedRay计算
interpolatedRay的计算源自对近裁剪平面四个角的某个特定向量的插值。
首先我们计算得到近裁剪平面的up、right方向向量

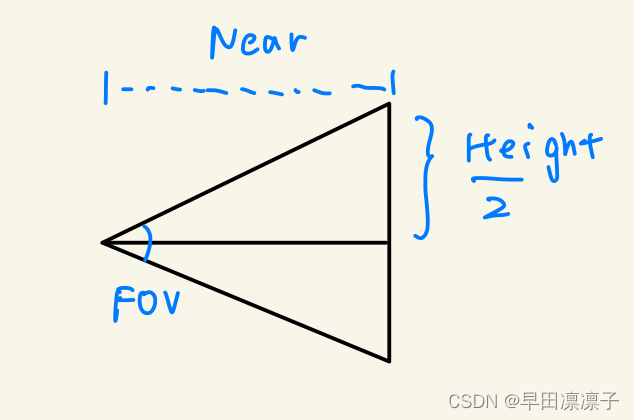
利用已知的向量表示出摄像机到四个角的向量


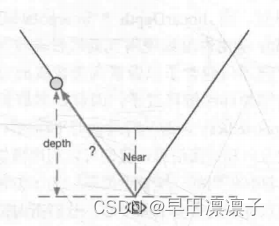
根据角的向量和深度值,可以求得摄像机到该点的距离

提取scale因子

四个角对应的向量值
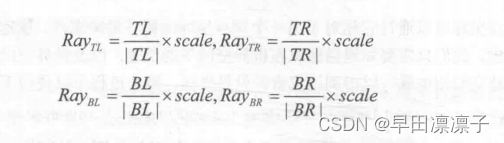
经过这四个向量的插值即可得到interpolatedRay
雾的计算
三种计算雾的计算公式:
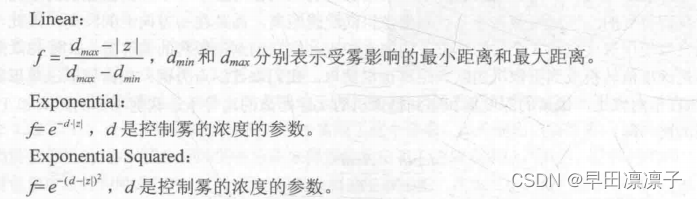
这里我们使用噪声纹理来实现不均匀的雾效
脚本
using System.Collections;
using System.Collections.Generic;
using UnityEngine;

public class FogWithNoise : PostEffectsBase
{
    public Shader fogShader;
    private Material fogMaterial;
    public Material material
    {
        get
        {
            fogMaterial = CheckShaderAndCreateMaterial(fogShader, fogMaterial);
            return fogMaterial;
        }
    }
    private Camera myCamera;
    public Camera camera
    {
        get
        {
            if (myCamera == null)
            {
                myCamera = GetComponent<Camera>();
            }
            return myCamera;
        }
    }
    private Transform myCameraTransform;
    public Transform cameraTransform
    {
        get
        {
            if (myCameraTransform == null)
            {
                myCameraTransform = camera.transform;
            }
            return myCameraTransform;
        }
    }
    //雾的浓度
    [Range(0.0f, 3.0f)]
    public float fogDensity = 1.0f;
    //雾的颜色
    public Color fogColor = Color.white;
    //起始高度
    public float fogStart = 0.0f;
    //终止高度
    public float fogend = 2.0f;
    //噪声纹理
    public Texture noiseTexture;
    //噪声纹理x方向上的移动速度
    [Range(-0.5f, 0.5f)]
    public float fogXSpeed = 0.1f;
    //噪声纹理y方向上的移动速度
    [Range(-0.5f, 0.5f)]
    public float fogYSpeed = 0.1f;
    //噪声纹理的使用程度,如果为0则雾效不受噪声影响
    [Range(0.0f, 3.0f)]
    public float noiseAmount = 1.0f;
    //设置摄像机状态
    private void OnEnable()
    {
        camera.depthTextureMode |= DepthTextureMode.Depth;
    }
    private void OnRenderImage(RenderTexture source, RenderTexture destination)
    {
        if (material != null)
        {
            //创建存放四个方向变量的矩阵变量
            Matrix4x4 frustumCorners = Matrix4x4.identity;

            //获取到计算所需要的变量
            float fov = camera.fieldOfView;
            float near = camera.nearClipPlane;
            float far = camera.farClipPlane;
            float aspect = camera.aspect;

            //计算四个方向变量

            float halfHeight = near * Mathf.Tan(fov * 0.5f * Mathf.Deg2Rad);
            //计算得到两个方向的向量
            Vector3 toRight = cameraTransform.right * halfHeight * aspect;
            Vector3 toTop = cameraTransform.up * halfHeight;


            //左上
            Vector3 topLeft = cameraTransform.forward * near + toTop - toRight;
            //scale因子
            float scale = topLeft.magnitude / near;
            topLeft.Normalize();
            //方向向量
            topLeft *= scale;
            //右上
            Vector3 topRight = cameraTransform.forward * near + toRight + toTop;
            topRight.Normalize();
            topRight *= scale;
            //左下
            Vector3 bottomLeft = cameraTransform.forward * near - toTop - toRight;
            bottomLeft.Normalize();
            bottomLeft *= scale;
            //右下
            Vector3 bottomRight = cameraTransform.forward * near + toRight - toTop;
            bottomRight.Normalize();
            bottomRight *= scale;

            //将计算得到的向量存放在矩阵中(按照一定的顺序)
            frustumCorners.SetRow(0, bottomLeft);
            frustumCorners.SetRow(1, bottomRight);
            frustumCorners.SetRow(2, topRight);
            frustumCorners.SetRow(3, topLeft);

            //传递属性值
            material.SetMatrix("_FrustumCornersRap", frustumCorners);
            material.SetMatrix("_ViewProjectionInverseMatrix", (camera.projectionMatrix * camera.worldToCameraMatrix).inverse);
            material.SetFloat("_FogDensity", fogDensity);
            material.SetColor("_FogColor", fogColor);
            material.SetFloat("_FogStart", fogStart);
            material.SetFloat("_FogEnd", fogend);
            material.SetTexture("_NoiseTex", noiseTexture);
            material.SetFloat("_FogXSpeed", fogXSpeed);
            material.SetFloat("_FogYSpeed", fogYSpeed);
            material.SetFloat("_NoiseAmount", noiseAmount);

            Graphics.Blit(source, destination, material);
        }
        else
        {
            Graphics.Blit(source, destination);
        }
    }
}
shader
Shader "Custom/Chapter15-FogWithNoise"
{
    Properties
    {
        _MainTex ("Base (RGB)", 2D) = "white" {}
        _FogDensity("Fog Density",Float)=1.0
        _FogColor("Fog Color",Color)=(1,1,1,1)
        _FogStart("Fog Start",Float)=0.0
        _FogEnd("Fog End",Float)=1.0
        _NoiseTex("Noise Texture",2D)="white"{}
        _FogXSpeed("Fog Horizontal Speed",Float)=0.1
        _FogYSpeed("Fog Vertical Speed",Float)=0.1
        _NoiseAmount("Noise Amount",Float)=1
    }
    SubShader
    {
    CGINCLUDE
    #include "unityCG.cginc"

    sampler2D _MainTex;
    half4 _MainTex_TexelSize;
    half _FogDensity;
    fixed4 _FogColor;
    half _FogStart;
    half _FogEnd;
    sampler2D _NoiseTex;
    half _FogXSpeed;
    half _FogYSpeed;
    half _NoiseAmount;
    sampler2D _CameraDepthTexture;
    float4x4 _FrustumCornersRay;

    struct v2f{
    float4 pos:SV_POSITION;
    //噪声纹理纹理坐标
    half2 uv:TEXCOORD0;
    //深度纹理纹理坐标
    half2 uv_depth:TEXCOORD1;
    //存放插值之后的向量
    float4 interpolatedRay:TEXCOORD2;
    };

    v2f vert (appdata_img v){
    v2f o;
    o.pos =UnityObjectToClipPos(v.vertex);
    o.uv=v.texcoord;
    o.uv_depth=v.texcoord;
    #if UNITY_UV_STARTS_AT_TOP
    if(_MainTex_TexelSize.y<0){
    o.uv_depth.y=1-o.uv_depth.y;
    }
    #endif
    //计算索引来确定方向变量,后面根据index来获取interpolatedRay
    int index=0;
    if(v.texcoord.x<0.5 && v.texcoord.y<0.5){
    index=0;
    }else if(v.texcoord.x>0.5 && v.texcoord.y<0.5){
    index=1;
    }else if(v.texcoord.x>0.5 && v.texcoord.y>0.5){
    index=2;
    }else if(v.texcoord.x<0.5 && v.texcoord.y>0.5){
    index=3;
    }

    #if UNITY_UV_STARTS_AT_TOP
    if(_MainTex_TexelSize.y<0){
    index=3-index;
    }
    #endif

    //从_FrustumCornersRay中获取对应index的方向向量
    o.interpolatedRay=_FrustumCornersRay[index];
    return o;
    }

    fixed4 frag(v2f i):SV_Target{
    //视角空间下的深度值
    float linearDepth =LinearEyeDepth(SAMPLE_DEPTH_TEXTURE(_CameraDepthTexture,i.uv_depth));
    //世界坐标
    float3 worldPos =_WorldSpaceCameraPos+linearDepth*i.interpolatedRay;
    //噪声纹理的偏移值
    float2 speed =_Time.y*float2(_FogXSpeed,_FogYSpeed);
    //采样噪声纹理
    float noise =(tex2D(_NoiseTex,i.uv+speed).r-0.5)*_NoiseAmount;

    //根据世界坐标的y值计算雾的浓度
    float fogDensity =(_FogEnd-worldPos.y)/(_FogEnd-_FogStart);//占比值
    //将噪声值加上去,随机的改变雾气的浓度
    fogDensity =(fogDensity*_FogDensity*(1+noise));//雾的浓度

    fixed4 finalColor=tex2D(_MainTex,i.uv);
    //根据雾的浓度来对雾的颜色和本来的颜色做混合
    finalColor.rgb =lerp(finalColor,_FogColor,fogDensity);

    return finalColor;
    }
    ENDCG
    Pass{
    ZTest Always Cull Off ZTest Off
    CGPROGRAM
    #pragma vertex vert
    #pragma fragment frag
    ENDCG
    }
    }
    FallBack Off
}


 1116
1116


 被折叠的 条评论
为什么被折叠?
被折叠的 条评论
为什么被折叠?
 到【灌水乐园】发言


