


链表
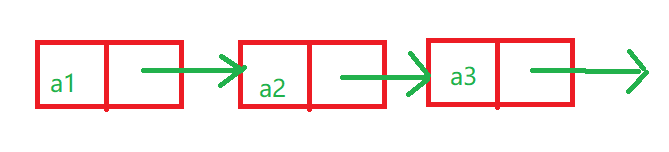
由字面意义可知,链表即链式链接而形成的,链表是一种物理上不一定连续、非顺序的存储结构,数据元素的逻辑顺序取决于链表指针链接次序,例如下列结构:

NULL:表示指针域为空,即最后一个链表结点
链表分为:单链表、双链表、带头结点与不带头结点链表
单链表
不带头结点单链表
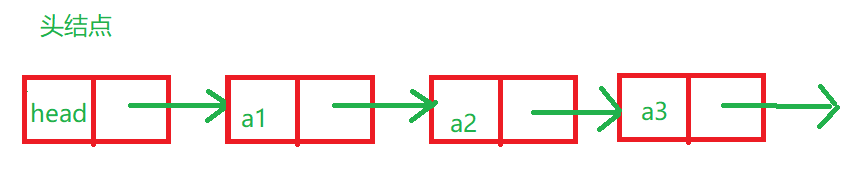
带头结点单链表
需要提前设定一个头结点 head:
循环单链表

双向链表
双向不循环链表
需要设定一个结点的前驱和后继结点:

带头结点的双向不循环链表
设定头结点 pHead、前驱结点 _prev、后继结点 _next:

双向循环链表

带头结点的双向循环链表

带头结点的双向循环链表的实现
一、定义结点
首先定义结点类型,设定两个指针:前驱指针、后继指针
typedef struct ListNode{
	Ldatatype _data;
	ListNode* _prev;      //前驱指向
	ListNode* _next;      //后继指向
}ListNode;
定义链表结构,设定一个指针指向 pHead 指向链表的头结点:
typedef struct List {
	ListNode* _head;
}List;
结点数据类型为 int 整型:
typedef int Ldatatype;
二、实现链表的初始化
将头结点的前驱后继指向全部设置为头结点,代表当前链表仅有一个头结点:
void List_Init(List* lst)
{
	lst->_head = (ListNode*)malloc(sizeof(ListNode));
	lst->_head->_prev = lst->_head->_next = lst->_head;           //初始化为只带头节点双向循环链表
}
三、链表的头插头删
1、头插操作:
将新节点 p 插入到头结点之后作为链表的首结点:


创建一个新节点 x,结点对应数据域存放 x ,结点的前驱结点、后继结点指向空 NULL:
ListNode* creatNode(Ldatatype val)
{
	ListNode* node = (ListNode*)malloc(sizeof(ListNode));
	node->_data = val;
	node->_next = node->_prev = NULL;
	return node;
}
头插一个新节点需要修改四个指向:
void ListPushFront(List* lst, Ldatatype val)       //头插
{
	ListNode* cur = creatNode(val);
	ListNode* next = lst->_head->_next;
	lst->_head->_next = cur;
	cur->_prev = lst->_head;
	cur->_next = next;
	next->_prev = cur;

	/*List_insert(lst->_head->_next, val);*/                 //可以调用任意位置插入函数
}
2、头删操作:
删除头指针之后的链表首结点,需要修改中间两个指针的指向即可:
// 双向链表头删
void ListPopFront(List* lst)
{
	if (lst->pHead == NULL)
		return;
	ListNode* node = lst->pHead->_next;
	if (node != lst->pHead) {
		ListNode* next = node->_next;
		lst->pHead->_next = next;
		next->_prev = lst->pHead;
		free(node);
	}
}
四、尾插尾删
1、尾插操作
将 p 结点插入到链表末尾:

插入过程,同样需要修改四个指针指向:

void ListPushBack(List* lst, LTDataType x)
{
	ListNode* node = ListCreate(x);
	ListNode* tail = lst->pHead->_prev;
	tail->_next = node;
	node->_prev = tail;
	node->_next = lst->pHead;
	lst->pHead->_prev = node;
}
2、尾删操作
void ListPopBack(List* lst)
{
	if ( lst->pHead == NULL )
		return;             //空链表
	if (lst->pHead->_next == lst->pHead || lst->pHead->_prev == lst->pHead) {
		free(lst->pHead);         //只有一个头节点
		lst->pHead = NULL;
	}
	ListNode* pre = lst->pHead->_prev;       //尾节点的位置
	if (pre != lst->pHead) {
		ListNode* node = pre->_prev;
		free(pre);
		node->_next = lst->pHead;
		lst->pHead->_prev = node;
	}
}
五、任意位置的操作
1、任意位置 node 之前插入新节点:

在 node 结点之前插入新的结点 p ,需要修改四个指针指向,过程与头插过程类似,可参考头插过程图。
// 双向链表在pos的前面进行插入
void ListInsert(ListNode* pos, LTDataType x)
{
	ListNode* node = ListCreate(x);
	ListNode* pre = pos->_prev;
	node->_next = pos;
	pre->_next = node;
	node->_prev = pre;
	pos->_prev = node;
}
2、删除任意 node 结点:

node 结点若在链表中间位置(如上图),可直接修改中间两个指针指向即可,node 结点若为头结点或尾节点可以参考头删尾删过程。
// 双向链表删除pos位置的节点
void ListErase(ListNode* pos)
{
	ListNode* pre = pos->_prev;
	ListNode* next = pos->_next;
	if (pre == pos ||  next == pos) {
		free(pos);      //只有一个节点pos
	}
	pre->_next = next;
	next->_prev = pre;
	free(pos);
}
六、链表的销毁
需要释放每一个结点的空间,最后不要忘记头结点也需要释放哦!
// 双向链表销毁
void ListDestory(List* lst)
{
	if (lst == NULL)
		return;
	ListNode* next = lst->pHead->_next;
	while (next!= lst->pHead) {
		ListNode* nextnext = next->_next;
		free(next);
		next = nextnext;
	}
	free(lst->pHead);
	lst->pHead == NULL;        //只有一个头节点
}
七、链表各结点信息的打印
// 双向链表打印
void ListPrint(List* lst)
{
	if (lst->pHead == NULL || lst->pHead->_next == lst->pHead)
		return;
	ListNode* next = lst->pHead->_next;
	while (next != lst->pHead)  {
		printf("%d ", next->_data);
		next = next->_next;
	}
	printf("\n");
}
八、测试部分
void test()
{
	List lst;
	ListInit(&lst);
	ListPushBack(&lst, 1);                  //尾插
	ListPushBack(&lst, 2);
	ListPushBack(&lst, 3);
	ListPushBack(&lst, 4);
	ListPushBack(&lst, 5);
	ListPrint(&lst);

	ListPushFront(&lst, 6);                  //头插
	ListPushFront(&lst, 7);
	ListPushFront(&lst, 8);
	ListPushFront(&lst, 9);
	ListPrint(&lst);

	ListPopFront(&lst);               //头删
	ListPopFront(&lst);
	ListPopFront(&lst);
	ListPrint(&lst);

	ListPopBack(&lst);          //尾删
	ListPopBack(&lst);
	ListPrint(&lst);

}

九、注意
本文主要演示的是带头结点的双向循环链表的实现过程,其中要注意:
1、判断链表是否为空的条件为:
lst->pHead->next==lst->pHead;
即:头结点的后继结点仍然为头结点,说明此链表只有一个头结点
2、带头双向循环链表的初始化
要注意头结点是必须存在的结点,因此初始化时候要注意 :头结点的后继节点=前驱节点=头节点
lst->pHead->_next=lst->pHead->_prev=lst->pHead;
3、链表的增删查改过程中要注意指针的指向,此过程读者可以自行画图来增强理解(也可以采用图中图例来理解);
链表的销毁过程:释放所有节点的空间要包括释放头结点 lst->pHead 的空间
完整代码可以参考本人GITHUB链接:https://github.com/Coderxingchild/DS/blob/master/list_shuangxiangxunhuanlianbiao/list_shuangxiangxunhuanlianbiao/list.cpp
(博客内容为原创,欢迎评论!)


 4044
4044


 被折叠的 条评论
为什么被折叠?
被折叠的 条评论
为什么被折叠?
 到【灌水乐园】发言


