


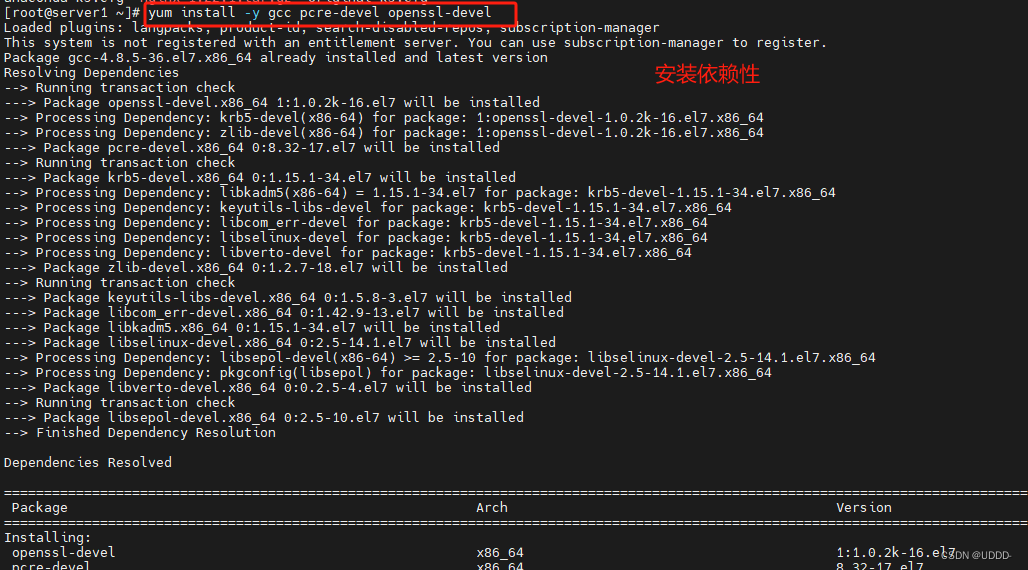
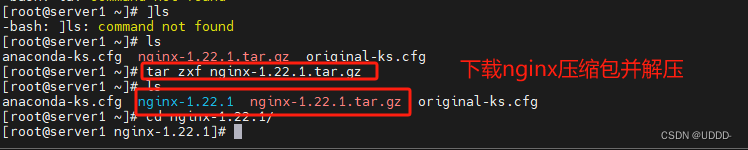
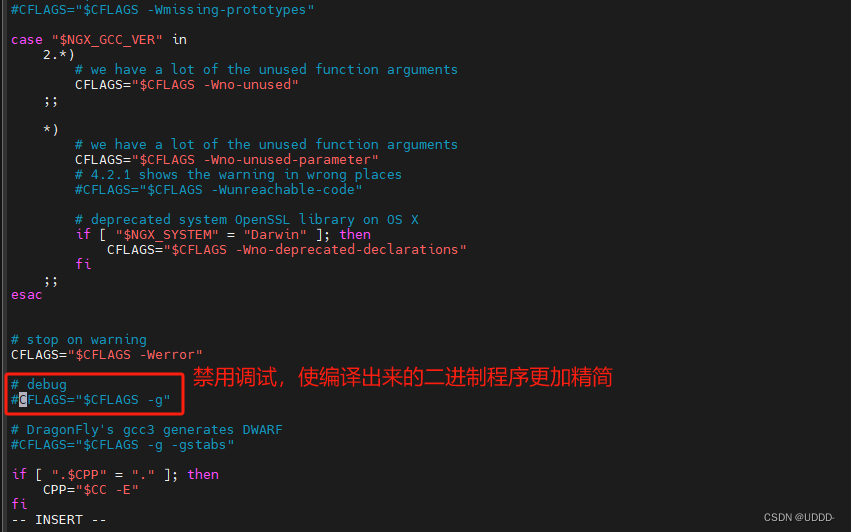
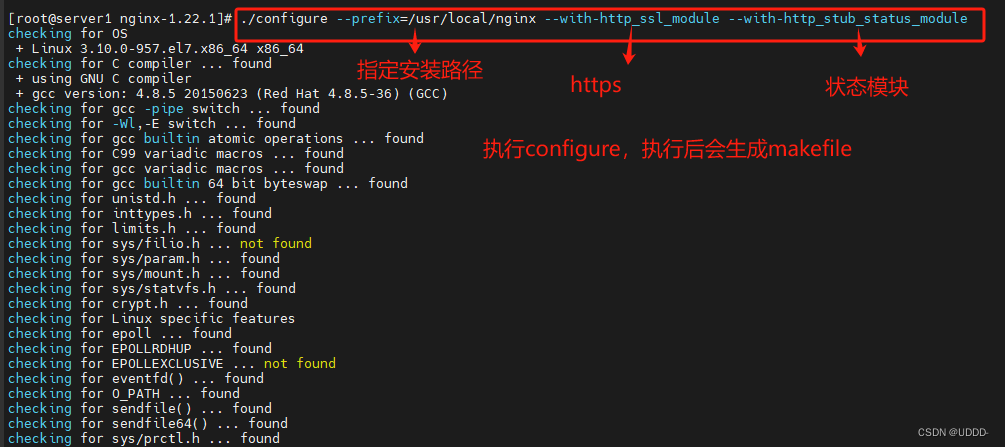
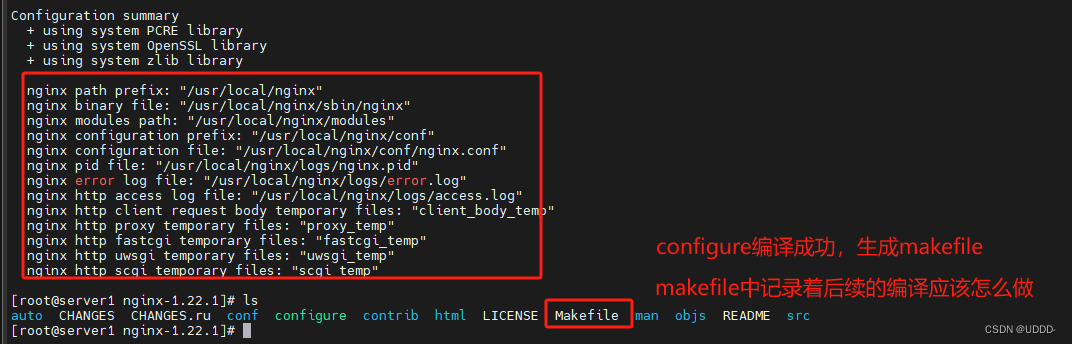
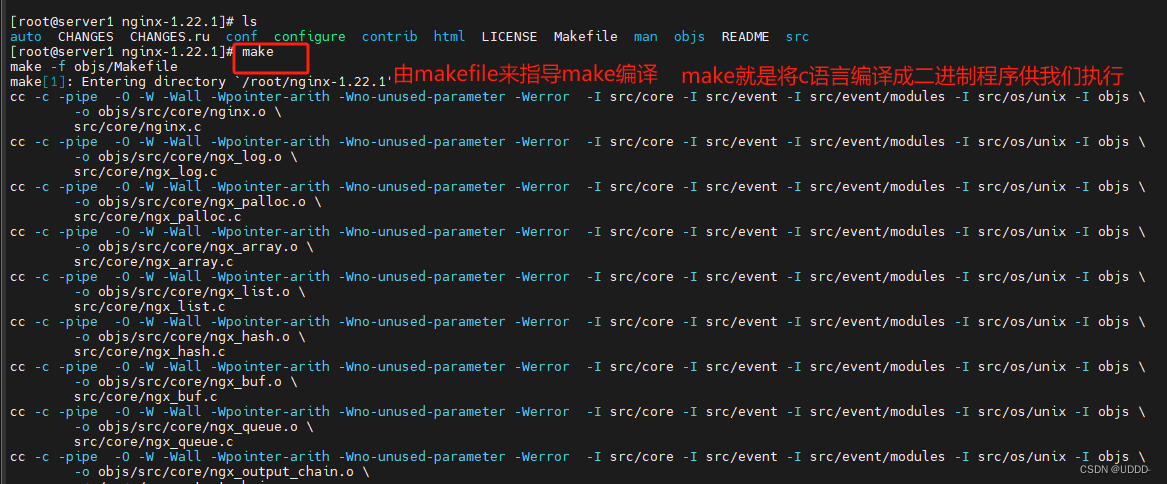
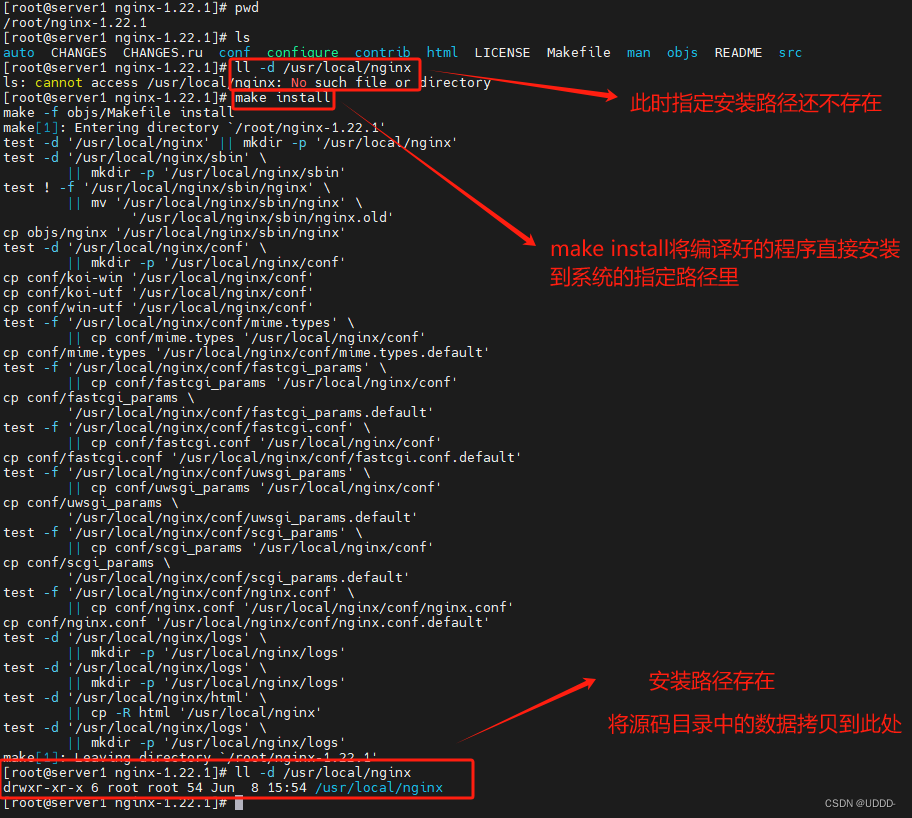
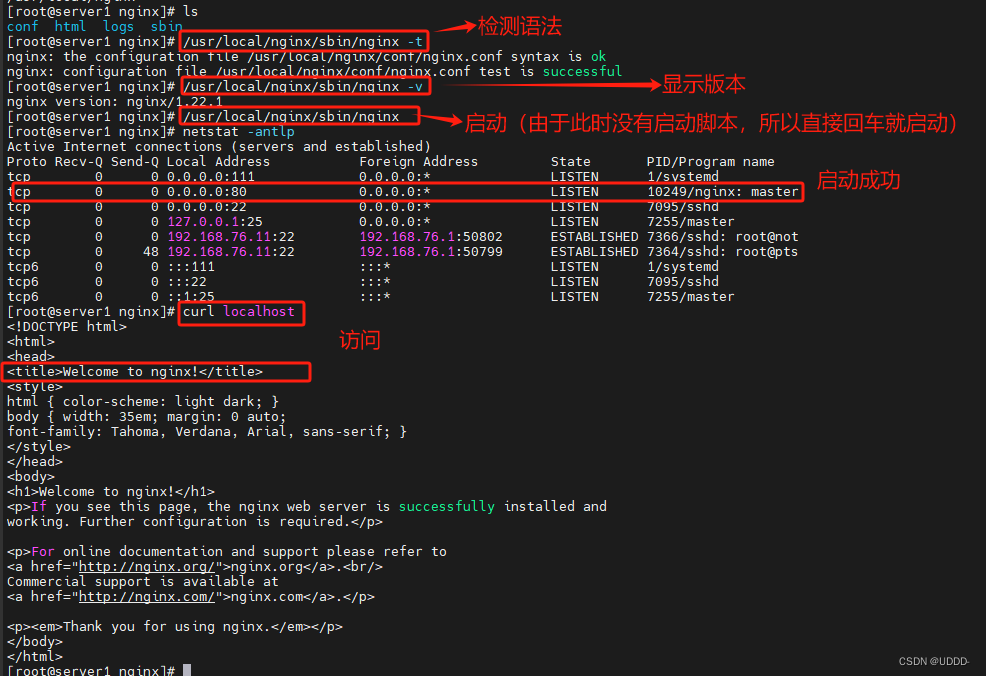
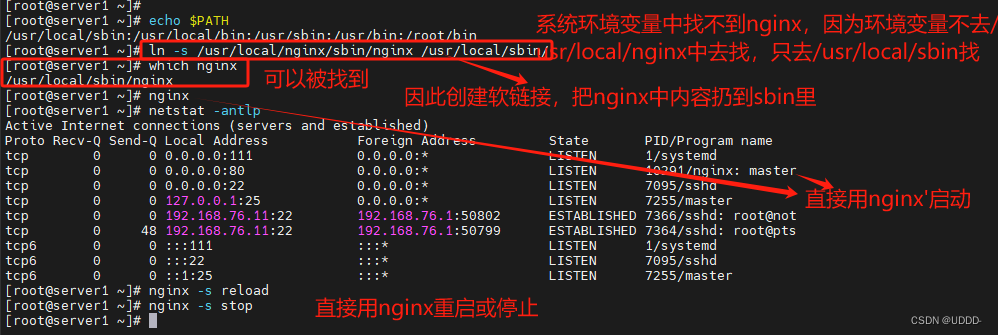
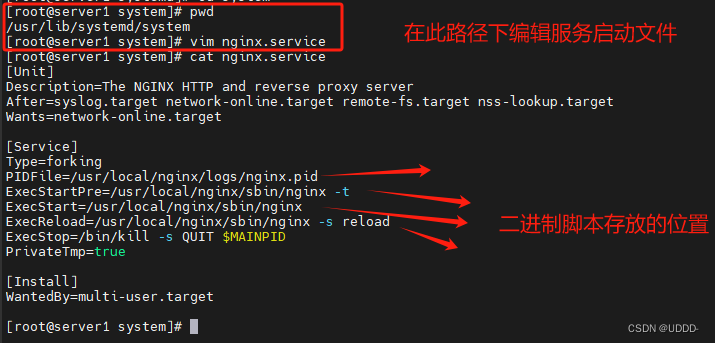
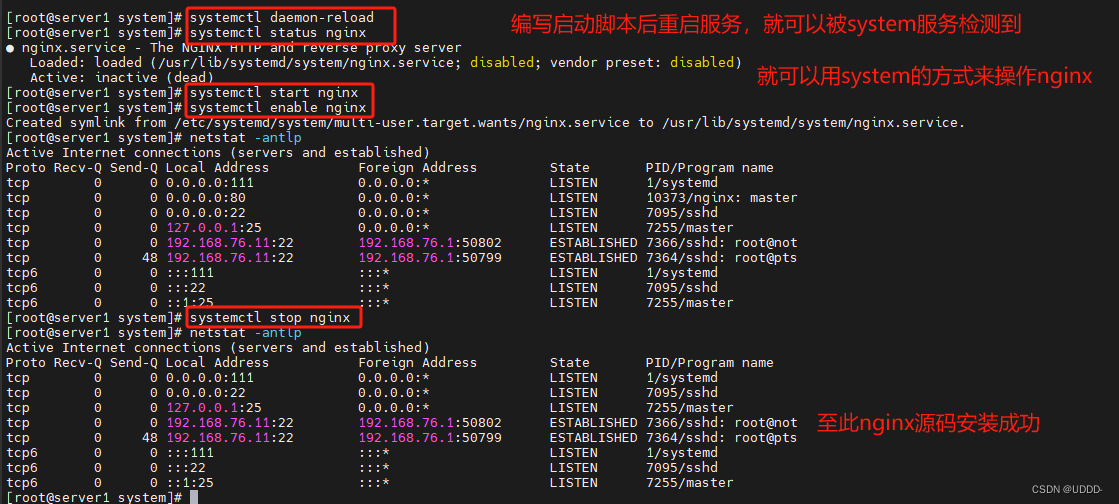
###1.nginx源码安装部署###


###2.平滑升级###
(1)版本升级
当服务器在运行时,需要升级的情况下,平滑升级即就是不断开服务器就可以进行升级,最大限度保证数据的完整性。
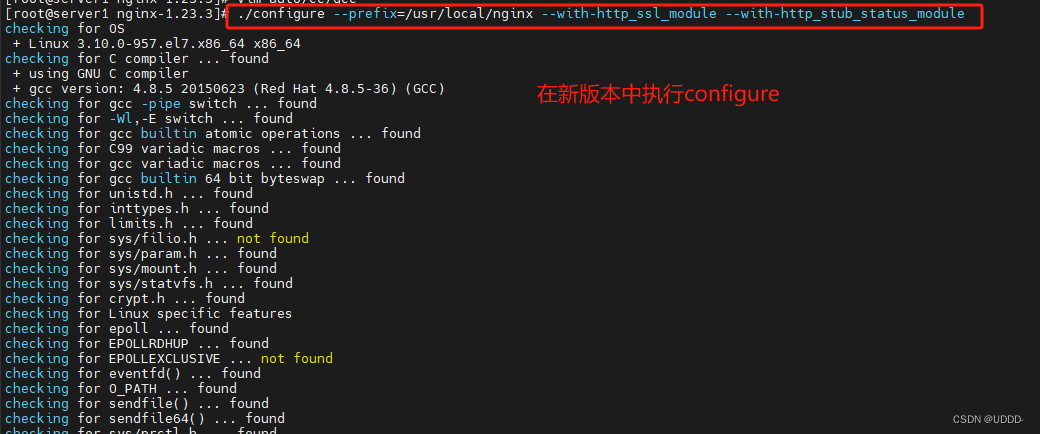
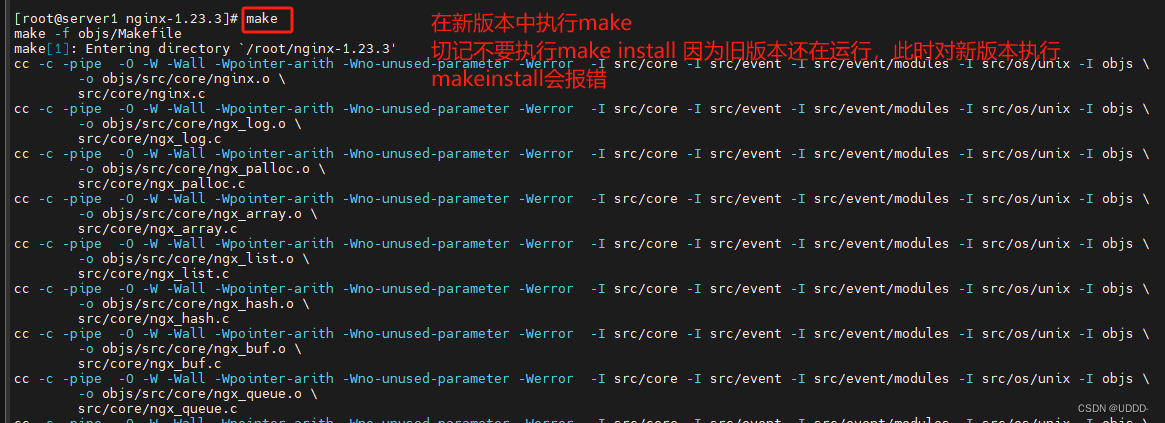
下载nginx新版本软件,正常执行./configure和make但不要执行make install。


备份原程序:
cd /usr/local/lnmp/nginx/sbin
cp nginx nginx.old 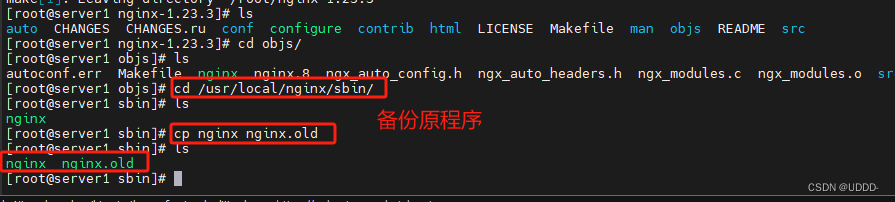 拷贝新程序:
cd nginx-1.23.1/objs
cp -f nginx /usr/local/lnmp/nginx/sbin
获取当前nginx主进程pid,即master进程:
ps ax|grep nginx
29636 ? Ss 0:00 nginx: master process nginx
29637 ? S 0:00 nginx: worker process
29638 ? S 0:00 nginx: worker processkill -USR2 29636
ps ax|grep nginx
29636 ? Ss 0:00 nginx: master process nginx
29637 ? S 0:00 nginx: worker process
29638 ? S 0:00 nginx: worker process
29761 ? S 0:00 nginx: master process nginx
29762 ? S 0:00 nginx: worker process
29763 ? S 0:00 nginx: worker process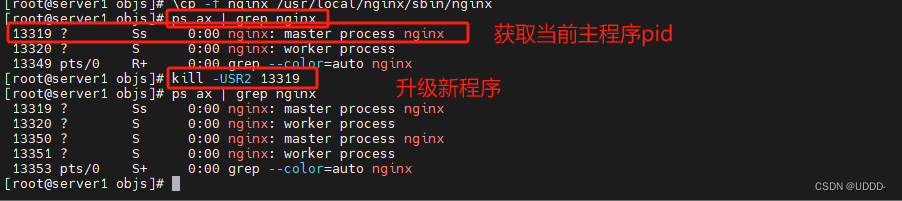
关闭原worker进程但保留主进程master,为了回退
kill -WINCH 29636
ps ax|grep nginx
29636 ? Ss 0:00 nginx: master process nginx
29761 ? S 0:00 nginx: master process nginx
29762 ? S 0:00 nginx: worker process
29763 ? S 0:00 nginx: worker process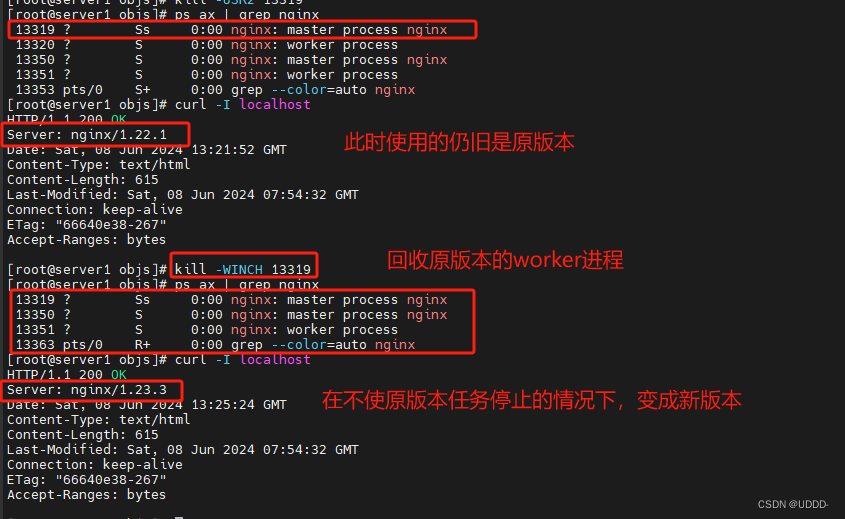
因为有时候我们会发现新版本并没有旧版本用着顺手,那么关闭worker进程但保留主进程就是为了回退,即就是关闭工作端worker,保留master。
(2)版本回退
回退的过程是相反的,先还原nginx程序,唤醒原进程,回收新版本,并且关闭。
还原nginx程序:
# cp -f nginx.old nginx
唤醒原进程:
# kill -HUP 29636
回收新版本的worker进程:
kill -WINCH 29761
关闭新版本主进程:
kill -QUIT 29761 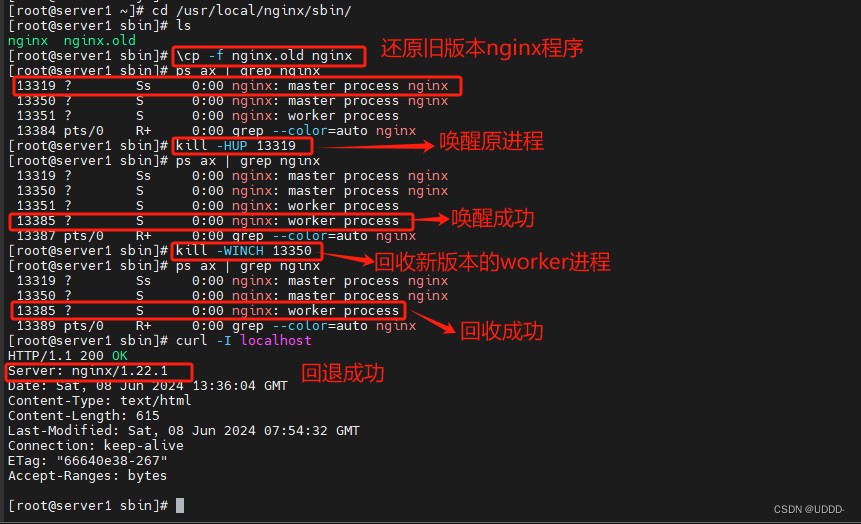
###3.负载均衡+反向代理###
(1)默认轮询
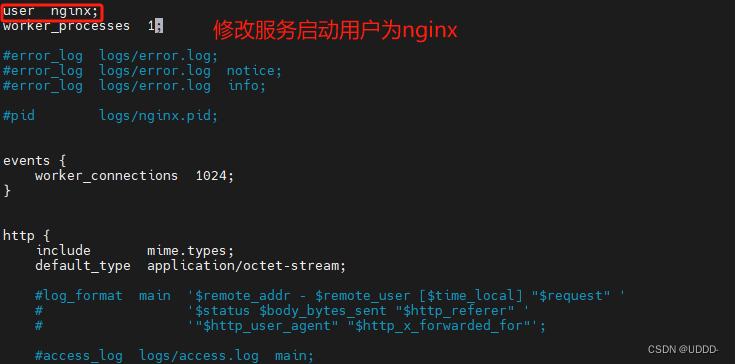
①修改nginx服务启动用户
[root@server1 conf]# useradd -M -d /usr/local/nginx/ -s /sbin/nologin nginx
[root@server1 ~]# cd /usr/local/nginx/conf/
[root@server1 conf]# vim nginx.conf
user nginx;
...

[root@server1 conf]# nginx  -s reload
[root@server1 conf]# ps axu |grep nginx
root      19100  0.0  0.0  46020  2000 ?        Ss   16:13   0:00 nginx: master process nginx
nginx     19279  0.0  0.1  46452  2036 ?        S    17:24   0:00 nginx: worker process


②nginx进程与cpu核心绑定
推荐设置:nginx进程数量与cpu和核心数一致
[root@server1 conf]# vim nginx.conf

user nginx;

worker_processes 2;

worker_cpu_affinity 01 10;   ##如果上边是3,则此处为001 010 100

...


[root@server1 conf]# nginx -s reload

[root@server1 conf]# ps axu |grep nginx

root 19100 0.0 0.0 46020 2000 ? Ss 16:13 0:00 nginx: master process nginx

nginx 19279 0.0 0.1 46452 2036 ? S 17:24 0:00 nginx: worker process

nginx 19280 0.0 0.1 46452 2036 ? S 17:24 0:00 nginx: worker process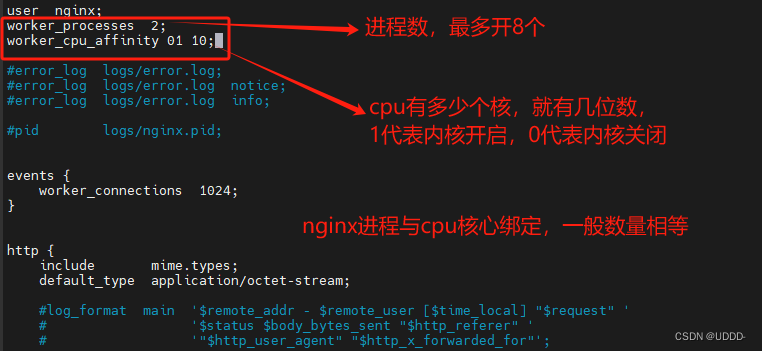

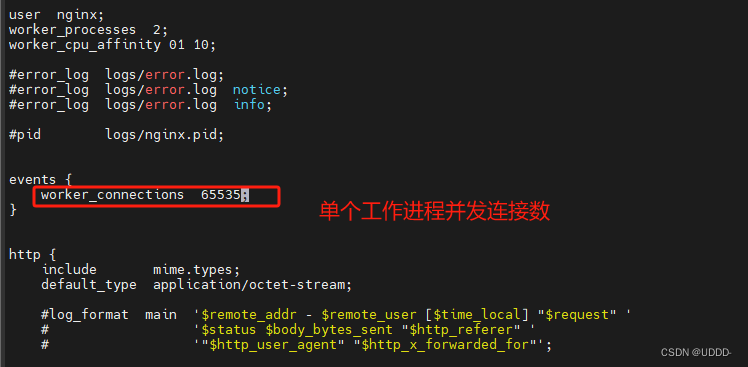
③修改nginx并发连接数
[root@server1 conf]# vim nginx.conf
...
events {
worker_connections 65535;
}
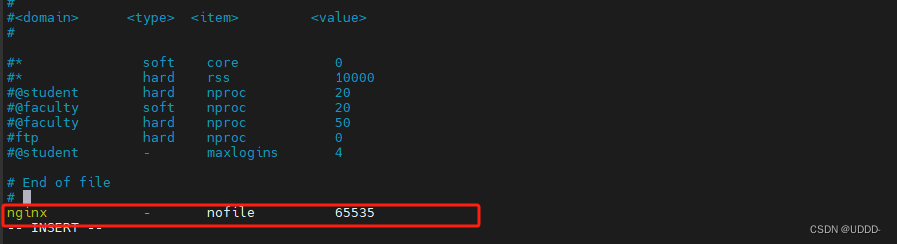
修改系统限制
[root@server1 conf]# vim /etc/security/limits.conf
nginx - nofile 65535
内核参数是根据本机物理资源自动配置的,一般不需要修改
[root@server1 conf]# sysctl fs.file-max
fs.file-max = 197384

④负载均衡设置
文档:https://docs.nginx.com/nginx/admin-guide/load-balancer/http-load-balancer/

[root@server1 conf]# vim nginx.conf
...
http {
    upstream westos {
        server 192.168.56.12;
        server 192.168.56.13:8080;
        server 192.168.56.11:8080 backup;
    }
...
    server {
        listen       80;
        server_name  localhost;

        location / {
            #root   html;
            #index  index.html index.htm;
            proxy_pass http://westos;
        }
...

[root@server1 conf]# nginx  -s reload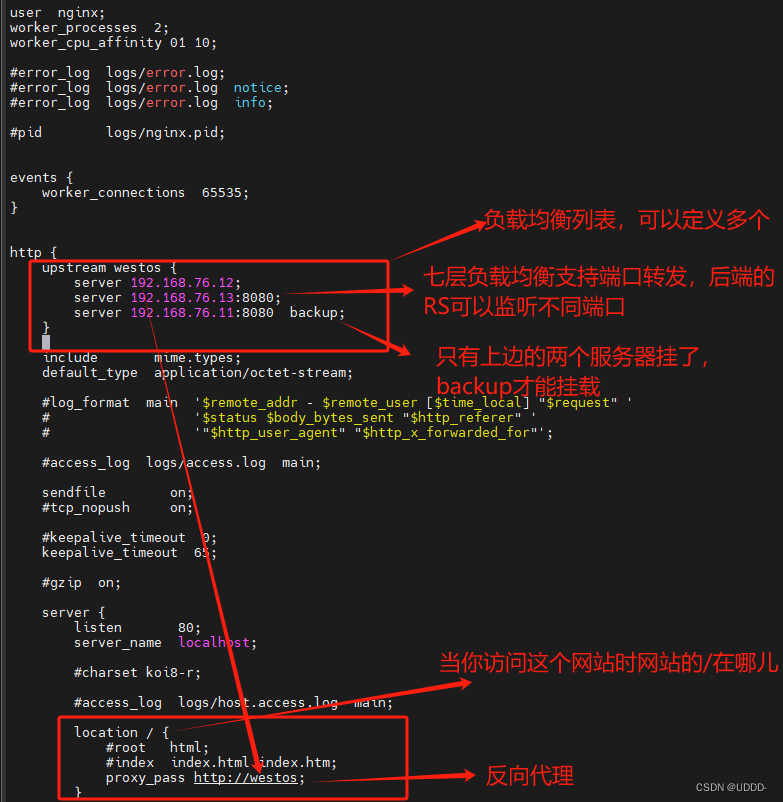


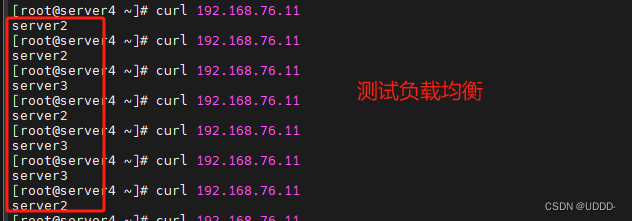
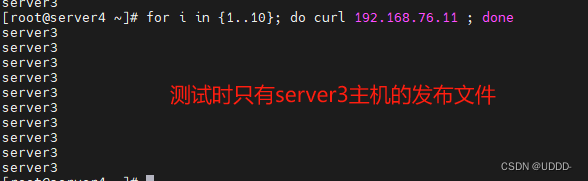
⑤nginx对后端自带健康检测(backup)

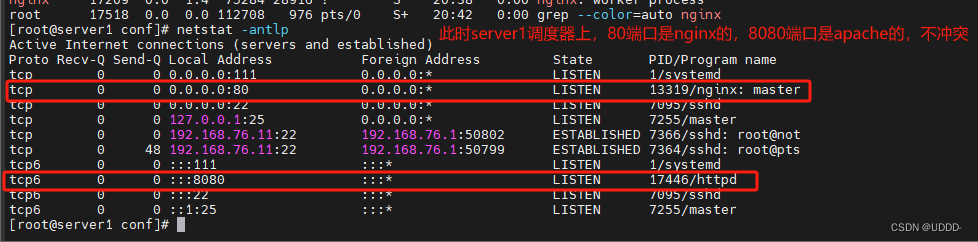
![]()


(2)改变权重,默认为1
在
server1主机中修改配置文件,增加server2主机的权重,检测语法,重启服务。
###server1------改变权重
cd /usr/local/nginx/conf/
vim nginx.conf
///
http {
        upstream westos {
        server 172.25.24.2:80 weight=2;			##增加权重
///
nginx -t
nginx -s reload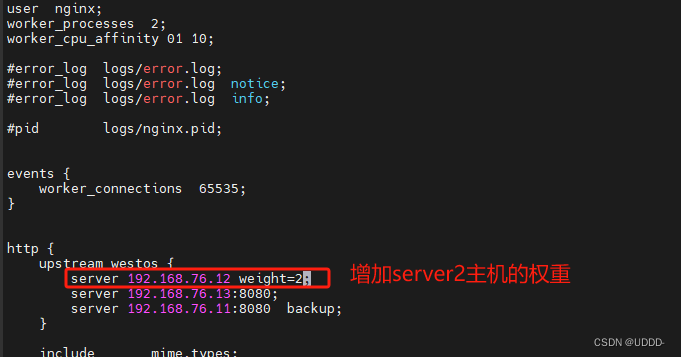


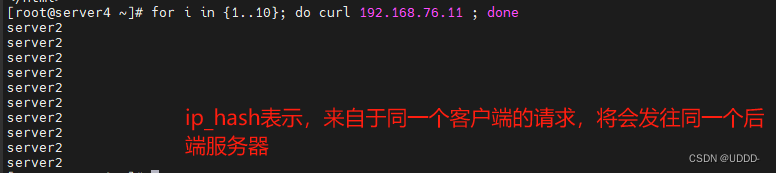
(3)ip_hash
ip_hash表示来自同一客户端的请求,将会发往同一个后端服务器
ip_hash对后端做健康检测,如果server3出问题,则调度server2
如果后端全挂,则http报错502(500表示服务器错误)
在server1主机中修改配置文件,在负载均衡模块中添加ip_hash,检测语法,重启服务。ip_hash算法不支持backup
vim nginx.conf
///
http {
        upstream westos {
        ip_hash;
///
nginx -t
nginx -s reload 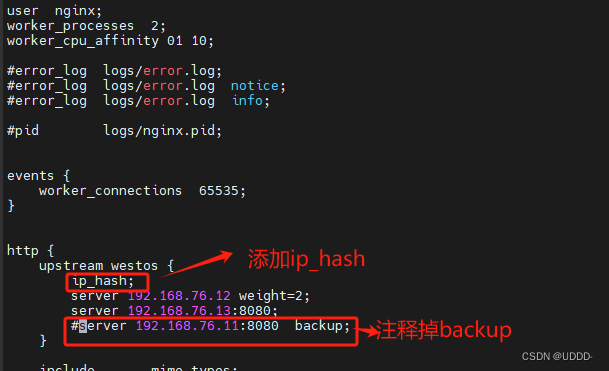

![]()
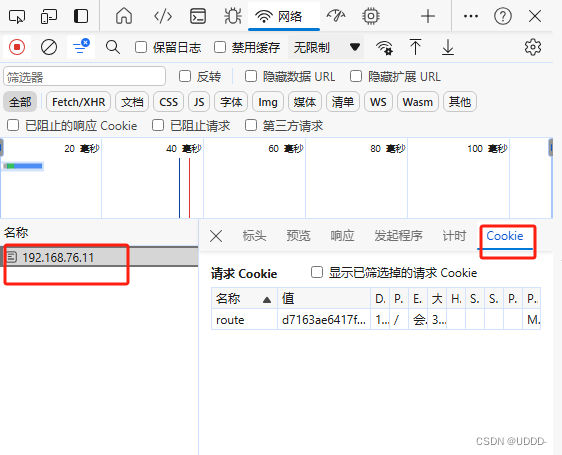
(4)基于cookie
基于cookie能够区分客户端来源,测试时只能在浏览器中进行
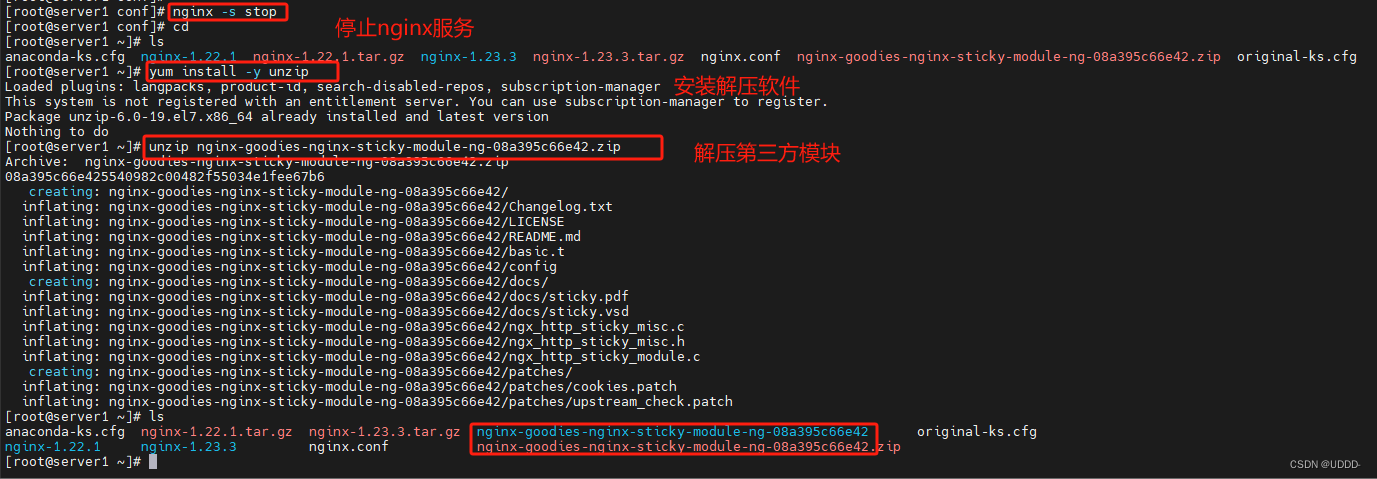
先停止nginx服务
[root@server1 conf]# nginx -s stop
[root@server1 ~]# yum install -y unzip
[root@server1 ~]# unzip nginx-goodies-nginx-sticky-module-ng-08a395c66e42.zip
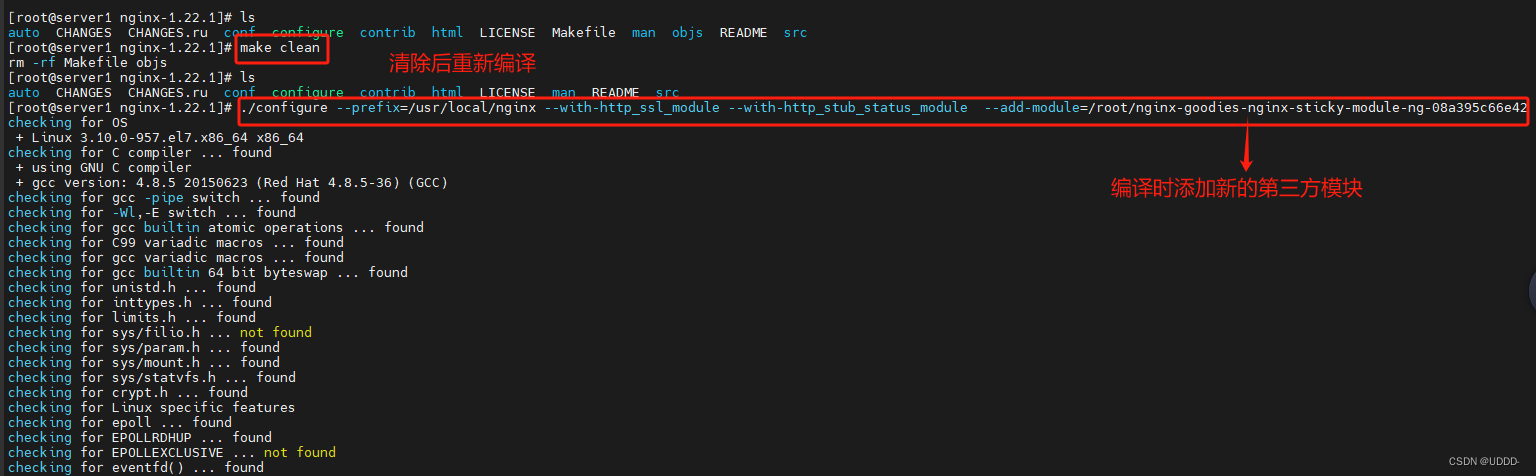
[root@server1 ~]# cd nginx-1.22.1/
[root@server1 nginx-1.22.1]# ./configure --prefix=/usr/local/nginx --with-http_ssl_module --with-http_stub_status_module --add-module=/root/nginx-goodies-nginx-sticky-module-ng-08a395c66e42
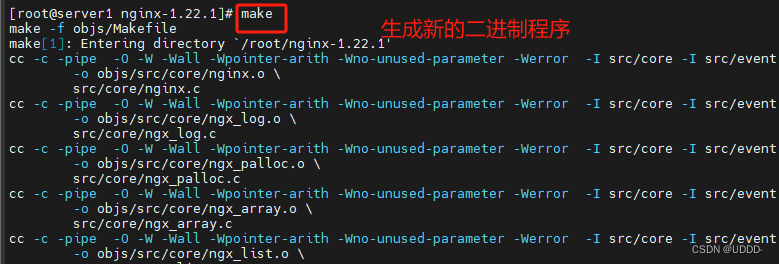
[root@server1 nginx-1.22.1]# make
[root@server1 nginx-1.22.1]# \cp -f objs/nginx /usr/local/nginx/sbin/nginx
[root@server1 objs]# cd /usr/local/nginx/conf/
[root@server1 conf]# vim nginx.conf
...
upstream westos {
#ip_hash;
sticky;
server 192.168.56.12 weight=2;
server 192.168.56.13:8080;
#server 192.168.56.11:8080 backup;
}
检测语法
[root@server1 conf]# nginx -t
nginx: the configuration file /usr/local/nginx/conf/nginx.conf syntax is ok
nginx: configuration file /usr/local/nginx/conf/nginx.conf test is successful
启动服务
[root@server1 conf]# nginx
使用浏览器测试 按F12可以查看cookie值


###4.安全控制###
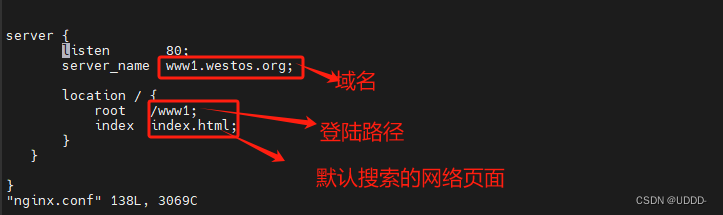
(1)基于域名的虚拟主机
[root@server1 nginx]# mkdir /www1/
[root@server1 nginx]# echo web1 > /www1/index.html

[root@server1 nginx]# vim conf/nginx.conf
http {
...
server {
        listen 80;
        server_name www1.westos.org;

        location / {
                root /www1;
                index index.html;
        }
}
}

[root@server1 nginx]# nginx  -s reload
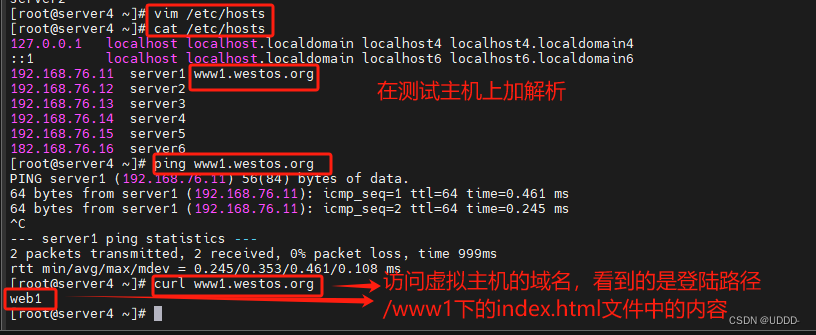
测试
[root@server4 ~]# vim /etc/hosts
192.168.56.11   server1 www1.westos.org

[root@server4 ~]# curl  www1.westos.org
web1
(2)限制并发连接数
建立目录用于存放实验素材
[root@server1 nginx]# cd html/
[root@server1 html]# mkdir download
[root@server1 ~]# cp vim.jpg /usr/local/nginx/html/download/
[root@server1 nginx]# vim conf/nginx.conf
http {
...
limit_conn_zone $binary_remote_addr zone=addr:10m;

server {
...
location / {
            root   html;
            index  index.html index.htm;
            #proxy_pass http://westos;
        }

		location /download/ {
            	 limit_conn addr 1;
        	}
	}
}
[root@server1 nginx]# nginx  -s reload
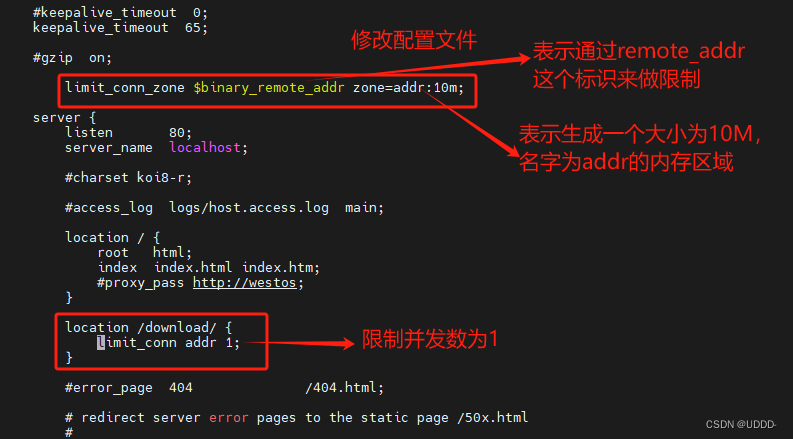

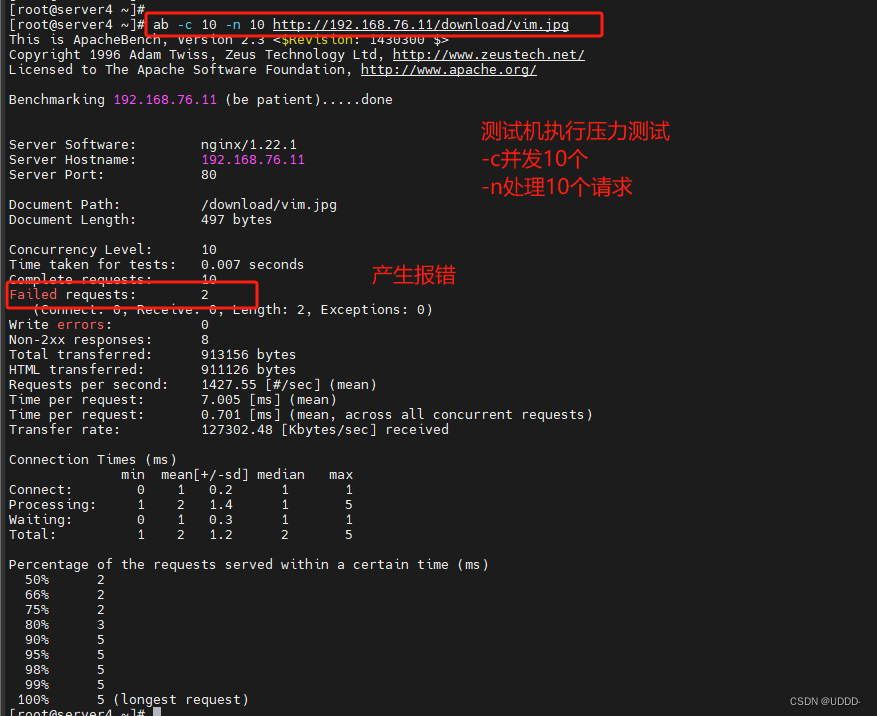
必须单线程下载,超出的并发连接会失败
测试:
[root@server4 ~]# ab -c 10 -n 10 http://192.168.56.11/download/vim.jpg
查看日志
[root@server1 nginx]# cat logs/access.log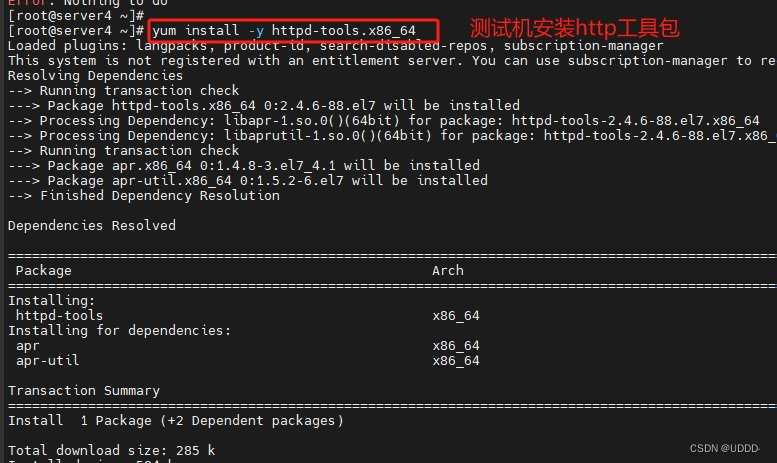

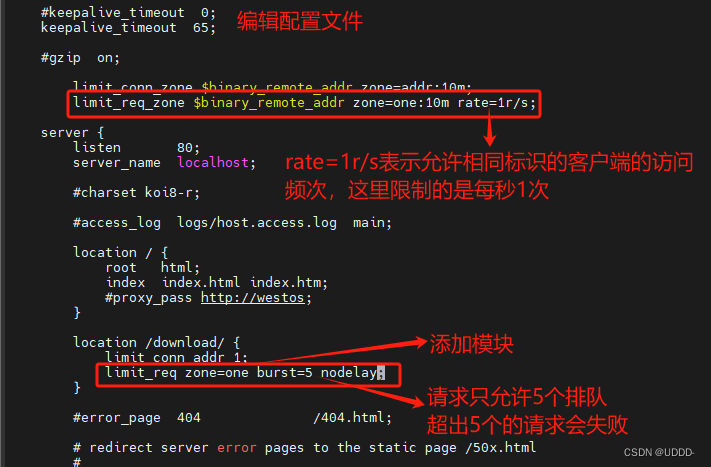
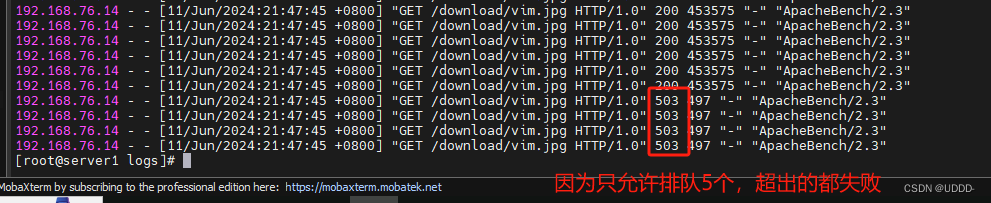
(3)限制请求数
[root@server1 nginx]# vim conf/nginx.conf
http {
...
limit_req_zone $binary_remote_addr zone=one:10m rate=1r/s;

server {
		location /download/ {
            	 limit_conn addr 1;
		limit_req zone=one burst=5 nodelay;
        	}
	}
}
[root@server1 nginx]# nginx  -s reload
测试
[root@server4 ~]# ab -c 1 -n 10 http://192.168.56.11/download/vim.jpg
查看日志
[root@server1 ~]# cat /usr/local/nginx/logs/access.log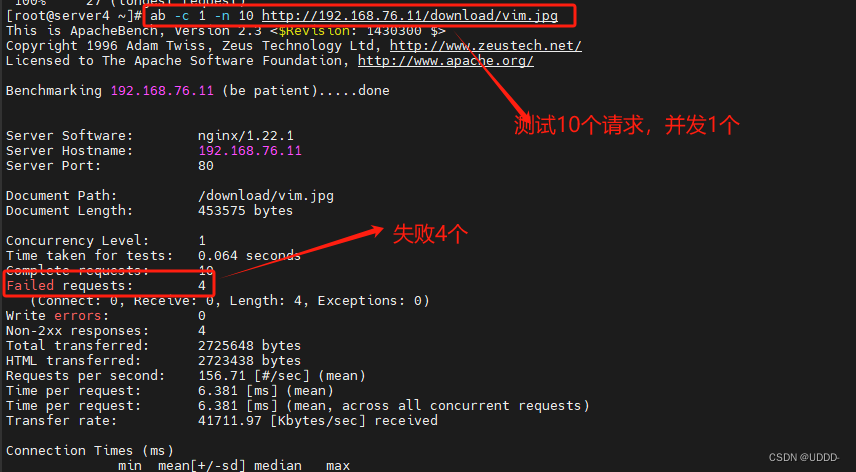
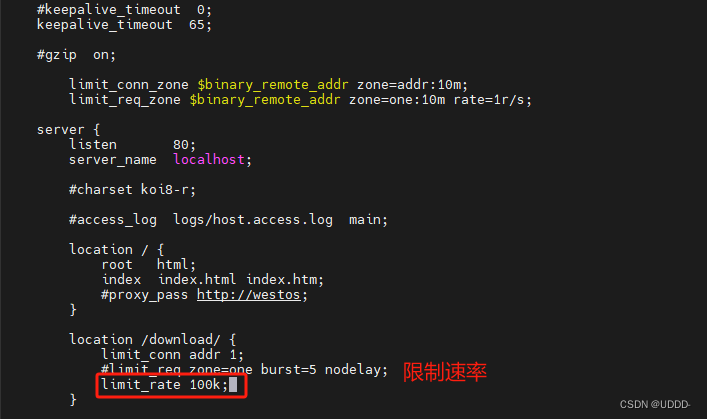
(4)限制速率
[root@server1 nginx]# vim conf/nginx.conf
http {
...
server {
		location /download/ {
            	 limit_conn addr 1;
		limit_rate 100k;
        	}
	}
}
[root@server1 nginx]# nginx  -s reload
测试
[root@server4 ~]# ab -c 1 -n 5 http://192.168.56.11/download/vim.jpg
查看日志
[root@server1 ~]# cat /usr/local/nginx/logs/access.log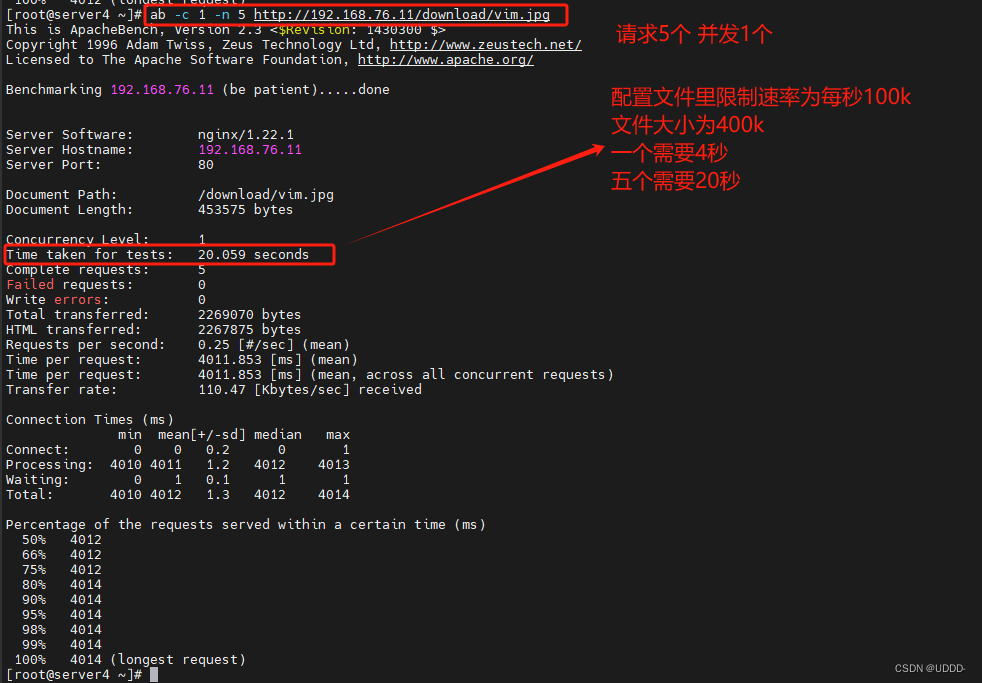
###5.nginx基础配置###
(1)https配置
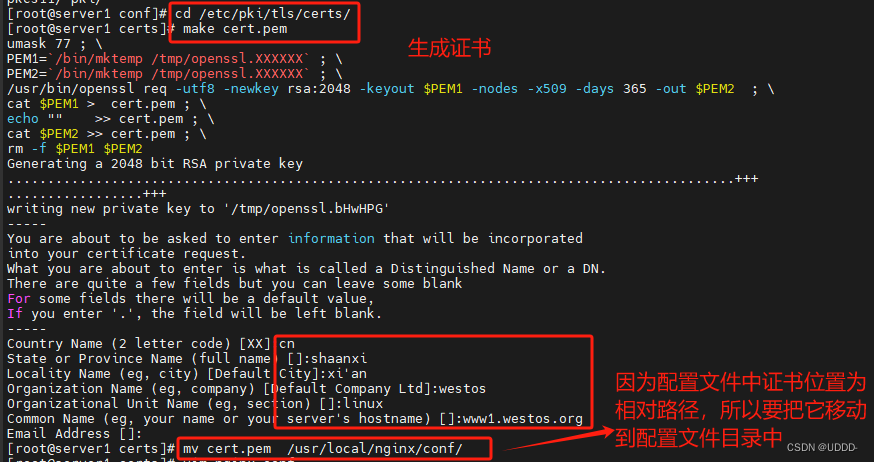
生成https证书
[root@server1 conf]# cd /etc/pki/tls/certs
[root@server1 certs]# make cert.pem
[root@server1 certs]# mv cert.pem  /usr/local/nginx/conf/
修改配置文件
[root@server1 conf]# vim nginx.conf
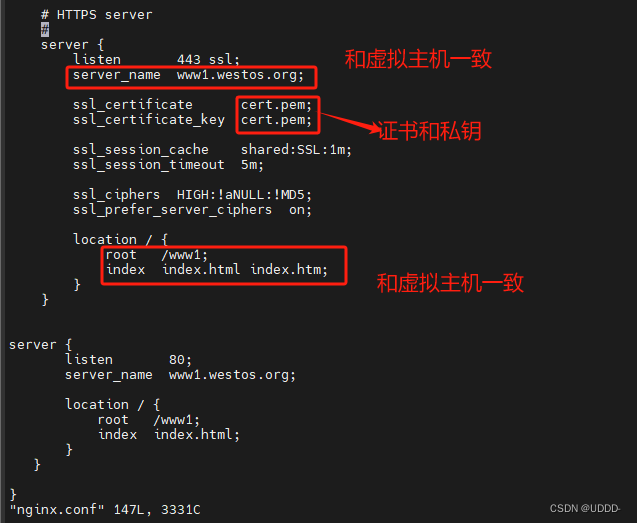
# HTTPS server
#
server {
listen 443 ssl;
server_name www1.westos.org;
ssl_certificate cert.pem;
ssl_certificate_key cert.pem;
ssl_session_cache shared:SSL:1m;
ssl_session_timeout 5m;
ssl_ciphers HIGH:!aNULL:!MD5;
ssl_prefer_server_ciphers on;
location / {
root /www1;
index index.html index.htm;
}
}
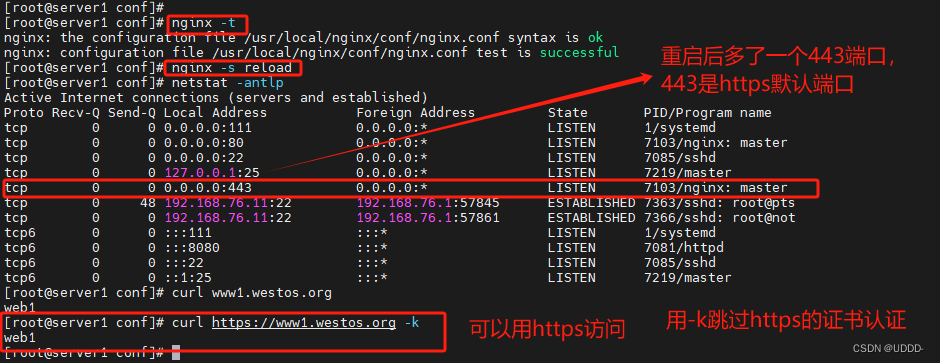
测试
[root@server1 conf]# nginx  -t
[root@server1 conf]# nginx  -s reload
[root@server4 ~]# curl  -k https://www1.westos.org
web1
(2)自动索引
可以在浏览器访问,下载软件更方便。
在配置文件中设定自动索引,注意注释上文参数设定,重启服务。
vim nginx.conf
///
        location /download/ {
                limit_conn addr 1;
                #limit_req zone=one burst=5 nodelay;
                #limit_rate 50k;		##注释
		autoindex.on;
///
nginx -s reload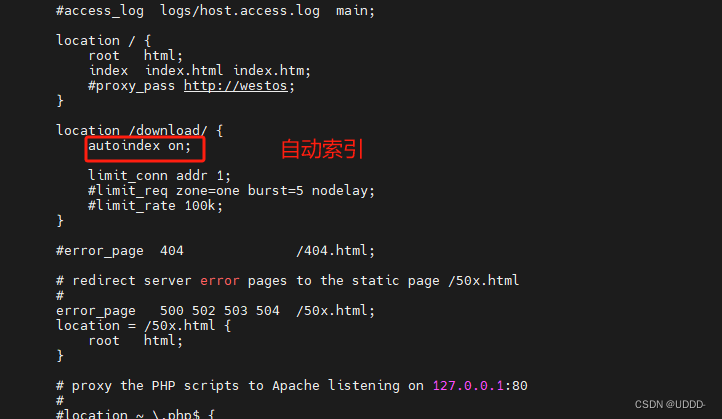
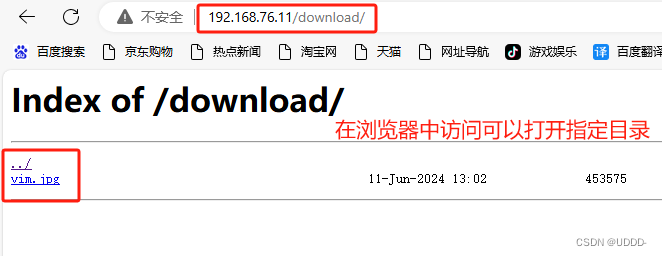
测试:在浏览器访问
http://192.168.76.11/download
(3)nginx empire缓存配置
nginx默认可以做缓存服务器。缓存可以降低网站带宽,加速用户访问。
编辑配置文件,设定对图片等进行缓存,缓存时间为1年,在此期间访问就会减少访问时间。
vim nginx.conf
///
location /download/ {
limit_conn addr 1;
#limit_req zone=one burst=5 nodelay;
#limit_rate 50k;
autoindex on;
} ##在此位置下方进行设定
location ~ .*\.(gif|jpg|png)$ { ##对图片等进行缓存
expires 365d;
root html;
}
///
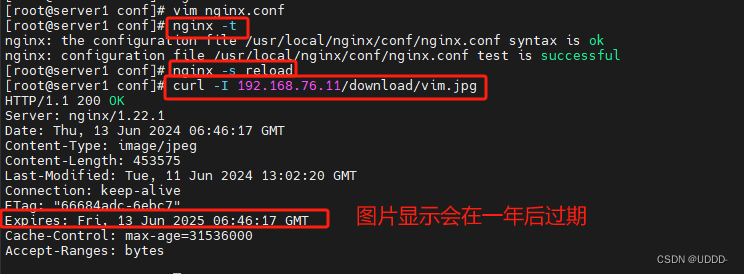
nginx -s reload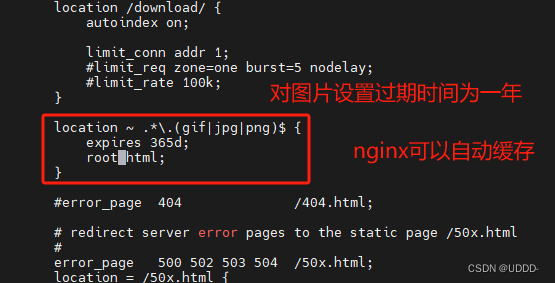
测试
curl -I 192.168.76.11/download/vim.jpg
///Expires: Thu, 13 Jun 2025 04:53:01 GMT
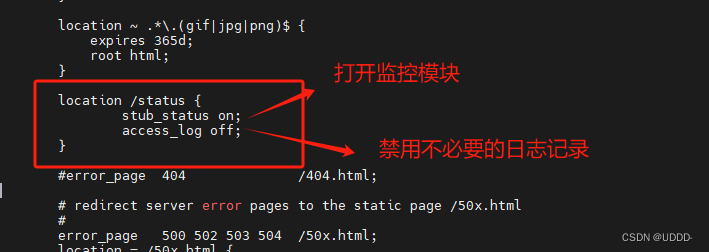
(4)禁用不必要的日志记录,以节省磁盘IO的消耗
cd conf/
vim nginx.conf
///
        location ~ .*\.(gif|jpg|png)$ {
                expires 365d;
                root html;
        }		##在这个位置的下面加入设定

        location /status {
                stub_status on;
                access_log off;
        }
///
nginx -t
nginx -s reload
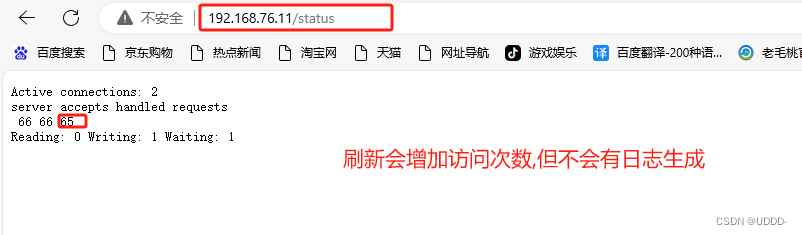
在浏览器访问
192.168.76.11/status	##刷新会增加访问次数,但不会有日志生成
cd ../logs
ls
cat access.log		##为空

(5)站点限制
在配置文件中设定指定目录只能本机访问,拒绝其他所有请求。
cd conf/
vim nginx.conf
///
        location /status {
                stub_status on;
                access_log off;
                allow 127.0.0.1;
                deny all;
        }
///
nginx -t
nginx -s reload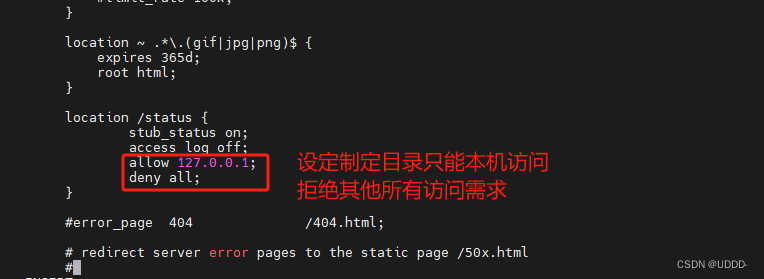
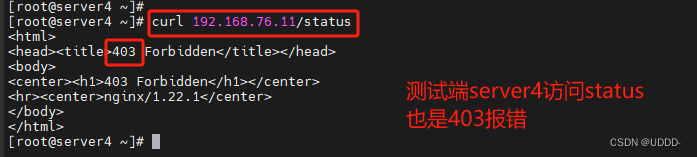
测试:
真机浏览器中访问http://192.168.76.11/status
##403报错拒绝访问

server4测试机curl  192.168.76.11/status
##403报错拒绝访问


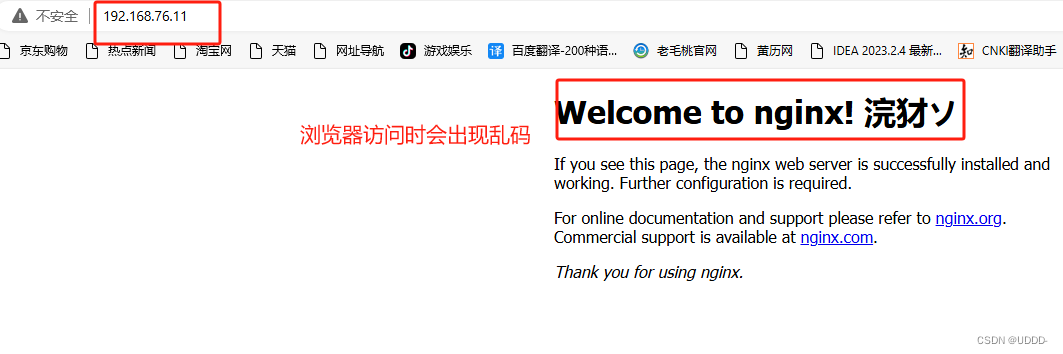
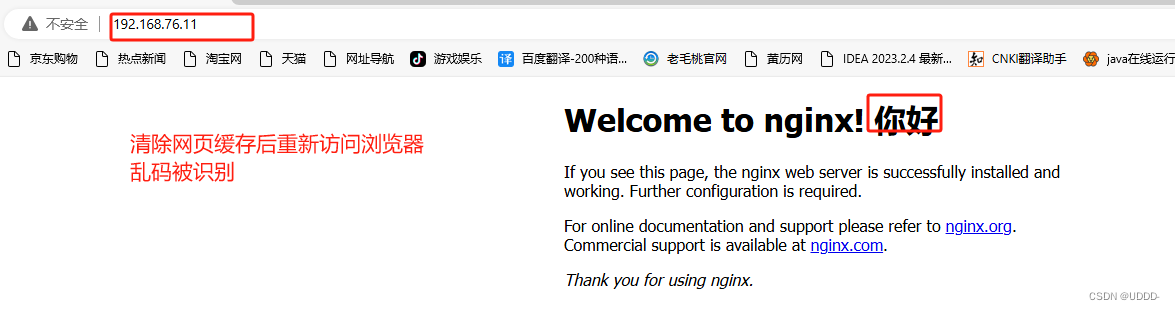
(6)中文乱码
nginx默认不支持中文字符,在浏览器访问时,中文会变成乱码。
在nginx发布文件中加入一行中文,在浏览器中访问为乱码。
cd ..(nginx)
cd html/
vim index.html
///
你好
///
#在浏览器访问时中文是乱码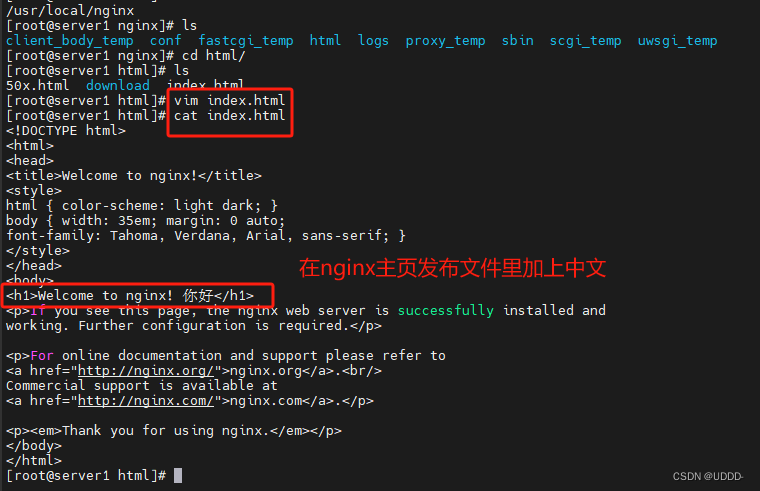
编辑配置文件,设定nginx支持中文字符,并重启服务。
vim nginx.conf
///
    server {
        listen       80;
        server_name  localhost;

        charset utf-8;
///
nginx -s reload
(7)日志轮询
编写一个脚本,设定打开nginx时会生成日志文件,命名格式为前一天。
[root@server1 ~]# vim /opt/nginx_log.sh
#!/bin/bash
cd /usr/local/nginx/logs && mv access.log access_$(date +%F -d -1day).log
kill -USR1 `cat /usr/local/nginx/logs/nginx.pid`
给脚本执行权限,执行脚本,切入到日志目录,产生日志。
[root@server1 ~]# chmod +x /opt/nginx_log.sh
[root@server1 ~]#  /opt/nginx_log.sh

[root@server1 ~]# cd /usr/local/nginx/logs/
[root@server1 logs]# ls
access_2023-02-21.log  ##生成日志

再加入crontab定时任务
crontab -e
00 00 * * * /opt/nginx_log.sh

crontab -l  执行
(8)重定向
①端口重定向
编辑配置文件,将80端口定向到443端口。
[root@server1 conf]# vim nginx.conf
...
server {
        listen 80;
        server_name www1.westos.org;
        rewrite ^/(.*)$ https://www1.westos.org/$1 permanent;

        location / {
                root /www1;
                index index.html;
        }
}
...
[root@server1 conf]# nginx -s reload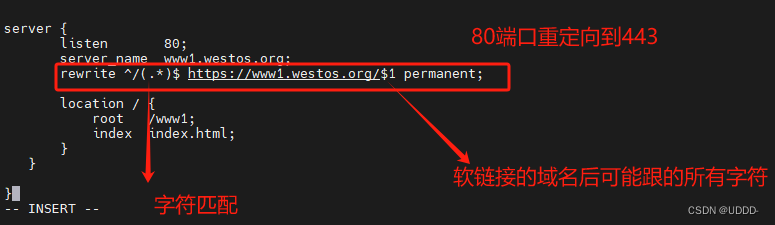
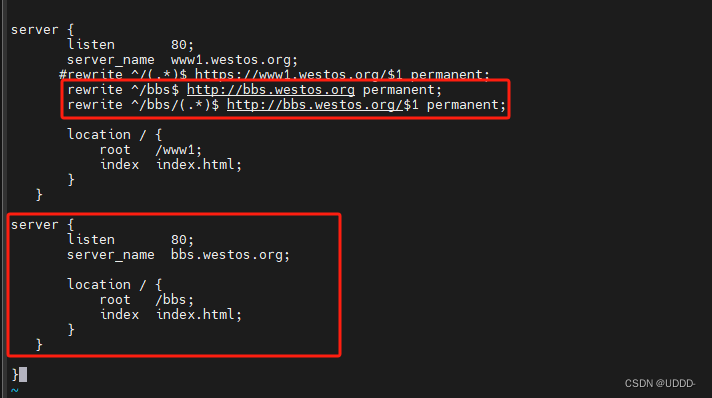
②虚拟主机重定向
www1.westos.org >> bbs.westos.org
cd ..(nginx)
cd html
mkdir bbs
mv bbs/ /
vim nginx.conf
///
server {
        listen 80;
        server_name www.westos.org;

        #rewrite ^/(.*)$ https://www.westos.org/$1 permanent;
        rewrite ^/bbs$ http://bbs.westos.org permanent;
        ##^/bbs$表示匹配以/开头,bbs结尾,,比如www.westos.org/bbs,如果后加其他url,则不能重定向
        rewrite ^/(.*)$ http://bbs.westos.org/$1 permanent;
        ##^/(.*)$表示匹配以/开头,$结尾,后面可以加url,比如www.westos.org/bbs/bbs.html
        }

server {
        listen 80;
        server_name bbs.westos.org;

        location / {
                root /bbs;
        index index.html;
                }
        }
///
nginx -s reload

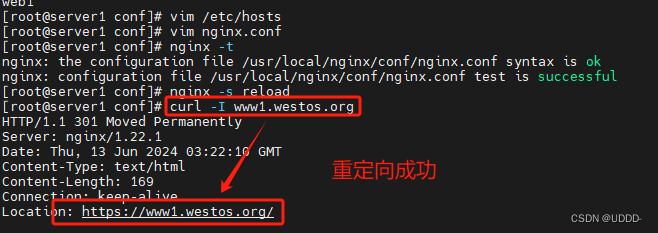
测试:用curl命令查看
curl -I www1.westos.org/bbs/
curl -I www1.westos.org/bbs/bbs.html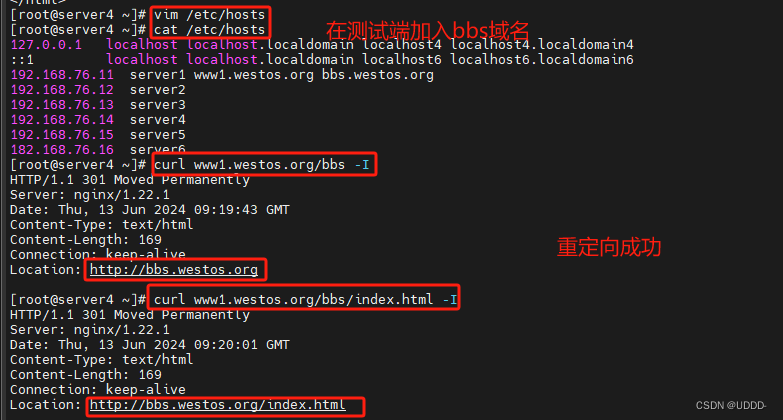
(9)防盗链
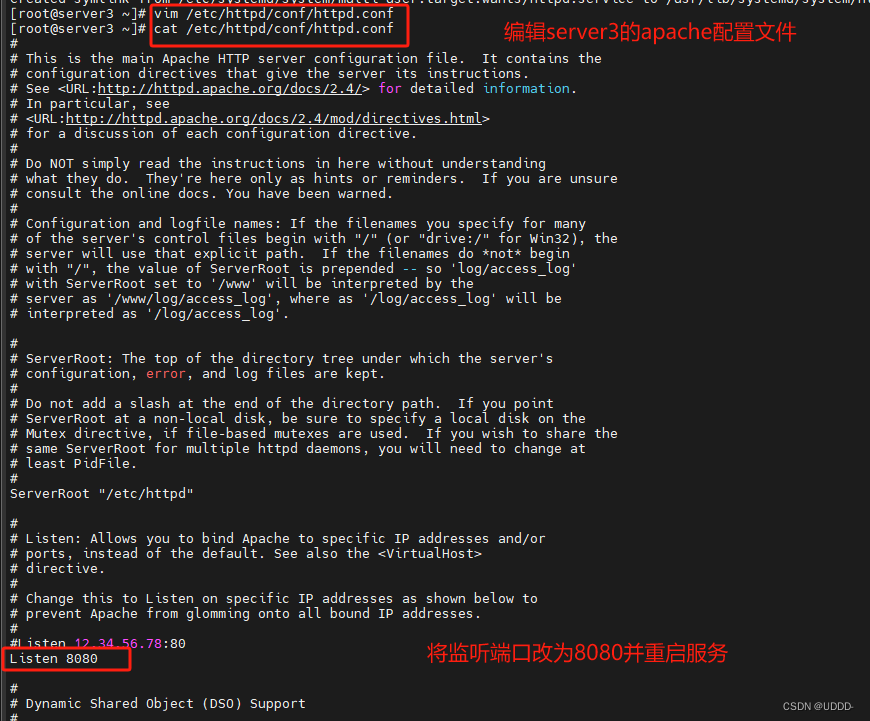
配置server2上的apache服务,在server2中编辑一发布文件,写入访问该文件时,盗取server1主机中的某一图片
[root@server2 ~]# cd /var/www/html/
[root@server2 html]# vim index.html
<html>
<body>
<img src="http://www1.westos.org/vim.jpg"/>
</body>
</html>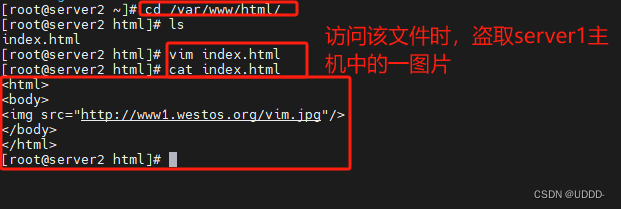
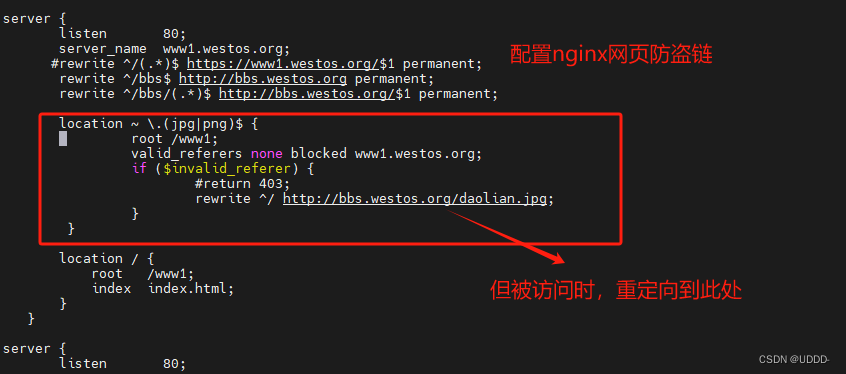
配置nginx网页防盗链
[root@server1 conf]# vim nginx.conf
...
location ~ \.(jpg|png)$ {
                root /www1;
                valid_referers none blocked www1.westos.org;
                if ($invalid_referer) {
                        #return 403;
                        rewrite ^/ http://bbs.westos.org/daolian.jpg;
                }
        }
[root@server1 conf]# nginx -s reload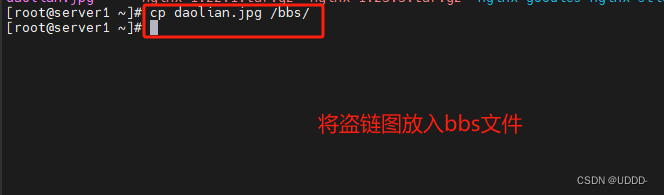
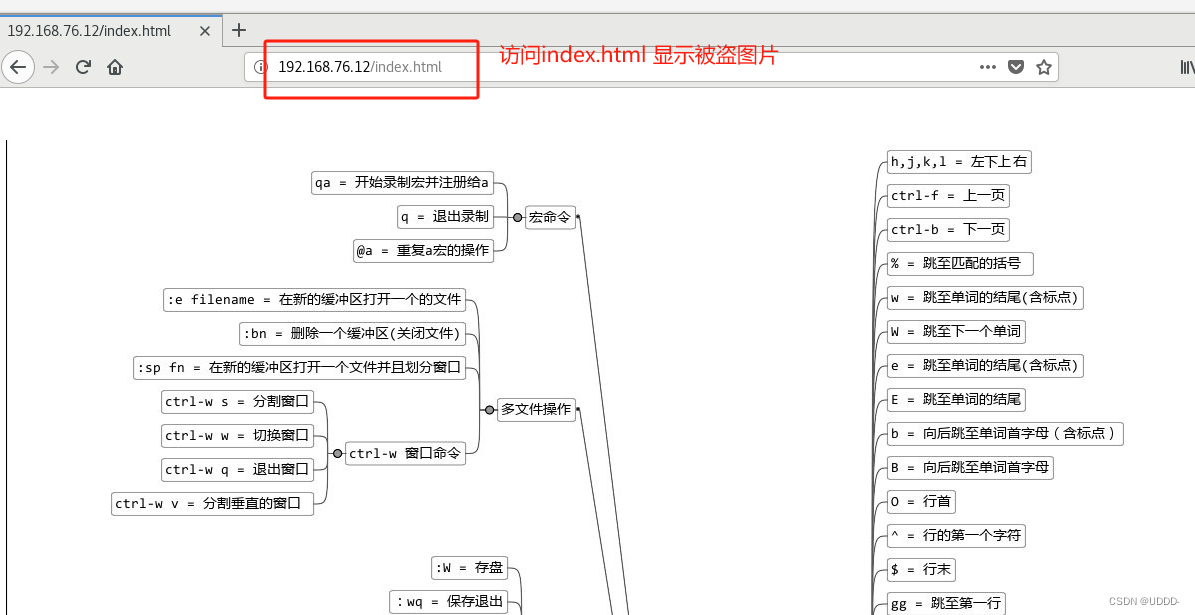
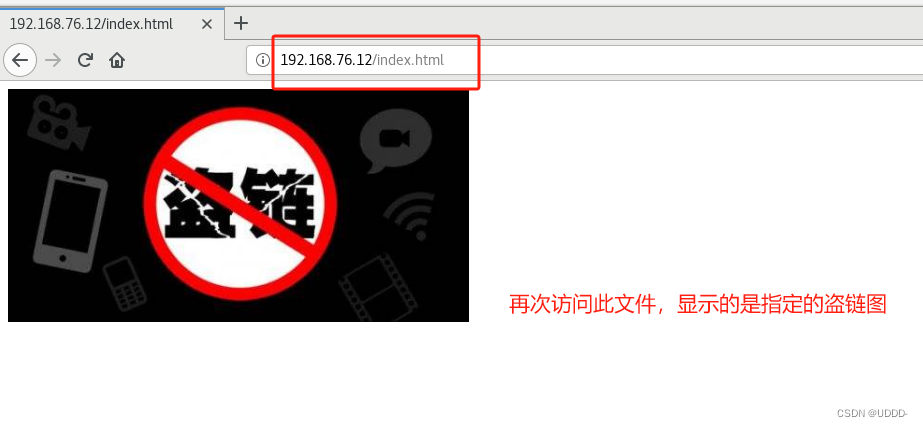
测试:
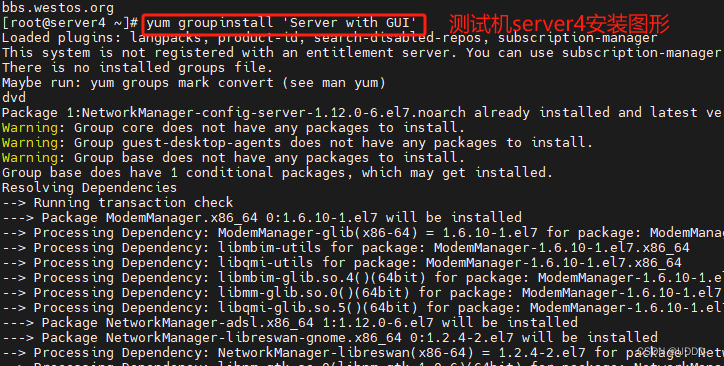
要显示图片,要在测试机server4中安装图形
192.168.76.11/index.html-->指定图片


 被折叠的 条评论
为什么被折叠?
被折叠的 条评论
为什么被折叠?
 到【灌水乐园】发言


