


目录
案例一:回到顶部:
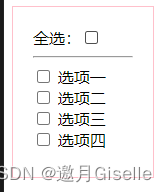
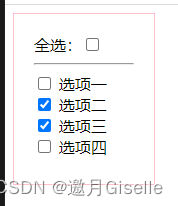
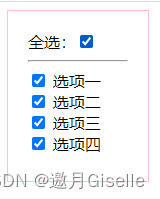
案例二:全选
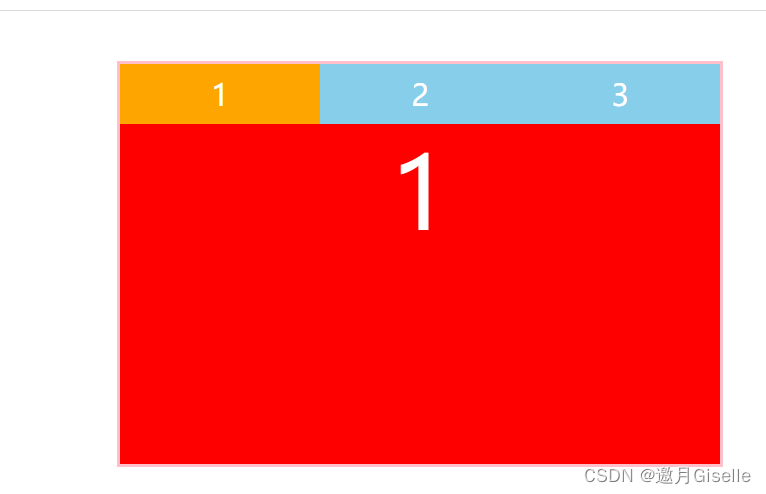
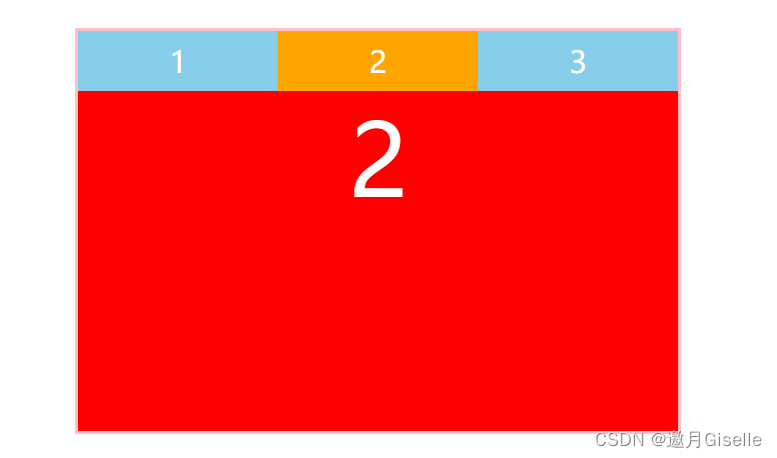
案例三:选项卡
案例四:动态渲染表格
案例五:鼠标跟随
案例六:轮播图
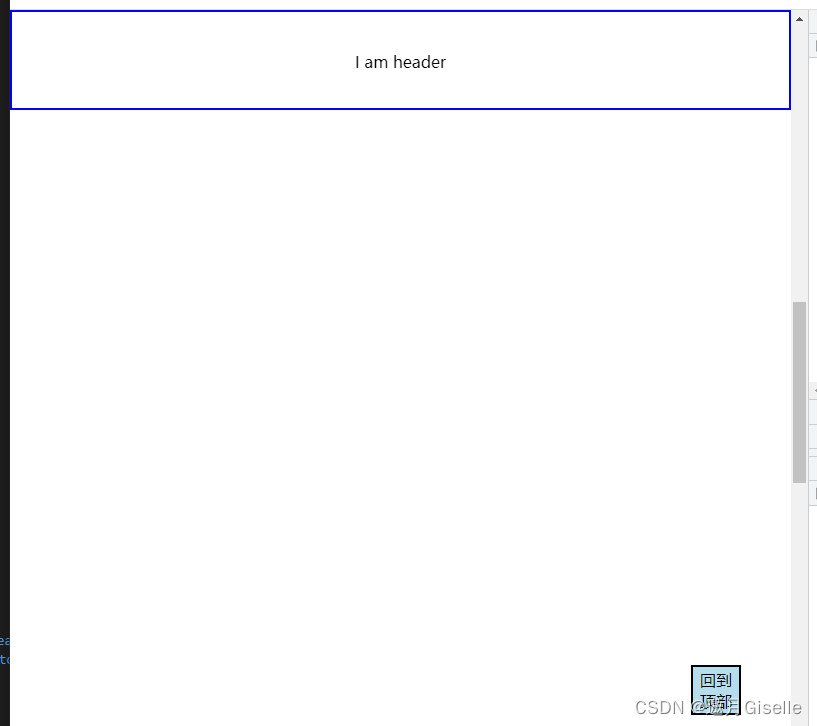
回到顶部:
思路:写一个header和一个button ,固定在上面和右下角,header往上溢出屏幕隐藏。默认header和button都不可见,当滚动栏到一定数值后显示出来,再通过按button平滑的回到顶部并回到隐藏
代码:1.给浏览器绑定滚动事件,实时获取浏览器卷去的高度
2.判断卷去的高度决定显示还是隐藏
3.回到顶部绑定点击事件
    <title>Document</title>
    <style>
        * {
            margin: 0;
            padding: 0;
        }
        body {
            height: 3000px;
        }
        /* 让页面出现滚动条 */
        .head {
            width: 100%;
            height: 100px;
            text-align: center;
            line-height: 100px;
            border: 2px solid blue;
            box-sizing: border-box;
            position: fixed;
            top: -100px;
            transition: all 0.3s linear;
        }
        .comeback {
            width: 50px;
            height: 50px;
            background-color: rgb(182, 221, 236);
            position: fixed;
            bottom: 50px;
            right: 50px;
            display: none;
           font-size: 16px;
        }
    </style>
</head>
<body>
    <header class="head" id="heaad"> I am header</header>
    <button class="comeback" id="come">回到顶部</button>
    <script>
        var head = document.getElementById('heaad')
        var btn = document.getElementById('come')
      window.onscroll = function () {
            var height = document.documentElement.scrollTop || document.body.scrollTop
            if (height >= 300) {
                head.style.top = '0px'
                btn.style.display = 'block'
            }
            else {
                head.style.top = '-100px'
                btn.style.display = 'none'
            }      }
       btn.onclick = function () {
           window.scrollTo({
               top:0,
               behavior:'smooth'
           })     }
    </script>
</body>
</html>
全选
    <style>
        .box {
            width: 100px;
            height: 130px;
            border: 1px solid pink;
            padding: 20px
        }
    </style>
</head>

<body>
    <div class="box">
        <span>全选:</span><input type="checkbox" id="all"><br>
        <hr />
        <input type="checkbox"> <span>选项一</span><br>
        <input type="checkbox"> <span>选项二</span><br>
        <input type="checkbox"> <span>选项三</span><br>
        <input type="checkbox"> <span>选项四</span>
    </div>
    <script>
        var selec = document.getElementById("all")
        var allty = document.getElementsByTagName("input")

        selec.onclick = function () {
            var type = selec.checked
            console.log(type)
            allty[1].checked = type;
            allty[2].checked = type;
            allty[3].checked = type;
            allty[4].checked = type;
        }
        for (var i = 1; i < allty.length; i++) {
            allty[i].onclick = function () {
                var flag = true;
                for (var j = 1; j < allty.length; j++) {
                    if (allty[j].checked == false) {
                        flag = false;
                        break;
                    }

                }
                selec.checked=flag;
            }
        }
    </script>
选项卡
 <style>
        * {
            margin: 0;
            padding: 0;
        }

        ul,
        ol,
        li {
            list-style: none;
        }

        .box {
            width: 600px;
            height: 400px;
            border: 3px solid pink;
            margin: 50px auto;
            display: flex;
            flex-direction: column;
        }

        .box>ul {
            height: 60px;
            display: flex;
        }

        .box>ul>li {
            flex: 1;
            color: #fff;
            background-color: skyblue;
            font-size: 30px;
            display: flex;
            justify-content: center;
            align-items: center;
            cursor: pointer;
        }

        .box>ul>li.active {
            background-color: orange;
        }

        .box>ol {
            flex: 1;
            position: relative;
        }

        .box>ol>li {
            width: 100%;
            height: 100%;
            background-color: red;
            display: flex;
            justify-content: center;
            color: #fff;
            font-size: 100px;
            position: absolute;
            left: 0;
            top: 0;
            display: none;
        }

        .box>ol>li.active {
            display: flex;
        }
    </style>
</head>

<body>
    <div class="box">
        <ul>
            <li class="active">1</li>
            <li>2</li>
            <li>3</li>
        </ul>
        <ol>
            <li class="active">1</li>
            <li>2</li>
            <li>3</li>
        </ol>
    </div>
    <script>
        var btns = document.querySelectorAll('ul>li')
        var tabs = document.querySelectorAll('ol>li')
        btns.forEach(function (item, index) {
            item.onclick = function () {
                btns.forEach(function (t, i) {
                    t.className = ''
                    tabs[i].className = ''
                })
                item.className='active'
                tabs[index].className='active'
            }
        })
    </script>
动态渲染表格
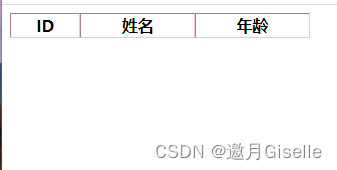
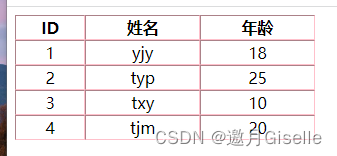
从图一动态渲染到图二
<style>
table {
width: 300px;
text-align: center;
border: pink;
}
</style>
</head>
<body>
<table border="1" cellspacing="0">
<thead>
<tr>
<th>ID</th>
<th>姓名</th>
<th>年龄</th>
</tr>
</thead>
<tbody>
<!-- js渲染 -->
</tbody>
</table>
<script>
var tbody = document.querySelector('tbody')
var users =
[{ id: 1, name: 'yjy', age: 18 },
{ id: 2, name: 'typ', age: 25 },
{ id: 3, name: 'txy', age: 10 },
{ id: 4, name: 'tjm', age: 20 }]
users.forEach(function (item) {
// 每一排都循环一次,判断有几排,循环创建几个tr
var tr = document.createElement('tr')
// 将每一排里面的值遍历一遍,创建td,并赋值给td
for (var k in item) {
var td = document.createElement('td')
td.innerHTML = item[k]
tr.append(td)
}
tbody.appendChild(tr)
}
)
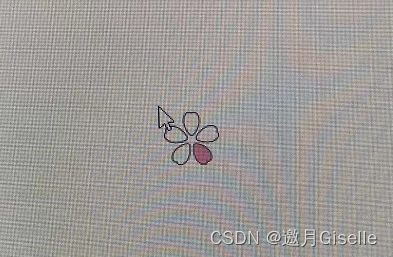
</script>鼠标跟随
光标走到什么位置,鼠标上的自定义图形就跟着
先引入这张图片,相对于整个窗口定位
事件对象
当事件触发的时候,一个描述该信息的对象数据类型
会记录很多信息,要想得到这个对象的信息,在事件后加个e形参,输出有很多信息(截取部分)

 <style>
        img{width: 50px;height: 50px;position: fixed; left: 0; top: 0;}
    </style>
</head>

<body>
    <img src="../tu/樱花.svg">
<script>
    var imgb=document.querySelector('img')
    document.onmousemove=function(e){
        // 拿到光标相对于窗口的坐标点位
        var x=e.clientX;
        var y=e.clientY;
        console.log(x,y)

        // 把x,y赋值给img标签的left和top
        imgb.style.left=x+'px'
        imgb.style.top=y+'px'
    }
</script>


 7755
7755


 被折叠的 条评论
为什么被折叠?
被折叠的 条评论
为什么被折叠?
 到【灌水乐园】发言


