


SynchronousQueue
SynchronousQueue是一个不存储元素的阻塞队列,它的主要特点是每个插入操作必须等待另一个线程的相应移除操作,反之亦然。这种队列在多线程编程中非常有用,尤其是在生产者-消费者模式中。
以下是一个使用SynchronousQueue的简单示例:
import java.util.concurrent.LinkedBlockingQueue;

public class SynchronousQueueExample {

    public static void main(String[] args) {
        // 创建一个SynchronousQueue实例
        SynchronousQueue<Integer> queue = new LinkedBlockingQueue<>();

        // 创建生产者线程
        Thread producer = new Thread(() -> {
            for (int i = 0; i < 10; i++) {
                try {
                    System.out.println("生产者生产:" + i);
                    queue.put(i); // 将元素放入队列,如果队列已满,此操作将阻塞
                } catch (InterruptedException e) {
                    e.printStackTrace();
                }
            }
        });

        // 创建消费者线程
        Thread consumer = new Thread(() -> {
            while (true) {
                try {
                    Integer item = queue.take(); // 从队列中取出元素,如果队列为空,此操作将阻塞
                    System.out.println("消费者消费:" + item);
                } catch (InterruptedException e) {
                    e.printStackTrace();
                }
            }
        });

        // 启动生产者和消费者线程
        producer.start();
        consumer.start();
    }
}
在这个示例中,我们创建了一个SynchronousQueue实例,并创建了两个线程:一个生产者线程和一个消费者线程。生产者线程向队列中添加元素,而消费者线程从队列中取出元素。由于SynchronousQueue的特性,当队列为空时,消费者线程将阻塞,直到生产者线程向队列中添加元素;同样,当队列已满时,生产者线程将阻塞,直到消费者线程从队列中取出元素。
使用场景:
- 生产者-消费者模型:当生产者产生数据的速度大于消费者消费数据的速度时,可以使用
SynchronousQueue来缓存数据,避免数据丢失。 - 任务队列:当需要执行一个耗时的任务,但又不想阻塞主线程时,可以将任务放入
SynchronousQueue中,然后在后台线程中执行。 - 资源池:当需要限制对某些资源的访问速度时,可以使用
SynchronousQueue来实现限流。
**原理分析:**通过信息的传递来实现生产者和消费者的阻塞和唤醒。
public SynchronousQueue(boolean fair) {
      transferer = fair ? new TransferQueue<E>() : new TransferStack<E>();
}
存储处于阻塞状态下的生产者线程、消费者线程.
public static ExecutorService newCachedThreadPool() {
    return new ThreadPoolExecutor(0, Integer.MAX_VALUE,
    60L, TimeUnit.SECONDS,
    new SynchronousQueue<Runnable>());
}
1000个请求丢入到线程池, -> 必须要找到一个消费者线程来处理. 1000个线程(生存周期是60s)
LinkedTransferQueue
LinkedTransferQueue是一个由链表结构组成的无界阻塞队列,它实现了TransferQueue接口。与SynchronousQueue.TransferQueue(公平模式)相比,它是可以统计长度,可以进行查询的;和LinkedBlockingQueue相比,它拥有更高的性能(使用CAS自旋);和ConcurrentLinkedQueue相比,它支持在遍历时批量获取元素。
以下是一个简单的使用示例:
import java.util.concurrent.LinkedTransferQueue;

public class LinkedTransferQueueExample {
    public static void main(String[] args) {
        LinkedTransferQueue<Integer> queue = new LinkedTransferQueue<>();

        // 生产者线程
        new Thread(() -> {
            for (int i = 0; i < 10; i++) {
                try {
                    System.out.println("生产者生产:" + i);
                    queue.put(i); // 将元素放入队列,如果队列已满,此操作将阻塞
                } catch (InterruptedException e) {
                    e.printStackTrace();
                }
            }
        }).start();

        // 消费者线程
        new Thread(() -> {
            while (true) {
                try {
                    Integer item = queue.take(); // 从队列中取出元素,如果队列为空,此操作将阻塞
                    System.out.println("消费者消费:" + item);
                } catch (InterruptedException e) {
                    e.printStackTrace();
                }
            }
        }).start();
    }
}
技术关联性:
LinkedTransferQueue与SynchronousQueue、LinkedBlockingQueue和ConcurrentLinkedQueue有关。
无界阻塞队列.
transfer 能力
LinkedBlockingQueue + TransferQueue
LinkedBlockingQueue
一个正常的基于链表结构的阻塞队列, 无界队列.
LinkedBlockingQueue是Java中的一个阻塞队列,它实现了BlockingQueue接口。它是一个线程安全的队列,可以在多线程环境下使用。LinkedBlockingQueue内部使用链表结构存储元素,可以指定容量,也可以不指定容量。当队列满时,插入操作会阻塞;当队列为空时,获取操作会阻塞。
下面是一个使用LinkedBlockingQueue的简单示例:
import java.util.concurrent.LinkedBlockingQueue;

public class LinkedBlockingQueueExample {

    public static void main(String[] args) {
        // 创建一个容量为5的LinkedBlockingQueue
        LinkedBlockingQueue<Integer> queue = new LinkedBlockingQueue<>(5);

        // 生产者线程
        new Thread(() -> {
            for (int i = 0; i < 10; i++) {
                try {
                    System.out.println("生产者生产:" + i);
                    queue.put(i);
                } catch (InterruptedException e) {
                    e.printStackTrace();
                }
            }
        }).start();

        // 消费者线程
        new Thread(() -> {
            for (int i = 0; i < 10; i++) {
                try {
                    Integer num = queue.take();
                    System.out.println("消费者消费:" + num);
                } catch (InterruptedException e) {
                    e.printStackTrace();
                }
            }
        }).start();
    }
}
使用场景:
- 当需要在多线程环境下实现生产者-消费者模式时,可以使用LinkedBlockingQueue作为缓冲区,将生产者生产的数据放入队列,消费者从队列中取出数据进行消费。
- 当需要对线程进行同步控制时,可以使用LinkedBlockingQueue的put()和take()方法进行线程间的通信。
LinkedBlockingDeque
双向链表组成的队列.
支持双向插入和移除.
在一定程度上能够解决多线程的竞争问题。
Fork/Join -工作窃取
阻塞队列的使用
责任链模式
构建一条执行链路。
阻塞队列的案例演示(详细如以下源码)
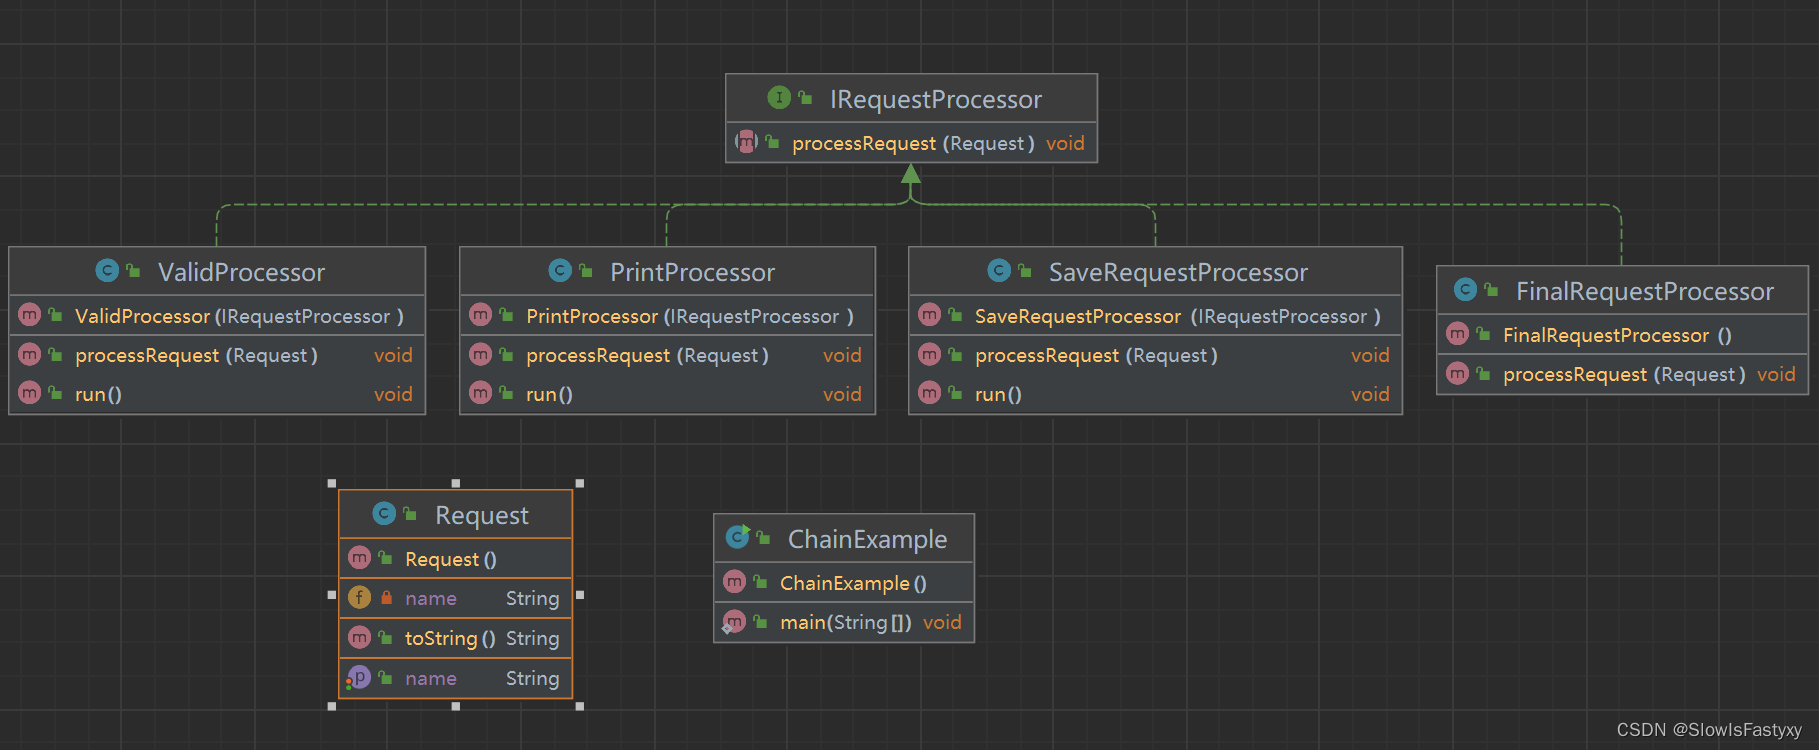
1、请求类
package org.example;

public class Request {

    private String name;

    public String getName() {
        return name;
    }

    public void setName(String name) {
        this.name = name;
    }

    @Override
    public String toString() {
        return "Request{" +
                "name='" + name + '\'' +
                '}';
    }
}
2、请求接口代码:
package org.example;

public interface IRequestProcessor {

    //处理请求
    void processRequest(Request request);

}
3、有效处理请求
package org.example;

import java.util.concurrent.BlockingQueue;
import java.util.concurrent.LinkedBlockingQueue;
public class ValidProcessor extends Thread implements IRequestProcessor{

    protected IRequestProcessor nextProcessor;

    protected BlockingQueue<Request> requests=new LinkedBlockingQueue<>();

    public ValidProcessor(IRequestProcessor nextProcessor) {
        this.nextProcessor = nextProcessor;
    }

    @Override
    public void processRequest(Request request) {
        requests.add(request);
    }

    @Override
    public void run() {
        while(true){
            try {
                //异步进行请求处理
                Request request=requests.take();
                System.out.println("ValidProcessor:"+request);
                if(null!=nextProcessor){
                    nextProcessor.processRequest(request);
                }
            } catch (InterruptedException e) {
                e.printStackTrace();
            }
        }
    }
}
4、打印请求处理
package org.example;

import java.util.concurrent.BlockingQueue;
import java.util.concurrent.LinkedBlockingQueue;

public class PrintProcessor extends Thread implements IRequestProcessor{

    protected IRequestProcessor nextProcessor;
    protected BlockingQueue<Request> requests=new LinkedBlockingQueue<>();

    public PrintProcessor(IRequestProcessor nextProcessor) {
        this.nextProcessor = nextProcessor;
    }

    @Override
    public void processRequest(Request request) {
        //doSomething;
        requests.add(request);
    }
    @Override
    public void run() {
        while(true){
            try {
                //异步进行请求处理
                Request request=requests.take();
                System.out.println("PrintProcessor:"+request);
                if(null!=nextProcessor){
                    nextProcessor.processRequest(request);
                }
            } catch (InterruptedException e) {
                e.printStackTrace();
            }
        }
    }
}
5、保存请求处理
package org.example;

import java.util.concurrent.BlockingQueue;
import java.util.concurrent.LinkedBlockingQueue;

public class SaveRequestProcessor extends Thread implements IRequestProcessor{

    protected IRequestProcessor nextProcessor;
    protected BlockingQueue<Request> requests=new LinkedBlockingQueue<>();

    public SaveRequestProcessor(IRequestProcessor nextProcessor) {
        this.nextProcessor = nextProcessor;
    }

    @Override
    public void processRequest(Request request) {
        //doSomething()
        requests.add(request);
    }

    @Override
    public void run() {
        while(true){
            try {
                //异步进行请求处理
                Request request=requests.take();
                System.out.println("SaveRequestProcessor:"+request);
                if(null!=nextProcessor){
                    nextProcessor.processRequest(request);
                }
            } catch (InterruptedException e) {
                e.printStackTrace();
            }
        }
    }
}
6、最终请求处理
package org.example;

public class FinalRequestProcessor implements IRequestProcessor{

    @Override
    public void processRequest(Request request) {
        System.out.println("FinalRequestProcessor:"+request);
    }
}
7、最终测试类
package org.example;

public class ChainExample {

    public static void main(String[] args) {
        FinalRequestProcessor finalRequestProcessor=new FinalRequestProcessor();
        SaveRequestProcessor saveRequestProcessor=new SaveRequestProcessor(finalRequestProcessor);
        saveRequestProcessor.start();
        PrintProcessor printProcessor=new PrintProcessor(saveRequestProcessor);
        printProcessor.start();
        ValidProcessor validProcessor=new ValidProcessor(printProcessor);
        validProcessor.start();
        Request request=new Request();
        request.setName("yxy");
        validProcessor.processRequest(request);
    }
}
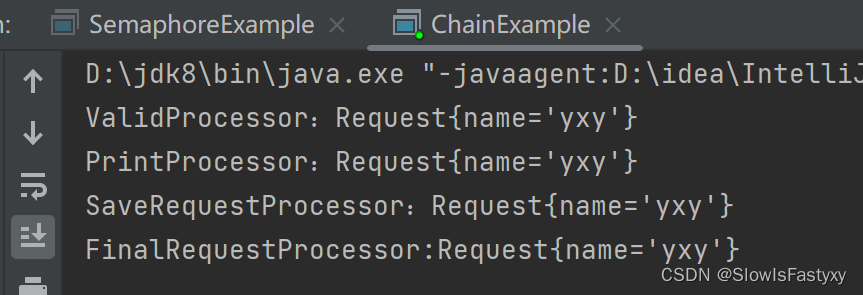
8、运行结果
J.U.C 并发工具
AQS的共享锁
CountDownLatch
计数器工具.
- await
- countDown
CountDownLatch的使用
多个线程阻塞示例代码如下:
import java.util.concurrent.CountDownLatch;

public class CountDownExample {
    // 创建一个CountDownLatch对象,初始计数器为1
    static CountDownLatch countDownLatch = new CountDownLatch(1);

    // 定义一个继承自Thread的静态内部类Thread1
    static class Thread1 extends Thread {
        @Override
        public void run() {
            try {
                // 线程休眠500毫秒
                Thread.sleep(500);
                // 调用countDownLatch的await方法,等待计数器减为0
                countDownLatch.await();
            } catch (InterruptedException e) {
                e.printStackTrace();
            }
            // 表示线程Thread1执行完毕
        }
    }

    // 定义一个继承自Thread的静态内部类Thread2
    static class Thread2 extends Thread {
        @Override
        public void run() {
            try {
                // 线程休眠500毫秒
                Thread.sleep(500);
                // 调用countDownLatch的await方法,等待计数器减为0
                countDownLatch.await();
            } catch (InterruptedException e) {
                e.printStackTrace();
            }
        }
    }

    // 定义一个继承自Thread的静态内部类Thread3
    static class Thread3 extends Thread {
        @Override
        public void run() {
            try {
                // 线程休眠500毫秒
                Thread.sleep(500);
                // 调用countDownLatch的await方法,等待计数器减为0
                countDownLatch.await();
            } catch (InterruptedException e) {
                e.printStackTrace();
            }
        }
    }

    // 主函数
    public static void main(String[] args) throws InterruptedException {
        // 创建并启动线程Thread1
        Thread1 t1 = new Thread1();
        t1.start();
        // 创建并启动线程Thread2
        Thread2 t2 = new Thread2();
        t2.start();
        // 创建并启动线程Thread3
        Thread3 t3 = new Thread3();
        t3.start();
        // 输出提示信息,表示所有线程执行结束
        System.out.println("所有线程执行结束");
        // 调用countDownLatch的countDown方法,将计数器减为0,通知等待的线程继续执行
        countDownLatch.countDown();
    }
}
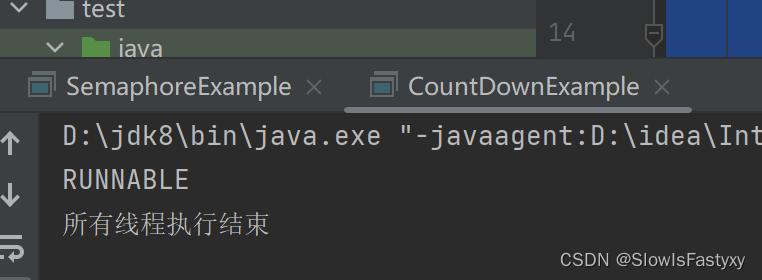
运行结果如下:
CountDownLatch的实际应用
在启动应用的时候,去对第三方的应用做健康检测(详细见源码)
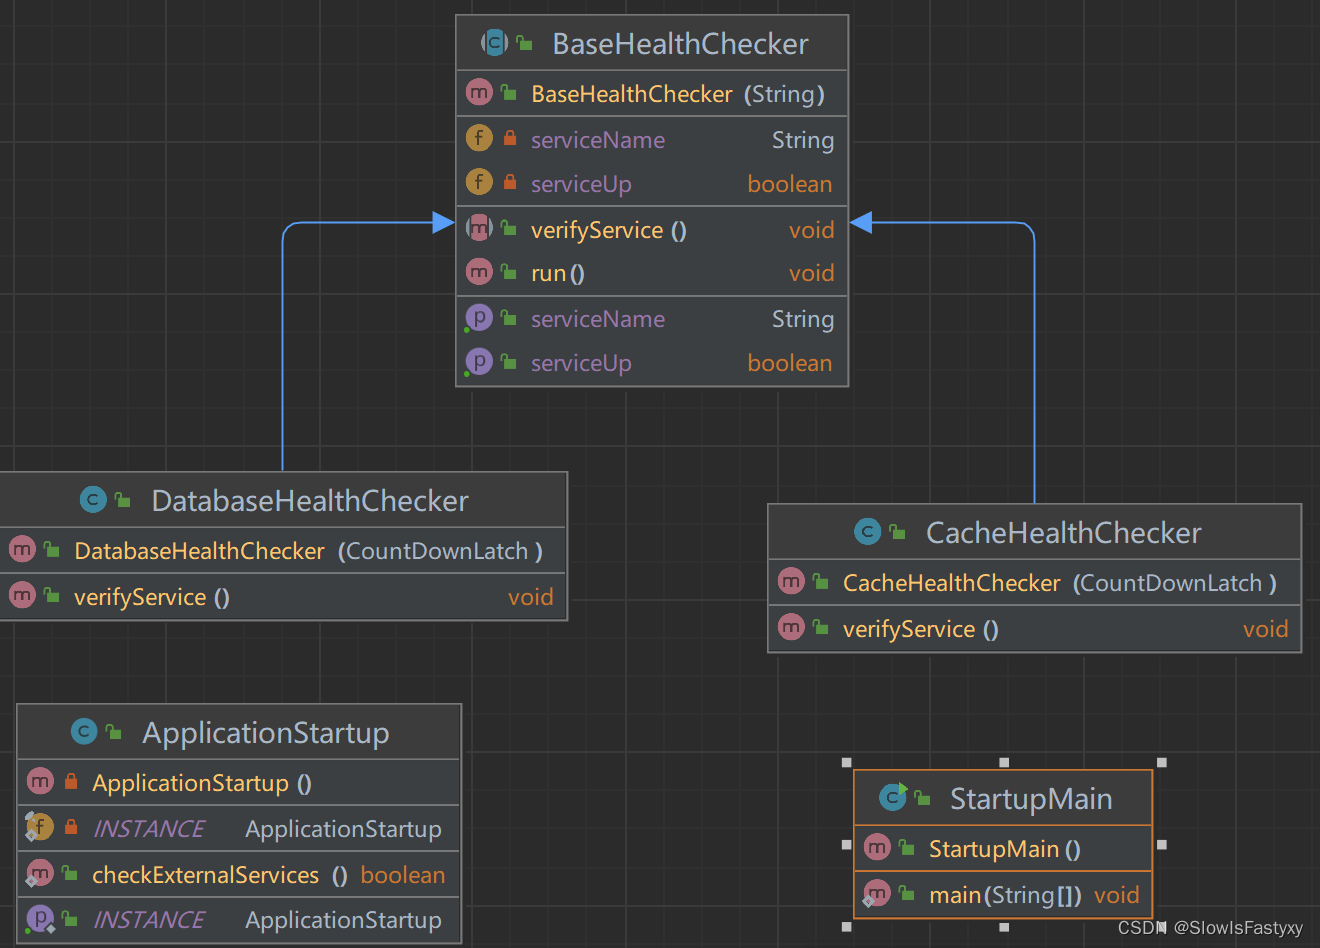
1、基层健康检查
package org.example.count;

import java.util.concurrent.CountDownLatch;
public abstract class BaseHealthChecker implements Runnable{

    private String serviceName; //服务名称

    private boolean serviceUp;

    public BaseHealthChecker(String serviceName) {
        this.serviceName = serviceName;
    }

    @Override
    public void run() {
        try {
            verifyService();
            serviceUp=true;
        }catch (Exception e){
            serviceUp=false;
        }finally {

        }
    }

    /**
     * 检查服务的健康情况
     */
    public abstract void verifyService() throws Exception;

    public String getServiceName() {
        return serviceName;
    }

    public boolean isServiceUp() {
        return serviceUp;
    }
}
2、缓存健康检查
package org.example.count;

import java.util.concurrent.CountDownLatch;

/**
 * 咕泡学院,只为更好的你
 * 咕泡学院-Mic: 2082233439
 * http://www.gupaoedu.com
 **/
public class CacheHealthChecker extends BaseHealthChecker{

    private CountDownLatch countDownLatch;

    public CacheHealthChecker(CountDownLatch countDownLatch) {
        super("CacheHealthChecker");
        this.countDownLatch=countDownLatch;
    }

    @Override
    public void verifyService() throws Exception {
        System.out.println("Checking:"+this.getServiceName());
        try {
            Thread.sleep(1000);
            // 如果检查失败,throw RuntimeException()
        } catch (Exception e) {
            throw e;
        }
        countDownLatch.countDown();
        System.out.println(this.getServiceName()+" 健康状态正常");
    }
}
3、数据库健康检查
package org.example.count;

import java.util.concurrent.CountDownLatch;
public class DatabaseHealthChecker extends BaseHealthChecker{
    private CountDownLatch countDownLatch;


    public DatabaseHealthChecker(CountDownLatch countDownLatch) {
        super("DatabaseHealthChecker");
        this.countDownLatch=countDownLatch;
    }

    @Override
    public void verifyService() throws Exception {
        System.out.println("Checking:"+this.getServiceName());
        try {
            Thread.sleep(1000);
        } catch (Exception e) {
            throw e;
        }
        countDownLatch.countDown();
        System.out.println(this.getServiceName()+" 健康状态正常");
    }

}
4、运用程序启动类
package org.example.count;

import org.omg.PortableInterceptor.INACTIVE;

import java.util.ArrayList;
import java.util.List;
import java.util.concurrent.CountDownLatch;

public class ApplicationStartup {

    private static List<BaseHealthChecker> services;
    private static CountDownLatch countDownLatch=new CountDownLatch(2);

    static{
        services=new ArrayList<>();
        services.add(new CacheHealthChecker(countDownLatch));
        services.add(new DatabaseHealthChecker(countDownLatch));
    }

    private final static ApplicationStartup INSTANCE=new ApplicationStartup();

    private ApplicationStartup(){}

    public static ApplicationStartup getInstance(){
        return INSTANCE;
    }

    public static boolean checkExternalServices() throws InterruptedException {
        for(BaseHealthChecker bh:services){
            new Thread(bh).start(); //针对每个服务采用线程来执行
        }
        countDownLatch.await();
        return true;
    }
}
5、主启动类
public class StartupMain {
public static void main(String[] args) {
try {
ApplicationStartup.checkExternalServices();
} catch (InterruptedException e) {
//有问题了.
}
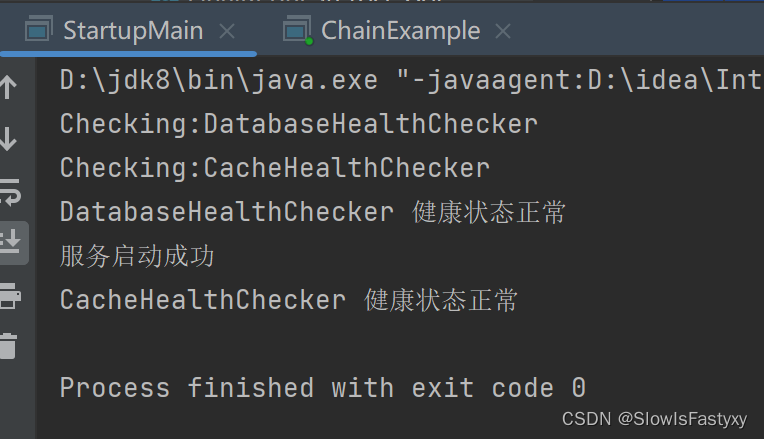
System.out.println("服务启动成功");
}
}
6、运行结果
CountDownLatch的实现原理
- 它可以让一个线程阻塞
- 也可以让多个线程阻塞
共享锁的实现。
可以允许多个线程同时抢占到锁,然后等到计数器归零的时候,同时唤醒. - state记录计数器.
- countDown的时候,实际上就是 state–
Semaphore
信号灯.,限流器,限制资源的访问.
本质上: 抢占一个令牌. -> 如果抢占到令牌,就通行, 否则,就阻塞!
package org.example;

import java.util.concurrent.Semaphore;
import java.util.concurrent.TimeUnit;


public class SemaphoreExample {

    public static void main(String[] args) {
        //限制资源的并发数量.
        Semaphore semaphore=new Semaphore(10);
        for (int i = 0; i < 20; i++) {
            new Car(i,semaphore).start();
        }
    }
    static class Car extends  Thread{
        private int num;
        private Semaphore semaphore;

        public Car(int num, Semaphore semaphore) {
            this.num = num;
            this.semaphore = semaphore;
        }
        @Override
        public void run(){
            try {
                semaphore.acquire(); //获得一个令牌
                System.out.println("第 "+num+"俩车抢到一个车位");
                TimeUnit.SECONDS.sleep(2);
                System.out.println("第 "+num+"走喽~");
            } catch (InterruptedException e) {
                e.printStackTrace();
            }finally {
                semaphore.release(); //释放一个令牌
            }
        }
    }
}
运行结果:
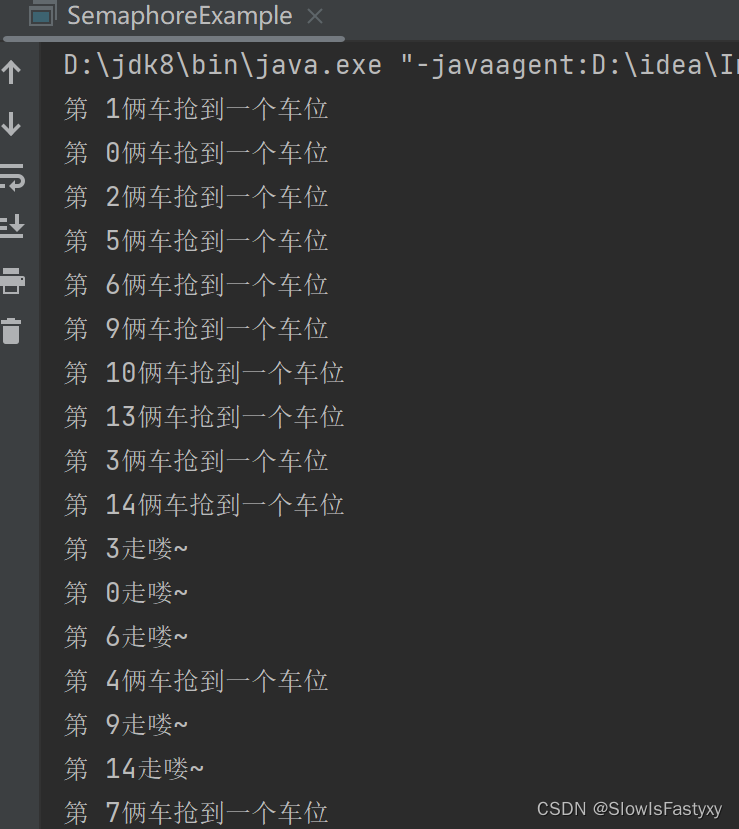
- acquire() 抢占一个令牌
- release() 释放一个令牌.
Semaphore semaphore=new Semaphore(10);
acquire = 10-1
- 为0的时候,阻塞
- 有可能同时阻塞N个线程
release = 令牌+1 - 有令牌了,唤醒。
- 从阻塞的线程中去唤醒。
为什么要用共享锁?
因为同时可以释放多个令牌,那么意味着可以同时有多个线程抢占到锁。
CyclicBarrier
可重复的栅栏
实现,相当于 , 多个线程通过CountDownLatch的await 。然后另外一个线程使用countDown方法来
唤醒。
示例代码:
package org.example;
import java.util.concurrent.BrokenBarrierException;
import java.util.concurrent.CyclicBarrier;
public class CyclicBarrierExample {
public static void main(String[] args) {
int n=4;
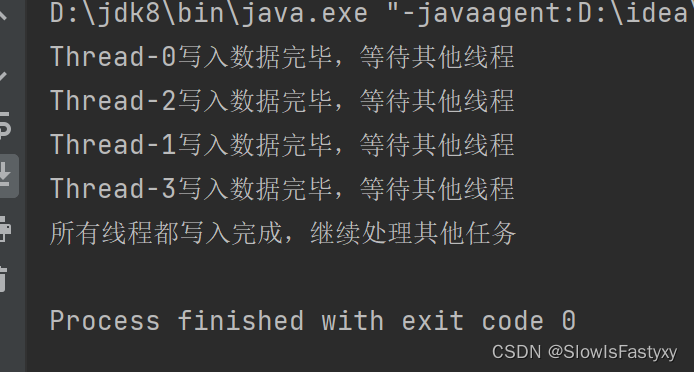
CyclicBarrier barrier=new CyclicBarrier(4,()->{
System.out.println("所有线程都写入完成,继续处理其他任务");
}); // 4
for (int i = 0; i < n; i++) {
new Writer(barrier).start();
}
}
static class Writer extends Thread{
private CyclicBarrier cyclicBarrier;
public Writer(CyclicBarrier barrier){
this.cyclicBarrier=barrier;
}
@Override
public void run(){
try {
Thread.sleep(1000);
System.out.println(Thread.currentThread().getName()+"写入数据完毕,等待其他线程");
cyclicBarrier.await(); //-1的动作
} catch (InterruptedException e) {
e.printStackTrace();
} catch (BrokenBarrierException e) {
e.printStackTrace();
}
}
}
}
运行结果:


 被折叠的 条评论
为什么被折叠?
被折叠的 条评论
为什么被折叠?
 到【灌水乐园】发言


