


Nginx详解(使用场景、源码安装、负载均衡、资源静态化、虚拟主机、Session一致性)
1. Nginx简介
Nginx是一款轻量级的Web 服务器/反向代理服务器
http://nginx.org/
http://nginx.org/en/download.html
占有内存少,并发能力强
官方测试nginx能够支撑5万并发链接,并且CPU、内存等资源消耗却非常低,运行非常稳定。
Tengine淘宝基于Nginx研发的web服务器
http://tengine.taobao.org/
http://tengine.taobao.org/book/

2.使用场景

2.1. 高并发场景
-
高并发通常是指通过设计保证系统能够同时并行处理很多请求。通俗来讲,高并发是指在同一个时间点,有很多用户同时的访问同一 API 接口或者 Url 地址。它经常会发生在有大活跃用户量,用户高聚集的业务场景中。
-
会给服务器和硬件环境带来很大的压力。
-
大学选体育课:
-
很卡,挤不进去
-
池:
刚开始的时候创建多个请求等待使用
使用完毕后并不会销毁,而是重新归还到池
如果业务量比较大,我们通过池控制最大连接的数
-
-
负载均衡(load Balance )
- 将请求/数据【均匀】分摊到多个操作单元上执行,负载均衡的关键在于【均匀】
2.2.正向代理
一个位于客户端和原始服务器之间的服务器,为了从原始服务器取得内容,客户端向代理发送一个请求并制定目标(原始服务器),然后代理向原始服务器转发请求并将获得的内容返回给客户端,客户端才能使用正向代理。我们平时说的代理就是指正向代理。
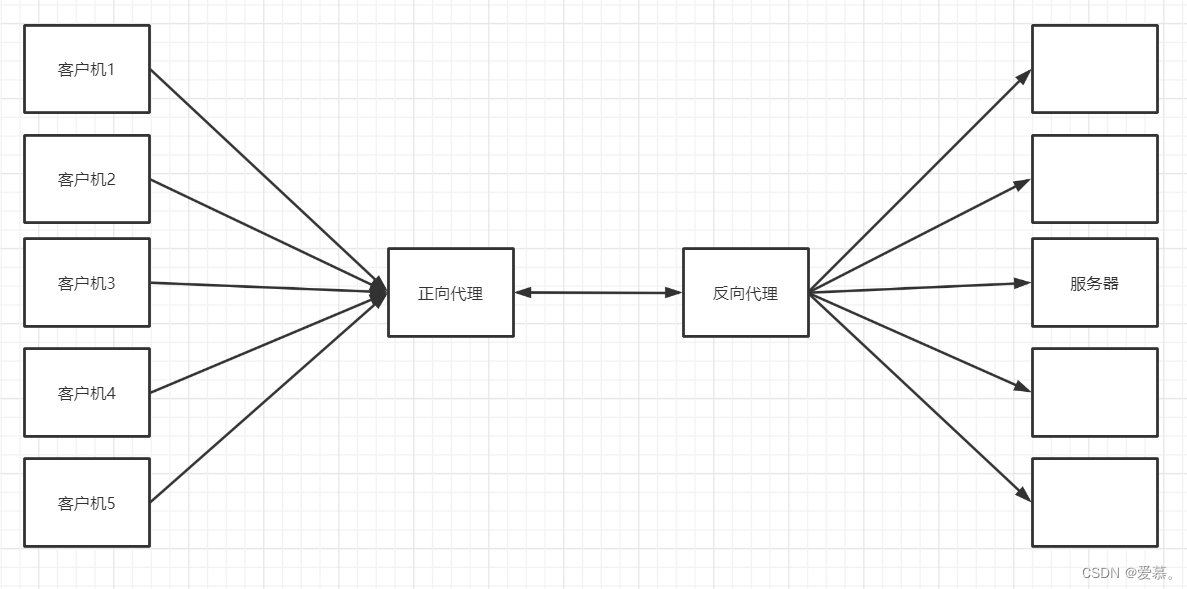
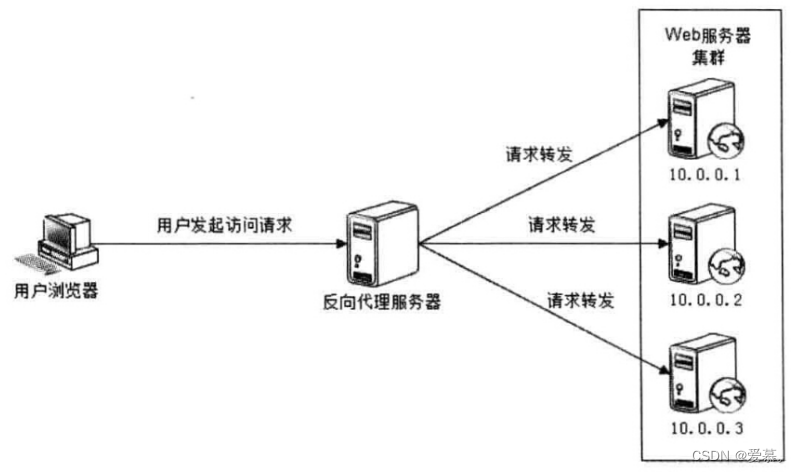
2.3反向代理
以代理服务器来接受internet上的连接请求,然后将请求转发给内部网络上的服务器,并将从服务器上得到的结果返回给internet上请求的客户端,此时代理服务器对外表现为一个反向代理服务器。
理解起来有些抽象,可以这么说:A向B借钱,B没有拿自己的钱,而是悄悄地向C借钱,拿到钱之后再交给A,A以为是B的钱,他并不知道C的存在。
客户只需要发送请求到代理服务器,代理服务器会将请求转发给内部的服务器去处理,处理完毕之后会将结果返回给客户,但整个过程中客户和实际处理服务器是不会直接建立连接的
3. Nginx源码安装
http://nginx.org/
首先我们要先下载到本地
3.1. 解编安启
- 将安装包上传到Linux虚拟机
- 解压,并把Nginx存放到指定目录
- tar -zxf nginx-1.23.1.tar.gz
- 需要安装nginx依赖的软件
- yum install gcc pcre-devel zlib-devel openssl-devel -y - 配置安装路径
- ./configure --prefix=/opt/bdp/nginx-1.23.1 - 开始编译并安装nginx
- make && make install
- 开启Ngxin
- cd /opt/bdp/nginx-1.8.1/sbin- ./nginx
- http://192.168.88.10
3.2. 常用命令
关闭nginx服务
kill `cat /usr/local/nginx/logs/nginx.pid`

nginx -s reload :修改配置后重新加载生效
nginx -s reopen :重新打开日志文件
nginx -t -c /path/to/nginx.conf 测试nginx配置文件是否正确

关闭nginx:
	nginx -s stop :快速停止nginx
			quit :完整有序的停止nginx

其他的停止nginx 方式:
	ps -ef | grep nginx
	kill -QUIT 主进程号 :从容停止Nginx
	kill -TERM 主进程号 :快速停止Nginx
	pkill -9 nginx :强制停止Nginx

启动nginx:
	nginx -c /path/to/nginx.conf

平滑重启nginx:
	kill -HUP 主进程号
3.3. 安装目录
- conf
- 配置文件
- html
- 静态资源文件
- sbin
- 可执行文件
- logs
- 日志文件
3.4. 配置文件
Nginx中文文档
- https://www.nginx.cn/doc/index.html
# user 指定运行 nginx 的用户和组(第一个参数为用户第二个为组,这里只有用户)
#user nobody;
# 指定工作进程数(一般设置为CPU核数)
worker_processes 1;

# 指定错误日志为 logs/ 目录下的 error.log 文件
#error_log logs/error.log;
# 指定错误日志,并指定写入格式为 notice
#error_log logs/error.log notice;
# 指定错误日志,并指定写入格式为 info
#error_log logs/error.log info;
# 指定 pid 文件(存放主进程 pid 号)
#pid logs/nginx.pid;
# nginx 连接配置模块
events {
# 指定每个工作进程最大连接数为 1024
worker_connections 1024;
}
# http 配置模块
http {
# 通过 include 加载 mime.types 文件,里面的 types {} 模块将文件扩展名映射到响应的 MIME 类型
include mime.types;
# 定义响应的默认 MIME 类型
default_type application/octet-stream;
# 写入格式 main 的内容格式如下
#log_format main '$remote_addr - $remote_user [$time_local] "$request"'
# '$status $body_bytes_sent "$http_referer" '
# '"$http_user_agent" "$http_x_forwarded_for"';
# 指定访问日志和写入格式为 main
#access_log logs/access.log main;
# 启用或者禁用 sendfile()
sendfile on;
# 启用或者禁用使用套接字选项(仅在 sendfile 使用时使用)
#tcp_nopush on;
# 0 值禁用保持活动的客户端连接
#keepalive_timeout 0;
# 65 s 超时
keepalive_timeout 65;
# 启用或者禁用 gzip
#gzip on;
# 虚拟主机配置模块
# user 指定运行 nginx 的用户和组(第一个参数为用户第二个为组,这里只有用户)
#user nobody;
# 指定工作进程数(一般设置为CPU核数)
worker_processes 1;
# 指定错误日志为 logs/ 目录下的 error.log 文件
#error_log logs/error.log;
# 指定错误日志,并指定写入格式为 notice
#error_log logs/error.log notice;
# 指定错误日志,并指定写入格式为 info
#error_log logs/error.log info;
# 指定 pid 文件(存放主进程 pid 号)
#pid logs/nginx.pid;
# nginx 连接配置模块
events {
# 指定每个工作进程最大连接数为 1024
worker_connections 1024;
}
# http 配置模块
http {
# 通过 include 加载 mime.types 文件,里面的 types {} 模块将文件扩展名映射到响应的 MIME 类型
include mime.types;
# 定义响应的默认 MIME 类型
default_type application/octet-stream;
# 写入格式 main 的内容格式如下
#log_format main '$remote_addr - $remote_user [$time_local] "$request"'
# '$status $body_bytes_sent "$http_referer" '
# '"$http_user_agent" "$http_x_forwarded_for"';
# 指定访问日志和写入格式为 main
#access_log logs/access.log main;
# 启用或者禁用 sendfile()
sendfile on;
# 启用或者禁用使用套接字选项(仅在 sendfile 使用时使用)
#tcp_nopush on;
# 0 值禁用保持活动的客户端连接
#keepalive_timeout 0;
# 65 s 超时
keepalive_timeout 65;
# 启用或者禁用 gzip
#gzip on;
# 虚拟主机配置模块
server {
# 监听 80 端口
listen 80;
# 监听域名为 localhost
server_name localhost;
# 将指定的 charset 添加到 “Content-Type” 响应头字段。
# 如果此charset与source_charset指令中指定的charset不同,则执行转换。
#charset koi8-r;
# 指定该虚拟主机的访问日志
#access_log logs/host.access.log main;
# 将特定的文件或目录重新定位,如 php 文件,image 目录等
location / {
# 设置请求的根目录
root html;
# 定义索引,按顺序匹配
index index.html index.htm;
}
# 定义显示 404 错误的 uri
#error_page 404 /404.html;
# redirect server error pages to the static page /50x.html
#
error_page 500 502 503 504 /50x.html;
# location 精准匹配 '/50x.html'
location = /50x.html {
root html;
}
# proxy the PHP scripts to Apache listening on 127.0.0.1:80
# 正则表达式匹配 php 文件
#location ~ \.php$ {
# 设置代理服务器的协议和地址,以及应该映射位置的可选URI。作为协议,可以指
定“http”或“https”。该地址可以指定为一个域名或IP地址,以及一个可选端口
# proxy_pass http://127.0.0.1;
#}
# pass the PHP scripts to FastCGI server listening on 127.0.0.1:9000
#
#location ~ \.php$ {
# root html;
# 设置 FastCGI 服务器的地址。地址可以指定为一个域名或 IP 地址,以及一个端口
# fastcgi_pass 127.0.0.1:9000;
# 设置将在以斜杠结尾的URI之后追加的文件名,
# fastcgi_index index.php;
# 设置一个应该传递给FastCGI服务器的参数。
# fastcgi_param SCRIPT_FILENAME /scripts$fastcgi_script_name;
# 加载 conf/fastcgi_params 文件
# include fastcgi_params;
#}
# deny access to .htaccess files, if Apache's document root
# concurs with nginx's one
#
#location ~ /\.ht {
# deny all;
#}
}
# another virtual host using mix of IP-, name-, and port-based
configuration
#
#server {
# listen 8000;
# listen somename:8080;
# server_name somename alias another.alias;
# location / {
# root html;
# index index.html index.htm;
# }
#}
# HTTPS server
#
# ssl 配置,要启用 ssl 模块需要在编译 nginx 时加上 --with-http_ssl_module 参数
#server {
# listen 443 ssl;
# server_name localhost;
# ssl_certificate cert.pem;
# ssl_certificate_key cert.key;
# ssl_session_cache shared:SSL:1m;
# ssl_session_timeout 5m;
# ssl_ciphers HIGH:!aNULL:!MD5;
# ssl_prefer_server_ciphers on;
# location / {
# root html;
# index index.html index.htm;
# }
#}
}
4. Nginx负载均衡
4.1. 集群搭建
- 节点分布
| 节点\角色 | Nginx | Tomcat | JDK |
|---|---|---|---|
| basenode | * | * | |
| node01 | * | * | |
| node02 | * | * | |
| node03 | * | * |
-
BaseNode修改配置文件
-
#user nobody; worker_processes 1; events { worker_connections 1024; } http { include mime.types; default_type application/octet-stream; sendfile on; keepalive_timeout 0; upstream bdp { server 192.168.88.101:8080; server 192.168.88.102:8080; server 192.168.88.103:8080; } server { listen 80; server_name localhost; location / { proxy_pass http://bdp; } } } -
Tomcat配置信息
-
vi /opt/bdp/apache-tomcat–8.5.47/webapps/ROOT/index.jsp
-
<%@ page pageEncoding="UTF-8" contentType="text/html; charset=UTF-8" %> <!DOCTYPE html> <html lang="en"> <head> <meta charset="UTF-8" /> <title>斗鱼直播</title> <link href="favicon.ico" rel="icon" type="image/x-icon" /> <link href="favicon.ico" rel="shortcut icon" type="image/x-icon"/> </head> <body> <h1>welcome to 斗鱼直播</h1> <h2>Server:<%=request.getLocalAddr() %></h2> <h2>Port:<%=request.getLocalPort() %></h2> <h2>Client:<%=request.getRemoteAddr() %></h2> <h2>Session:<%=session.getId() %></h2> <hr/> <img src="/static/img/qbl.jpg" height="200px" /> </body> </html>- 启动Tomcat和Nginx
- 访问Nginx,会依次将Tomcat页面显示到也面
- 启动Tomcat和Nginx
-
-
4.2负载策略
4.2.1. 请求轮询
- 依次转发给配置的服务器
4.2.2. 增加权重
-
使用服务器权重,还可以进一步影响nginx负载均衡算法,谁的权重越大,分发到的请求就越多。
-
说你行你就行不行也行
upstream bdpweight {
	server 192.168.88.101:8080 weight=2;
	server 192.168.88.103:8080 weight=1;
}
4.2.3.最少连接数
-
在连接负载最少的情况下,nginx会尽量避免将过多的请求分发给繁忙的应用程序服务器,而是将新请求分发给不太繁忙的服务器,避免服务器过载。
-
upstream bdpleast {
	least_conn;
	server 192.168.88.101:8080;
	server 192.168.88.103:8080;
}
4.2.4. IpHash
-
确保来自同一客户端的请求将始终定向到同一台服务器,除非此服务器不可用
-
upstream bdphash {
	ip_hash;
	server 192.168.88.101:8080;
	server 192.168.88.103:8080;
}
5. 资源静态化
5.1. 图床
-
由外部服务器统一管理图片
-
https://imgurl.org/
5.2. 配置静态资源
-
<body> <h1> welcome to cluster</h1> <h1> 服务器地址: <%= request.getLocalAddr() %> </h1> <h1> 客户端地址: <%= request.getRemoteAddr() %> </h1> <h1> Session的ID : <%= session.getId() %> </h1> <img width="200px" src="/static/qbl.jpg" /> </body> -
##在Nginx的html目录下创建一个static文件夹,然后存放图片
location ^~ /static/ {
    root html;
}
5.3. 路径路由规则
-
location = / {
	#规则A
}
location = /login {
	#规则B
}
location ^~ /static/ {
	#规则C
}
location ~ \.(gif|jpg|png|js|css)$ {
	#规则D
}
location ~* \.png$ {
	#规则E
}
location !~ \.xhtml$ {
	#规则F
}
location !~* \.xhtml$ {
	#规则G
}
location / {
	#规则H
}
访问根目录/, 比如http://localhost/ 将匹配规则A
访问 http://localhost/login 将匹配规则B,http://localhost/register 则匹配规则H
访问 http://localhost/static/a.html 将匹配规则C
访问 http://localhost/a.gif, http://localhost/b.jpg 将匹配规则D和规则E,但是规则D
顺序优先,规则E不起作用, 而 http://localhost/static/c.png 则优先匹配到 规则C
访问 http://localhost/a.PNG 则匹配规则E, 而不会匹配规则D,因为规则E不区分大小写。
访问 http://localhost/a.xhtml 不会匹配规则F和规则G,http://localhost/a.XHTML不会
匹配规则G,因为不区分大小写。规则F,规则G属于排除法,符合匹配规则但是不会匹配到,所以想想看实际应用中哪里会用到。
访问 http://localhost/category/id/1111 则最终匹配到规则H,因为以上规则都不匹配,这个 时候应该是nginx转发请求给后端应用服务器,比如FastCGI(php),tomcat(jsp),nginx作为方向代理服务器存在。
6. 单Linux搭建多Tomcat
6.1. 拷贝多台

6.2. 环境变量
- 设置并执行 source /etc/profile
#tomcat8080
export CATALINA_HOME=/opt/bdp/apache-tomcat-8080
export CATALINA_BASE=/opt/bdp/apache-tomcat-8080
export TOMCAT_HOME=/opt/bdp/apache-tomcat-8080
#tomcat18080
export CATALINA_HOME18080=/opt/bdp/apache-tomcat-18080
export CATALINA_BASE18080=/opt/bdp/apache-tomcat-18080
export TOMCAT_HOME18080=/opt/bdp/apache-tomcat-18080
6.3. server.xml****文件
-
vim apache-tomcat-18080/conf/server.xml
-
只需要修改tomcat18080即可,8080保持不变
-
22--默认为8005--》修改为18005
<Server port="18005" shutdown="SHUTDOWN">
69--默认为8080--》修改为18080
<Connector port="18080" protocol="HTTP/1.1" connectionTimeout="20000"
redirectPort="8443" />
116-默认为8009--》修改为18009
<Connector port="18009" protocol="AJP/1.3" redirectPort="8443" />
-
6.4. catalina.sh脚本
-
vim apache-tomcat-18080/bin/catalina.sh
-
只需要修改Tomcat18080即可,修改catalina.sh
-
####################113行开始添加
export CATALINA_BASE=$CATALINA_BASE18080
export CATALINA_HOME=$CATALINA_HOME18080
export TOMCAT_HOME=$TOMCAT_HOME18080
-
6.5. 启动Tomcat
./apache-tomcat-8080/bin/startup.sh
./apache-tomcat-18080/bin/startup.sh
7. 虚拟主机
-
虚拟主机使用的是特殊的软硬件技术,它把一台运行在因特网上的服务器主机分成多台“虚拟”的主机,每台虚拟主机都可以是一个独立的网站,可以具有独立的域名,具有完整的Intemet服务器功能(WWW、FTP、Email等),同一台主机上的虚拟主机之间是完全独立的。从网站访问者来看,每一台虚拟主机和一台独立的主机完全一样。
-
分类
-
1、基于域名的虚拟主机,通过域名来区分虚拟主机
-
2、基于端口的虚拟主机,通过端口来区分虚拟主机
-
7.1. 基于域名
-
修改Window的 C:\Windows\System32\drivers\etchosts 文件
-
192.168.88.100 www.aaa8080.com
192.168.88.100 www.bbb18080.com
-
-
修改Nginx配置文件
-
http {
	upstream miaosha {
		server 192.168.88.101:8080;
		server 192.168.88.102:8080;
		server 192.168.88.103:8080;
	}
upstream fxhh {
		server 192.168.88.101:18080;
		server 192.168.88.102:18080;
		server 192.168.88.103:18080;
}
server {
		listen 80;
		server_name www.miaosha.bdp.com;
		location / {
		proxy_pass http://miaosha;
		}
	}
	server {
		listen 80;
		server_name www.fxhh.bdp.com;

		location / {
		proxy_pass http://fxhh;
		}
		}
}
-
7.2. 基于端口
-
修改Window的 C:\Windows\System32\drivers\etchosts 文件
-
192.168.88.100 www.bdp.com
-
-
修改Nginx配置文件
-
http {
	upstream port12345 {
		server 192.168.88.101:8080;
		server 192.168.88.102:8080;
		server 192.168.88.103:8080;
	}
	upstream port54321 {
		server 192.168.88.101:18080;
		server 192.168.88.102:18080;
		server 192.168.88.103:18080;
	}
	server {
		listen 12345;
		server_name www.bdp.com;

		location / {
		proxy_pass http://port12345;
		}
	}
	server {
		listen 54321;
		server_name www.bdp.com;

		location / {
		proxy_pass http://port54321;
		}
	}
}
-
8. Session一致性
-
节点分布
-
节点\角色 Nginx Tomcat JDK memcache basenode * * * node01 * * node02 * * node03 * *
内存数据库
安装数据库
- yum install memcached -y
开启数据库服务
-
systemctl status memcached
-
systemctl start memcached
-
systemctl enable memcached
-
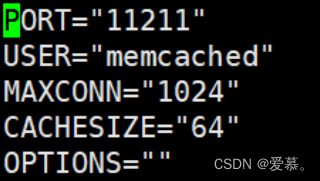
vim /etc/sysconfig/memcached
-
Tomcat
-
拷贝jar包到当前服务器lib目录下
- 要注意memcached的版本
-
如果一个机器有多个tomcat都需要session一致
-
配置tomcat/conf/server.xml
-
相同项目如果想共享session,需要把jvmRoute命名一致
-
如果你只有一个tomcat,忽略此步骤
<Engine name="Catalina" defaultHost="localhost" jvmRoute="jvm18080">
</Engine>
-
-
配置 tomcat/conf/context.xml
-
<Manager className="de.javakaffee.web.msm.MemcachedBackupSessionManager" memcachedNodes="n1:192.168.88.100:11211" sticky="true" lockingMode="auto" sessionBackupAsync="false" requestUriIgnorePattern=".*\.(ico|png|gif|jpg|css|js)$" sessionBackupTimeout="1000" transcoderFactoryClass="de.javakaffee.web.msm.serializer.kryo.KryoTranscoderFactory" />- 重启Tomcat服务器
-
访问发现同一个server是可以共享session的,但是不同server因为涉及到跨域的问题
omcat/conf/server.xml
-
相同项目如果想共享session,需要把jvmRoute命名一致
-
如果你只有一个tomcat,忽略此步骤
<Engine name="Catalina" defaultHost="localhost" jvmRoute="jvm18080"> </Engine> -
配置 tomcat/conf/context.xml
-
<Manager className="de.javakaffee.web.msm.MemcachedBackupSessionManager" memcachedNodes="n1:192.168.88.100:11211" sticky="true" lockingMode="auto" sessionBackupAsync="false" requestUriIgnorePattern=".*\.(ico|png|gif|jpg|css|js)$" sessionBackupTimeout="1000" transcoderFactoryClass="de.javakaffee.web.msm.serializer.kryo.KryoTranscoderFactory" />- 重启Tomcat服务器
-
访问发现同一个server是可以共享session的,但是不同server因为涉及到跨域的问题
- session还是不同的,需要设置cookie的domain


 651
651


 被折叠的 条评论
为什么被折叠?
被折叠的 条评论
为什么被折叠?
 到【灌水乐园】发言


