


引言
编译环境
Anaconda3, python3.7.9, tensorFlow2.3.1
(把所有代码打在一起,就可以运行了。建议用jupyter一部分一部分的敲最好)
我们通过tensorflow_datasets模块加载Fashion MNIST数据集
首先python需要安装tensorflow_datasets模块
注意使用 tensorflow-datasets 的前提是已经安装好 TensorFlow,目前支持的版本是 tensorflow (或者 tensorflow-gpu) >= 1.15.0
pip install tensorflow_datasets
impoet tensorflow_datasets as tfds, 可以通过 tfds.list_builders() 列出所有可用的数据集
Fashion-MNIST数据集包含了10个类别的图像, 分别是:t-shirt(T恤), trouser(牛仔裤), pullover(套衫), dress(裙子), coat(外套), sandal(凉鞋), shirt(衬衫), sneaker(运动鞋), bag(包), ankle boot(短靴)。
Fashion MNIST数据集,它包含70000个灰度图像分类。我们将使用60000张图片进行训练,10000张图片用于评估。
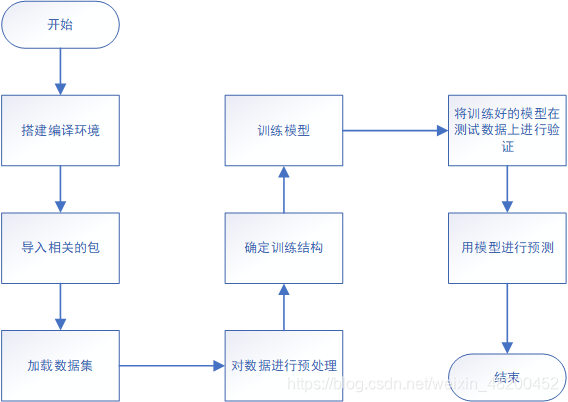
软件设计流程图
下面开始代码部分
导入相关的库
from __future__ import absolute_import, division, print_function

import tensorflow as tf
import tensorflow_datasets as tfds

tf.compat.v1.logging.set_verbosity(tf.compat.v1.logging.ERROR)

import math
import numpy as np
import matplotlib.pyplot as plt

#tqdm是python中很常用的模块,它的作用就是在终端上出现一个进度条,使得代码进度可视化
import tqdm
import tqdm.auto
tqdm.tqdm = tqdm.auto.tqdm
加载数据集
tfds.load() 常用参数(tfds.load相关介绍):
name 数据集的名字
split 对数据集的切分
data_dir数据集的位置或者数据集下载的位置
as_supervised 返回元组(默认返回字典)
with_info 真,则返回元组
batch_size 批次数
shuffle_files 随机
#使用tfds加载数据集
dataset,metadata = tfds.load('fashion_mnist',as_supervised=True,with_info=True)
train_dataset, test_dataset = dataset['train'], dataset['test']
创建一个列表,将数值映射到好懂的字符串
class_names = ['T-shirt/top', 'Trouser', 'Pullover', 'Dress', 'Coat',
             'Sandal', 'Shirt', 'Sneaker', 'Bag', 'Ankle boot']
查看数据
num_train_examples = metadata.splits['train'].num_examples
num_test_examples = metadata.splits['test'].num_examples
print("Number of training examples: {}".format(num_train_examples))
print("Number of test examples: {}".format(num_test_examples))
对数据进行预处理
我们采用这个normalize函数,通过调用.map将该函数应用到数据集中的每个元素上。将每个像素值转换为浮点型,然后将像素值的范围标准化为0-1之间,而不是0-255之间。这是一种很常见的机器学习技巧。最后返回图像和标签对。
def normalize(images, labels):
    images = tf.cast(images, tf.float32)
    images /= 255
    return images, labels

train_dataset = train_dataset.map(normalize)
test_dataset = test_dataset.map(normalize)
我们从数据集中获取第一个样本并绘制图像:
for image, label in test_dataset.take(1):
    break
image = image.numpy().reshape((28,28))

plt.figure()
plt.imshow(image, cmap=plt.cm.binary)
plt.colorbar()
plt.grid(False)
plt.show()
确定训练结构
定义模型,该模型由2个卷积块组成,每个卷积块中都有一个最大池层。然后我们有一个完全连接的层,有128个单元,
该模型利用relu激活函数,使用softmax输出10个类的类概率
model = tf.keras.Sequential([
    tf.keras.layers.Conv2D(32, (3, 3), padding='same', activation=tf.nn.relu,
                          input_shape=(28, 28, 1)),
    tf.keras.layers.MaxPooling2D((2, 2), strides=2),
    tf.keras.layers.Conv2D(64, (3, 3), padding='same', activation=tf.nn.relu),
    tf.keras.layers.MaxPooling2D((2, 2), strides=2),
    tf.keras.layers.Flatten(),
    tf.keras.layers.Dense(128, activation=tf.nn.relu),
    tf.keras.layers.Dense(10, activation=tf.nn.softmax)
])

##使用.compile方法确定模型训练结构
model.compile(optimizer='adam',
             loss='sparse_categorical_crossentropy',
             metrics=['accuracy'])
训练模型
#在训练模型时,我们只需要指定训练批数(batch)
BATCH_SIZE = 32
train_dataset = train_dataset.repeat().shuffle(num_train_examples).batch(BATCH_SIZE)
test_dataset = test_dataset.batch(BATCH_SIZE)

#调用fit()方法训练模型
model.fit(train_dataset, epochs=10, steps_per_epoch=math.ceil(num_train_examples/BATCH_SIZE))
把模型用在测试数据上的结果如何
test_loss, test_accuracy = model.evaluate(test_dataset, steps=math.ceil(num_test_examples/32))
print('Accuracy on test dataset:',test_accuracy)
用模型进行预测
#调用predict()返回32个答案,每个答案都是包含10个类别的概率分布
for test_images, test_labels in test_dataset.take(1):
    test_images = test_images.numpy()
    test_labels = test_labels.numpy()
    predictions = model.predict(test_images)
print(predictions.shape)
print(predictions[0])
全部代码:
pip install tensorflow_datasets

from __future__ import absolute_import, division, print_function

import tensorflow as tf
import tensorflow_datasets as tfds

tf.compat.v1.logging.set_verbosity(tf.compat.v1.logging.ERROR)

import math
import numpy as np
import matplotlib.pyplot as plt

#tqdm是python中很常用的模块,它的作用就是在终端上出现一个进度条,使得代码进度可视化
import tqdm
import tqdm.auto
tqdm.tqdm = tqdm.auto.tqdm

#使用tfds加载数据集
dataset,metadata = tfds.load('fashion_mnist',as_supervised=True,with_info=True)
train_dataset, test_dataset = dataset['train'], dataset['test']

class_names = ['T-shirt/top', 'Trouser', 'Pullover', 'Dress', 'Coat',
             'Sandal', 'Shirt', 'Sneaker', 'Bag', 'Ankle boot']

num_train_examples = metadata.splits['train'].num_examples
num_test_examples = metadata.splits['test'].num_examples
print("Number of training examples: {}".format(num_train_examples))
print("Number of test examples: {}".format(num_test_examples))

def normalize(images, labels):
    images = tf.cast(images, tf.float32)
    images /= 255
    return images, labels

train_dataset = train_dataset.map(normalize)
test_dataset = test_dataset.map(normalize)

for image, label in test_dataset.take(1):
    break
image = image.numpy().reshape((28,28))

plt.figure()
plt.imshow(image, cmap=plt.cm.binary)
plt.colorbar()
plt.grid(False)
plt.show()

model = tf.keras.Sequential([
    tf.keras.layers.Conv2D(32, (3, 3), padding='same', activation=tf.nn.relu,
                          input_shape=(28, 28, 1)),
    tf.keras.layers.MaxPooling2D((2, 2), strides=2),
    tf.keras.layers.Conv2D(64, (3, 3), padding='same', activation=tf.nn.relu),
    tf.keras.layers.MaxPooling2D((2, 2), strides=2),
    tf.keras.layers.Flatten(),
    tf.keras.layers.Dense(128, activation=tf.nn.relu),
    tf.keras.layers.Dense(10, activation=tf.nn.softmax)
])

##使用.compile方法确定模型训练结构
model.compile(optimizer='adam',
             loss='sparse_categorical_crossentropy',
             metrics=['accuracy'])

#在训练模型时,我们只需要指定训练批数(batch)
BATCH_SIZE = 32
train_dataset = train_dataset.repeat().shuffle(num_train_examples).batch(BATCH_SIZE)
test_dataset = test_dataset.batch(BATCH_SIZE)

#调用fit()方法训练模型
model.fit(train_dataset, epochs=10, steps_per_epoch=math.ceil(num_train_examples/BATCH_SIZE))

test_loss, test_accuracy = model.evaluate(test_dataset, steps=math.ceil(num_test_examples/32))
print('Accuracy on test dataset:',test_accuracy)

#调用predict()返回32个答案,每个答案都是包含10个类别的概率分布
for test_images, test_labels in test_dataset.take(1):
    test_images = test_images.numpy()
    test_labels = test_labels.numpy()
    predictions = model.predict(test_images)
print(predictions.shape)
print(predictions[0])


 3164
3164


 被折叠的 条评论
为什么被折叠?
被折叠的 条评论
为什么被折叠?
 到【灌水乐园】发言


