


一、认识devops
DevOps(Development和Operations的组合词)是一组过程、方法与系统的统称,用于促进开发(应用程序/软件工程)、技术运营和质量保障(QA)部门之间的沟通、协作与整合。它是一种重视“软件开发人员(Dev)”和“IT运维技术人员(Ops)”之间沟通合作的文化、运动或惯例。透过自动化“软件交付”和“架构变更”的流程,来使得构建、测试、发布软件能够更加地快捷、频繁和可靠。它的出现是由于软件行业日益清晰地认识到:为了按时交付软件产品和服务,开发和运营工作必须紧密合作。
二、安装docker
1.先保持环境纯净(没有安装过docker请跳过此步)
yum remove docker \
>                   docker-client \
>                   docker-client-latest \
>                   docker-common \
>                   docker-latest \
>                   docker-latest-logrotate \
>                   docker-logrotate \
>                   docker-engine
2、安装需要的安装包yum-utils
yum install -y yum-utils3、设置镜像仓库地址
这里选择阿里云的地址,也可以自行选择官方(太慢),有道等
 yum-config-manager \
  --add-repo \
   http://mirrors.aliyun.com/docker-ce/linux/centos/docker-ce.repo
4.更新yum软件包索引
yum makecache fase
5. 安装docker (ce社区版)
yum install docker-ce docker-ce-cli containerd.io
docker启动
systemctl start docker
查看docker版本
[root@localhost ~]# docker --version
Docker version 24.0.2, build cb74dfc
[root@localhost ~]#
6.添加镜像加速地址
各自的加速地址,阿里云给的不一样,需要自行登录上去进行查看
sudo mkdir -p /etc/docker
sudo tee /etc/docker/daemon.json <<-'EOF'
{
  "registry-mirrors": ["https://ijzshcrf.mirror.aliyuncs.com"]
}
EOF
sudo systemctl daemon-reload
sudo systemctl restart docker
三、安装docker-compose
Compose 项目是 Docker 官方的开源项目,负责实现对 Docker 容器集群的快速编排。
Compose有2个重要的概念:
项目(Project):由一组关联的应用容器组成的一个完整业务单元,在 docker-compose.yml 文件中定义。
服务(Service):一个应用的容器,实际上可以包括若干运行相同镜像的容器实例。
docker compose运行目录下的所有yml文件组成一个工程,一个工程包含多个服务,每个服务中定义了容器运行的镜像、参数、依赖。一个服务可包括多个容器实例。docker-compose就是docker容器的编排工具,主要就是解决相互有依赖关系的多个容器的管理。
下载最新版的docker-compose文件
https://github.com/docker/compose/releases/download/v2.5.0/docker-compose-linux-x86_64github太慢,附上下好的docker-compose
链接:https://pan.baidu.com/s/1h55D2GKnezF-8n9CECdhnw?pwd=t5ub
提取码:t5ub
把软件包放到/usr/local/bin/目录下。并改名为docker-compose
[root@localhost ~]# cd /usr/local/bin/
[root@localhost bin]# ls
docker-compose-Linux-x86_64(2)
[root@localhost bin]# mv docker-compose-Linux-x86_64\(2\) docker-compose
[root@localhost bin]# ls
docker-compose
[root@localhost bin]# chmod 755 docker-compose
[root@localhost bin]# docker-compose version
docker-compose version 1.25.0-rc4, build 8f3c9c58
docker-py version: 4.1.0
CPython version: 3.7.4
OpenSSL version: OpenSSL 1.1.0l  10 Sep 2019
[root@localhost bin]#
四、安装github
1.先dokcer search 看看有没有镜像。
[root@localhost ~]# docker search gitlab-ce
NAME                                     DESCRIPTION                                     STARS               OFFICIAL            AUTOMATED
gitlab/gitlab-ce                         GitLab Community Edition docker image based …   3932                                    [OK]
twang2218/gitlab-ce-zh                   汉化的 GitLab 社区版 Docker Image                     267                                     [OK]
beginor/gitlab-ce                        GitLab Community Edition with zh-cn             75                                      [OK]
yrzr/gitlab-ce-arm64v8                   GitLab Community Edition docker image for ar…   74
drud/gitlab-ce                                                                           16
rapidfort/gitlab-ce                                                                      11
gitlab/gitlab-ce-qa                      GitLab QA has a test suite that allows end-t…   9
slpcat/gitlab-ce                         gitlab-ce最新社区版10.1.0,omnibus二进制包                5
polinux/gitlab-ce                        GitLab-CE on Steroids (Extra features - see …   3                                       [OK]
marq/gitlab-ce-subgit                    A GitLab container with SubGit included.        3                                       [OK]
wlsf82/gitlab-ce                         Fork of GitLab Community Edition docker imag…   2
lizhenliang/gitlab-ce-zh                                                                 2
idoall/gitlab-ce                         gitlab-ce                                       1                                       [OK]
computersciencehouse/gitlab-ce-oidc      GitLab CE Docker image with OpenID Connect s…   1                                       [OK]
projectatomic/gitlab-centos7-atomicapp   Gitlab Atomic App                               1                                       [OK]
oidatiftla/gitlab-ce                     Mirror of gitlab/gitlab-ce with more tags (m…   0
visitsb/gitlab-ce                        Fixes official https://hub.docker.com/r/gitl…   0
sstruss/gitlab-ce-armhf                  gitlab-ce armhf image for armv7/armhf platfo…   0
toshi0123/gitlab-ce                      gitlab-ce based on alpine linux                 0                                       [OK]
lezapedrola/gitlab-ce                                                                    0
jbuncle/gitlab-ce                                                                        0
chefplatform/gitlab-ce-kitchen           Docker image based on gitlab/gitlab-ce provi…   0
imachineml/gitlab-ce                                                                     0
visualon/gitlab-ce                       customized gitlab-ce docker image               0
efthde/gitlab-ce-arm64                   gitlab-ce arm64 build                           0
2.直接先拉取镜像到本地来
##默认就是最新的,可以不用再后面指定:latest
docker pull gitlab/gitlab-ce
拉取完查看本地是否有镜像
docker images
、3.编写docker-compose脚本。直接部署gitlab
[root@localhost gitlab_docker]# cat docker-compose.yml
version: '3.1'
services:
  gitlab:
    image: 'gitlab/gitlab-ce:latest'
    container_name: gitlab
    restart: always
    environment:
      GITLAB_OMNIBUS_CONFIG: |
        external_url 'http://192.168.174.146:8929'
        gitlab_rails['gitlab_shell_ssh_port'] = 2224
    ports:
      - '8929:8929'
      - '2224:2224'
    volumes:
      - './config:/etc/gitlab'
      - './logs:/var/log/gitlab'
      - './data:/var/opt/gitlab'
[root@localhost gitlab_docker]#
4.执行脚本,自动编排docker
[root@localhost gitlab_docker]# docker-compose up -d
Creating network "gitlab_docker_default" with the default driver
Creating gitlab ... done
[root@localhost gitlab_docker]#
[root@localhost gitlab_docker]#
[root@localhost gitlab_docker]# docker ps -a
CONTAINER ID        IMAGE                     COMMAND             CREATED             STATUS                             PORTS                                                                     NAMES
5ed30d64844a        gitlab/gitlab-ce:latest   "/assets/wrapper"   11 seconds ago      Up 11 seconds (health: starting)   22/tcp, 80/tcp, 0.0.0.0:2224->2224/tcp, 443/tcp, 0.0.0.0:8929->8929/tcp   gitlab
5.查看gitlab的web界面
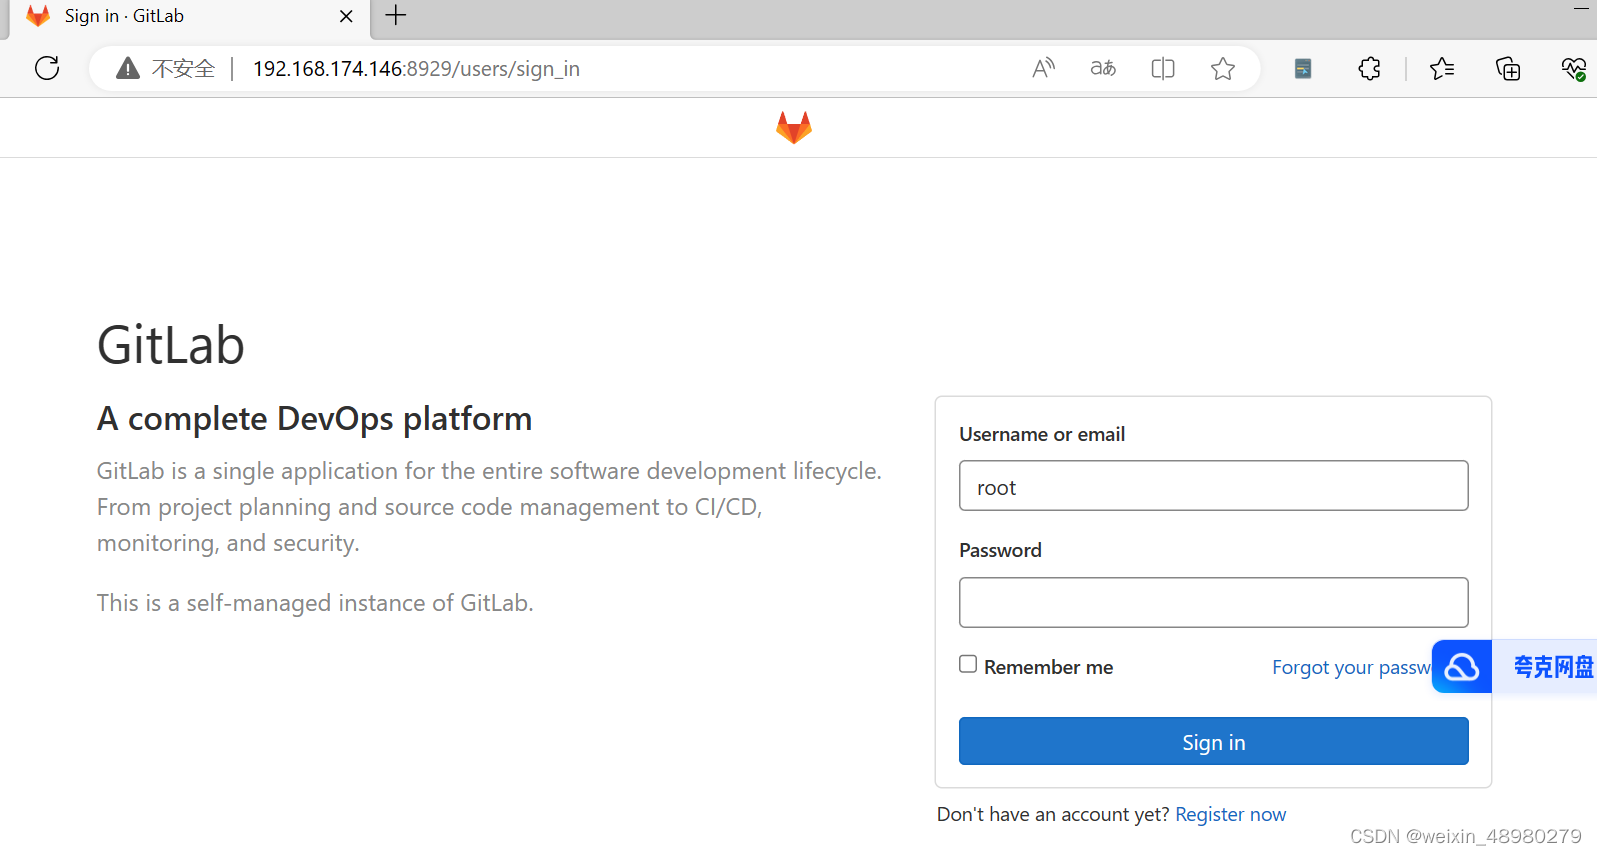
账号是root,密码需要到这个容器里面区查看 ,执行docker exec -it gitlab bash

密码输入到web界面中,点击登录后。然后先修改密码

五、安装jdk与maven(第二台机器)
可以自行搜索官网进行下载,笔者已经下好放在网盘:
链接:https://pan.baidu.com/s/1smP2KhLa8YVIv0Aw7ywcpw?pwd=eqvw
提取码:eqvw
下载完成后放进root下(任意即可)
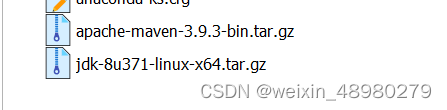
解压到指定目录并重命名
tar -zxvf apache-maven-3.9.3-bin.tar.gz -C /usr/local/
tar -zxvf jdk-8u371-linux-x64.tar.gz -C /usr/local/

mv apache-maven-3.9.3/ maven
mv jdk1.8.0_371/ jdk
修改maven配置文件(/usr/local/maven/conf/settings.xml)对比文件,新增了镜像,jdk8插件地址
 <mirrors>
    <!-- mirror
     | Specifies a repository mirror site to use instead of a given repository. The repository that
     | this mirror serves has an ID that matches the mirrorOf element of this mirror. IDs are used
     | for inheritance and direct lookup purposes, and must be unique across the set of mirrors.
     |
    <mirror>
      <id>mirrorId</id>
      <mirrorOf>repositoryId</mirrorOf>
      <name>Human Readable Name for this Mirror.</name>
      <url>http://my.repository.com/repo/path</url>
    </mirror>
     -->
    <mirror>
      <id>aliyun</id>
      <mirrorOf>*</mirrorOf>
      <name>aliyun</name>
      <url>https://maven.aliyun.com/repository/public</url>
    </mirror>
  </mirrors>

  <!-- profiles
   | This is a list of profiles which can be activated in a variety of ways, and which can modify
   | the build process. Profiles provided in the settings.xml are intended to provide local machine-
   | specific paths and repository locations which allow the build to work in the local environment.
   |
   | For example, if you have an integration testing plugin - like cactus - that needs to know where
   | your Tomcat instance is installed, you can provide a variable here such that the variable is
   | dereferenced during the build process to configure the cactus plugin.
   |
   | As noted above, profiles can be activated in a variety of ways. One way - the activeProfiles
   | section of this document (settings.xml) - will be discussed later. Another way essentially
   | relies on the detection of a property, either matching a particular value for the property,
   | or merely testing its existence. Profiles can also be activated by JDK version prefix, where a
   | value of '1.4' might activate a profile when the build is executed on a JDK version of '1.4.2_07'.
   | Finally, the list of active profiles can be specified directly from the command line.
   |
   | NOTE: For profiles defined in the settings.xml, you are restricted to specifying only artifact
   |       repositories, plugin repositories, and free-form properties to be used as configuration
   |       variables for plugins in the POM.
   |
   |-->
  <profiles>
    <!-- profile
     | Specifies a set of introductions to the build process, to be activated using one or more of the
     | mechanisms described above. For inheritance purposes, and to activate profiles via <activatedProfiles/>
     | or the command line, profiles have to have an ID that is unique.
     |
     | An encouraged best practice for profile identification is to use a consistent naming convention
     | for profiles, such as 'env-dev', 'env-test', 'env-production', 'user-jdcasey', 'user-brett', etc.
     | This will make it more intuitive to understand what the set of introduced profiles is attempting
     | to accomplish, particularly when you only have a list of profile id's for debug.
     |
     | This profile example uses the JDK version to trigger activation, and provides a JDK-specific repo.
    <profile>
      <id>jdk-1.4</id>

      <activation>
        <jdk>1.4</jdk>
      </activation>

      <repositories>
        <repository>
          <id>jdk14</id>
          <name>Repository for JDK 1.4 builds</name>
          <url>http://www.myhost.com/maven/jdk14</url>
          <layout>default</layout>
          <snapshotPolicy>always</snapshotPolicy>
        </repository>
      </repositories>
    </profile>
    -->

    <!--
     | Here is another profile, activated by the property 'target-env' with a value of 'dev', which
     | provides a specific path to the Tomcat instance. To use this, your plugin configuration might
     | hypothetically look like:
     |
     | ...
     | <plugin>
     |   <groupId>org.myco.myplugins</groupId>
     |   <artifactId>myplugin</artifactId>
     |
     |   <configuration>
     |     <tomcatLocation>${tomcatPath}</tomcatLocation>
     |   </configuration>
     | </plugin>
     | ...
     |
     | NOTE: If you just wanted to inject this configuration whenever someone set 'target-env' to
     |       anything, you could just leave off the <value/> inside the activation-property.
     |
    <profile>
      <id>env-dev</id>

      <activation>
        <property>
          <name>target-env</name>
          <value>dev</value>
        </property>
      </activation>

      <properties>
        <tomcatPath>/path/to/tomcat/instance</tomcatPath>
      </properties>
    </profile>
    -->
    <profile>
        <id>jdk18</id>
        <activation>
            <activeByDefault>true</activeByDefault>
            <jdk>1.8</jdk>
        </activation>
        <properties>
            <maven.compiler.source>1.8</maven.compiler.source>
            <maven.compiler.target>1.8</maven.compiler.target>
            <maven.compiler.compilerVersion>1.8</maven.compiler.compilerVersion>
        </properties>
    </profile>
  </profiles>
  <activeProfiles>
    <activeProfile>jdk18</activeProfile>
  </activeProfiles>

  <!-- activeProfiles
   | List of profiles that are active for all builds.
   |
  <activeProfiles>
    <activeProfile>alwaysActiveProfile</activeProfile>
    <activeProfile>anotherAlwaysActiveProfile</activeProfile>
  </activeProfiles>
  -->
</settings>
[root@localhost conf]#
六、安装jenkins(第二台机器)
拉取jenkins镜像
docker pull jenkins/jenkins:2.319.1-lts


[root@localhost ~]# docker images
REPOSITORY        TAG           IMAGE ID       CREATED         SIZE
jenkins/jenkins   2.319.1-lts   2a4bbe50c40b   19 months ago   441MB
[root@localhost ~]#
创建此yml文件。
[root@localhost ~]# cat /usr/local/docker/jenkins_docker/docker-compose.yml
version: '3.1'
services:
  jenkins:
    image: 'jenkins/jenkins:2.319.1-lts'
    container_name: jenkins
    restart: always
    ports:
      - '8080:8080'
      - '50000:50000'
    volumes:
      - './data:/var/jenkins_home/'
[root@localhost ~]#
使用docker-compose创建jenkins
cd /usr/local/docker/jenkins_docker/
docker-compose up -d
chmod -R 777 data
docker-compose restart
查看容器日志:docker logs -f jenkins
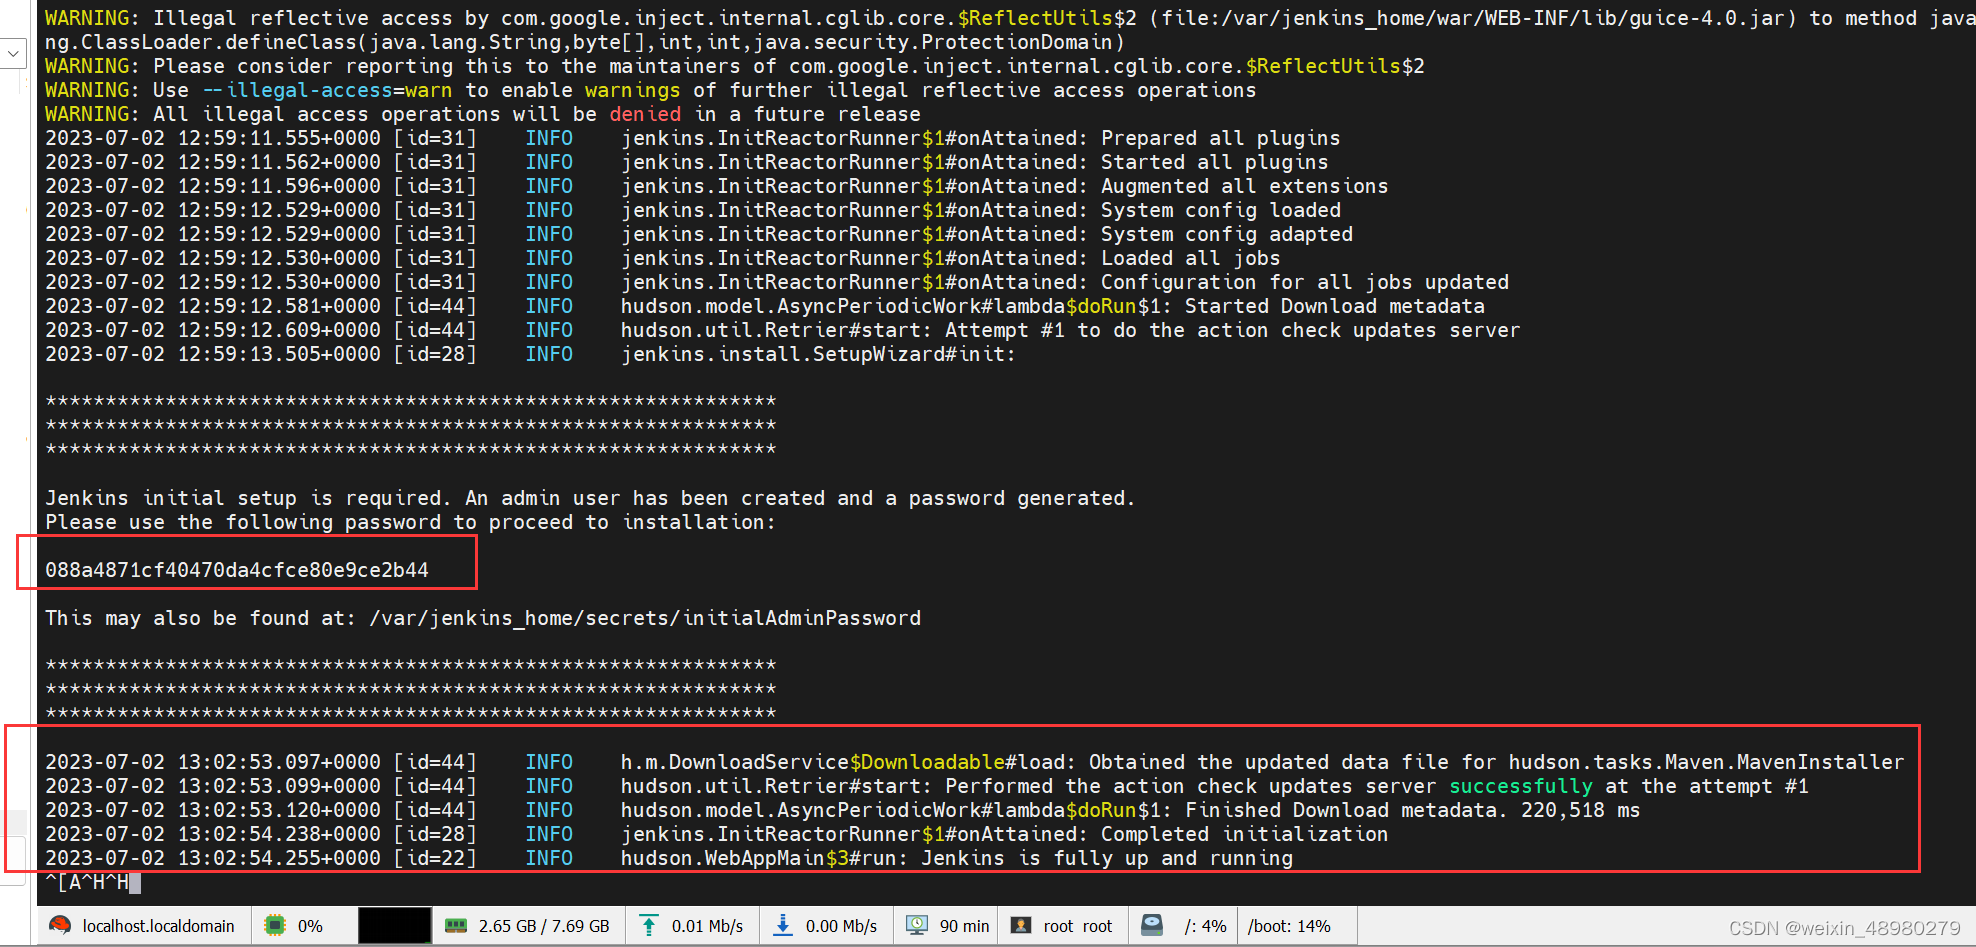
当出现上图中时,说明已经初始化完成了,浏览器打开地址(自己虚拟机的)192.168.174.140:8080
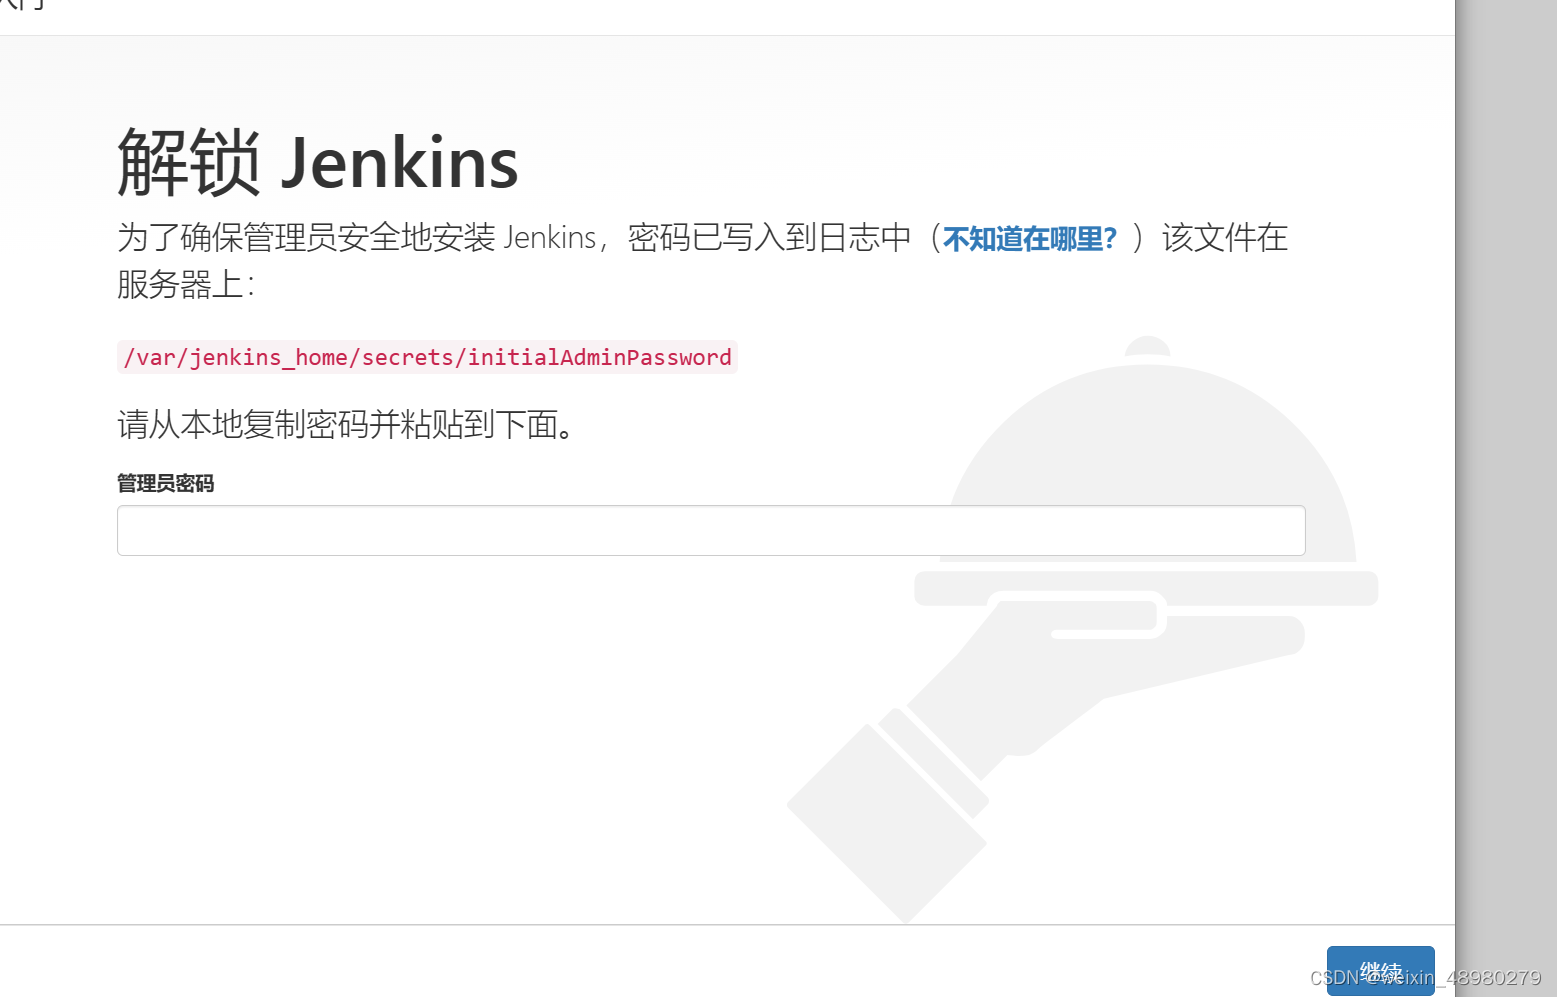
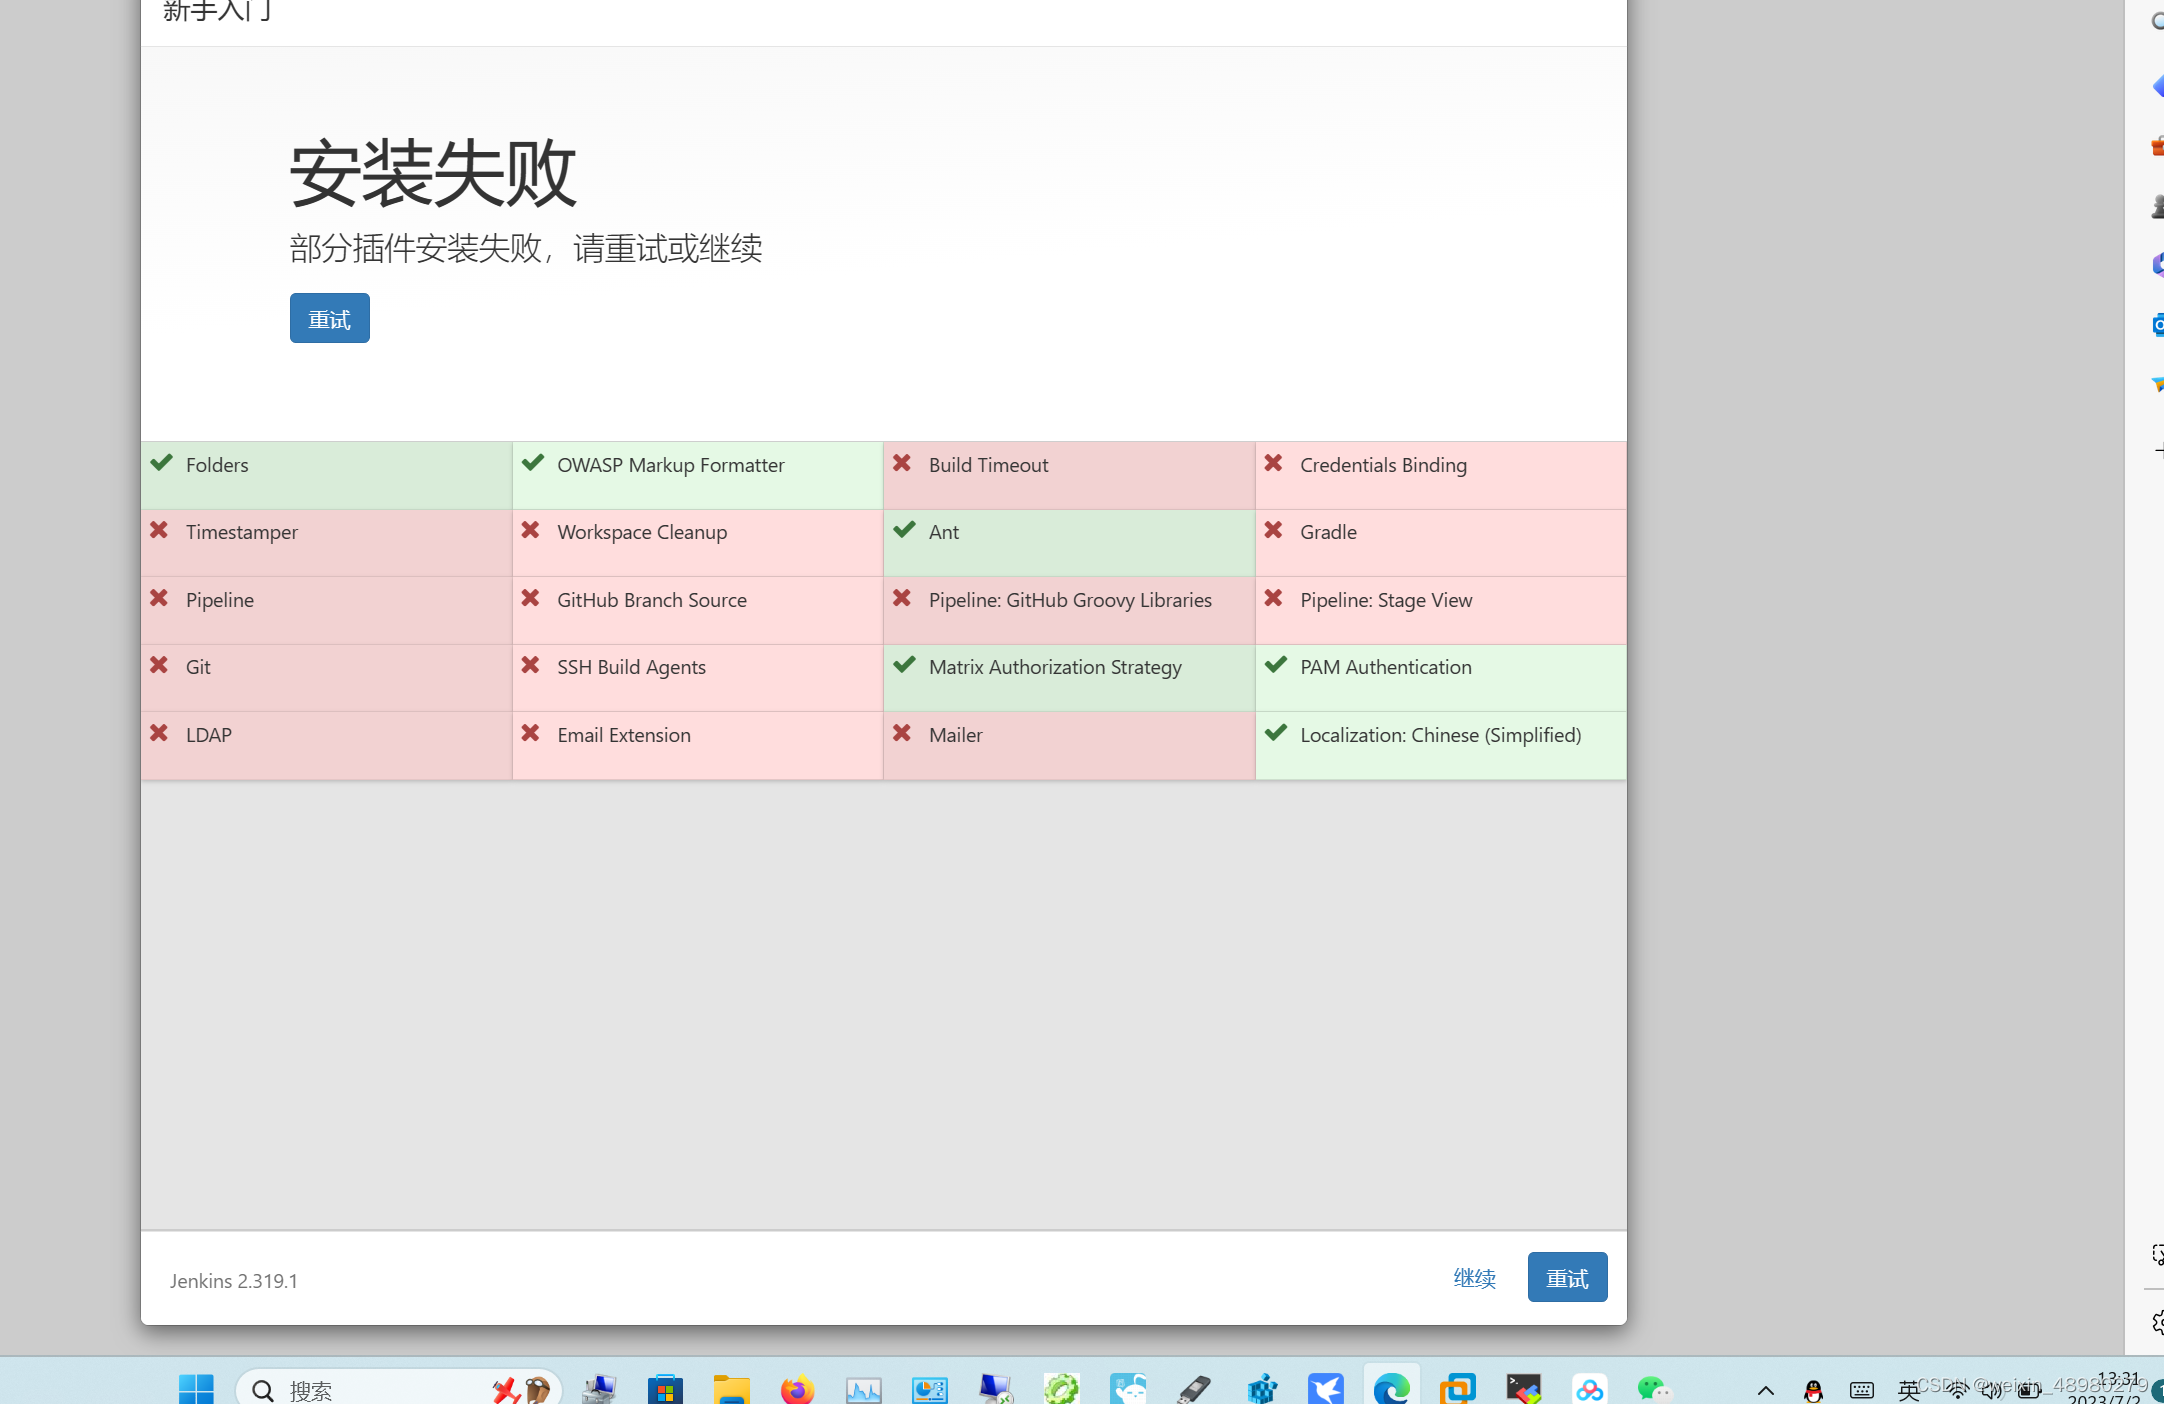
密码就在上上张图框起来处,拷贝过来输入,点击继续,选择插件来安装

部分安装失败不影响,后续补,点击继续
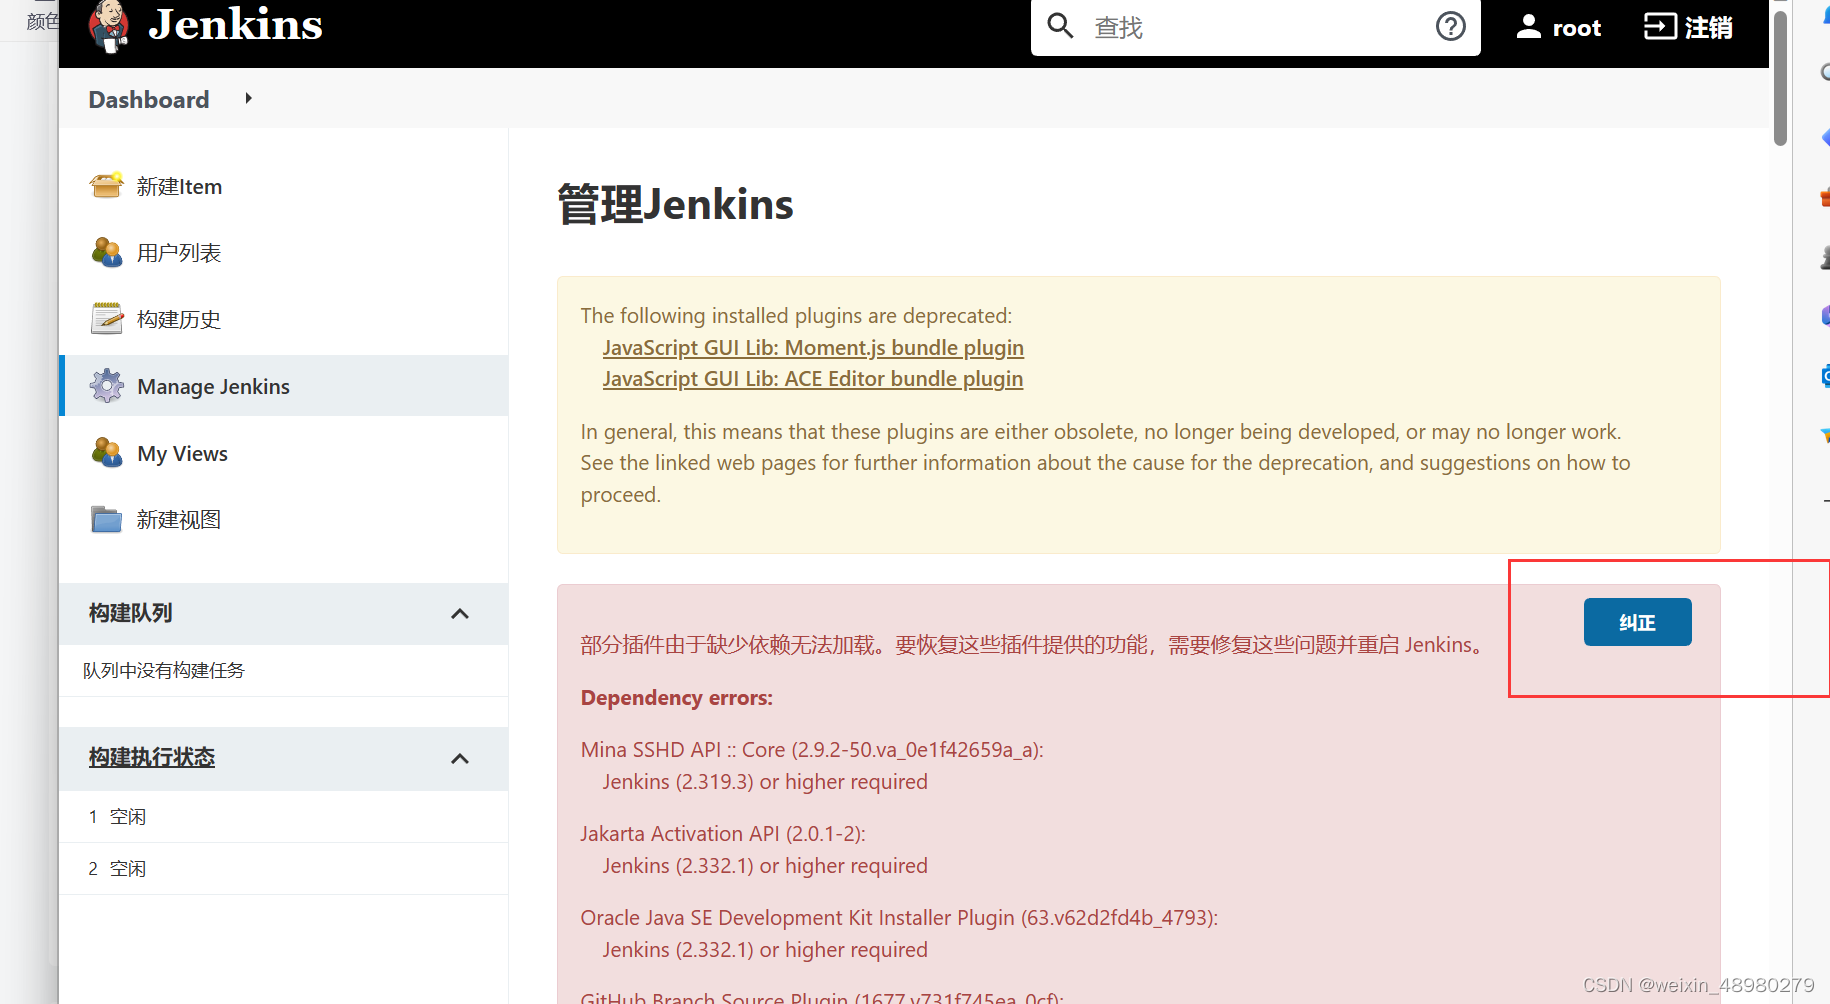
进入后点击如图:
未完待续。。。


 619
619


 被折叠的 条评论
为什么被折叠?
被折叠的 条评论
为什么被折叠?
 到【灌水乐园】发言


