


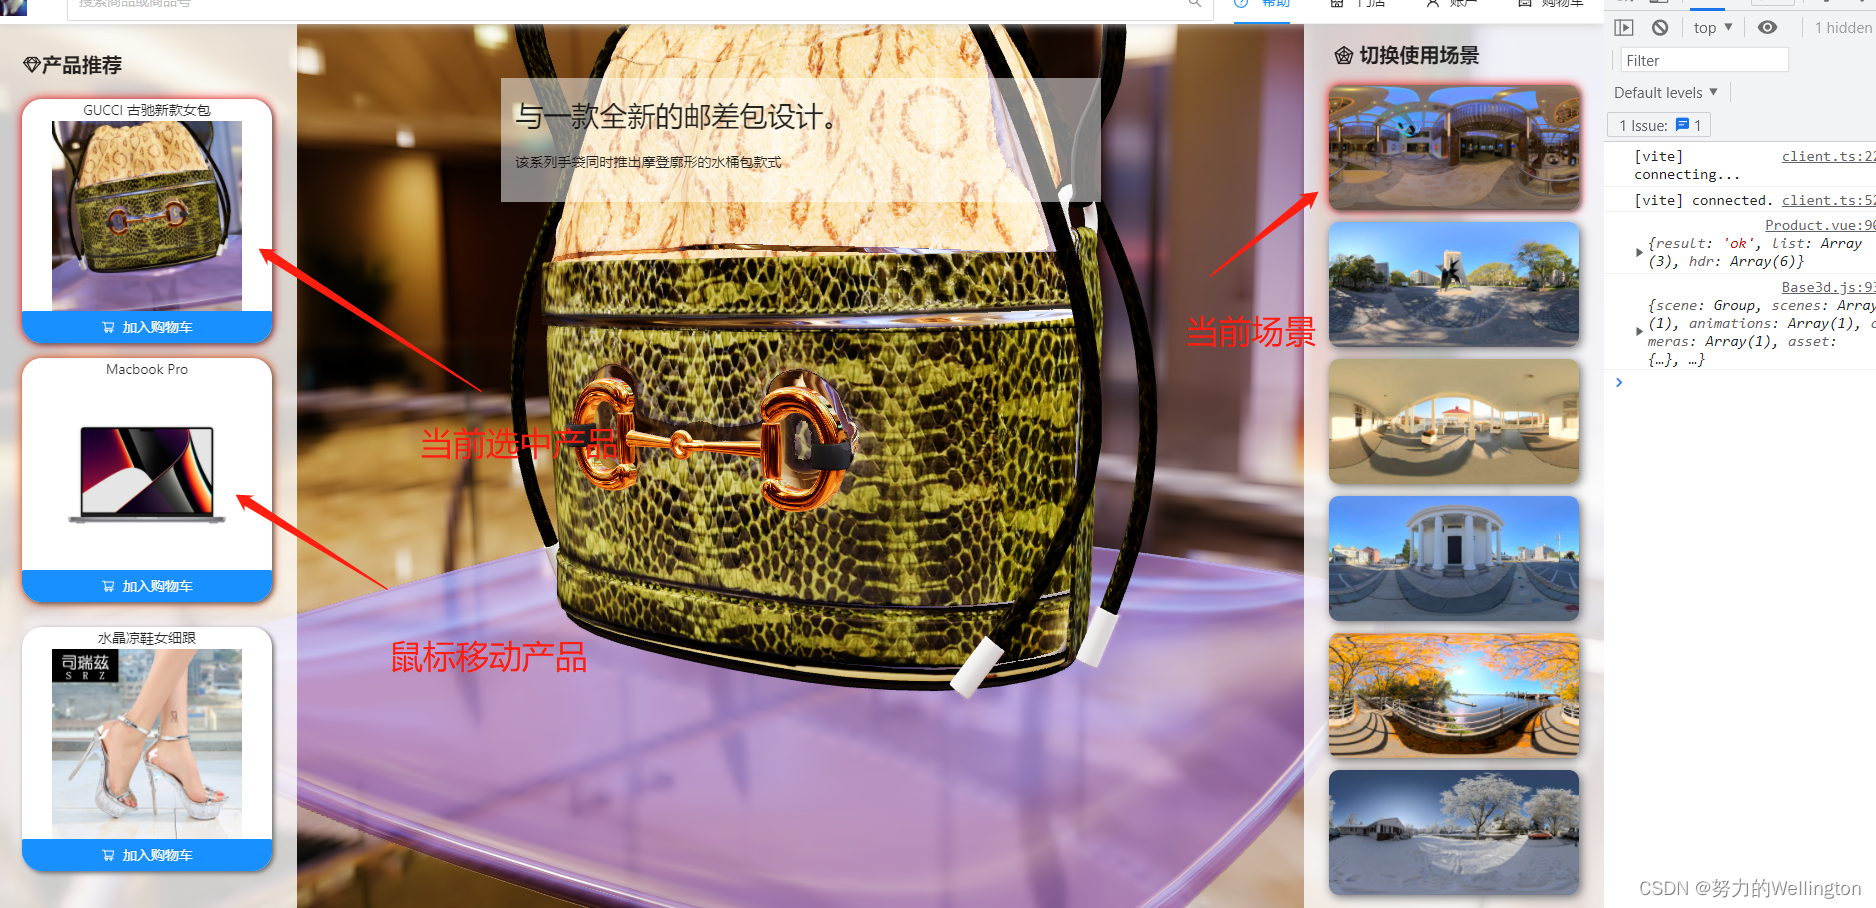
 本文介绍了如何使用Vue.js和Ant Design构建一个3D商城,详细展示了产品列表和场景列表的实现过程。通过点击产品和场景,可以改变3D模型和环境映射,并且具有鼠标悬停和点击的选中效果。产品列表和场景列表的样式设计注重用户体验,包括阴影、过渡和边框颜色变化等视觉效果。
【3D商城】切换产品与场景效果
产品内容放入列表

在Product.vue中,产品列表prod-list标签下写产品的内容(class=“products”)以及加入购物车的按钮
 <div class="products">
        <div
          class="prod-item"
          :class="{ active: pI == data.pIndex }" //判断现在的索引值是否为选中索引值相同,相同active为true
          v-for="(prod, pI) in data.products"
          @click="changeModel(prod, pI)"
        >
          <div class="prod-title">
            {{ prod.title }}
          </div>
          <div class="img">
            <img :src="prod.imgsrc" :alt="prod.title" />
          </div>
          <a-button type="primary" block @click.stop="addBuycart(prod)">
            <template #icon>
              <ShoppingCartOutlined></ShoppingCartOutlined>
            </template>
            加入购物车
          </a-button>
 </div>
onMounted拿到数据的结果(result)给到产品
script:(添加场景的空数组)
const data = reactive({
  products: [],
  isLoading: true,  //加载完成前,loading为true
  scenes: [],
在生命周期函数onMounted()中赋值产品和场景的数据
onMounted(async () => {
  let result = await api.getProducts();
  console.log(result);
  //   data.isLoading = false;
  data.products = result.list;
  data.scenes = result.hdr;
});
导入ant-design(图标: ShoppingCartOutlined 购物车)
import {
  SketchOutlined,    //钻石图标
  RadarChartOutlined,
  ShoppingCartOutlined,
} from "@ant-design/icons-vue";
style样式(设置产品的效果)
 .products {
    display: flex;             // 所有子元素自动成为容器成员
    flex-direction: column;   //子元素的排列方向:垂直
    justify-content: center; //子元素在主轴上的对齐方式:居中
    align-items: center;   //义子元素在侧轴上如何对齐:居中
    .prod-item {          //小卡片
      display: flex;
      flex-direction: column;
      justify-content: center;
      align-items: center;
      width: 250px;
      background-color: #fff;
      border-radius: 20px;     //圆角
      overflow: hidden;   //隐藏溢出
      margin: 10px 0;     //上下10px 左右为0
      box-shadow: 2px 2px 5px #666;     // 阴影
      transition: all 0.3s;
      &.active {
        box-shadow: 2px 2px 5px #666, 0px 0px 10px red;
      }
      &:hover {    //鼠标放上去悬浮
        transform: translate(0px, -5px);  //垂直5px
        box-shadow: 2px 2px 5px #666, 0px 0px 10px orangered;
        // background-color: orange;
      }
      img {
        width: 190px;
      }
      .prod-title {
        padding: 0 20px;  //上下0  左右 20px
      }
    }
  }
字体修改
.prod-list {
  h1 {
    font-size: 20px;   //字体像素
    font-weight: 900;  //字体加粗
    padding: 10px 25px 0;  //上10  左右25  下 0
  }
}
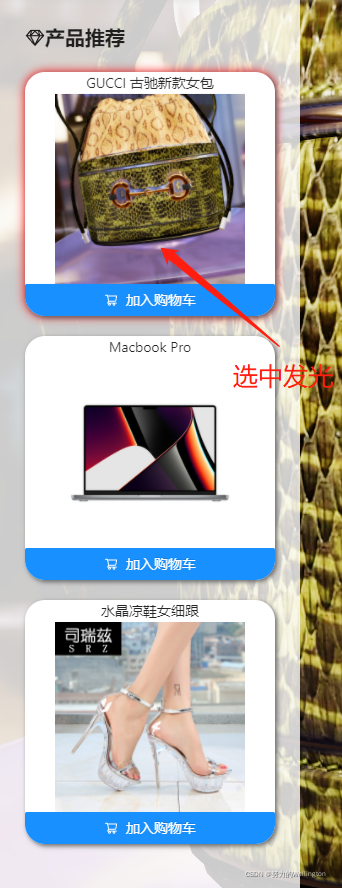
列表结果显示:
场景内容放入列表
在Product.vue中,产品列表prod-list标签下写场景的内容(class=“scenes”)
<div class="scenes">
        <div
          class="scene-item"
          v-for="(scene, index) in data.scenes"
          @click="changeHdr(scene, index)"
        >
          <img
            :class="{ active: index == data.sceneIndex }"
            :src="`./files/hdr/${scene}.jpg`"
            :alt="scene"
          />
        </div>
      </div>
样式:
.scene-list {
  h3 {
    font-size: 20px;   //字体
    font-weight: 900;  //加粗
    padding: 0 30px;  //上下0  左右30px
  }
  .scenes {
    display: flex;
    flex-direction: column;
    justify-content: center;
    align-items: center;
  }
  .scene-item {
    padding: 6px 0;
    img {
      width: 250px;
      border-radius: 10px;
      box-shadow: 2px 2px 10px #666;
      transition: all 0.3s;
      &.active {
        box-shadow: 2px 2px 5px #666, 0px 0px 10px red;
      }
      &:hover {
        transform: translate(0px, -5px);
        box-shadow: 2px 2px 5px #666, 0px 0px 10px orangered;
      }
    }
  }
}
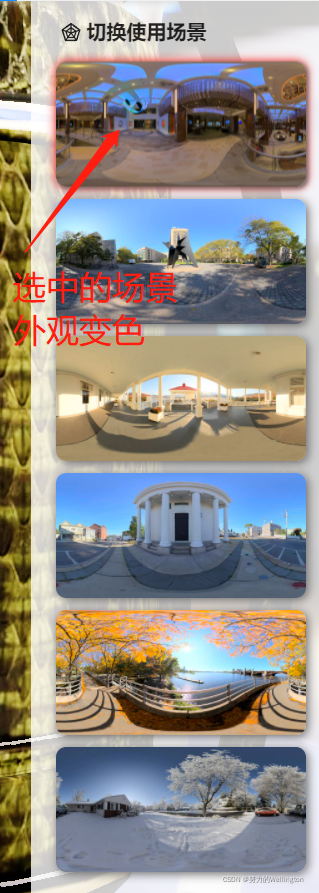
场景列表结果显示:
点击选中框外观状态设置
在之前鼠标移动选中的基础上再加一个鼠标点击选中的外观状态,默认当前产品的索引值(pIndex)和场景(sceneIndex)的索引值均为0
const data = reactive({
  products: [],
  isLoading: true,  //加载完成前,loading为true
  scenes: [],
  pIndex: 0,      //默认当前索引
  sceneIndex: 0,   //默认当前索引
});
定义函数设置选中产品函数
function changeModel(prod, pI) {
  data.pIndex = pI;
  data.base3d.setModel(prod.modelName);
}
定义函数设置选中场景函数
function changeHdr(scene, index) {
  data.sceneIndex = index;
  data.base3d.setEnvMap(scene);
}
结果显示:

结果
左边和右边的产品列表和场景列表内容编写完毕。当鼠标点击产品时,产品外部呈现红色,鼠标移动到某个产时,外部呈现出橙色,鼠标移动到某个场景时,场景边框外部呈现出橙色


 被折叠的 条评论
为什么被折叠?
被折叠的 条评论
为什么被折叠?
 到【灌水乐园】发言


